Język Programowania Rust
autorstwa Steve Klabnik i Carol Nichols, ze wsparciem społeczności Rusta
Bieżąca wersja tekstu zakłada, że używasz Rusta w wersji 1.67.1 (wydanego 2023-02-09) lub nowszego. Zajrzyj do sekcji "Instalacja" w rozdziale 1 celem uzyskania informacji o sposobach instalacji lub aktualizacji Rusta.
Oryginalna, anglojęzyczna wersja książki w wersji HTML dostępna jest na stronie
https://doc.rust-lang.org/stable/book/
oraz w trybie offline, instalowana wraz z Rustem przy użyciu rustup. Użyj
polecenia rustup docs --book, żeby ją otworzyć.
Istnieje kilka społecznościowych tłumaczeń tej książki. Niniejsze tłumaczenie jest zaś dostępna na stronie http://rust.w8.pl/book/.
Anglojęzyczna wersja dostępna jest też w wersji papierowej oraz ebooka za sprawą wydawnictwa No Starch Press.
🚨 Want a more interactive learning experience? Try out a different version of the Rust Book, featuring: quizzes, highlighting, visualizations, and more: https://rust-book.cs.brown.edu
Przedmowa
To nie zawsze było oczywiste, ale rolą języka programowania Rust fundamentalnie jest potęgowanie możliwości: nieważne, jaki kod aktualnie piszesz, Rust pozwala ci sięgać dalej i pewnie programować w szerszym zakresie domen niż kiedykolwiek wcześniej.
Spójrz przykładowo na pracę na „poziomie systemowym”, gdzie trzeba borykać się z takimi niskopoziomowymi szczegółami jak zarządzanie pamięcią, reprezentacja danych czy współbieżność. Tradycyjnie, ten obszar programowania był postrzegany jako tajemny i dostępny jedynie dla wybranej garstki, która poświęciła długie lata, by nauczyć się unikać jego osławionych pułapek. Nawet ci, którzy się tym zajmują, robią to uważnie, aby ich kod nie stał się furtką dla exploitów, awarii lub innych przykładów zepsucia.
Rust pozbywa się tych barier poprzez eliminację starych zasadzek i dostarczenie przyjaznego i dopracowanego zestawu narzędzi, które pomagają ci po drodze. Programiści zmuszeni do „umoczenia się” w niskopoziomowej kontroli, mogą do tego celu użyć Rusta, bez podejmowania zwyczajowego ryzyka wywołania awarii lub dziur bezpieczeństwa i bez konieczności uczenia się drobnych szczegółów kapryśnych narzędzi. Nawet lepiej, język zaprojektowano z myślą o prowadzeniu cię w sposób naturalny ku tworzeniu niezawodnego kodu, który jest wydajny zarówno pod względem szybkości, jak i wykorzystania pamięci.
Programiści, którzy już pracują z niskopoziomowym kodem, mogą użyć Rusta do podniesienia swoich ambicji. Dla przykładu, wprowadzenie wielowątkowości w Ruście jest mało ryzykowną operacją: kompilator wyłapie za ciebie popularne błędy. Możesz też uderzyć w bardziej agresywną optymalizację kodu z uczuciem pewności, że nie wprowadzisz przypadkowo źródeł awarii czy podatności na ataki.
Ale Rust nie jest ograniczony do programowania systemowego i niskopoziomowego. Jest ekspresyjny i wystarczająco ergonomiczny, żeby za jego pomocą tworzyć aplikacje CLI, serwery sieciowe i wiele innych rodzajów przyjaznego do pisania kodu - w dalszej części książki znajdziesz proste przykłady obu takich programów. Praca z Rustem pozwala ci na budowanie umiejętności, które można przenosic z jednej domeny do drugiej; możesz uczyć sie Rusta pisząc aplikację sieciową, by potem zastosować te same rozwiązania tworząc dla Raspberry Pi.
Niniejsza książka w pełni obejmuje potencjał Rusta do ulepszania swoich użytkowników. To przyjazny i dostępny tekst, nakierowany nie tylko na pomoc w podniesieniu twojego poziomu znajomości Rusta, ale również na poprawę twojej pewności siebie jako programisty w ujęciu ogólnym. Zanurz się więc, przygotuj na naukę - i witaj w społeczności Rusta!
— Nicholas Matsakis i Aaron Turon
Wstęp
Uwaga: Niniejsze tłumaczenie oparto na wydaniu książki The Rust Programming Language dostępnej w druku oraz w wersji elektronicznej, wydanych przez No Starch Press.
Witaj na łamach Języka Programowania Rust - wprowadzającej książki o Ruście. Język programowania Rust pomaga w tworzeniu szybszego, bardziej niezawodnego oprogramowania. Konstrukcja języków stawia często wysokopoziomową ergonomię w bezpośrednim konflikcie z niskopoziomowym stopniem kontroli. Rust rzuca wyzwanie temu problemowi. Dzięki zrównoważeniu potężnych możliwości technicznych i świetnego doświadczenia dla programistów, Rust daje szansę objęcia kontroli nad niskopoziomowymi szczegółami (takimi jak zarządzanie pamięcią) bez napotykania na problemy, które tradycyjnie takiej możliwości towarzyszyły.
Dla kogo jest Rust
Rust jest idealnym wyborem dla wielu ludzi z wielu różnych powodów. Przyjrzyjmy się kilku najważniejszym grupom.
Zespoły deweloperów
Rust dowodzi swojej produktywności jako narzędzie kolaboracji wśród dużych zespołów deweloperów, ze zróżnicowaną wiedzą na temat programowania systemowego. Niskopoziomowy kod jest podatny na rozmaite, subtelne błędy (bugi), które w większości innych języków programowania da się wyłapać jedynie poprzez rozległe testy i ostrożne sprawdzanie kodu przez doświadczonych programistów. W Ruście kompilator pełni rolę bramkarza, który nie dopuszcza do skompilowania kodu zawierającego tego typu błędy. Dotyczy to również błędów w programach współbieżnych (wielowątkowych). Współpraca z kompilatorem pozwala zespołowi spędzić więcej czasu na dopracowywaniu logiki programu niż na polowaniu na bugi.
Rust jednocześnie wnosi do świata programowania systemowego nowoczesne narzędzia deweloperskie:
- Cargo - dołączony menedżer zależności i narzędzie do budowania, czyni dodawanie, kompilowanie i zarządzanie zależnościami bezbolesnym i spójnym procesem w obrębie ekosystemu Rusta.
- Rustfmt zapewnia spójny styl kodu wśród deweloperów.
- Serwer języka Rust (Rust Language Server) zapewnia w konkretnych Zintegrowanych Środowiskach Programistycznych (IDE) auto-uzupełnianie oraz ostrzeżenia inline o błędach.
Korzystając z tych oraz innych narzędzi w ekosystemie Rusta, deweloperzy mogą pozostać produktywni również podczas pisania kodu niskopoziomowego.
Uczniowie
Rust jest językiem dla uczniów i osób zainteresowanych uczeniem się systemowych pojęć. Z pomocą Rusta, wielu ludzi poznało tematy z zakresu rozwoju systemów operacyjnych. Społeczność Rusta jest niezwykle gościnna i chętnie odpowiada na pytania uczniów. Poprzez zaangażowanie w projekty takie jak niniejsza książka, zespoły tworzące Rusta chcą uczynić pojęcia systemowe osiągalnymi dla większej ilości osób, szczególnie tych, dla których programowanie jest czymś zupełnie nowym.
Firmy
W setkach dużych i małych firm używa się Rusta do różnych zadań, w poczet których można zaliczyć: narzędzia linii poleceń, usługi sieciowe, narzędzia w DevOps, urządzenia wbudowane, analizę i przetwarzanie audio i video, kryptowaluty, bioinformatykę, silniki wyszukiwarek, aplikacje w Internecie Rzeczy, uczenie maszynowe, a nawet główne komponenty przeglądarki sieciowej Firefox.
Programiści open source
Rust jest dla tych, którzy chcą tworzyć również sam język Rust, jego społeczność, narzędzia deweloperskie oraz biblioteki. Z przyjemnością ujrzelibyśmy Twój wkład w tworzenie Rusta.
Ludzie, którzy cenią szybkość i stabilność
Rust powstał dla ludzi, którzy poszukują w języku programowania szybkości i stabilności. Przez szybkość rozumiemy zarówno szybkość działania programów napisanych w Ruście, jak i oferowaną przez ten język szybkość ich pisania. Weryfikacje przez kompilator Rusta zapewniają stabilność programu podczas refaktorowania i dodawania nowych funkcjonalności. Kontrastuje to z kruchym, zaległym kodem, którego deweloperzy często boją się modyfikować, co ma miejsce w językach pozbawionych podobnych mechanizmów kontroli. Dążąc do wykorzystania bezkosztowych abstrakcji oraz wysokopoziomowych rozwiązań, które kompilują się do kodu niskopoziomowego równie szybkiego, co ten pisany ręcznie, Rust stara się, aby bezpieczny kod mógł być jednocześnie szybki.
Twórcy Rusta mają nadzieję wspierać również wielu innych użytkowników. Wymienieni stanowią jedynie kilkoro z największych interesariuszy. Ogólnie rzecz ujmując, największą aspiracją Rusta jest wyeliminowanie kompromisów, które programiści zaakceptowali w ciągu dekad, poprzez zaoferowanie jednocześnie: bezpieczeństwa i produktywności, szybkości oraz ergonomii. Wypróbuj Rusta i sprawdź, czy i tobie pasują jego wybory.
Dla kogo jest ta książka
Niniejsza książka zakłada, że czytelnik pisał już kod w innym języku, ale nie określa w żaden sposób, w jakim. Starano się dostarczyć materiał szeroko dostępny dla osób o wysoce zróżnicowanych podstawach w programowaniu. Nie poświęcono wiele czasu tłumaczeniu, czym jest programowanie lub jak o nim myśleć. Jeżeli jesteś osobą zupełnie nową w temacie programowania, większe korzyści przyniesie ci przeczytanie innych pozycji, wprowadzających do programowania.
Jak używać tej książki
Głównym założeniem w książce jest to, że jest ona czytana kolejno, od początku do końca. Późniejsze rozdziały opierają się na pojęciach z rozdziałów wcześniejszych, a te z kolei mogą nie wchodzić w niektóre szczegóły omawianego tematu. Do wielu tematów wracamy zazwyczaj w późniejszych rozdziałach.
W książce znajdują się rozdziały dwojakie: pojęciowe i projektowe. W rozdziałach pojęciowych zapoznasz się z aspektami Rusta, a w rozdziałach projektowych stworzymy razem krótkie programy wykorzystujące wiedzę przekazaną do danego momentu. Rozdziałami projektowymi są te o numerach 2, 12 i 20. Pozostałe to rozdziały pojęciowe.
Rozdział 1 wyjaśnia, jak zainstalować Rusta, jak napisać program „Witaj, świecie!” oraz jak używać Cargo - menedżera pakietów i narzędzie budowania Rusta. Rozdział 2 jest praktycznym wprowadzeniem do języka Rust. Poszczególne pojęcia omawiamy tu ogólnie, podczas gdy szczegóły zostaną wyjaśnione w późniejszych rozdziałach. Jeżeli chcesz od razu pobrudzić sobie ręce, rozdział 2 jest do tego idealnym miejscem. W rozdziale 3 omawiane są funkcje języka Rust podobne do tych z innych języków programowania. Z rozdziału 4 można nauczyć się systemu własności w Ruście. Jeśli jednak należysz do szczególnie skrupulatnych czytelników, którzy wolą poznać każdy szczegół przed przejściem do kolejnych tematów, możesz wstępnie pominąć rozdział 2 i przejść prosto do rozdziału 3, po czym cofać się do rozdziału 2 dopiero, gdy zechcesz wykorzystać w opisanym tam projekcie rzeczy, których się nauczyłeś.
Rozdział 5 omawia struktury i metody, a rozdział 6 obejmuje typy wyliczeniowe
enum, wyrażenia match oraz konstrukcję if let. Struktury i typy
wyliczeniowe stosowane są w Ruście do tworzenia własnych typów.
W rozdziale 7 dowiadujemy się o systemie modułów w Ruście oraz o zasadach prywatności przy organizacji kodu oraz jego publicznego Interfejsu Programowania Aplikacji (API). Rozdział 8 omawia niektóre popularne struktury danych kolekcji dostarczone przez bibliotekę standardową, takie jak wektory, ciągi znaków (string) i tablice mieszające (hash map). Rozdział 9 odkrywa filozofię oraz techniki obsługi błędów w Ruście.
Rozdział 10 wchodzi w temat typów ogólnych, cech (traits) oraz trwałości
(lifetimes), które dają ci możliwość definiowania kodu, odnoszącego się do
wielu typów danych. Rozdział 11 jest w całości poświęcony testowaniu, które mimo
gwarancji bezpieczeństwa Rusta nadal jest konieczne, by zapewnić prawidłową
logikę wykonywania programów. W rozdziale 12 budujemy natomiast własną
implementację fragmentu funkcjonalności polecenia grep, które wyszukuje tekst
w treści plików. Do tego celu będzie potrzebny cały szereg pojęć omówionych w
poprzednich rozdziałach.
Rozdział 13 omawia domknięcia (closures) oraz iteratory: cechy Rusta wywodzące się z języków funkcyjnych. W rozdziale 14 głębiej przyglądamy się Cargo i mówimy o najlepszych praktykach dotyczących dzielenia się swoimi bibliotekami z innymi programistami. Rozdział 15 omawia dostarczone w bibliotece standardowej inteligentne wskaźniki oraz cechy, które zapewniają im funkcjonalność.
W rozdziale 16 przechodzimy przez różne modele programowania współbieżnego oraz tłumaczymy, jak Rust pomaga w programowaniu wielowątkowym bez obaw. Rozdział 17 wyjaśnia z kolei, jak idiomy Rusta można porównać do zasad programowania obiektowego, z którym możesz być już zaznajomiony.
Rozdział 18 omawia wzorce oraz dopasowywanie wzorców, co jest potężnym narzędzie do wyrażania myśli w programach pisanych w Ruście. Rozdział 19 jest swoistym tyglem ciekawszych, zaawansowanych tematów, wliczając niebezpiecznego Rusta i więcej na temat trwałości, cech, typów, funkcji i domknięć.
W rozdziale 20 tworzymy projekt, w którym implementujemy wielowątkowy, niskopoziomowy serwer sieciowy!
Na zakończenie, kilka dodatków zawiera przydatne informacje o języku w formacie przypominajacym książkę referencyjną. Dodatek A obejmuje słowa kluczowe Rusta, Dodatek B operatory i symbole, Dodatek C omawia dostarczone przez bibliotekę standardową cechy wyprowadzane, natomiast Dodatek D - kilka przydatnych narzędzi deweloperskich, a Dodatek E wyjaśnia koncepcję edycji Rusta. W dodatku F można znaleźć tłumaczenia książki, a w dodatku G zajmiemy się tym, jak powstaje Rust i czym jest Rust Nightly.
Nie ma złego sposobu na czytanie tej książki - jeśli masz ochotę skakać w przód, proszę bardzo! Powrót do wcześniejszych rozdziałów może okazać się konieczny, jeżeli doświadczysz uczucia zagubienia. Rób wszystko, co ci pomaga.
Ważną częścią procesu poznawania Rusta jest uczenie się odczytywania komunikatów błędów wyświetlanych przez kompilator: będą cię one nakierowywać na uzyskanie działającego kodu. Dlatego też zaprezentujemy wiele przykładów kodu, który się nie kompiluje, wraz z komunikatami błędów zwracanych w każdym przypadku przez kompilator. Miej świadomość, że wybrany przez ciebie na chybił-trafił przykład może się nie skompilować. Koniecznie przeczytaj okalający go tekst aby sprawdzić, czy dany kod przy próbie kompilacji powinien zwrócić błąd. Również Ferris pomoże ci rozpoznać kod, który nie powinien zadziałać:
| Ferris | Znaczenie |
|---|---|
 | Ten kod się nie kompiluje! |
 | Ten kod panikuje! |
 | Ten kod nie daje pożądanego zachowania. |
W większości przypadków pokierujemy cię do uzykania prawidłowej wersji kodu, który pierwotnie się nie kompiluje.
Kod źródłowy
Pliki źródłowe, z których wygenerowana została niniejsza książka, można znaleźć na GitHubie.
Informacje od tłumaczy
W niniejszej książce znajdziesz wiele przykładów programów oraz wycinki kodu,
w których: łańcuchy znaków w makrach println!, komentarze, a czasem nawet
nazwy projektów Cargo; zostały przetłumaczone. Jest to zabieg tłumaczy mający
na celu jak największe usunięcie bariery jaką stwarza użycie języka angielskiego w zrozumieniu
pojęć zawartych w tej książce. Prosimy, abyś rozważył(a) użycie języka angielskiego, kiedy
zdecydujesz się na udostępnienie swojego kodu, zarówno w przypadku Rusta przy udostępnianiu własnych skrzyń,
jak i w przypadku wszelkich innych języków programowania.
Na początek
Zacznijmy twoją podróż z Rustem! Jest wiele do nauczenia, ale każda podróż ma gdzieś swój początek. W tym rozdziale omówimy:
- Instalację Rusta pod Linuksem, macOS i Windowsem
- Stworzenie programu wyświetlającego tekst „Witaj, świecie!”
- Używanie
cargo, menadżera pakietów i systemu budowania Rusta
Instalacja
Naszym pierwszym krokiem jest zainstalowanie Rusta. Ściągniemy go za pomocą
rustup, narzędzia uruchamianego z linii poleceń, które służy do zarządzania
wersjami Rusta i powiązanych narzędzi. Będzie do tego potrzebne połączenie z
internetem.
Uwaga: Jeśli z jakiegoś powodu wolisz nie używać narzędzia
rustup, odwiedź Stronę opisującą inne metody instalacji Rusta.
Wykonanie kolejnych kroków spowoduje zainstalowanie najnowszej, stabilnej wersji kompilatora Rusta. Stabilność Rusta gwarantuje, że wszystkie przykłady z książki, które poprawnie się kompilują, kompilowały się będą nadal w nowszych wersjach języka. Komunikaty zwrotne błędów i ostrzeżeń mogą nieco różnić się od siebie w zależności od wersji, ponieważ dość często są one poprawiane. Innymi słowy, każda nowsza, stabilna wersja Rusta zainstalowana przy użyciu tych samych kroków powinna współgrać z treścią książki zgodnie z oczekiwaniami.
Oznaczenia w linii poleceń
W tym rozdziale oraz w dalszych częściach książki, będziemy korzystać z poleceń wydawanych przy użyciu terminala. Wszystkie linie, które powinno się wprowadzić w terminalu będą rozpoczynać się od znaku
$. Nie musisz go wpisywać. Pokazany jest on jedynie celem zidentyfikowania początku każdego polecenia. Linie, które nie zaczynają się od$, zazwyczaj pokazują komunikat wyświetlony po wydaniu ostatniego polecenia. Dodatkowo, specyficzne przykłady dla terminala PowerShell będą wykorzystywały znak>zamiast$.
Instalacja rustup pod Linuksem lub macOS
Jeśli korzystasz z Linuksa lub macOS, otwórz konsolę / terminal i wpisz następujące polecenie:
$ curl --proto '=https' --tlsv1.2 https://sh.rustup.rs -sSf | sh
Spowoduje to ściągnięcie skryptu, który rozpocznie instalację narzędzia
rustup, które z kolei zainstaluje najnowszą, stabilną wersję Rusta. Możesz
otrzymać prośbę o wprowadzenie swojego hasła. Jeśli wszystko się powiedzie,
zobaczysz na ekranie taki tekst:
Rust is installed now. Great!
Będziesz też potrzebować programu linkującego (linkera), którego Rust używa do złączenia wyników kompilowania w jeden plik. Prawdopodobnie masz już taki zainstalowany, ale jeżeli przy próbie kompilacji programu Rusta uzyskasz błędy informujące, że nie można uruchomić linkera, oznacza to, że w danym systemie linker nie jest zainstalowany i konieczna jest jego ręczna instalacja. Kompilatory języka C zazwyczaj wyposażone są w odpowiedni linker. Sprawdź dokumentację swojej platformy, aby dowiedzieć się, jak przeprowadzić ewentualną instalację kompilatora C. Wiele popularnych pakietów Rusta korzysta z kodu C i wymaga również kompilatora C. Z tego względu jego instalacja w tym momencie może być zasadna.
W systemie macOS możesz uruchomić kompilator języka C poleceniem:
$ xcode-select --install
Użytkownicy Linuksa powinni generalnie zainstalować GCC lub Clang, zgodnie z dokumentacją ich
dystrybucji. Na przykład, jeśli używasz Ubuntu, możesz zainstalować pakiet build-essential.
Instalacja rustup pod Windowsem
Z poziomu Windowsa, odwiedź stronę https://www.rust-lang.org/tools/install i kieruj się instrukcjami instalacji Rusta. W którymś momencie procesu otrzymasz komunikat informujący, że będziesz również potrzebować narzędzi budowania MSVC dla Visual Studio 2013 lub nowszego.
Aby uzyskać narzędzia kompilacji, powinieneś zainstalować Visual Studio 2022. Na pytanie, które składniki zainstalować, należy wybrać:
- „Desktop Development with C++”
- The Windows 10 or 11 SDK
- pakiet języka angielskiego, wraz z dowolnym innym pakietem językowym do wyboru
Dalsza część książki będzie zawierać polecenia działające zarówno w cmd.exe jak i w PowerShell. Jeżeli pojawią się jakieś różnice, zostaną one wyjaśnione.
Aktualizowanie i odinstalowanie
Kiedy już zainstalujesz Rusta używając rustup, aktualizacja do najnowszej
wersji jest prosta. W terminalu uruchom następujący skrypt aktualizacji:
$ rustup update
Aby odinstalować Rusta oraz rustup, w terminalu uruchom skrypt dezinstalacji:
$ rustup self uninstall
Rozwiązywanie problemów
Aby sprawdzić, czy Rust jest prawidłowo zainstalowany, otwórz terminal i wpisz następujące polecenie:
$ rustc --version
Powinien się wyświetlić numer wersji, hasz oraz data commita najnowszej wersji stabilnej, w formacie podobnym do poniższego:
rustc x.y.z (abcabcabc rrrr-mm-dd)
Jeśli widzisz coś takiego, Rust zainstalował się prawidłowo! Jeśli nie, to sprawdź
czy Rust został dodany do zmiennej środowiskowej %PATH%.
W Windows CMD, wpisz:
> echo %PATH%
W PowerShellu, wpisz:
> echo $env:Path
W systemie Linux lub macOS, wpisz:
$ echo $PATH
Jeśli wszystko się zgadza, a Rust nadal nie działa, istnieje kilka miejsc, w których możesz uzyskać pomoc. Dowiedz się, jak skontaktować się z innymi Rustowcami (to takie nasze przezwisko) na the community page.
Lokalna dokumentacja
Instalacja dołącza również lokalną kopię dokumentacji, więc można ją czytać
offline. Uruchom rustup doc, żeby otworzyć lokalną dokumentację w swojej
przeglądarce.
Za każdym razem, kiedy przytoczone są typ lub funkcja z biblioteki standardowej, a nie masz pewności co robią lub jak ich użyć, użyj dokumentacji API (Interfejs Programowania Aplikacji), aby się dowiedzieć.
Witaj, świecie!
Ponieważ Rust jest już zainstalowany, napiszmy pierwszy program. Przy poznawaniu nowego języka tradycją stało się tworzenie krótkiego programu, który wyświetla na ekranie tekst „Witaj, świecie! (ang. „Hello World!”). Postąpimy tu tak samo.
Uwaga: Książka zakłada u czytelnika podstawową znajomość wiersza poleceń. Sam Rust nie wymaga konkretnego edytora, narzędzi czy też miejsca, gdzie zapisany jest kod, więc jeśli preferujesz używanie zintegrowanego środowiska programistycznego zamiast wiersza poleceń, masz do tego pełne prawo. Wiele IDE obsługuje Rusta w pewnym stopniu - możesz sprawdzić dokumentację swojego IDE, aby uzyskać szczegóły. Zespół Rusta ostatnio zadbał o obsługę języka w niektórych IDE dzięki
rust-analyzer. Więcej szczegółów zawiera Dodatek D.
Tworzenie katalogu projektu
W pierwszej kolejności utwórz katalog, w którym umieścisz swój kod. Rust w żaden sposób nie narzuca lokalizacji dla kodu, ale dla potrzeb niniejszej książki sugerujemy utworzenie katalogu projects w katalogu domowym i przechowywanie tam wszystkich swoich programów.
Otwórz terminal i wprowadź następujące polecenia, aby utworzyć katalog projects, w którym umieścimy kolejny, pod projekt „Witaj, świecie!”:
Pod Linuksem, macOS, lub w PowerShell pod Windowsem, wpisz to:
$ mkdir ~/projects
$ cd ~/projects
$ mkdir hello_world
$ cd hello_world
W Windows CMD, wpisz to:
> mkdir %USERPROFILE%\projects
> cd /d %USERPROFILE%\projects
> mkdir hello_world
> cd hello_world
Pisanie i uruchamianie programu w Ruście
Następnie utwórz nowy plik źródłowy i nazwij go main.rs. Pliki języka Rust zawsze zakończone są rozszerzeniem .rs. Jeśli w nazwie pliku znajduje się więcej niż jedno słowo, użyj znaku podkreślenia jako separatora. Na przykład, hello_world.rs zamiast helloworld.rs.
Otwórz plik main.rs, który właśnie utworzyłeś i wprowadź kod podany w Listingu 1-1:
Plik: main.rs
fn main() {
    println!("Witaj, świecie!");
}
Listing 1-1: Program wyświetlający „Witaj, świecie!”
Zapisz plik i wróć do okna terminala w katalogu ~/projects/hello_world. Pod Linuksem lub macOS, wprowadź podane polecenia, żeby skompilować i uruchomić program:
$ rustc main.rs
$ ./main
Witaj, świecie!
Pod Windowsem, uruchom .\main.exe zamiast ./main.
> rustc main.rs
> .\main.exe
Witaj, świecie!
Bez względu na posiadany system operacyjny, powinieneś/powinnaś zobaczyć w oknie
terminala wyświetlony tekst Witaj, świecie!. Jeśli nic takiego nie widzisz,
zajrzyj do sekcji „Rozwiązywanie problemów” w
rozdziale poświęconym instalacji, po sposoby na otrzymanie pomocy.
Jeśli widzisz tekst Witaj, świecie!, to gratulacje! Właśnie oficjalnie napisałeś
program w Ruście, a to czyni z ciebie programistę Rusta - Witaj!
Anatomia programu w Ruście
Przyjrzyjmy się teraz dokładnie, co właściwie dzieje się w twoim programie „Witaj, świecie!”. Oto pierwsza część układanki:
fn main() {

}
Powyższe linie definiują w Ruście funkcję. Funkcja main jest szczególna: to
pierwsza rzecz, która wykonuje się w każdym programie napisanym w Ruście. Pierwsza
linia deklaruje funkcję o nazwie main, która nie przyjmuje argumentów oraz
niczego nie zwraca. Gdyby funkcja przyjmowała jakieś argumenty, ich nazwy
umieszczone byłyby w nawiasach, ().
Zwróć też uwagę, że ciało funkcji otoczone jest nawiasami klamrowymi, {}.
Rust wymaga tych znaków wokół ciał wszystkich funkcji. Za dobry styl uważa się
umieszczenie klamry otwierającej w tej samej linii, co deklaracja funkcji i
oddzielenie jej od poprzedzającego kodu jedną spacją.
Uwaga: Jeśli chcesz trzymać się ściśle standardowego stylu używanego w Rustowych projektach, możesz użyć
rustfmt-- narzędzia do automatycznego formatowania kodu do konkretnego stylu (więcej orustfmtjest w Dodatku D). Programu zawarty jest w standardowej dystrybucji Rusta, tak jakrustc, więcrustfmtprawdopodobnie już zainstalowany na twoim komputerze!
Wewnątrz funkcji main mamy następujący kod:
#![allow(unused)]
fn main() {
    println!("Witaj, świecie!");
}
Ta linia wykonuje całą robotę w naszym krótkim programie: wyświetla tekst na ekranie. Należy tu zwrócić uwagę na cztery szczegóły.
Po pierwsze, wcięcie tekstu w Ruście składa się z czterech spacji, a nie z tabulatora.
Po drugie, println! wywołuje w Ruście makro. Gdyby wywoływana była
funkcja, wpisana byłaby jako println (bez !). Makra będą szerzej opisane w
rozdziale 19. Jedyne, co musisz wiedzieć teraz, to to, że użycie ! wywołuje
makro zamiast zwykłej funkcji i że makra nie zawsze podlegają tym samym regułą co funkcje.
Po trzecie, w programie widzimy łańcuch znaków (string) "Witaj, świecie!".
Przekazujemy go jako argument do println!, którego ostatecznym efektem jest
wyświetlenie łańcucha na ekranie.
Po czwarte, linia zakończona jest średnikiem (;), który oznacza, że bieżące
wyrażenie jest zakończone i można zacząć kolejne. Większość linii w Ruście
kończy się znakiem średnika.
Kompilacja i uruchomienie to oddzielne kroki
Przed momentem uruchomiliśmy nowo napisany program. Zbadajmy teraz kolejno każdy poprzedzający ten moment etap.
Zanim uruchomisz program w Ruście, należy go skompilować kompilatorem Rusta,
wprowadzając polecenie rustc i przekazując do niego jako argument nazwę pliku
źródłowego. Wygląda to tak:
$ rustc main.rs
Jeśli masz doświadczenie w C lub C++, zauważysz, że jest to podobne do
wywoływania gcc lub clang. Po udanej kompilacji, Rust tworzy binarny plik
wykonywalny.
Pod Linuksem, macOS lub w PowerShell pod Windowsem możesz sprawdzić obecność
pliku wykonywalnego używając w terminalu polecenia ls:
$ ls
main  main.rs
W przypadku Linuksa i macOS zobaczysz dwa pliki. PowerShell pod Windowsem wyświetli trzy pliki - te same, które wyświetliłby CMD. W CMD pod Windowsem możesz wpisać:
> dir /B %= opcja /B powoduje wyświetlenie jedynie nazw plików =%
main.exe
main.pdb
main.rs
To potwierdza obecność kodu źródłowego z rozszerzeniem .rs, programu wykonywalnego (main.exe pod Windowsem, main wszędzie indziej), a także, w przypadku Windowsa, pliku z rozszerzeniem .pdb zawierającego informacje debugujące. Wszystko, co pozostało do zrobienia, to uruchomienie pliku main lub main.exe, w taki sposób:
$ ./main # lub .\main.exe pod Windowsem
Jeżeli main.rs jest twoim programem „Witaj, świecie!”, wyświetli to w oknie
terminala tekst Witaj, świecie!.
Jeśli jesteś doświadczony w językach dynamicznych, takich jak Ruby, Python lub
JavaScript, możesz nie być przyzwyczajony do traktowania kompilacji i
uruchomienia programu jako oddzielnych kroków. Rust jest językiem kompilowanym
z wyprzedzeniem, co oznacza, że możesz skompilować program i dać go komuś,
kto uruchomi go nawet nie mając zainstalowanego Rusta. Jeśli natomiast dasz
komuś plik .rb, .py lub .js, odbiorca musi mieć zainstalowane
odpowiednio implementacje Ruby, Pythona lub JavaScript. Jednak w tych językach
jedna komenda wystarczy, aby jednocześnie skompilować i uruchomić program.
Wszystko jest kompromisem w konstrukcji danego języka.
Kompilacja poprzez rustc jest wystarczająca dla prostych programów, ale w
miarę rozrastania się twojego projektu, odczujesz potrzebę zarządzania
wszystkimi dostępnymi w nim opcjami i ułatwienia dzielenia się kodem.
W dalszym ciągu przedstawimy narzędzie zwane Cargo, które pomoże ci w pisaniu
prawdziwych programów w Ruście.
Witaj, Cargo!
Cargo jest menedżerem pakietów i systemem budowania Rusta. Większość Rustowców używa tego narzędzia do zarządzania swoimi projektami, ponieważ Cargo potrafi wykonać za nich wiele zadań, takich jak budowanie kodu oraz ściąganie i budowanie bibliotek, od których kod jest zależny. Biblioteki, których wymaga twój kod nazywamy zależnościami (dependencies).
Najprostsze programy w Ruście, takie jak ten, który właśnie napisaliśmy, nie mają żadnych zależności, więc gdybyśmy zbudowali projekt „Witaj, świecie!” (ang. „Hello World!”) za pomocą Cargo, zostałaby użyta tylko ta część narzędzia, która zajmuje się budowaniem kodu. W miarę pisania bardziej skomplikowanych programów, zechcesz dodawać zależności i jeśli swój projekt rozpoczniesz z użyciem Cargo, będzie to o wiele łatwiejsze do zrobienia.
Jako że przeważająca większość projektów w Ruście używa Cargo, w dalszym ciągu książki założymy, że ty również go używasz. Jeśli korzystałeś(-aś) z oficjalnych instalatorów, zgodnie z opisem w sekcji „Instalacja”, Cargo zainstalował się razem z Rustem. Jeżeli instalowałeś(-aś) Rusta w inny sposób, możesz sprawdzić, czy Cargo jest zainstalowany, przez wprowadzenie w terminalu następującej komendy:
$ cargo --version
Jeżeli widzisz numer wersji, Cargo jest zainstalowane! Jeśli natomiast pojawia
się błąd z rodzaju komendy nie znaleziono, powinieneś/powinnaś zajrzeć do dokumentacji
swojej metody instalacji celem ustalenia, jak zainstalować Cargo osobno.
Tworzenie projektu z Cargo
Stwórzmy nowy projekt z pomocą Cargo i przyjrzyjmy się, czym różni się on od naszego pierwotnego projektu „Witaj, świecie!”. Przejdź z powrotem do swojego katalogu projects (lub innego, w którym zdecydowałeś(-aś) się trzymać swój kod) i bez względu na posiadany system operacyjny wprowadź polecenie:
$ cargo new hello_cargo
$ cd hello_cargo
Pierwsze polecenie stworzy nowy katalog o nazwie hello_cargo. Ponieważ nadaliśmy naszemu projektowi nazwę hello_cargo, Cargo tworzy jego pliki źródłowe w katalogu o tej samej nazwie.
Wejdź do katalogu hello_cargo i wyświetl listę plików. Powinieneś(-aś) zobaczyć, że
Cargo utworzył dla nas dwa pliki i jeden podkatalog: plik Cargo.toml oraz
katalog src z plikiem main.rs wewnątrz. Zainicjował również nowe
repozytorium Gita, w komplecie z plikiem .gitignore.
Gdybyś jednak wykonał(a) komendę cargo new w folderze, w którym istnieje już
repozytorium Gita, to pliki związane z Gitem nie zostałyby stworzone.
Możesz zmienić to zachowanie używając komendy cargo new --vcs=git.
Uwaga: Git jest często stosowanym systemem kontroli wersji. Możesz zlecić
cargo newzastosowanie innego systemu kontroli wersji lub też nie stosowanie żadnego, za pomocą flagi--vcs. Uruchomcargo new --help, żeby zobaczyć dostępne opcje.
Otwórz plik Cargo.toml w wybranym przez siebie edytorze tekstu. Zawartość powinna wyglądać podobnie do kodu z listingu 1-2:
Plik: Cargo.toml
[package]
name = "hello_cargo"
version = "0.1.0"
edition = "2021"

# See more keys and their definitions at https://doc.rust-lang.org/cargo/reference/manifest.html

[dependencies]
Listing 1-2: Zawartość pliku Cargo.toml wygenerowanego
przez cargo new
Plik jest w formacie TOML (Tom’s Obvious, Minimal Language) (Oczywisty, Minimalistyczny Język Toma - przyp. tłum.), którego Cargo używa do konfiguracji.
Pierwsza linia, [package], jest nagłówkiem sekcji, której kolejne wyrażenia
konfigurują pakiet. W miarę dodawania informacji do tego pliku, dodamy też inne
sekcje.
Następne trzy linie ustalają informacje konfiguracyjne, których Cargo
potrzebuje do kompilacji twojego programu: nazwę, wersję, i dane o
używanej edycji Rusta. O kluczu edition będzie mowa w Dodatku E.
Ostatnia linia, [dependencies], rozpoczyna sekcję, gdzie wyszczególnia się
wszystkie zależności twojego projektu. W Ruście pakiety z kodem źródłowym
nazywane są skrzyniami (crates). Do tego projektu nie będziemy potrzebować
żadnych skrzyń, ale do programu w rozdziale drugim owszem. Wówczas przyda nam
się sekcja zależności.
Otwórz teraz plik src/main.rs i przyjrzyj się zawartości:
Plik: src/main.rs
fn main() {
    println!("Hello, world!");
}
Cargo wygenerował dla ciebie program „Witaj, świecie!”, prawie taki sam jak ten, jak napisaliśmy w listingu 1-1 (tyle, że w języku angielskim)! Różnice między naszym poprzednim projektem, a tym wygenerowanym przez Cargo są takie, że w Cargo kod źródłowy trafia do podkatalogu src, a w katalogu głównym pozostaje plik konfiguracyjny Cargo.toml.
Cargo zakłada, że kod źródłowy znajduje się w podkatalogu src, dzięki czemu katalog główny wykorzystany jest tylko na pliki README, informacje o licencjach, pliki konfiguracyjne i wszystko inne, co nie jest kodem. Używanie Cargo pomaga utrzymać ci własne projekty w należytym porządku. Na wszystko jest miejsce i wszystko jest na swoim miejscu.
Jeżeli zacząłeś(-aś) jakiś projekt bez użycia Cargo, taki jak nasz poprzedni z katalogu hello_world, możesz przekonwertować go na wersję kompatybilną z Cargo, przenosząc kod źródłowy do podkatalogu src i tworząc odpowiedni plik Cargo.toml.
Budowanie i uruchamianie projektu z Cargo
Przyjrzyjmy się teraz, jakie są różnice w budowaniu i uruchamianiu programu „Witaj, świecie!” poprzez Cargo. Aby zbudować swój projekt, z poziomu głównego katalogu hello_cargo wprowadź polecenie:
$ cargo build
   Compiling hello_cargo v0.1.0 (file:///projects/hello_cargo)
    Finished dev [unoptimized + debuginfo] target(s) in 2.85 secs
Spowoduje to utworzenie pliku wykonywalnego w target/debug/hello_cargo (lub target\debug\hello_cargo.exe pod Windowsem), zamiast w katalogu bieżącym. Ponieważ domyślnie budowana jest wersja debug programu, Cargo umieszcza skompilowany plik binarny w katalogu debug. Plik można uruchomić następującym poleceniem:
$ ./target/debug/hello_cargo # lub .\target\debug\hello_cargo.exe pod Windowsem
Hello, world!
Jeśli wszystko przebiegło prawidłowo, Hello, world! powinno
wyświetlić się w oknie terminala. Uruchomienie cargo build za pierwszym razem
powoduje dodatkowo utworzenie przez Cargo nowego pliku w katalogu głównym o
nazwie Cargo.lock, który wykorzystywany jest do śledzenia dokładnych wersji
zależności w twoim projekcie. Ponieważ bieżący projekt nie posiada zależności,
zawartość pliku jest dość licha. Nie będziesz musiał własnoręcznie modyfikować
tego pliku; Cargo zajmie się tym za ciebie.
Właśnie zbudowaliśmy projekt poleceniem cargo build i uruchomiliśmy go przez
./target/debug/hello_cargo. Możemy również użyć cargo run, żeby skompilować
i uruchomić program za jednym rzutem:
$ cargo run
    Finished dev [unoptimized + debuginfo] target(s) in 0.0 secs
     Running `target/debug/hello_cargo`
Hello, world!
Większość programistów używa cargo run, bo jest ono wygodniejsze i łatwiejsze do zapamiętania od użycia cargo build i pełnej ścieżki do zbudowanego pliku binarnego.
Zauważ, że tym razem nie wyświetliła się informacja o tym, że Cargo kompilował
hello_cargo. Program wywnioskował, że zawartość plików nie uległa zmianie,
więc po prostu uruchomił binarkę. Gdyby kod źródłowy został zmodyfikowany, Cargo
przebudowałby projekt przed jego uruchomieniem i wówczas informacja na ekranie
wyglądałaby następująco:
$ cargo run
   Compiling hello_cargo v0.1.0 (file:///projects/hello_cargo)
    Finished dev [unoptimized + debuginfo] target(s) in 0.33 secs
     Running `target/debug/hello_cargo`
Hello, world!
Mamy jeszcze do dyspozycji cargo check. To polecenie szybko sprawdzi twój kod,
celem upewnienia się, że skompilowałby się on prawidłowo, ale nie tworzy pliku
wykonywalnego:
$ cargo check
   Compiling hello_cargo v0.1.0 (file:///projects/hello_cargo)
    Finished dev [unoptimized + debuginfo] target(s) in 0.32 secs
Jaki jest cel pomijania tworzenia binarki? Taki, że cargo check jest często o
wiele szybsze od cargo build, ponieważ cały krok generowania pliku
wykonywalnego jest pomijany. Jeśli masz zwyczaj sprawdzać swoją pracę w trakcie
pisania kodu, użycie cargo check przyspieszy proces! Wielu Rustowców okresowo
uruchamia cargo check, żeby sprawdzić, czy wszystko się kompiluje, a
cargo build dopiero, kiedy zdecydują się na uruchomienie binarki.
Podsumujmy, co do tej pory nauczyliśmy się o Cargo:
- Możemy stworzyć projekt używając
cargo new. - Możemy zbudować projekt poleceniami
cargo build. - Możemy zbudować i uruchomić projekt w jednym kroku z użyciem
cargo run. - Możemy zbudować projekt bez tworzenia binarki, aby sprawdzić błędy używając
cargo check. - Zamiast umieszczać pliki wynikowe budowania w tym samym katalogu co nasz kod, Cargo umieści je w podkatalogu target/debug.
Dodatkową zaletą używania Cargo jest to, że polecenia są identyczne, bez względu na system operacyjny, pod którym pracujesz. Od tego momentu nie będziemy zatem podawać osobnych instrukcji dla Linuksa i macOS czy Windowsa.
Budowanie do publikacji
Gdy twój projekt jest już gotowy do publikacji, możesz użyć polecenia
cargo build --release celem przeprowadzenia kompilacji z optymalizacjami.
Spowoduje to utworzenie pliku wykonywalnego w podkatalogu target/release
zamiast w target/debug. Przeprowadzone optymalizacje sprawiają, że twój
program w Ruście wykonuje się szybciej, ale jednocześnie jego kompilacja trwa
dłużej. Dlatego też istnieją dwa różne profile: jeden rozwojowy, kiedy zależy ci
na szybkim i częstym budowaniu oraz drugi, przeznaczony do zbudowania
ostatecznej wersji, która trafi do użytkownika. Nie będzie ona wielokrotnie
przebudowywana, ale wykonywać się będzie tak szybko, jak to tylko możliwe.
Jeżeli prowadzisz testy czasu wykonywania swojego kodu, pamiętaj o wywołaniu
cargo build --release i testowaniu pliku wykonywalnego z
podkatalogu target/release.
Cargo jako konwencja
W przypadku prostych projektów, Cargo nie wnosi wielu korzyści w porównaniu z
używaniem prostego rustc, ale udowodni swoją wartość w miarę postępów. Przy
skomplikowanych projektach złożonych z wielu plików lub mających wiele zależności,
zezwolenie Cargo na koordynację budowania znacznie ułatwia pracę.
Nawet jeśli projekt hello_cargo jest prosty, używa już sporej części arsenału
narzędzi, z którymi będziesz mieć do czynienia przez pozostały okres swojej
kariery z Rustem. Rzeczywiście, rozpoczęcie pracy nad jakimkolwiek istniejącym
projektem sprowadza się do wydania kilku poleceń: check out kodu w Git,
wejście do katalogu roboczego i budowanie:
$ git clone przyklad.org/jakisprojekt
$ cd jakisprojekt
$ cargo build
Więcej informacji o Cargo można znaleźć w jego dokumentacji.
Podsumowanie
Jesteś już na dobrej drodze do rozpoczęcia podróży z Rustem! W tym rozdziale nauczyłeś(-aś) się, jak:
- Zainstalować najnowszą, stabilną wersję Rusta z użyciem
rustup, - Uaktualnić Rusta do nowszej wersji,
- Otwierać lokalną kopię dokumentacji,
- Napisać program „Witaj, świecie!” używając bezpośrednio
rustc, - Stworzyć i uruchomić nowy projekt używając konwencji Cargo.
To świetna pora na stworzenie poważniejszego programu, aby przyzwyczaić się do czytania i pisania kodu w Ruście. W następnym rozdziale zbudujemy program grający w zgadywankę. Jeśli jednak chcesz zacząć naukę o działaniu powszechnych pojęć programistycznych w Ruście, przejdź do rozdziału 3, a następnie wróć do rozdziału 2.
Piszemy grę zgadywankę
Rozpocznijmy zabawę z Rustem tworząc razem praktyczny projekt. Ten rozdział zapozna cię z kilkoma podstawowymi
konceptami Rusta, prezentując ich użycie w prawdziwym programie. Dowiesz się, co oznaczają let, match, metoda,
funkcja powiązana (associated function), nauczysz się, jak używać skrzyń (crates), i wielu innych rzeczy!
Dokładniejsze omówienie tych tematów znajduje się w dalszych rozdziałach. W tym rozdziale przećwiczysz jedynie podstawy.
Zaimplementujemy klasyczny problem programistyczny dla początkujących: grę zgadywankę. Oto zasady: program generuje losową liczbę całkowitą z przedziału od 1 do 100. Następnie prosi użytkownika o wprowadzenie liczby z tego przedziału. Gdy użytkownik wprowadzi swoją odpowiedź, program informuje, czy podana liczba jest niższa czy wyższa od wylosowanej. Gdy gracz odgadnie wylosowaną liczbę, program wyświetla gratulacje dla zwycięzcy i kończy działanie.
Tworzenie nowego projektu
Aby stworzyć nowy projekt, wejdź do folderu projects utworzonego w rozdziale 1 i za pomocą Cargo wygeneruj szkielet projektu, w ten sposób:
$ cargo new guessing_game
$ cd guessing_game
Pierwsza komenda, cargo new, jako argument przyjmuje nazwę projektu (guessing_game).
W kolejnej linii komenda cd przenosi nas do nowo utworzonego folderu projektu.
Spójrz na wygenerowany plik Cargo.toml:
Plik: Cargo.toml
[package]
name = "guessing_game"
version = "0.1.0"
edition = "2021"

# See more keys and their definitions at https://doc.rust-lang.org/cargo/reference/manifest.html

[dependencies]
Jak już widziałeś w rozdziale 1, cargo new tworzy dla ciebie program
„Hello World!”. Otwórz plik src/main.rs:
Plik: src/main.rs
fn main() {
    println!("Hello, world!");
}
Teraz skompilujemy i uruchomimy ten program w jednym kroku za pomocą komendy cargo run:
$ cargo run
   Compiling guessing_game v0.1.0 (file:///projects/guessing_game)
    Finished dev [unoptimized + debuginfo] target(s) in 1.50s
     Running `target/debug/guessing_game`
Hello, world!
Komenda run jest przydatna, kiedy chcesz w szybki sposób testować kolejne iteracje rozwoju projektu.
Tak właśnie jest w przypadku naszej gry: chcemy testować każdy krok, zanim przejdziemy do kolejnego.
Otwórz jeszcze raz plik src/main.rs. W tym pliku będziesz pisał kod programu.
Przetwarzanie odpowiedzi
Pierwsza część programu będzie prosiła użytkownika o podanie liczby, przetwarzała jego odpowiedź i sprawdzała, czy wpisane przez niego znaki mają oczekiwaną postać. Zaczynamy od wczytania odpowiedzi gracza. Przepisz kod z listingu 2-1 do pliku src/main.rs.
Plik: src/main.rs
use std::io;

fn main() {
    println!("Zgadnij numer!");

    println!("Podaj swoją liczbę:");

    let mut guess = String::new();

    io::stdin()
        .read_line(&mut guess)
        .expect("Błąd wczytania linii");

    println!("Wybrana przez ciebie liczba: {guess}");
}
Listing 2-1: Implementacja wczytująca odpowiedź użytkownika i wypisująca ją na ekran
Powyższy fragment kodu zawiera dużo informacji - przeanalizujmy go kawałek po kawałku. Aby wczytać odpowiedź gracza
a następnie wyświetlić ją na ekranie, musimy dołączyć do programu bibliotekę io (input/output).
Biblioteka io pochodzi z biblioteki standardowej (znanej jako std):
use std::io;

fn main() {
    println!("Zgadnij numer!");

    println!("Podaj swoją liczbę:");

    let mut guess = String::new();

    io::stdin()
        .read_line(&mut guess)
        .expect("Błąd wczytania linii");

    println!("Wybrana przez ciebie liczba: {guess}");
}
Domyślnie Rust posiada zestaw elementów zdefiniowanych w bibliotece standardowej, które importuje do każdego programu. Ten zestaw nazywany jest prelude i można zobaczyć co zawiera w dokumentacji biblioteki standardowej.
Jeśli typu, którego chcesz użyć, nie ma w prelude, musisz go jawnie zaciągnąć używając słowa use.
Skorzystanie z biblioteki std::io dostarcza wielu pożytecznych mechanizmów związanych z io,
włącznie z funkcjonalnością do wczytywania danych wprowadzonych przez użytkownika.
Tak jak mówiliśmy już w rozdziale 1, każdy program rozpoczyna wykonanie w funkcji main.
use std::io;

fn main() {
    println!("Zgadnij numer!");

    println!("Podaj swoją liczbę:");

    let mut guess = String::new();

    io::stdin()
        .read_line(&mut guess)
        .expect("Błąd wczytania linii");

    println!("Wybrana przez ciebie liczba: {guess}");
}
fn deklaruje nową funkcję, () informuje, że funkcja ta nie przyjmuje żadnych parametrów,
a { otwiera ciało funkcji.
W rozdziale 1 nauczyłeś się również, że println! jest makrem, które wyświetla zawartość stringa na ekranie:
use std::io;

fn main() {
    println!("Zgadnij numer!");

    println!("Podaj swoją liczbę:");

    let mut guess = String::new();

    io::stdin()
        .read_line(&mut guess)
        .expect("Błąd wczytania linii");

    println!("Wybrana przez ciebie liczba: {guess}");
}
Powyższy fragment kodu wypisuje na ekranie informację, na czym polega gra, i prosi użytkownika o wprowadzenie odgadniętej przez niego liczby.
Zapisywanie wartości w zmiennych
Teraz stworzymy zmienną do zapisywania odpowiedzi użytkownika, w ten sposób:
use std::io;

fn main() {
    println!("Zgadnij numer!");

    println!("Podaj swoją liczbę:");

    let mut guess = String::new();

    io::stdin()
        .read_line(&mut guess)
        .expect("Błąd wczytania linii");

    println!("Wybrana przez ciebie liczba: {guess}");
}
Program robi się coraz bardziej interesujący! W tej krótkiej linii wiele się dzieje.
Instrukcji let używamy do utworzenia zmiennej. Tutaj kolejny przykład:
let apples = 5;W tej linii tworzona jest nowa zmienna o nazwie apples, do której przypisana jest wartość 5.
W Ruście wszystkie zmienne są domyślnie niemutowalne (stałe), co oznacza, że nadana im na początku wartość nie zmieni się.
We’ll be discussing this concept in detail in the „Variables and Mutability”
section in Chapter 3.
Poniższy przykład pokazuje, jak stawiając słowo kluczowe mut przed nazwą zmiennej stworzyć zmienną mutowalną:
let apples = 5; // immutable
let mut bananas = 5; // mutable
Uwaga: Znaki
//rozpoczynają komentarz, który ciągnie się do końca linii. Rust ignoruje zawartość komentarzy. Komentarze omówimy bardziej szczegółowo w rozdziale 3.
Powróćmy do naszej gry-zgadywanki.
Teraz już wiesz, że let mut guess utworzy mutowalną zmienną o nazwie guess.
Po prawej stronie znaku przypisania (=) jest wartość, która jest przypisywana do guess,
i która jest wynikiem wywołania funkcji String::new, tworzącej nową instancję Stringa.
String to dostarczany przez bibliotekę standardową typ tekstowy,
gdzie tekst ma postać UTF-8 i może się swobodnie rozrastać.
Znaki :: w wyrażeniu ::new wskazują na to, że new jest funkcją powiązaną (associated
function) z typem String. Funkcje powiązane są zaimplementowane na danym typie, w tym
przypadku na Stringu, a nie na konkretnej instancji typu String
(niektóre języki programowania nazywają to metodą statyczną).
Funkcja new tworzy nowy, pusty String. W przyszłości spotkasz się z funkcjami new
dla wielu różnych typów, ponieważ jest to standardowa nazwa dla funkcji tworzącej nową
instancję danego typu.
Podsumowując, linia let mut guess = String::new(); stworzyła mutowalną zmienną, która jest obecnie przypisania do nowej, pustej instancji typu String. Uff!
Pobieranie danych od użytkownika
Przypominasz sobie, że załączyliśmy do programu obsługę wejścia/wyjścia z biblioteki
standardowej przy pomocy linii use std::io;?
Teraz wywołamy z stdin funkcję znajdującą się w module io, które pozwoli nam na pobranie danych od użytkownika:
use std::io;

fn main() {
    println!("Zgadnij numer!");

    println!("Podaj swoją liczbę:");

    let mut guess = String::new();

    io::stdin()
        .read_line(&mut guess)
        .expect("Błąd wczytania linii");

    println!("Wybrana przez ciebie liczba: {guess}");
}
Gdybyśmy nie zaimportowali io za pomocą use std::io na początku programu, aby wywołać tę funkcję musielibyśmy
napisać std::io::stdin.
Funkcja stdin zwraca instancję std::io::Stdin,
która jest typem reprezentującym uchwyt do standardowego wejścia dla twojego terminala.
Dalszy fragment kodu, .read_line(&mut guess), wywołuje metodę read_line
na uchwycie wejścia standardowego, aby w ten sposób wczytać znaki wprowadzone przez gracza.
Do metody read_line podajemy argument &mut guess, by wskazać gdzie zapisać wczytane znaki.
Zadaniem metody read_line jest wziąć to, co użytkownik wpisze na wejście standardowe i dodać to
do podanego string (bez nadpisania jego zawartości), który przyjmuje ona jako argument.
String ten musi być mutowalny, aby metoda była w stanie go zmodyfikować.
Znak & wskazuje na to, że argument guess jest referencją. Referencja oznacza, że wiele kawałków kodu może operować
na jednej instancji danych, bez konieczności kopiowania tej danej kilkakrotnie. Referencje są skomplikowane,
a jedną z głównych zalet Rusta jest to, jak bezpiecznie i łatwo można ich używać.
Do dokończenia tego programu nie musisz znać wielu szczegółów na ten temat: rozdział 4 omówi referencje bardziej
wnikliwie. Póki co wszystko co musisz wiedzieć o referencjach to to, że podobnie jak zmienne, domyślnie są niemutowalne.
Dlatego musimy napisać &mut guess, a nie &guess, aby dało się tę referencję modyfikować.
Obsługa potencjalnych błędów z użyciem Result
Nie skończyliśmy jeszcze analizy tej linii kodu. Pomimo tego że doszliśmy już do trzeciej linii tekstu, wciąż jest to część pojedynczej, logicznej linii kodu. Kolejną częścią jest ta metoda:
use std::io;

fn main() {
    println!("Zgadnij numer!");

    println!("Podaj swoją liczbę:");

    let mut guess = String::new();

    io::stdin()
        .read_line(&mut guess)
        .expect("Błąd wczytania linii");

    println!("Wybrana przez ciebie liczba: {guess}");
}
Moglibyśmy napisać ten kod tak:
io::stdin().read_line(&mut guess).expect("Błąd wczytania linii");Jednakże taka długa linia jest trudna do czytania, więc lepiej ją podzielić. Często warto złamać linię i wprowadzić dodatkowe wcięcie, by poprawić czytelność długich wywołań ze składnią typu .nazwa_metody().
Teraz omówimy, co ta linia robi.
Jak już wspomnieliśmy wcześniej, read_line zapisuje tekst wpisany przez użytkownika do stringa przekazanego jako argument. Ale również zwraca wartość typu Result.
Result jest enumeracją, często nazywaną enumem lub typamem wyliczeniowym.
Typ wyliczeniowy to typ, który może mieć stały zestaw wartości, nazywanych wariantami (variants).
Chapter 6 will cover enums in more detail. The purpose of these Result types is to encode error-handling information.
Możliwe wartości Result to Ok i Err. Ok oznacza, że operacja powiodła się sukcesem i wewnątrz obiektu Ok znajduje się poprawnie wygenerowana wartość. Err oznacza, że operacja nie powiodła się, i obiekt Err zawiera informację o przyczynach niepowodzenia.
Obiekty typu Result, tak jak obiekty innych typów,
mają zdefiniowane dla siebie metody. Instancja Result ma metodę expect,
którą możesz wywołać. Jeśli dana instancja Result będzie miała wartość Err, wywołanie metody expect spowoduje zakończenie się programu i wyświetlenie na ekranie wiadomości, którą podałeś jako argument do expect. Sytuacje, gdy metoda read_line zwraca Err, najprawdopodobniej są wynikiem błędu pochodzącego z systemu operacyjnego. Gdy zaś zwrócony Result ma wartość Ok,
expect odczyta wartość właściwą, przechowywaną przez Ok, i zwróci tę wartość, gotową do użycia w programie.
W tym przypadku wartość ta odpowiada liczbie bajtów, które użytkownik wprowadził na wejście.
Gdybyśmy pominęli wywołanie expect, program skompilowałby się z ostrzeżeniem:
$ cargo build
   Compiling guessing_game v0.1.0 (file:///projects/guessing_game)
warning: unused `Result` that must be used
  --> src/main.rs:10:5
   |
10 |     io::stdin().read_line(&mut guess);
   |     ^^^^^^^^^^^^^^^^^^^^^^^^^^^^^^^^^
   |
   = note: this `Result` may be an `Err` variant, which should be handled
   = note: `#[warn(unused_must_use)]` on by default

warning: `guessing_game` (bin "guessing_game") generated 1 warning
    Finished dev [unoptimized + debuginfo] target(s) in 0.59s
Rust ostrzega, że nie zrobiliśmy nic z wartością Result zwróconą z read_line, a co za tym idzie,
program nie obsłużył potencjalnego błędu. Sposobem na pozbycie się tego ostrzeżenia jest dopisanie obsługi błędów. Tutaj jednak chcemy, by program zakończył się, gdy nie uda się odczytać odpowiedzi użytkownika,
więc możemy użyć expect. O wychodzeniu ze stanu błędu przeczytasz w rozdziale 9.
Wypisywanie wartości z pomocą println! i placeholderów
Poza klamrą zamykającą program, w kodzie który dotychczas napisaliśmy została już tylko jedna linia do omówienia:
use std::io;

fn main() {
    println!("Zgadnij numer!");

    println!("Podaj swoją liczbę:");

    let mut guess = String::new();

    io::stdin()
        .read_line(&mut guess)
        .expect("Błąd wczytania linii");

    println!("Wybrana przez ciebie liczba: {guess}");
}
Ta linia wyświetla na ekranie łańcuch, w którym zapisaliśmy odpowiedź użytkownika. Zestaw {} nawiasów
nawiasów klamrowych to placeholder: pomyśl o {} jak o małych szczypcach kraba, które trzymają
wartość w miejscu. Podczas wypisywania wartości zmiennej, nazwa zmiennej może
znajdować się wewnątrz nawiasów klamrowych. By wypisać wynik
wyrażenia, umieść puste nawiasy klamrowe w łańcuchu formatującym,
a za łańcuchem same wyrażenia, oddzielone przecinkami, po jednym dla kolejnych pustych nawiasów klamrowych.
Wyświetlanie zmiennej i wyniku wyrażenia w jednym wywołaniu println! wyglądałoby tak:
#![allow(unused)]
fn main() {
let x = 5;
let y = 10;

println!("x = {x} i y + 2 = {}", y + 2);
}
Ten kod wypisze na ekran x = 5 i y + 2 = 12.
Testowanie pierwszej część programu
Przetestujmy pierwszą część Zgadywanki. Uruchom grę poleceniem cargo run:
$ cargo run
   Compiling guessing_game v0.1.0 (file:///projects/guessing_game)
    Finished dev [unoptimized + debuginfo] target(s) in 2.53 secs
     Running `target/debug/guessing_game`
Zgadnij numer!
Podaj swoją liczbę:
6
Wybrana przez ciebie liczba: 6
W tym miejscu pierwsza część gry jest gotowa: wczytujemy odpowiedź użytkownika z klawiatury i wypisujemy ją na ekranie.
Generowanie sekretnej liczby
Następnie musimy wygenerować sekretną liczbę, którą gracz będzie próbował odgadnąć.
Sekretna liczba powinna zmieniać się przy każdym uruchomieniu programu, aby gra bawiła więcej niż raz.
Użyjmy losowej liczby z przedziału od 1 do 100, żeby odgadnięcie jej nie było zbyt trudne.
W bibliotece standardowej Rusta nie ma jeszcze obsługi liczb losowych, dlatego musimy sięgnąć do skrzyni
rand.
Więcej funkcjonalności z użyciem skrzyń
Zapamiętaj: skrzynia (ang. crate) to kolekcja plików źródłowych Rusta.
Projekt, który budujemy, to skrzynia binarna
(binary crate), czyli plik wykonywalny. Skrzynia rand to library crate, czyli biblioteka stworzona do używania w
innych programach.
Z użyciem Cargo dodawanie zewnętrznych pakietów jest bajecznie proste. Aby móc używać rand w naszym kodzie,
wystarczy zmodyfikować plik Cargo.toml tak, aby zaciągał skrzynię rand jako zależność do projektu.
Otwórz Cargo.toml i dodaj na końcu, pod nagłówkiem sekcji [dependencies], poniższą linię.
Upewnij się, że podałeś rand dokładnie tak jak poniżej, z
z tym samym numerem wersji. Inaczej kody zawarte w tym tutorialu mogą nie zadziałać:
Plik: Cargo.toml
[dependencies]
rand = "0.8.5"
Plik Cargo.toml podzielony jest na sekcje, których ciało zaczyna się po nagłówku i kończy się w miejscu, gdzie zaczyna się kolejna sekcja. W sekcji [dependencies] informujesz Cargo, jakich zewnętrznych skrzyń i w której wersji wymaga twój projekt. Tutaj przy skrzyni rand znajduje się specyfikator wersji 0.8.5.
Cargo rozumie Semantic Versioning (nazywane tez czasem SemVer), które to jest standardem zapisywania numeru wersji. Numer 0.8.5 jest właściwie skrótem do ^0.8.5, które oznacza wersję conajmniej 0.8.5, ale poniżej 0.9.0.
Cargo considers these versions to have public APIs compatible with version 0.8.5, and this specification ensures you’ll get the latest patch release that will still compile with the code in this chapter. Any version 0.9.0 or greater is not guaranteed to have the same API as what the following examples use.
Teraz bez zmieniania niczego w kodzie przekompilujmy projekt, tak jak przedstawia listing 2-2:
$ cargo build
    Updating crates.io index
  Downloaded rand v0.8.5
  Downloaded libc v0.2.127
  Downloaded getrandom v0.2.7
  Downloaded cfg-if v1.0.0
  Downloaded ppv-lite86 v0.2.16
  Downloaded rand_chacha v0.3.1
  Downloaded rand_core v0.6.3
   Compiling libc v0.2.127
   Compiling getrandom v0.2.7
   Compiling cfg-if v1.0.0
   Compiling ppv-lite86 v0.2.16
   Compiling rand_core v0.6.3
   Compiling rand_chacha v0.3.1
   Compiling rand v0.8.5
   Compiling guessing_game v0.1.0 (file:///projects/guessing_game)
    Finished dev [unoptimized + debuginfo] target(s) in 2.53s
Listing 2-2: Wynik po wywołaniu cargo build po dodaniu zależności do skrzyni rand
Być może u siebie zobaczysz inne numery wersji (jednak wszystkie będą kompatybilne z kodem, dzięki SemVer!), inne linie (zależnie od systemu operacyjnego), lub linie wydrukowane w innej kolejności.
Teraz kiedy mamy już zdefiniowaną jakąś zewnętrzną zależność, Cargo ściąga najnowsze wersje wszystkich skrzyń z rejestru, który jest kopią danych z Crates.io. Crates.io to miejsce, gdzie ludzie związani z Rustem publikują dla innych swoje otwarto-źródłowe projekty.
Po zaktualizowaniu rejestru Cargo sprawdza sekcję [dependencies] i ściąga skrzynie, jeśli jakichś brakuje.
W tym przypadku, pomimo że podaliśmy do zależności jedynie skrzynę rand, Cargo ściągnął jeszcze inne skrzynie,
od których zależny jest rand. Po ich ściągnięciu Rust je kompiluje, a następnie, mając już dostępne
niezbędne zależności, kompiluje projekt.
Gdybyś teraz bez wprowadzania jakichkolwiek zmian wywołał ponownie cargo build, nie zobaczyłbyś nic ponad linię Finished.
Cargo wie, że zależności są już ściągnięte i skompilowane, i że nie zmieniałeś nic w ich kwestii w pliku Cargo.toml.
Cargo również wie, że nie zmieniałeś nic w swoim kodzie, więc jego też nie rekompiluje. Nie ma nic do zrobienia,
więc po prostu kończy swoje działanie.
Jeśli wprowadzisz jakąś trywialną zmianę w pliku src/main.rs, zapiszesz, a następnie ponownie zbudujesz projekt, zobaczysz jedynie dwie linijki na wyjściu:
$ cargo build
   Compiling guessing_game v0.1.0 (file:///projects/guessing_game)
    Finished dev [unoptimized + debuginfo] target(s) in 2.53 secs
Te dwie linie pokazują, że Cargo przebudował uwzględniając jedynie twoją maleńką zmianą z pliku src/main.rs. Zależności nie zmieniły się, więc Cargo wie, że może użyć ponownie te, które już raz ściągnął i skompilował.
Plik Cargo.lock zapewnia powtarzalność kompilacji
Cargo posiada mechanizm, który zapewnia że za każdym razem, gdy ty lub ktokolwiek inny będziecie przebudowywać projekt,
kompilowane będą te same artefakty: Cargo użyje zależności w konkretnych wersjach, chyba że wskażesz inaczej.
Na przykład, co by się stało, gdyby za tydzień wyszła nowa wersja skrzyni rand 0.8.6, która zawierałaby poprawkę istotnego błędu,
ale jednocześnie wprowadza regresję, która zepsuje twój kod?
Odpowiedzią na ten problem jest plik Cargo.lock, który został stworzony w momencie,
gdy po raz pierwszy wywołałeś cargo build. Znajduje się on teraz w twoim folderze guessing_game.
Kiedy po raz pierwszy budujesz dany projekt, Cargo sprawdza wersje każdej z zależności, tak by kryteria były spełnione,
i wynik zapisuje w pliku Cargo.lock. Od tego czasu przy każdym kolejnym budowaniu, Cargo widząc, że plik Cargo.lock
istnieje, będzie odczytywać z niego wersje zależności do pobrania, zamiast na nowo próbować je określać.
Dzięki temu twoje kompilacje są automatycznie reprodukowalne. Innymi słowy, twój projekt będzie wciąż używał wersji 0.8.5,
do czasu aż sam jawnie nie wykonasz aktualizacji.
Ponieważ plik Cargo.lock jest ważny dla powtarzalnych kompilacji,
jest on często umieszczany w systemie kontroli wersji wraz z resztą kodu w projekcie.
Aktualizowanie skrzyni do nowszej wersji
Kiedy chcesz zmienić wersję skrzyni na nowszą, możesz skorzystać z komendy update dostarczanej przez Cargo, która
zignoruje plik Cargo.lock i wydedukuje na nowo najświeższe wersje skrzyń, które pasują do twojej specyfikacji z Cargo.toml.
Cargo zapisze te wersje do pliku Cargo.lock.
Jednak domyślnie Cargo będzie szukało jedynie wersji większej od 0.8.5 i mniejszej od 0.9.0.
Jeśli skrzynia rand została wypuszczona w dwóch nowych wersjach, 0.8.6 i 0.9.0,
po uruchomieniu cargo update zobaczysz taki wynik:
$ cargo update
    Updating crates.io index
    Updating rand v0.8.5 -> v0.8.6
Cargo ignoruje wydanie 0.9.0.
Teraz zauważysz również zmianę w pliku Cargo.lock - wersja skrzyni rand będzie ustawiona na 0.8.6.
Gdybyś chciał używać rand w wersji 0.9.0 lub jakiejkolwiek z serii 0.9.x,
musiałbyś zaktualizować plik Cargo.toml do takiej postaci:
[dependencies]
rand = "0.9.0"
Następnym razem gdy wywołasz cargo build, Cargo zaktualizuje rejestr dostępnych skrzyń i
zastosuje nowe wymagania co do wersji skrzyni rand, zgodnie z tym co zamieściłeś w pliku.
Można by jeszcze wiele mówić o Cargo i jego ekosystemie. Wrócimy do tego w rozdziale 14. Na razie wiesz wszystko, co w tej chwili potrzebujesz. Dzięki Cargo ponowne używanie bibliotek jest bardzo łatwe, więc Rustowcy mogą pisać mniejsze projekty, składające się z wielu skrzyń.
Generowanie Losowej Liczby
A teraz użyjmy w końcu skrzyni rand by wygenerować liczbę do zgadnięcia.
Zmodyfikujmy plik src/main.rs, tak jak pokazano na listingu 2-3:
Plik: src/main.rs
use std::io;
use rand::Rng;

fn main() {
    println!("Zgadnij liczbę!");

    let secret_number = rand::thread_rng().gen_range(1..=100);

    println!("Sekretna liczba to: {secret_number}");

    println!("Podaj swoją liczbę:");

    let mut guess = String::new();

    io::stdin()
        .read_line(&mut guess)
        .expect("Błąd wczytania linii");

    println!("Wybrana przez ciebie liczba: {guess}");
}
Listing 2-3: Zmiany potrzebne do wygenerowania losowej liczby
Najpierw dodajmy linię use rand::Rng;. Rng to cecha (ang. trait), która definiuje metody implementowane przez generator liczb losowych. Cecha ta musi być widoczna w zasięgu, w którym chcemy tych metod używać.
Cechy szczegółowo omówimy w rozdziale 10.
Dodajemy również dwie linie w środku. W pierwszej linii wywołujemy funkcję rand::thread_rng, która daje nam gotowy do użycia konkretny generator liczb losowych:
taki, który jest lokalny dla wątku wywołującego i seedowany z systemu operacyjnego.
Następnie wywołujemy metodę gen_range tego generatora. Ta metoda zdefiniowana jest w cesze Rng,
którą włączyliśmy wyrażeniem use rand::Rng;.
Zakres typu start..=koniec jest inkluzywny, zawiera obie podane wartości granicznej, dolną i górną.
Dlatego podaliśmy 1..=100, aby zażądać liczby pomiędzy 1 a 100.
Uwaga: Wiedza, której cechy użyć i które funkcje i metody ze skrzyni wywoływać, nie jest czymś co po prostu wiesz. Instrukcja jak używać danej skrzyni znajduje się zawsze w jej dokumentacji. Kolejną przydatną komendą Cargo jest polecenie
cargo doc --open, które lokalnie zbuduje dokumentację dostarczaną przez wszystkie zależności, jakich używasz, i otworzy ją w przeglądarce. Gdyby, przykładowo, interesowały cię inne funkcjonalności ze skrzynirand, wpiszcargo doc --openi wybierzrandz paska po lewej.
Druga dodana przez nas linia wypisuje na ekranie sekretną liczbę. Jest to przydatne podczas implementowania do testowania programu i zostanie usunięte w finalnej wersji. Gra nie byłaby zbyt ekscytująca, gdyby program podawał sekretną liczbę od razu na starcie!
Spróbuj uruchomić program kilka razy:
$ cargo run
   Compiling guessing_game v0.1.0 (file:///projects/guessing_game)
    Finished dev [unoptimized + debuginfo] target(s) in 2.53 secs
     Running `target/debug/guessing_game`
Zgadnij liczbę!
Sekretna liczba to: 7
Podaj swoją liczbę:
4
Wybrana przez ciebie liczba: 4
$ cargo run
     Running `target/debug/guessing_game`
Zgadnij liczbę!
Sekretna liczba to: 83
Podaj swoją liczbę:
5
Wybrana przez ciebie liczba: 5
Za każdym razem powinieneś/powinnaś otrzymać inny sekretny numer, jednak zawsze z zakresu od 1 do 100. Dobra robota!
Porównywanie Odpowiedzi z Sekretnym Numerem
Teraz, kiedy już mamy odpowiedź gracza i wylosowaną sekretną liczbę, możemy je porównać. Ten krok przedstawiony jest na listingu 2-4. Ten kod nie będzie się jeszcze kompilował. Zaraz wyjaśnimy dlaczego.
Plik: src/main.rs
use rand::Rng;
use std::cmp::Ordering;
use std::io;

fn main() {
    // --snip--
    println!("Zgadnij liczbę!");

    let secret_number = rand::thread_rng().gen_range(1..=100);

    println!("Sekretna liczba to: {secret_number}");

    println!("Podaj swoją liczbę:");

    let mut guess = String::new();

    io::stdin()
        .read_line(&mut guess)
        .expect("Błąd wczytania linii");

    println!("Wybrana przez ciebie liczba: {guess}");

    match guess.cmp(&secret_number) {
        Ordering::Less => println!("Za mała!"),
        Ordering::Greater => println!("Za duża!"),
        Ordering::Equal => println!("Jesteś zwycięzcą!"),
    }
}
Listing 2-4: Obsługa możliwych rezultatów operacji porównywania dwóch liczb
Po pierwsze dodaliśmy kolejne use, które wprowadza nam do zasięgu typ std::cmp::Ordering z biblioteki standardowej.
Ordering jest enumem, takim jak Result, ale ma inne warianty: Less, Greater, i Equal. Są to trzy możliwe wyniki porównywania dwóch wartości.
Następnie dopisaliśmy na końcu pięć nowych linii wykorzystujących typ Ordering.
Metoda cmp porównuje dwie wartości. Można wywołać ją na dowolnym obiekcie, który da się porównywać.
Przyjmuje ona referencję do drugiego obiektu, z którym chcemy porównać pierwszy:
tutaj porównujemy guess do secret_number. cmp zwraca wariant enuma Ordering
(którego typ zaciągnęliśmy poprzez wyrażenie use). Za pomocą wyrażenia match, na podstawie wartości Ordering zwróconej przez wywołanie cmp z wartościami guess z secret_number, decydujemy, co zrobić dalej.
Wyrażenie match składa się z odnóg. Każda odnoga składa się ze wzorca dopasowania i kodu, który ma się wykonać, jeśli wartość podana na początku wyrażenia match będzie pasowała do danego wzorca.
Rust bierze wartość podaną do match i przegląda kolejno wzorce ze wszystkich odnóg.
Wzorce i konstrukcja match to potężne mechanizmy w Ruście, które pozwolą wyrazić w kodzie wiele różnych scenariuszy i pomogą zapewnić obsługę ich wszystkich.
Zostaną one omówione szczegółowo, odpowiednio w rozdziale 6 i 18.
Przeanalizujmy na przykładzie, co dokładnie dzieje się z użytym tutaj wyrażeniem match.
Powiedzmy, że użytkownik wybrał liczbę 50, a losowo wygenerowana sekretna liczba to 38.
Kiedy kod porówna 50 do 38, metoda cmp zwróci wartość Ordering::Greater, ponieważ 50 jest większe niż 38.
Zatem match otrzymuje tutaj wartość Ordering::Greater.
Match sprawdza wzorzec w pierwszej odnodze, Ordering::Less, ale wartość Ordering::Greater nie pasuje do wzorca Ordering::Less, więc kod z tej odnogi jest pomijany i sprawdzana jest następna odnoga.
Wzorzec z następnej odnogi, Ordering::Greater, pasuje do Ordering::Greater!
Powiązany kod w tej odnodze jest wykonywany i na ekranie pojawia się napis Za duża!.
Wyrażenie match kończy wykonanie po pierwszym znalezionym dopasowaniu, więc ostatnia odnoga nie będzie już w tym przypadku sprawdzana.
Niemniej, kod z listingu 2-4 jeszcze się nie skompiluje. Spróbujmy:
$ cargo build
   Compiling libc v0.2.86
   Compiling getrandom v0.2.2
   Compiling cfg-if v1.0.0
   Compiling ppv-lite86 v0.2.10
   Compiling rand_core v0.6.2
   Compiling rand_chacha v0.3.0
   Compiling rand v0.8.5
   Compiling guessing_game v0.1.0 (file:///projects/guessing_game)
error[E0308]: mismatched types
  --> src/main.rs:22:21
   |
22 |     match guess.cmp(&secret_number) {
   |                 --- ^^^^^^^^^^^^^^ expected struct `String`, found integer
   |                 |
   |                 arguments to this function are incorrect
   |
   = note: expected reference `&String`
              found reference `&{integer}`
note: associated function defined here
  --> /rustc/d5a82bbd26e1ad8b7401f6a718a9c57c96905483/library/core/src/cmp.rs:783:8

For more information about this error, try `rustc --explain E0308`.
error: could not compile `guessing_game` due to previous error
Komunikat błędu wskazuje, że typy są niezgodne. Rust jest silnie statycznym typowanym językiem. Jednak również wspiera dedukcję typów.
Kiedy napisaliśmy let guess = String::new(), Rust potrafił wywnioskować, że guess powinno być Stringiem,
dzięki czemu nie musieliśmy pisać typu jawnie.
Z drugiej strony, secret_number jest typem numerycznym. Wiele typów numerycznych może przyjmować wartość spomiędzy 1 a 100:
i32, 32-bitowa liczba całkowita; u32, 32-bitowa liczba całkowita bez znaku; i64, 64-bitowa liczba całkowita; a także inne.
Jeśli nie wskazano inaczej, to domyślnie Rust wybiera i32, co jest typem secret_number, jeśli nie wpisaliśmy gdzieś indziej w kodzie jakiejś informacji,
która spowoduje że Rust wybierze inny typ. Przyczyną błędu jest to, że Rust nie potrafi porównywać
stringa z typem numerycznym.
Ostatecznie musimy przekonwertować stringa, którego program wczytał jako wejście z klawiatury,
do postaci typu numerycznego, który można porównać matematycznie do sekretnej liczby. Osiągamy to dodając kolejną linię do ciała funkcji main:
Plik: src/main.rs
use rand::Rng;
use std::cmp::Ordering;
use std::io;

fn main() {
    println!("Zgadnij liczbę!");

    let secret_number = rand::thread_rng().gen_range(1..=100);

    println!("Sekretna liczba to: {secret_number}");

    println!("Podaj swoją liczbę:");

    // --snip--

    let mut guess = String::new();

    io::stdin()
        .read_line(&mut guess)
        .expect("Błąd wczytania linii");

    let guess: u32 = guess.trim().parse().expect("Podaj liczbę!");

    println!("Wybrana przez ciebie liczba: {guess}");

    match guess.cmp(&secret_number) {
        Ordering::Less => println!("Za mała!"),
        Ordering::Greater => println!("Za duża!"),
        Ordering::Equal => println!("Jesteś zwycięzcą!"),
    }
}
Dodana linia to:
let guess: u32 = guess.trim().parse().expect("Podaj liczbę!");Tworzymy tu zmienną o nazwie guess. Ale czekaj, czy program przypadkiem nie ma już zmiennej o takiej nazwie? Owszem ma, ale szczęśliwie Rust pozwala przesłaniać poprzednią wartość
zmiennej guess nową wartością. Przesłanianie (shadowing)
pozwala użyć ponownie nazwy guess, zamiast zmuszać nas do tworzenia dwóch osobnych zmiennych, takich jak przykładowo guess_str i guess. Rozdział 3 opowiada więcej o przesłanianiu zmiennych. Teraz wspomnimy jedynie, że funkcjonalność ta jest często używana w sytuacjach, gdy konieczna jest konwersja wartości z jednego typu do drugiego.
Nowej zmiennej guess nadajemy wartość wyrażenia guess.trim().parse(). Zmienna guess w tym wyrażeniu
odnosi się do pierwotnej zmiennej guess, która była stringiem zawierającym dane wczytane z klawiatury.
Metoda trim z interfejsu Stringa spowoduje usunięcie wszelkich białych znaków znajdujących
się na początku lub końcu stringa. Jest to niezbędne, bo aby sparsować String do typu u32, String ten powinien zawierać jedynie znaki numeryczne.
Jednakże, aby zadowolić funkcję read_line, użytkownik musi
wcisnąć enter. Po wciśnięciu enter znak nowej linii jest dopisywany do stringa. Przykładowo, jeśli użytkownik wpisał 5 i wcisnął enter, to guess przyjmie postać: 5\n.
Znak \n reprezentuje nową linię, czyli wynik wciśnięcia enter. (Pod Windowsem w wyniku wciśnięcia enter otrzymujemy \r\n.)
Metoda trim usunie niechciane \n, dzięki czemu w stringu pozostanie jedynie 5.
Metoda parse parsuje stringa do innego typu. Tu używamy jej by otrzymać typ liczbowy. Co więcej, musimy powiedzieć Rustowi, jakiego dokładnie typu oczekujemy, używając wyrażenia let guess: u32.
Dwukropek (:) po guess informuje Rusta, że dalej podany będzie typ zmiennej.
Rust ma kilka wbudowanych typów numerycznych;
u32, którą tu podaliśmy, to 32-bitowa liczba całkowita bez znaku. Jest to dobry domyślny wybór dla małych liczb dodatnich.
O innych typach numerycznych przeczytasz w rozdziale 3.
Dodatkowo, dzięki anotacji u32 w tym przykładowym programie
i porównaniu tej liczby z secret_number, Rust wywnioskuje, że secret_number też powinien być typu u32. Zatem
porównanie zachodzi pomiędzy dwiema wartościami tego samego typu!
Wywołanie parse często może zakończyć się niepowodzeniem. Jeśli, na przykład, string będzie zawierał
A👍%, to jego konwersja do liczby nie może się udać. Z tego względu metoda parse zwraca
typ Result, podobnie jak metoda read_line (wspominaliśmy o tym wcześniej w sekcji
„Obsługa potencjalnych błędów z użyciem Result”). Potraktujemy ten Result w ten sam sposób, używając ponownie metody expect. Jeśli parse zwróci wariant Err
(ponieważ nie udało się stworzyć liczby ze stringa), wywołanie expect spowoduje zawieszenie się gry i wypisanie na ekran
podanego przez nas tekstu. Gdy zaś parse powiedzie się i poprawnie skonwertuje stringa do liczby, zwrócony Result
będzie wariantem Ok, a expect zwróci liczbę zaszytą w wartości Ok.
Teraz uruchomimy program!
$ cargo run
   Compiling guessing_game v0.1.0 (file:///projects/guessing_game)
    Finished dev [unoptimized + debuginfo] target(s) in 0.43 secs
     Running `target/debug/guessing_game`
Zgadnij liczbę!
Sekretna liczba to: 58
Podaj swoją liczbę:
  76
Wybrana przez ciebie liczba: 76
Za duża!
Nieźle! Pomimo tego że dodaliśmy spacje przed liczbą, program wciąż poprawnie rozpoznał, że użytkownik wybrał liczbę 76. Uruchom program kilka razy, aby sprawdzić jak program reaguje na różne wejścia: podaj właściwą liczbę, za wysoką, następnie za niską.
Nasza gra już z grubsza działa, ale użytkownik może odgadywać liczbę tylko jeden raz. Zmieńmy to dodając pętlę!
Wielokrotne zgadywanie dzięki pętli
Słowo kluczowe loop (pętla) tworzy pętlę nieskończoną. Dodamy taką pętlę, żeby dać graczowi więcej szans na odgadnięcie liczby:
Plik: src/main.rs
use rand::Rng;
use std::cmp::Ordering;
use std::io;

fn main() {
    println!("Zgadnij liczbę!");

    let secret_number = rand::thread_rng().gen_range(1..=100);

    // --snip--

    println!("Sekretna liczba to: {secret_number}");

    loop {
        println!("Podaj swoją liczbę:");

        // --snip--


        let mut guess = String::new();

        io::stdin()
            .read_line(&mut guess)
            .expect("Błąd wczytania linii");

        let guess: u32 = guess.trim().parse().expect("Podaj liczbę!");

        println!("Wybrana przez ciebie liczba: {guess}");

        match guess.cmp(&secret_number) {
            Ordering::Less => println!("Za mała!"),
            Ordering::Greater => println!("Za duża!"),
            Ordering::Equal => println!("Jesteś zwycięzcą!"),
        }
    }
}
Jak widzisz, przenieśliśmy do pętli cały kod następujący po zachęcie gracza do odgadnięcia liczby. Pamiętaj, żeby zwiększyć wcięcia linii wewnątrz pętli o kolejne cztery spacje, następnie uruchom program ponownie. Niestety teraz program pyta o wprowadzenie odgadniętej liczby w nieskończoność i użytkownik nie może z niego łatwo wyjść!
Użytkownik może zawsze zatrzymać program używając skrótu klawiszowego ctrl-c. Lecz
jest jeszcze inny sposób, żeby uciec temu nienasyconemu potworowi, jak wspomnieliśmy w dyskusji o parse
w „Porównywanie odpowiedzi gracza z sekretnym numerem”: wprowadzenie znaku, który nie jest liczbą, spowoduje zawieszenie się programu. Można z tego skorzystać,
aby wyjść z programu, tak jak pokazujemy poniżej:
$ cargo run
   Compiling guessing_game v0.1.0 (file:///projects/guessing_game)
    Finished dev [unoptimized + debuginfo] target(s) in 1.50 secs
     Running `target/debug/guessing_game`
Zgadnij liczbę!
Sekretna liczba to: 59
Podaj swoją liczbę:
45
Wybrana przez ciebie liczba: 45
Za mała!
Podaj swoją liczbę:
60
Wybrana przez ciebie liczba: 60
Za duża!
Podaj swoją liczbę:
59
Wybrana przez ciebie liczba: 59
Jesteś zwycięzcą!
Podaj swoją liczbę:
quit
thread 'main' panicked at 'Podaj liczbę!: ParseIntError { kind: InvalidDigit }', src/main.rs:28:47
note: run with `RUST_BACKTRACE=1` environment variable to display a backtrace
Wpisanie quit faktycznie powoduje wyjście z programu, ale taki sam skutek daje wprowadzenie dowolnego innego ciągu znaków nienumerycznych. Zamykanie programu w ten sposób nie jest zbyt optymalne. Dodatkowo, chcielibyśmy, aby gra zatrzymała się, kiedy gracz wprowadzi poprawny numer.
Wychodzenie z programu po poprawnym odgadnięciu
Dodanie wyrażenia break sprawi, że gra zakończy się, kiedy gracz wygra.
Plik: src/main.rs
use rand::Rng;
use std::cmp::Ordering;
use std::io;

fn main() {
    println!("Zgadnij liczbę!");

    let secret_number = rand::thread_rng().gen_range(1..=100);

    println!("Sekretna liczba to: {secret_number}");

    loop {
        println!("Podaj swoją liczbę:");

        let mut guess = String::new();

        io::stdin()
            .read_line(&mut guess)
            .expect("Błąd wczytania linii");

        let guess: u32 = guess.trim().parse().expect("Podaj liczbę!");

        println!("Wybrana przez ciebie liczba: {guess}");

        // --snip--

        match guess.cmp(&secret_number) {
            Ordering::Less => println!("Za mała!"),
            Ordering::Greater => println!("Za duża!"),
            Ordering::Equal => {
                println!("Jesteś zwycięzcą!");
                break;
            }
        }
    }
}
Dodanie linii break po Jesteś zwycięzcą! powoduje, że program opuszcza pętlę, gdy gracz odgadnie poprawnie
sekretny numer. Wyjście z pętli jest równoważne z zakończeniem pracy programu, ponieważ pętla jest ostatnią
częścią funkcji main.
Obsługa niepoprawnych danych wejściowych
W celu dalszego ulepszenia gry zróbmy tak, żeby program, zamiast zawieszać się, ignorował wprowadzone dane nienumeryczne,
a użytkownik mógł zgadywać dalej. Możemy to osiągnąć edytując linię, w której guess jest konwertowane ze Stringa do
u32, w sposób przedstawiony na listingu 2-5.
Plik: src/main.rs
use rand::Rng;
use std::cmp::Ordering;
use std::io;

fn main() {
    println!("Zgadnij liczbę!");

    let secret_number = rand::thread_rng().gen_range(1..=100);

    println!("Sekretna liczba to: {secret_number}");

    loop {
        println!("Podaj swoją liczbę:");

        let mut guess = String::new();

        // --snip--

        io::stdin()
            .read_line(&mut guess)
            .expect("Błąd wczytania linii");

        let guess: u32 = match guess.trim().parse() {
            Ok(num) => num,
            Err(_) => continue,
        };

        println!("Wybrana przez ciebie liczba: {guess}");

        // --snip--

        match guess.cmp(&secret_number) {
            Ordering::Less => println!("Za mała!"),
            Ordering::Greater => println!("Za duża!"),
            Ordering::Equal => {
                println!("Jesteś zwycięzcą!");
                break;
            }
        }
    }
}
Listing 2-5: Ignorowanie wejścia nieliczbowego i pytanie o kolejne liczby, zamiast zawieszania programu
Zamieniliśmy expect na wyrażenie match by zamienić zakończenie się programu na obsługuję błędów. Pamiętaj, że typem zwracanym przez
parse jest Result, a Result jest typem wyliczeniowym, który ma warianty Ok oraz Err.
Używamy tutaj wyrażenia match, podobnie jak robiliśmy to z wynikiem Ordering zwracanym przez
metodę cmp.
Jeśli parse jest w stanie pomyślnie zamienić stringa w liczbę, zwróci wariant Ok, zawierający
w sobie liczbę otrzymaną w konwersji. Wartość Ok odpowiada wzorcowi z pierwszej gałęzi match, zatem
match zwróci wartość num, która została obliczona i zapisana wewnątrz wartości Ok.
Ta liczba zostanie przypisana do nowoutworzonej przez nas zmiennej guess.
Jeśli jednak parse nie jest w stanie przekonwertować stringa na liczbę, zwróci wartość Err,
która zawiera dodatkowe informacje o błędzie. Wartość Err nie pasuje do wzorca Ok(num) z pierwszej odnogi match, ale pasuje do wzorca Err(_) z drugiej odnogi. Znak podkreślenia, _, pasuje do wszystkich wartości;
w tym przypadku mówimy, że do wzorca mają pasować wszystkie wartości Err, bez znaczenia na to jakie dodatkowe informacje
mają one w środku. Program zatem wykona instrukcje z drugiego ramienia, continue, co oznacza że program ma przejść
do kolejnej iteracji pętli i poprosić o nową liczbę. Dzięki temu program ignoruje wszystkie problemy jakie może napotkać
parse!
Teraz wszystko w naszym programie powinno działać zgodnie z oczekiwaniami. Wypróbujmy to:
$ cargo run
   Compiling guessing_game v0.1.0 (file:///projects/guessing_game)
    Finished dev [unoptimized + debuginfo] target(s) in 4.45s
     Running `target/debug/guessing_game`
Zgadnij liczbę!
Sekretna liczba to: 61
Podaj swoją liczbę:
10
Wybrana przez ciebie liczba: 10
Za mała!
Podaj swoją liczbę:
99
Wybrana przez ciebie liczba: 99
Za duża!
Podaj swoją liczbę:
foo
Podaj swoją liczbę:
61
Wybrana przez ciebie liczba: 61
Jesteś zwycięzcą!
Wspaniale! Jeszcze jedna drobna poprawka i nasza gra w zgadywankę będzie już skończona.
Program wciąż wyświetla sekretny numer. To było przydatne podczas testów, ale na dłuższą metę psułoby zabawę.
Usuńmy println! odpowiedzialną za wyświetlanie sekretnego numeru. Listing 2-6 pokazuje końcową wersję programu.
Plik: src/main.rs
use rand::Rng;
use std::cmp::Ordering;
use std::io;

fn main() {
    println!("Zgadnij liczbę!");

    let secret_number = rand::thread_rng().gen_range(1..=100);

    loop {
        println!("Podaj swoją liczbę:");

        let mut guess = String::new();

        io::stdin()
            .read_line(&mut guess)
            .expect("Błąd wczytania linii");

        let guess: u32 = match guess.trim().parse() {
            Ok(num) => num,
            Err(_) => continue,
        };

        println!("Wybrana przez ciebie liczba: {guess}");

        match guess.cmp(&secret_number) {
            Ordering::Less => println!("Za mała!"),
            Ordering::Greater => println!("Za duża!"),
            Ordering::Equal => {
                println!("Jesteś zwycięzcą!");
                break;
            }
        }
    }
}
Listing 2-6: Kompletna gra w zgadywankę
Podsumowanie
Właśnie udało ci się zbudować grę w zgadywankę. Gratulacje!
Ten projekt w praktyczny sposób zapoznał cię z wieloma konceptami Rusta:
let, match, funkcjami, używaniem zewnętrznych skrzyń,
i innymi. W najbliższych rozdziałach koncepty te będą omówione bardziej szczegółowo.
Rozdział 3 omawia koncepty obecne w większości języków programowania, takie jak zmienne,
typy danych czy funkcje, i prezentuje jak należy w nich korzystać w Ruście.
Rozdział 4 odkrywa system własności, mechanizm który wyróżnia Rusta spośród innych języków.
Rozdział 5 omawia składnię struktur i metod, a rozdział 6 wyjaśnia, jak działają typy numeryczne.
This project was a hands-on way to introduce you to many new Rust concepts:
let, match, functions, the use of external crates, and more. In the next
few chapters, you’ll learn about these concepts in more detail. Chapter 3
covers concepts that most programming languages have, such as variables, data
types, and functions, and shows how to use them in Rust. Chapter 4 explores
ownership, a feature that makes Rust different from other languages. Chapter 5
discusses structs and method syntax, and Chapter 6 explains how enums work.
Powszechne koncepcje programistyczne
W tym rozdziale zostaną omówione pojęcia i rozwiązania, które pojawiają się niemal w każdym języku programowania oraz ich zastosowanie w Ruście. Wiele języków programowania ma dużo wspólnych cech. Żadna z koncepcji zaprezentowanych w tym rozdziale nie jest unikalna dla Rusta, ale omówimy je w kontekście Rusta i wytłumaczymy zasady ich używania.
W szczególności dowiesz się czym są oraz jak wykorzystywać: zmienne, podstawowe typy danych, funkcje, komentarze i przepływ sterowania. Te fundamentalne elementy pojawią się w każdym programie napisanym w Rust, a poznanie ich wcześnie zapewni ci silne podstawy do dalszej nauki.
Słowa kluczowe
Rust, podobnie jak w inne języki programowania, posiada grupę słów kluczowych, które są zarezerwowane wyłącznie do użytku w kontekście językowym. Zapamiętaj, że nie możesz wykorzystywać tych słów jako nazw zmiennych, ani funkcji. Większość słów kluczowych ma specjalne znaczenie i będziesz ich używał do wykonywania różnych operacji w swoich programach; niektóre nie mają obecnie jeszcze żadnego zastosowania, lecz zostały zarezerwowane dla funkcjonalności, które mogą zostać dodane w przyszłości do Rusta. Listę słów kluczowych znajdziesz w Dodatku A.
Zmienne i ich modyfikowalność
Tak jak wspomniano w rozdziale „Storing Values with Variables” , zmienne są domyślnie niemodyfikowalne (niemutowalne, ang. immutable). To jeden z wielu prztyczków, którymi Rust zachęca cię do tworzenia kodu w pełni wykorzystującego mechanizmy bezpieczeństwa i prostoty współbieżności, które oferuje ten język programowania. Jednakże nadal możesz uczynić zmienne modyfikowalnymi. Przyjrzyjmy się bliżej temu, jak i dlaczego Rust zachęca cię do preferowania niemodyfikowalności zmiennych oraz czemu czasem możesz chcieć zrezygnować z tej właściwości.
Gdy zmienna jest niemodyfikowalna, po przypisaniu wartości do danej nazwy, nie można później zmienić tej wartości. Aby to zobrazować, utworzymy nowy projekt o nazwie variables w folderze projects korzystając z komendy
cargo new --bin variables.
Następnie w nowo utworzonym folderze variables, odnajdź i otwórz src/main.rs, zmień kod w tym pliku na poniższy, który jednak jeszcze nie skompiluje się poprawnie:
Plik: src/main.rs
fn main() {
    let x = 5;
    println!("Wartość x wynosi: {x}");
    x = 6;
    println!("Wartość x wynosi: {x}");
}
Zapiszmy zmiany i uruchommy program, używając cargo run. Powinniśmy otrzymać następujący komunikat o błędzie związanym z niemutowalnością:
$ cargo run
   Compiling variables v0.1.0 (file:///projects/variables)
error[E0384]: cannot assign twice to immutable variable `x`
 --> src/main.rs:4:5
  |
2 |     let x = 5;
  |         -
  |         |
  |         first assignment to `x`
  |         help: make this binding mutable: `mut x`
3 |     println!("Wartość x wynosi: {x}");
4 |     x = 6;
  |     ^^^^^ cannot assign twice to immutable variable

For more information about this error, try `rustc --explain E0384`.
error: could not compile `variables` due to previous error
Ten przykład pokazuje, jak kompilator pomaga ci odnajdywać błędy w twoich programach. Mimo że błędy kompilacji mogą być denerwujące, świadczą jedynie o tym, że twój program jeszcze nie działa prawidłowo. Nie wykonuje w bezpieczny sposób tego, co chcesz, by robił. Tw błędy nie oznaczają jednak, że nie jesteś dobrym programistą! Nawet doświadczeni Rustowcy nadal napotykają błędy podczas kompilacji.
Otrzymany komunikat błędu `` cannot assign twice to immutable variable x``` oznacza, że nie można dwukrotnie przypisać wartości do niemodyfikowalnej zmiennej x`.
Pierwotnie nadanej wartości nie można zmienić.
To ważne, że napotykamy błędy w trakcie kompilacji, gdy próbujemy zmienić wartość, którą wcześniej określiliśmy jako niemodyfikowalną, gdyż takie działanie może prowadzić do podatności i błędów w programie. Jeżeli pierwsza część kodu opiera się na założeniu, że dana wartość nigdy nie ulegnie zmianie, a inna część kodu zmienia tę wartość, pierwsza część kodu może przestać wykonywać swoje zadanie poprawnie. Przyczyna tego rodzaju błędów może być trudna do zidentyfikowania po wystąpieniu, szczególnie gdy druga część kodu zmienia daną wartość tylko czasami.
W Ruście, kompilator gwarantuje, że jeżeli ustawimy wartość na niemodyfikowalną, to naprawdę nigdy nie ulegnie zmianie. Oznacza to, że czytając i pisząc kod, nie musisz ciągle sprawdzać gdzie i jak wartość może się zmienić. W związku z tym tworzony przez ciebie kod staje się łatwiejszy do zrozumienia.
Jednak modyfikowalność może być też bardzo użyteczna. Zmienne są tylko domyślnie niemodyfikowalne. Można uczynić
je modyfikowalnymi, dodając mut przed nazwą zmiennej. Poza tym, że dzięki dodaniu mut możliwa jest modyfikacja wartości zmiennej, jest ono też wyraźnym sygnałem dla osób, które będą czytały kod w przyszłości. Informuje, że inne
części kodu będą modyfikować wartość danej zmiennej.
Na przykład, zmieńmy kod w src/main.rs na poniższy:
Plik: src/main.rs
fn main() {
    let mut x = 5;
    println!("Wartość x wynosi: {x}");
    x = 6;
    println!("Wartość x wynosi: {x}");
}
Gdy teraz uruchomimy program, otrzymamy:
$ cargo run
   Compiling variables v0.1.0 (file:///projects/variables)
    Finished dev [unoptimized + debuginfo] target(s) in 0.30s
     Running `target/debug/variables`
Wartość x wynosi: 5
Wartość x wynosi: 6
Możemy zmienić wartość, do której odwołuje się x z 5 na 6, dzięki wykorzystaniu mut. W niektórych przypadkach będziesz chciał uczynić zmienną modyfikowalną, ponieważ sprawi to, że pisanie kodu stanie się wygodniejsze niż
gdyby tworzono go tylko z użyciem niemodyfikowalnych zmiennych.
Stałe
Brak możliwości modyfikacji wartości zmiennej może przypominać ci inne rozwiązanie programistyczne, które wykorzystuje wiele języków programowania: stałe (constants). Podobnie jak zmienne niemodyfikowalne, stałe to wartości, których nie można zmienić, przypisane do nazw, ale występuje też kilka różnic między stałymi i zmiennymi.
Po pierwsze, nie możesz używać mut do stałych. Stałe są nie tylko domyślnie niemodyfikowalne. One są zawsze niemodyfikowalne.
Do deklaracji stałej wykorzystujemy słowo kluczowe const zamiast let i zawsze musimy określić typ wartości. Typy danych i ich adnotacje omówimy już niedługo, w następnym podrozdziale "Typy Danych",
więc nie przejmuj się na razie szczegółami. Po prostu zapamiętaj, że zawsze musisz nadać stałej typ danych.
Stałe mogą być deklarowane w każdym zasięgu, włączając w to zasięg globalny, dzięki czemu są bardzo użyteczne w przypadku wartości, z których korzysta wiele części kodu.
Ostatnia różnica to, że stałym można nadać wartości tylko za pomocą stałych wyrażeń, a nie takich obliczanych dopiero trakcie działania programu.
Oto przykład deklaracji stałej:
#![allow(unused)]
fn main() {
const TRZY_GODZINY_W_SEKUNDACH: u32 = 60 * 60 * 3;
}
Nazwą stałej jest TRZY_GODZINY_W_SEKUNDACH, zaś jej wartością jest iloczyn: 60 (liczba sekund w minucie), kolejnej 60 (liczba minut w godzienie) i 3 (liczba godzin którą chcemy odliczyć w programie). Konwencja nazewnicza Rusta dla stałych
zobowiązuje do wykorzystywanie tylko dużych liter z podkreśleniami między słowami.
The compiler is able to evaluate a limited set of operations at compile time, which lets us choose to write out this value in a way that’s easier to understand and verify, rather than setting this constant to the value 10,800. See the Rust Reference’s section on constant evaluation for more information on what operations can be used when declaring constants.
Stałe są dostępne przez cały okres działania programu w zasięgu, w którym zostały zadeklarowane, stają się tym samym dobrym wyborem dla wartości w twojej domenie aplikacji, które mogą być wykorzystywane przez różne elementy programu, takich jak maksymalna liczba punktów, które może uzyskać gracz, czy też prędkość światła.
Nazywanie predefiniowanych wartości używanych przez twój program stałymi jest użyteczne w przekazywaniu znaczenia wykorzystywanych wartości dla przyszłych współtwórców kodu. Pomaga to w utrzymaniu predefiniowanych wartości w jednym miejscu i ułatwia ich późniejsze uaktualnianie.
Przesłanianie
Jak widzieliśmy w poradniku do gry zgadywanki w rozdziale 2, można zadeklarować nową zmienną o takiej samej nazwie, jak miała dawna zmienna, i ta nowa zmienna przesłania dawną zmienną. Rustowcy mówią, że pierwsza zmienna jest przesłoniona przez drugą. I właśnie tą nową zmienną użyje kompilator w miejscach wystąpienia jej nazwy, aż do czasu gdy i ona nie zostanie przesłonięta, albo nie skończy się zasięg jej życia.
Możemy przesłonić zmienną poprzez wykorzystanie tej
samej nazwy zmiennej i ponowne użycie słowa kluczowego let, tak jak poniżej:
Plik: src/main.rs
fn main() {
    let x = 5;

    let x = x + 1;

    {
        let x = x * 2;
        println!("Wartość x w wewnętrznym bloku kodu wynosi: {x}");
    }

    println!("Wartość x wynosi: {x}");
}
Ten program najpierw deklaruje zmienną x o wartość 5. Następnie tworzy nową zmienną x powtarzając let x =, pobiera oryginalną wartość zmiennej i dodaje do niej 1 w wyniku czego wartość x to obecnie 6. Użycie deklaracji let po raz trzeci również przesłania x i tworzy kolejną zmienną, której wartość jest ustalona poprzez przemnożenie poprzedniej wartość przez 2, czyli na 12. Gdy
uruchomimy ten program, otrzymamy:
$ cargo run
   Compiling variables v0.1.0 (file:///projects/variables)
    Finished dev [unoptimized + debuginfo] target(s) in 0.31s
     Running `target/debug/variables`
Wartość x w wewnętrznym bloku kodu wynosi: 12
Wartość x wynosi: 6
To nie to samo, co nadanie mut zmiennej, gdyż jeżeli przypadkowo spróbujemy ponownie przypisać wartość do zmiennej, nie wykorzystując słowa kluczowego let otrzymamy błąd kompilacji. Dzięki użyciu let, możemy przeprowadzić
kilka transformacji na wartości, pozostawiając przy tym zmienną niemodyfikowalną.
Inna różnica między mut i przesłanianiem to, że za każdym razem, gdy używamy słowa kluczowego let, tworzymy nową zmienną, co oznacza, że możemy wybrać inny typ danych, ale ponownie użyć tej samej nazwy zmiennej. Na przykład, powiedzmy, że nasz program prosi użytkownika o pokazanie ilości spacji, jaka ma zostać umieszczona między jakimś tekstem, poprzez wpisanie tych spacji, ale my tak naprawdę chcemy przechowywać tę wartość jako liczbę:
fn main() {
    let spaces = "   ";
    let spaces = spaces.len();
}
Powyższa konstrukcja jest dozwolona, gdyż pierwsza zmienna spaces typu string, to zupełnie inna zmienna niż druga zmienna spaces typu numerycznego. Dzięki przesłanianiu nie musimy wykorzystywać dwóch różnych nazw np. spaces_str i spaces_num. Zamiast tego, ponownie korzystamy z prostszej nazwy spaces. Jednak, jeżeli spróbowalibyśmy użyć
mut dla tej zmiennej otrzymalibyśmy błąd kompilacji:
fn main() {
    let mut spaces = "   ";
    spaces = spaces.len();
}
Błąd mówi o tym, że nie możemy zmodyfikować typu zmiennej:
$ cargo run
   Compiling variables v0.1.0 (file:///projects/variables)
error[E0308]: mismatched types
 --> src/main.rs:3:14
  |
2 |     let mut spaces = "   ";
  |                      ----- expected due to this value
3 |     spaces = spaces.len();
  |              ^^^^^^^^^^^^ expected `&str`, found `usize`

For more information about this error, try `rustc --explain E0308`.
error: could not compile `variables` due to previous error
Teraz gdy poznaliśmy już działanie zmiennych, przyjrzyjmy się bliżej typom danych, jakich mogą być zmienne.
Typy danych
Każda wartość w Ruście ma pewien typ danych, dzięki czemu Rust wie, z jakim rodzajem danych ma do czynienia i jak z nimi pracować. Przyjrzymy się bliżej dwóm grupom typów danych: skalarnym i złożonym.
Pamiętaj, że Rust jest językiem statycznie typowanym (statically typed),
co oznacza, że podczas kompilacji musi znać typy danych wszystkich zmiennych
obecnych w kodzie. Zazwyczaj kompilator może wywnioskować typ danych, którego
chcemy użyć na podstawie użytej wartość i sposobu jej wykorzystywania.
W przypadku gdy wiele typów danych spełnia dane założenia, przykładowo gdy
w rozdziale 2 w sekcji "Porównywanie odpowiedzi gracza z sekretnym numerem"
konwertowaliśmy String do typu numerycznego wykorzystując funkcję parse
musimy dodać adnotację typu danych:
#![allow(unused)]
fn main() {
let guess: u32 = "42".parse().expect("To nie liczba!");
}
Jeżeli w powyższym kodzie nie dodalibyśmy adnotacji typu danych : u32, Rust wyświetliłby następujący komunikat o błędzie, mówiący o tym, że kompilator potrzebuje więcej informacji, aby określić, jakiego typu danych chcemy użyć:
$ cargo build
   Compiling brak_adnotacji_typow v0.1.0 (file:///projects/brak_adnotacji_typow)
error[E0282]: type annotations needed
 --> src/main.rs:2:9
  |
2 |     let guess = "42".parse().expect("To nie liczba!");
  |         ^^^^^
  |
help: consider giving `guess` an explicit type
  |
2 |     let guess: _ = "42".parse().expect("To nie liczba!");
  |              +++

For more information about this error, try `rustc --explain E0282`.
error: could not compile `brak_adnotacji_typow` due to previous error
Można napotkać różne zapisy poszczególnych typów danych.
Typy skalarne
Typ skalarny reprezentuje pojedynczą wartość. Rust posiada 4 główne, skalarne typy danych: całkowity (ang. integer), zmiennoprzecinkowy (ang. floating-point numbers), logiczny (ang. Boolean) i znakowy (ang. characters). Możesz kojarzyć je z innych języków programowania. Zobaczmy jak działają w Ruście.
Typy całkowite
Liczba całkowita to liczba nieposiadająca części ułamkowej.
Jeden z typów całkowitych, u32, wykorzystywaliśmy w rozdziale 2. Ten typ danych określa, że wartość, do której się odnosi, jest liczbą całkowitą bez znaku (typy całkowite ze znakiem zaczynają się od i zamiast u), która zajmuje 32 bity pamięci. Tabela 3-1 pokazuje typy całkowite wbudowane w Rusta.
Każdy z wariantów w kolumnach Ze znakiem i Bez znaku (na przykład i16) może zostać użyty do zadeklarowania typu danych liczby całkowitej.
Tabela 3-1: Typy całkowite w Ruście
| Rozmiar | Ze znakiem | Bez znaku |
|---|---|---|
| 8-bitów | i8 | u8 |
| 16-bitów | i16 | u16 |
| 32-bity | i32 | u32 |
| 64-bity | i64 | u64 |
| 128-bitów | i128 | u128 |
| arch | isize | usize |
Każdy z wariantów może posiadać znak lub nie, a także ma określony rozmiar. Nazwy Ze znakiem i Bez znaku odnoszą się do tego, czy dana liczba może być ujemna, czy tylko dodatnia -- inaczej mówiąc, czy liczba musi posiadać znak (ze znakiem), czy też nie, gdyż wiadomo, że zawsze będzie dodatnia (bez znaku). Można to porównać do zapisywania liczb na kartce, gdy znak ma znaczenie, zapisujemy go -- odpowiednio plus lub minus przed liczbą, ale gdy liczba jest dodatnia i w danym kontekście nie jest to konieczne, pomijamy znak. Liczby całkowite ze znakiem przechowywane są z pomocą Kodu uzupełnień do dwóch (jeżeli nie jesteś pewien, co to oznacza, możesz poszukać informacji w internecie; wyjaśnienie jest poza zakresem materiału zawartego w tej książce).
Każdy wariant ze znakiem może przechowywać liczby od -(2n - 1) do
2n - 1 - 1 włącznie, gdzie n to liczba bitów, które wykorzystuje
dany wariant. Tak więc i8 może przechowywać liczby od -(27) do
27 - 1, co daje zakres od -128 do 127. Warianty bez znaku mogą
przechowywać liczby od 0 do 2n - 1, więc u8 może przechowywać
liczby od 0 do 28 - 1, co daje zakres od 0 do 255.
Dodatkowo rozmiar typów isize oraz usize zależy od architektury komputera, na którym uruchamiasz swój program: 64 bity na komputerze o 64-bitowej architekturze i 32 bity na komputerze o 32-bitowej architekturze.
Możesz zapisywać literały liczb całkowitych w każdej z form uwzględnionych w Tabeli 3-2. Zauważ, że wszystkie literały mogące oznaczać różne typy numeryczne, pozwalają na użycie przyrostka by wskazać typ, np. 57u8.
Literały numeryczne dopuszczają też wizualny separator _ poprawiający czytelności, np. 1_000 oznacza tą samą wartość co 1000.
Tabela 3-2: Literały liczb całkowitych w Ruście
| Literały liczbowe | Przykład |
|---|---|
| Dziesiętny | 98_222 |
| Szesnastkowy | 0xff |
| Ósemkowy | 0o77 |
| Binarny | 0b1111_0000 |
Bajt (tylko u8) | b'A' |
W takim razie skąd masz wiedzieć, którego typu całkowitego użyć? Jeżeli nie masz pewności, to zazwyczaj dobrze jest zacząć od typów domyślnych wykorzystywanych przez Rusta. Dla liczb całkowitych to i32. Z typów isize i usize
korzystamy głównie przy indeksowaniu różnego rodzaju kolekcji danych.
Przekroczenie zakresu liczb całkowitych
Załóżmy, że mamy zmienną typy
u8, która może przechowywać wartości między 0 i 255. Jeżeli spróbujemy przypisać tej zmiennej wartość nie mieszczącą się w podanym zakresie, np. 256, nastąpi przekroczenie zakresu liczb całkowitych. Rust posiada kilka ciekawych zasad dotyczących takiej sytuacji. Kiedy program kompilowany jest w trybie debugowania, Rust dołącza do niego mechanizmy powodujące jego "spanikowanie" (panic) w momencie wystąpienia przekroczenia zakresu liczb całkowitych. Rust wykorzystuje termin "panikowania" programu wtedy, gdy program kończy działaniem zwracając błąd; panikowanie szczegółowiej omówimy w sekcji „Nieodwracalne błędy zpanic!” w rozdziale 9.Kiedy kompilujemy program w trybie produkcyjnym z włączoną flagą
--release, Rust nie dołącza do programu mechanizmów wykrywających przekroczenia zakresu liczb całkowitych, które spowodują spanikowanie programu. Zamiast tego w przypadku wystąpienia przekroczenia zakresu, Rust wykona operację nazywaną zawinięciem uzupełnia do dwóch. Krótko mówiąc, wartości większe niż maksymalna dla danego typu danych zostaną "zawinięte w koło" do mniejszych wartości, odpowiednich dla danego typu danych. Na przykład w przypadkuu8, 256 zostanie zamienione na 0, 257 na 1 itd. Program nie spanikuje, ale zmiennym zostaną przypisane inne wartości niż byś tego oczekiwał. Poleganie na zawinięciu uzupełnia do dwóch jest uważane za błąd.Przepełnienia można obsłużyć jawnie. W tym celu można skorzystać z następujących rodzin metod, zapewnionych prymitywnym typom liczbowym przez bibliotekę standardową:
- zawijanie we wszystkich trybach kompilacji za pomocą metod
wrapping_*, takich jakwrapping_add;- zwracanie wartość
Nonejeśli wystąpiło przepełnienie za pomocą metodchecked_*;- zwracanie wartość liczbowej wraz z wartością logiczną (boolean) wskazującą, czy wystąpiło przepełnienie za pomocą metod
overflowing_*;- nasycenie do minimalnych lub maksymalnych wartości za pomocą metod
saturating_*.
Typy zmiennoprzecinkowe
Rust posiada też dwa prymitywne typy danych dla liczb zmiennoprzecinkowych, czyli liczb posiadających część ułamkową. Typy zmiennoprzecinkowe w Ruście to: f32 i f64, o rozmiarach, odpowiednio, 32 i 64 bity. Domyślnie Rust
wykorzystuje f64, gdyż nowoczesne procesory wykonują operacje na tym typie niemal tak szybko, jak na f32, a jest on bardziej precyzyjny.
Oto przykład pokazujący liczby zmiennoprzecinkowe w akcji:
Plik: src/main.rs
fn main() {
    let x = 2.0; // f64

    let y: f32 = 3.0; // f32
}
Liczby zmiennoprzecinkowe są reprezentowane zgodnie ze standardem IEEE-754.
Typ f32 to liczba zmiennoprzecinkowa zapisana w wyżej wymienionym standardzie z pojedynczą precyzją, a f64 -- z podwójną.
Operacje arytmetyczne
Rust wspiera podstawowe operacje arytmetyczne na wszystkich numerycznych typach danych: dodawanie, odejmowanie, mnożenie, dzielenia i resztę z dzielenia.
Dzielenie na typach liczb całkowitych odrzuca resztę z dzielenia, zaokrąglając w kierunku zera.
Poniższy kod przedstawia przykładowe użycie każdej z wymienionych operacji w połączeniu z instrukcją let:
Plik: src/main.rs
fn main() {
    // dodawanie
    let sum = 5 + 10;

    // odejmowanie
    let difference = 95.5 - 4.3;

    // mnożenie
    let product = 4 * 30;

    // dzielenie
    let quotient = 56.7 / 32.2;
    let truncated = -5 / 3; // Results in -1

    // reszta
    let remainder = 43 % 5;
}
Każde z wyrażeń w tych instrukcjach korzysta z operatora matematycznego i jest wyliczane do pojedynczej wartości, która następnie jest przypisywana do zmiennej. Listę wszystkich operatorów obsługiwanych przez Rusta znajdziesz w Dodatku B.
Typ logiczny (Boolean)
W Ruście, podobnie jak w wielu innych językach programowania, typ Boolean może
przyjąć jedną z dwóch wartości: true lub false. Boolean ma wielkość jednego bajta.
Typ logiczny w Ruście jest deklarowany z pomocą bool. Na przykład:
Plik: src/main.rs
fn main() {
    let t = true;

    let f: bool = false; // z jawną deklaracją typu
}
Jednym z głównych zastosowań typu Boolean są wyrażenia logiczne, takie jak if.
Działanie wyrażenia if w Ruście omówimy w sekcji Kontrola przepływu.
Typ znakowy
Do tej pory pracowaliśmy tylko z liczbami, ale Rust wspiera też litery. Najprostszym typ znakowym jest char. Oto przykłady jego deklaracji:
Plik: src/main.rs
fn main() {
    let c = 'z';
    let z: char = 'ℤ'; // with explicit type annotation
    let heart_eyed_cat = '😻';
}
Proszę zauważyć, że literały typu char są zapisywane z użyciem pojedynczego cudzysłowia, w przeciwieństwie do literałów łańcuchowych, które korzystają z podwójnego cudzysłowia.
Typ char w Ruście ma wielkość czterech bajtów i reprezentuje Skalarną Wartość Unikod, co oznacza, że można w nim przedstawić dużo więcej niż tylko znaki ASCII.
Litery akcentowane; chińskie, japońskie i koreańskie symbole; emoji; pola o zerowej długości to wszystko poprawne wartości dla typu char w Ruście.
Skalarne Wartości Unikod mieszczą się w zakresach od U+0000 do U+D7FF i od U+E000 do U+10FFFF włącznie. Jednak „znak” nie jest naprawdę ideą w Unikodzie, więc twój intuicyjny sposób postrzegania tego, czym jest „znak” może nie
być zgodny z tym, czym w rzeczywistości jest char w Ruście. Szczegółowo omówimy ten temat w "Ciągach znaków" w rozdziale 8.
Typy złożone
Typy złożone mogą grupować wiele wartości w jeden typ danych. Rust posiada dwa prymitywne typy złożone: krotki i tablice.
Krotki
Krotka pozwala na zgrupowanie pewnej liczby wartości o różnych typach danych w jeden złożony typ danych. Krotka ma stałą długość. Po zadeklarowaniu nie może się powiększyć ani pomniejszyć.
Aby stworzyć krotkę, zapisujemy w nawiasie okrągłym listę wartości oddzielonych przecinkami. Każda pozycja w krotce ma pewien typ danych, przy czym wszystkie wartości nie muszą mieć tego samego typu danych. W tym przykładzie dodaliśmy opcjonalne adnotacje typów danych:
Plik: src/main.rs
fn main() {
    let tup: (i32, f64, u8) = (500, 6.4, 1);
}
Zmienna tup odnosi się do całej krotki, gdyż krotka jest traktowana jak jeden złożony element. Aby uzyskać dostęp do wartości, które składają się na krotkę, możemy skorzystać z dopasowywania do wzorca i rozdzielić wartość krotki,
tak jak poniżej:
Plik: src/main.rs
fn main() {
    let tup = (500, 6.4, 1);

    let (x, y, z) = tup;

    println!("Wartość y wynosi: {y}");
}
Powyższy program najpierw tworzy krotkę i przypisuje ją do zmiennej tup.
Następnie korzysta ze wzorca w połączeniu z instrukcją let, aby przetransformować tup w trzy niezależne zmienne x, y, i z.
Tę operację nazywamy destrukturyzacją, gdyż rozdziela pojedynczą krotkę na trzy części. Na końcu, program wypisuje wartość zmiennej y, czyli 6.4.
Możemy też uzyskać bezpośredni dostęp do elementu krotki, wykorzystując znak kropki (.) oraz indeks wartości, do której chcemy uzyskać dostęp. Na przykład:
Plik: src/main.rs
fn main() {
    let x: (i32, f64, u8) = (500, 6.4, 1);

    let five_hundred = x.0;

    let six_point_four = x.1;

    let one = x.2;
}
Powyższy program tworzy krotkę x, a następnie uzyskuje dostęp do jej elementów wykorzystując ich indeksy. Podobnie, jak w większości języków programowania pierwszy indeks w krotce ma wartość 0.
The tuple without any values has a special name, unit. This value and its corresponding type are both written () and represent an empty value or an empty return type. Expressions implicitly return the unit value if they don’t return any other value.
Tablice
Innym sposobem na stworzenie kolekcji wartości jest użycie tablicy. W przeciwieństwie do krotki każdy element tablicy musi być tego samego typu. Tablice w Ruście różnią się od tablic znanych z paru innych języków programowania tym, że mają stały rozmiar. Raz zadeklarowane nie mogą zwiększyć ani zmniejszyć swojego rozmiaru.
W Ruście, aby umieścić wartości w tablicy, zapisujemy je jako lista rozdzieloną przecinkami, wewnątrz nawiasów kwadratowych:
Plik: src/main.rs
fn main() {
    let a = [1, 2, 3, 4, 5];
}
Tablice są przydatne, gdy chcesz umieścić dane na stosie, a nie na stercie (Stos i stertę omówimy w rozdziale 4) lub gdy chcesz mieć pewność, że ilość elementów nigdy się nie zmieni. Jednak tablica nie jest tak elastyczna, jak typ wektorowy. Wektor jest podobnym typem kolekcji, dostarczanym przez bibliotekę standardową, ale może zwiększać i zmniejszać swój rozmiar. Jeżeli nie jesteś pewien, czy użyć wektora, czy tablicy, prawdopodobnie powinieneś użyć wektora. Rozdział 8 szczegółowo opisuje wektory i ich działanie.
Jednak tablice są bardziej przydatne, gdy wiadomo, że liczba elementów nie zmieni się. Przykładowo gdy w programie chcemy używać nazw miesięcy, lepiej przechowywać je w tablicy niż w wektorze, ponieważ wiemy, że potrzebujemy dokładnie 12 elementów:
#![allow(unused)]
fn main() {
let months = ["Styczeń", "Luty", "Marzec", "Kwiecień", "Maj", "Czerwiec", "Lipiec",
              "Sierpień", "Wrzesień", "Październik", "Listopad", "Grudzień"];
}
Typ tablicy zapisujemy używając nawiasów kwadratowych, wewnątrz których umieszczamy typ każdego z elementów, po nim średnik, a następnie liczbę elementów w tablicy, tak jak poniżej:
#![allow(unused)]
fn main() {
let a: [i32; 5] = [1, 2, 3, 4, 5];
}
Powyżej i32 to typ każdego elementu. Po średniku liczba 5 oznacza, że w tej tablicy znajdzie się pięć elementów.
By stworzyć tablicę mającą te same wartości dla każdego elementu, można podać tę wartość, po niej średnik i liczbę elementów, całość obejmując nawiasami kwadratowymi:
#![allow(unused)]
fn main() {
let a = [3; 5];
}
Tablica a będzie zawierać 5 elementów, a każdy z nich początkowo przyjmie wartość 3.
Taki sam rezultat osiągnąłby taki zapis: let a = [3, 3, 3, 3, 3];, ale ten pierwszy jest krótszy.
Uzyskiwanie Dostępu do Elementów Tablicy
Tablica to obszar pamięci ulokowany na stosie. Możesz uzyskać dostęp do elementów tablicy, korzystając z indeksowania, tak jak poniżej:
Plik: src/main.rs
fn main() {
    let a = [1, 2, 3, 4, 5];

    let first = a[0];
    let second = a[1];
}
W tym przykładzie, zmienna o nazwie first otrzyma wartość 1, ponieważ taka wartość znajduje się w tablicy na miejscu o indeksie [0]. Zmienna o nazwie second otrzyma wartość 2 od pozycji w tablicy o indeksie [1].
Próba Uzyskania Dostępu do Niepoprawnego Elementu Tablicy
Co się stanie, gdy spróbujemy uzyskać dostęp do elementu, który jest poza tablicą? Zmienimy wcześniejszy przykład na poniższy kod, który pobiera indeks tablicy od użytkownika, używając kodu podobnego do tego z gry zgadywanki z rozdziału 2:
Plik: src/main.rs
use std::io;

fn main() {
    let a = [1, 2, 3, 4, 5];

    println!("Please enter an array index.");

    let mut index = String::new();

    io::stdin()
        .read_line(&mut index)
        .expect("Failed to read line");

    let index: usize = index
        .trim()
        .parse()
        .expect("Index entered was not a number");

    let element = a[index];

    println!("Wartość elementu pod indeksem {index} wynosi: {element}");
}
Nie wystąpiły żadne błędy w trakcie kompilacji. Po uruchomieniu za pomocą cargo run i podaniu 0, 1, 2, 3, lub 4, program wypisuje wartość z tablicy o podanym indeksie. Jeśli jednak w zamian zostanie podana liczba niebędąca
poprawnym indeksem tej tablicy, jak np. 10, pojawi się następujący komunikat:
thread 'main' panicked at 'index out of bounds: the len is 5 but the index is 10', src/main.rs:19:19
note: run with `RUST_BACKTRACE=1` environment variable to display a backtrace
Uruchomienie programu poskutkowało błędem wykonania w momencie użycia niepoprawnej wartości dla operacji indeksowania. Program zakończył działanie w tym momencie
z komunikatem o błędzie i nie wykonał końcowego println!. Przy próbie dostępu do elementu z wykorzystaniem indeksowania, Rust sprawdza, czy podany indeks jest mniejszy
niż długość tablicy. Jeżeli ten indeks jest większy lub równy długości tablicy, program spanikuje. To sprawdzenie musi się odbyć w czasie wykonywania, szczególnie w tym przypadku, w którym kompilator nie może wiedzieć, jaką wartość wprowadzi użytkownik uruchamiający kod.
Oto pierwszy przykład zasad bezpieczeństwa Rusta w akcji. W wielu niskopoziomowych językach programowania tego rodzaju test nie jest wykonywany, a skorzystanie z niepoprawnego indeksu może skutkować uzyskaniem dostępu do niewłaściwego bloku pamięci. Rust chroni przed takimi błędami. Zamiast pozwolić na uzyskanie dostępu do pamięci i kontynuację działania, zamyka program. Obsługę błędów w Ruście dokładniej omówimy w rozdziale 9. Tam też pokażemy jak pisać czytelny i bezpieczny kod, który nigdy nie panikuje i nie dopuszcza do nieprawidłowych dostępów do pamięci.
Funkcje
Funkcje są wszechobecne w kodzie Rusta. Widzieliśmy już jedną z najważniejszych funkcji w całym języku: funkcję main, która jest punktem wejściowym wielu programów. Widzieliśmy już też słowo kluczowe fn, za pomocą którego można deklarować nowe funkcje.
W kodzie Rusta konwencjonalnym stylem zapisu nazw funkcji i zmiennych jest użycie tzw. snake case. W tym stylu wszystkie człony pisane są małymi literami, a poszczególne wyrazy oddzielone są podkreślnikami. Poniżej program zawierający przykładową definicję funkcji:
Plik: src/main.rs
fn main() {
    println!("Witaj, świecie!");

    another_function();
}

fn another_function() {
    println!("Kolejna funkcja.");
}
Definicje funkcji w Ruście składają się ze słowa kluczowego fn, nazwy funkcji i pary nawiasów okrągłych. Nawiasy klamrowe informują kompilator, gdzie zaczyna i kończy się ciało funkcji.
Zdefiniowane przez nas funkcje możemy wywołać, pisząc ich nazwę wraz z parą nawiasów.
Ponieważ funkcja another_function jest już zdefiniowana programie, możemy ją wywołać z wnętrza funkcji main.
Proszę zauważyć, że definicja funkcji another_function znajduje się w kodzie źródłowym po ciele funkcji main;
moglibyśmy równie dobrze umieścić ją przed funkcją main. Rusta nie obchodzi, gdzie umieszczasz definicje swoich funkcji, a jedynie to żeby te definicje były w zasięgu widzianym przez wywołującego.
Stwórzmy nowy projekt o nazwie functions, dzięki któremu zapoznamy się z głębiej z funkcjami w Ruście. Umieść powyższy przykład z another_function w pliku src/main.rs i uruchom program. Powinieneś zobaczyć taki wynik:
$ cargo run
   Compiling functions v0.1.0 (file:///projects/functions)
    Finished dev [unoptimized + debuginfo] target(s) in 0.28s
     Running `target/debug/functions`
Witaj, świecie!
Kolejna funkcja.
Linie kodu wykonywane są w kolejności, w jakiej pojawiają się w funkcji main. Najpierw pokaże się tekst „Witaj, świecie!”, a następnie wywołana jest funkcja another_function i ukazuje się wiadomość z jej wnętrza.
Parametry funkcji
Funkcje mogą również przyjmować parametry, które są specjalnymi zmiennymi, będącymi częścią sygnatury funkcji. Jeśli funkcja, którą wywołujesz, posiada parametry, możesz jej podać konkretne wartości tych parametrów. Technicznie rzecz biorąc, konkretne wartości przekazywane do funkcji nazywają się argumentami, jednak w swobodnych rozmowach ludzie mają w zwyczaju używać słów parametry i argumenty zamiennie, zarówno dla zmiennych w definicji funkcji, jak i konkretnych wartości przekazywanych podczas wywołania funkcji.
Poniższa zaktualizowana wersja funkcji another_function prezentuje, jak wyglądają parametry w Ruście:
Plik: src/main.rs
fn main() {
    another_function(5);
}

fn another_function(x: i32) {
    println!("Wartość x wynosi: {x}");
}
Spróbuj uruchomić ten program; powinieneś otrzymać następujący wynik:
$ cargo run
   Compiling functions v0.1.0 (file:///projects/functions)
    Finished dev [unoptimized + debuginfo] target(s) in 1.21s
     Running `target/debug/functions`
Wartość x wynosi: 5
Deklaracja funkcji another_function ma jeden parametr o nazwie x. Typ x jest określony jako i32.
Kiedy wartość 5 jest przekazana do another_function, makro println! umieszcza 5 w miejscu, gdzie
string formatujący zawiera x w nawiasach klamrowych.
W sygnaturze funkcji trzeba podać typ każdego z parametrów. To celowa decyzja projektantów Rusta: wymaganie adnotacji typów w definicjach funkcji powoduje, że nie trzeba już podawać ich niemal nigdzie więcej, a Rust i tak wie, co mamy na myśli. Kompilator jest również w stanie wypisać bardziej pomocne komunikaty o błędach, jeśli wie, jakich typów oczekuje funkcja.
Jeśli chcesz, żeby funkcja przyjmowała wiele parametrów, rozdziel kolejne deklaracje parametrów przecinkami, jak poniżej:
Plik: src/main.rs
fn main() {
    print_labeled_measurement(5, 'h');
}

fn print_labeled_measurement(value: i32, unit_label: char) {
    println!("Wynik pomiaru: {value}{unit_label}");
}
W tym przykładzie stworzyliśmy funkcję print_labeled_measurement z dwoma parametrami.
Pierwszy parametr ma nazwę value i typ i32. Drugi jest
nazwany unit_label i jest typu char. Funkcja drukuje tekst zawierający wartości zarówno value jak i unit_label.
Spróbujmy uruchomić ten kod. Otwórz plik src/main.rs w twoim projekcie functions i zastąp jego zawartość kodem z powyższego przykładu. Uruchom program poleceniem cargo run:
$ cargo run
   Compiling functions v0.1.0 (file:///projects/functions)
    Finished dev [unoptimized + debuginfo] target(s) in 0.31s
     Running `target/debug/functions`
Wynik pomiaru: 5h
Ponieważ wywołaliśmy tę funkcję z argumentem 5 jako wartość dla value oraz 'h' jako wartość dla unit_label, program wypisał właśnie te wartości.
Instrukcje i wyrażenia
Ciało funkcji jest składa sie z serii instrukcji (statements) i opcjonalnie jest zakończone wyrażeniem (expression). Jak dotąd analizowaliśmy jedynie funkcje bez końcowego wyrażenia, jednakże widziałeś już wyrażenia będące częścią instrukcji. Ponieważ Rust jest językiem opartym o wyrażenia, ważne jest, aby zrozumieć różnicę między tymi dwoma. Podobne rozróżnienie nie występuje w innych językach, więc przyjrzyjmy się teraz instrukcjom i wyrażeniom oraz jak różnice między nimi wpływają na postać funkcji.
- Instrukcje to polecenia wykonania jakichś akcji; nie zwracają one wartości.
- Wyrażenia zaś rozwijają się do wartości zwracanej. Spójrzmy na przykłady.
Tworzenie zmiennej i przypisanie do niej wartości z użyciem słowa kluczowego let jest instrukcją. W listingu 3-1, let y = 6; to instrukcja.
Plik: src/main.rs
fn main() {
    let y = 6;
}
Listing 3-1: Deklaracja funkcji main zawierającej jedną instrukcję
Definicje funkcji są również instrukcjami; cały powyższy przykład jest instrukcją sam w sobie.
Instrukcje nie mają wartości zwracanej. To znaczy, że nie możesz przypisać instrukcji let do innej
zmiennej, tak jak poniższy kod próbuje zrobić; Rust zwróci błąd:
Plik: src/main.rs
fn main() {
    let x = (let y = 6);
}
Po uruchomieniu tego programu dostaniesz taki błąd:
$ cargo run
   Compiling functions v0.1.0 (file:///projects/functions)
error: expected expression, found `let` statement
 --> src/main.rs:2:14
  |
2 |     let x = (let y = 6);
  |              ^^^

error: expected expression, found statement (`let`)
 --> src/main.rs:2:14
  |
2 |     let x = (let y = 6);
  |              ^^^^^^^^^
  |
  = note: variable declaration using `let` is a statement

error[E0658]: `let` expressions in this position are unstable
 --> src/main.rs:2:14
  |
2 |     let x = (let y = 6);
  |              ^^^^^^^^^
  |
  = note: see issue #53667 <https://github.com/rust-lang/rust/issues/53667> for more information

warning: unnecessary parentheses around assigned value
 --> src/main.rs:2:13
  |
2 |     let x = (let y = 6);
  |             ^         ^
  |
  = note: `#[warn(unused_parens)]` on by default
help: remove these parentheses
  |
2 -     let x = (let y = 6);
2 +     let x = let y = 6;
  |

For more information about this error, try `rustc --explain E0658`.
warning: `functions` (bin "functions") generated 1 warning
error: could not compile `functions` due to 3 previous errors; 1 warning emitted
Instrukcja let y = 6 nie zwraca żadnej wartości, więc nie ma nic, co moglibyśmy przypisać do x.
Tym Rust różni się od innych języków, takich jak C lub Ruby, w których operacja przypisania zwraca wartość
tego przypisania. W tych językach można napisać x = y = 6 i zarówno x i y będą miały wartość 6;
w Ruście tak się jednak nie stanie.
Wyrażenia rozwijają się do pewnej wartości i zaraz po instrukcjach stanowią większość kodu,
jaki napiszesz w Ruście. Rozważmy prostą operację matematyczną, taką jak 5 + 6, która to jest
wyrażeniem rozwijającym się do wartości 11. Wyrażenia mogą być częścią instrukcji: w listingu 3-1
liczba 6 w instrukcji let y = 6; jest wyrażeniem, które rozwija się do wartości 6. Wywołanie funkcji
jest wyrażeniem. Wywołanie makra jest wyrażeniem. Blok, który tworzymy za pomocą nawiasów klamrowych dla zdefiniowania nowego zasięgu, również jest wyrażeniem, na przykład:
Plik: src/main.rs
fn main() {
    let y = {
        let x = 3;
        x + 1
    };

    println!("Wartość y wynosi: {y}");
}
To wyrażenie:
{
    let x = 3;
    x + 1
}
jest blokiem, który rozwija się do wartości 4. Ta wartość w ramach instrukcji let wpisywana jest do y.
Zwróć uwagę na końcową linię x + 1 bez średnika, która różni się od większości linii, jakie
widziałeś do tej pory. Wyrażenia nie kończą się średnikiem. Jeśli dodasz średnik na końcu wyrażenia,
zmienisz je w instrukcję, która nie będzie rozwijać się do żadnej wartości. Pamiętaj o tym, gdy będziesz
zagłębiać się w zagadnienie wartości zwracanych z funkcji i wyrażeń w kolejnej sekcji.
Funkcje zwracające wartość
Funkcje mogą zwracać wartości do miejsca w kodzie, gdzie zostały wywołane. Wartości zwracanej
z funkcji nie nadajemy nazwy, a jedynie deklarujemy jej typ po strzałce (->). W Ruście
wartość zwracana z funkcji jest równoważna wartości ostatniego wyrażenia z bloku ciała funkcji.
Możesz też użyć instrukcji wcześniejszego wyjścia z funkcji poprzez użycie słowa kluczowego return,
jednak większość funkcji zwraca niejawnie ostatnie wyrażenie. Poniżej przykład funkcji zwracającej wartość:
Plik: src/main.rs
fn five() -> i32 {
    5
}

fn main() {
    let x = five();

    println!("Wartość x wynosi: {x}");
}
W funkcji five nie ma żadnych wywołań funkcji, makr, ani nawet instrukcji let
- tylko sama liczba
5. Jest to całkowicie poprawna funkcja w Ruście. Zauważ, że typ zwracany z funkcji jest również zdefiniowany, jako-> i32. Spróbuj uruchomić ten kod; rezultat powinien wyglądać tak:
$ cargo run
   Compiling functions v0.1.0 (file:///projects/functions)
    Finished dev [unoptimized + debuginfo] target(s) in 0.30s
     Running `target/debug/functions`
Wartość x wynosi: 5
W funkcji five 5 jest wartością zwracaną, dlatego też typ wartości zwracanej to i32.
Przyjrzyjmy się temu bliżej. Są tu dwa istotne fragmenty: pierwszy, linia let x = five();
pokazuje, że używamy wartości zwracanej z funkcji five do zainicjalizowania zmiennej.
Ponieważ funkcja five zwraca 5, to linia ta jest równoważna poniższej:
#![allow(unused)]
fn main() {
let x = 5;
}
Druga rzecz, to postać funkcji five, która nie przyjmuje żadnych parametrów
i określa typ zwracany, ale jej ciało to samotne 5 bez średnika, ponieważ jest to
wyrażenie, którego wartość chcemy zwrócić.
Spójrzmy na kolejny przykład:
Plik: src/main.rs
fn main() {
    let x = plus_one(5);

    println!("Wartość x wynosi: {x}");
}

fn plus_one(x: i32) -> i32 {
    x + 1
}
Po uruchomieniu tego kodu na ekranie zostanie wypisane Wartość x wynosi: 6. Jednak gdybyśmy dopisali średnik po linii zawierającej x + 1, zmienilibyśmy wyrażenie w instrukcję i Rust zgłosiłby błąd.
Plik: src/main.rs
fn main() {
    let x = plus_one(5);

    println!("Wartość x wynosi: {x}");
}

fn plus_one(x: i32) -> i32 {
    x + 1;
}
Próba kompilacji poskutkuje następującym błędem:
$ cargo run
   Compiling functions v0.1.0 (file:///projects/functions)
error[E0308]: mismatched types
 --> src/main.rs:7:24
  |
7 | fn plus_one(x: i32) -> i32 {
  |    --------            ^^^ expected `i32`, found `()`
  |    |
  |    implicitly returns `()` as its body has no tail or `return` expression
8 |     x + 1;
  |          - help: remove this semicolon to return this value

For more information about this error, try `rustc --explain E0308`.
error: could not compile `functions` due to previous error
Główny fragment wiadomości o błędzie, mismatched types, czyli niezgodność typów, informuje o podstawowym problemie w tym kodzie. Definicja funkcji plus_one określa typ zwracany jako i32, jednak instrukcje nie rozwijają się do żadnej wartości, i wartość zwrócona z funkcji przyjmuje postać (), czyli pustej krotki. Jest to sprzeczne z definicją funkcji i powoduje błąd.
W komunikacie błędu Rust podaje przypuszczalne rozwiązanie tego problemu: sugeruje, aby usunąć średnik z końca linii, co naprawi błąd kompilacji.
Komentarze
Wszyscy programiści starają się tworzyć czytelny i zrozumiały kod, jednak czasem potrzebne jest dodatkowe wyjaśnienie. W takich wypadkach programiści umieszczają w kodzie notki lub komentarze, które mimo że są ignorowane przez kompilator, mogą okazać się przydatne dla osób czytających kod.
Oto prosty komentarz:
#![allow(unused)]
fn main() {
// Witaj, świecie
}
W Ruście, komentarze muszą rozpoczynać się dwoma ukośnikami i ciągną się
do końca linii. W przypadku komentarzy, których długość przekracza jedną
linię, musisz wstawić // na początku każdej linii, tak jak poniżej:
#![allow(unused)]
fn main() {
// A więc opisujemy tu coś skomplikowanego, wystarczająco długo,
// że potrzebujemy wieloliniowych komentarzy, aby to zrobić!
// Fiu! Fiu! Na szczęście ten komentarz wyjaśni, o co chodzi.
}
Komentarze mogą być też umieszczone na końcu linii zawierającej kod:
Plik: src/main.rs
fn main() {
    let lucky_number = 7; // Czuję, że sprzyja mi dziś szczęście
}
Jednak częściej spotkasz się z zapisem, w którym komentarz znajduje się w oddzielnej linii nad kodem, który jest przez niego opisywany:
Plik: src/main.rs
fn main() {
    // Czuję, że sprzyja mi dziś szczęście
    let lucky_number = 7;
}
Rust posiada też wbudowany inny typ komentarzy, komentarze dokumentacji, które omówimy w sekcji "Publikacja skrzyni w Crates.io" rozdziału 14.
Przepływ sterowania
Wykonanie jakiegoś kodu w zależności od tego, czy warunek jest spełniony, albo wykonywania go wielokrotnie dopóki warunek jest spełniony, to podstawowe możliwości większości języków programowania. Najpopularniejsze konstrukcje, które pozwalają sterować przebiegiem wykonania kodu Rusta to wyrażenia if oraz pętle.
Wyrażenia if
Wyrażenie if pozwala na rozgałęzienie kodu w zależności od spełnienia warunków. Podajemy warunek i nakazujemy: „Jeśli ten warunek jest spełniony, uruchom ten blok kodu. Jeśli warunek nie jest spełniony, nie uruchamiaj tego bloku kodu.”
Stwórzmy nowy projekt o nazwie branches (z ang. rozgałęzienia) w katalogu projects by zgłębić wyrażanie if. W pliku src/main.rs wpiszmy:
Plik: src/main.rs
fn main() {
    let number = 3;

    if number < 5 {
        println!("warunek został spełniony");
    } else {
        println!("warunek nie został spełniony");
    }
}
Wszystkie wyrażenia if rozpoczynają się słowem kluczowym if, po którym następuje warunek. W tym przypadku, warunek sprawdza czy zmienna number ma wartość mniejszą od 5.
Blok kodu umieszczony w nawiasach klamrowych bezpośrednio po warunku zostanie wykonany tylko wtedy, gdy warunek będzie spełniony, tj. będzie miał wartość logiczną true.
Bloki kodu powiązane z warunkami w wyrażenie if nazywane są czasami odnogami, podobnie jak to było w przypadku wyrażenia match, o którym wspomnieliśmy w sekcji „Porównywanie Odpowiedzi z Sekretnym Numerem” rozdziału 2.
Opcjonalnie, możemy również dodać wyrażenie else, co zresztą uczyniliśmy, aby dodać alternatywny blok kodu, wykonywany gdy warunek nie zajdzie (da false). Jeśli nie ma wyrażenia else, a warunek da false, program po prostu pominie blok if i przejdzie do następnego fragmentu kodu.
Spróbujmy uruchomić ten kod. Powinniśmy zobaczyć:
$ cargo run
   Compiling branches v0.1.0 (file:///projects/branches)
    Finished dev [unoptimized + debuginfo] target(s) in 0.31s
     Running `target/debug/branches`
warunek został spełniony
Zmieńmy number tak, by jego wartość nie spełniała warunku false i zobaczmy co się stanie:
fn main() {
    let number = 7;

    if number < 5 {
        println!("warunek został spełniony");
    } else {
        println!("warunek nie został spełniony");
    }
}
Uruchommy program ponownie i zobaczmy co wypisze:
$ cargo run
   Compiling branches v0.1.0 (file:///projects/branches)
    Finished dev [unoptimized + debuginfo] target(s) in 0.31s
     Running `target/debug/branches`
warunek nie został spełniony
Warto też zauważyć, że warunek w tym kodzie musi dawać wartość typu bool, bo inaczej kod się nie skompiluje. Na przykład, spróbujmy uruchomić następujący kod:
Plik: src/main.rs
fn main() {
    let number = 3;

    if number {
        println!("number wynosi trzy");
    }
}
Tutaj wartością warunku w if jest liczba 3, co prowadzi do błędu kompilacji:
$ cargo run
   Compiling branches v0.1.0 (file:///projects/branches)
error[E0308]: mismatched types
 --> src/main.rs:4:8
  |
4 |     if number {
  |        ^^^^^^ expected `bool`, found integer

For more information about this error, try `rustc --explain E0308`.
error: could not compile `branches` due to previous error
Błąd wskazuje, że Rust oczekiwał boola, a dostał liczbę. W przeciwieństwie do języków takich jak Ruby i JavaScript, Rust nie próbuje automatycznie konwertować typów nie-Boolean na Boolean.
Jako warunek w if należy zawsze podać jawne wyrażenie dające wartość logiczną.
Jeśli na przykład chcemy, aby blok kodu if uruchamiał się tylko wtedy, gdy liczba nie jest równa 0, to możemy zmienić wyrażenie if tak:
Plik: src/main.rs
fn main() {
    let number = 3;

    if number != 0 {
        println!("number wynosi coś innego niż zero");
    }
}
Ten program wypisze number wynosi coś innego niż zero.
Obsługa wielu warunków za pomocą else if
Można użyć wielu warunków łącząc if i else w wyrażenie else if. Na przykład:
Plik: src/main.rs
fn main() {
    let number = 6;

    if number % 4 == 0 {
        println!("number jest podzielny przez 4");
    } else if number % 3 == 0 {
        println!("number jest podzielny przez 3");
    } else if number % 2 == 0 {
        println!("number jest podzielny przez 2");
    } else {
        println!("number nie jest podzielny przez 4, 3, ani 2");
    }
}
Ten program może podążyć czterema różnymi ścieżkami. Po jego uruchomieniu powinniśmy zobaczyć:
$ cargo run
   Compiling branches v0.1.0 (file:///projects/branches)
    Finished dev [unoptimized + debuginfo] target(s) in 0.31s
     Running `target/debug/branches`
number jest podzielny przez 3
Kiedy ten program wykonuje się, sprawdza każde wyrażenie if po kolei i wykonuje pierwszy blok kodu, dla którego zachodzi warunek. Proszę zauważyć, że mimo iż 6 jest podzielne przez 2, nie widzimy wyjścia liczba jest podzielna przez 2, ani nie widzimy tekstu liczba nie jest podzielna przez 4, 3, ani 2 z bloku else.
Dzieje się tak dlatego, że Rust wykonuje blok tylko dla pierwszego warunku dającego true, a gdy już go znajdzie, to dalszych warunków nawet nie sprawdza.
Użycie zbyt wielu wyrażeń else if może zagmatwać kod. Więc jeśli jest ich więcej niż jedno, to warto rozważyć refaktoryzację kodu. Dla takich przypadków, w Ruście przewidziano potężną konstrukcję match, która jest opisana w rozdziale 6.
if w składni let
Ponieważ if jest wyrażeniem, to możemy go użyć po prawej stronie instrukcji let, aby przypisać jego wynik do zmiennej, co pokazano na listingu 3-2.
Plik: src/main.rs
fn main() {
    let condition = true;
    let number = if condition { 5 } else { 6 };

    println!("Wartość zmiennej number wynosi: {number}");
}
Listing 3-2: Przypisanie wyniku wyrażenia if do zmiennej
Zmiennej number zostanie nadana wartość będąca wynikiem wyrażenia if. Uruchommy ten kod, aby zobaczyć co się stanie:
$ cargo run
   Compiling branches v0.1.0 (file:///projects/branches)
    Finished dev [unoptimized + debuginfo] target(s) in 0.30s
     Running `target/debug/branches`
Wartość zmiennej number wynosi: 5
Należy pamiętać, że wartościami bloków kodu są ostatnie wyrażenie w nich zawarte, a liczby same w sobie są również wyrażeniami. W tym przypadku, wartość całego wyrażenia if zależy od tego, który blok kodu zostanie wykonany.
Oznacza to, że wartości, które potencjalnie mogą być wynikami poszczególnych odnóg if muszą być tego samego typu. Na listingu 3-2, wynikami zarówno ramienia if jak i ramienia else były liczby całkowite i32. Jeśli typy są niezgodne, jak w poniższym przykładzie, to otrzymamy błąd:
Plik: src/main.rs
fn main() {
    let condition = true;

    let number = if condition { 5 } else { "six" };

    println!("Wartość zmiennej number wynosi: {number}");
}
Próba skompilowania tego kodu skończy się błędem. Odnogi if i else mają niezgodne typy wartości, zaś Rust dokładnie wskazuje, gdzie w programie należy szukać problemu:
$ cargo run
   Compiling branches v0.1.0 (file:///projects/branches)
error[E0308]: if and else have incompatible types
 --> src/main.rs:4:44
  |
4 |     let number = if condition { 5 } else { "six" };
  |                                 -          ^^^^^ expected integer, found `&str`
  |                                 |
  |                                 expected because of this

For more information about this error, try `rustc --explain E0308`.
error: could not compile `branches` due to previous error
Wyrażenie w bloku if daje liczbę całkowitą, a wyrażenie w bloku else łańcuch znaków. To nie zadziała, ponieważ zmienne muszą mieć jeden typ, a Rust musi już w czasie kompilacji definitywnie wiedzieć jakiego typu jest zmienna number. Znajomość tego typu pozwala kompilatorowi sprawdzić, czy jest on poprawny we wszystkich miejscach użycia number. Rust nie byłby w stanie tego zrobić, gdyby typ number był określany dopiero w czasie wykonywania; kompilator byłby bardziej skomplikowany i dawałby mniej gwarancji na kod, gdyby musiał śledzić wiele hipotetycznych typów dla każdej zmiennej.
Powtarzanie Za Pomocą Pętli
Często przydaje się wykonanie bloku kodu więcej niż raz. Do tego zadania Rust udostępnia kilka pętli, które wykonują kod wewnątrz ciała pętli do końca, po czym natychmiast wykonują go ponownie. Aby poeksperymentować z pętlami, stwórzmy nowy projekt o nazwie loops.
Rust ma trzy rodzaje pętli: loop, while, i for. Wypróbujmy każdy z nich.
Powtarzanie Wykonania Za Pomocą loop
Słowo kluczowe loop nakazuje Rustowi wykonywać blok kodu w koło, bez końca, lub do momentu, w którym wyraźnie nakażemy mu przestać.
By to zilustrować, zmieńmy zawartość pliku src/main.rs w katalogu loops na następującą:
Plik: src/main.rs
fn main() {
    loop {
        println!("znowu!");
    }
}
Gdy uruchomimy ten program, zobaczymy znowu! wypisywane w koło, bez końca, dopóki ręcznie nie zatrzymamy programu. W większości terminali można to zrobić za pomocą skrótu klawiszowego ctrl-c. Spróbujmy:
$ cargo run
   Compiling loops v0.1.0 (file:///projects/loops)
    Finished dev [unoptimized + debuginfo] target(s) in 0.29s
     Running `target/debug/loops`
znowu!
znowu!
znowu!
znowu!
^Cznowu!
Symbol ^C pokazuje gdzie wcisnęliśmy ctrl-c.
Słowo znowu! może zostać wypisane lub nie po ^C, zależnie od tego, która linia programu była wykonywana w momencie gdy odebrał on sygnał przerwania.
Szczęśliwie, Rust zapewnia również sposób na przerwanie pętli za pomocą kodu. Można umieścić słowo kluczowe break wewnątrz pętli, aby powiedzieć programowi, gdzie ma przerwać jej wykonywanie.
Proszę sobie przypomnieć, że już to zrobiliśmy w grze-zgadywance w sekcji „Quitting After a Correct Guess” rozdziału 2, aby zakończyć program, gdy użytkownik wygrał grę, zgadując poprawną liczbę.
W grze-zgadywance użyliśmy również continue, które, użyte w pętli, nakazuje programowi pominąć kod pozostały do wykonania w bieżącej iteracji i rozpocząć następną iterację.
Zwracanie Wartości z Pętli
Jednym z zastosowań pętli loop jest ponawianie prób operacji, która może się nie udać, jak na przykład sprawdzenie czy wątek zakończył swoją pracę. Może zajść również potrzeba przekazania wyniku tej operacji poza pętlę, do reszty kodu. Aby to zrobić, można ten wynik podać bezpośrednio po wyrażeniu break zatrzymującym pętle. Zostanie on zwrócony na zewnątrz pętli i będzie można go tam użyć, na przykład tak:
fn main() {
    let mut counter = 0;

    let result = loop {
        counter += 1;

        if counter == 10 {
            break counter * 2;
        }
    };

    println!("Zmienna result wynosi {result}");
}
Przed pętlą deklarujemy zmienną o nazwie counter i inicjujemy ją wartością 0. Następnie deklarujemy zmienną o nazwie result, która będzie przechowywać wartość zwracaną z pętli.
W każdej iteracji pętli dodajemy 1 do zmiennej counter i, następnie, sprawdzamy czy counter jest równy 10. Jeśli jest, to używamy słowa kluczowego break z wartością counter * 2.
Za pętlą umieściliśmy średnik kończący instrukcję przypisującą tą wartość do result.
Na koniec wypisujemy wartość result, która w tym przypadku wynosi 20.
Etykiety Rozróżniające Pętle
Gdy zagnieżdżamy pętle w pętlach, break i continue odnoszą się do najbardziej wewnętrznej pętli, w której się znajdują.
Można opcjonalnie określić etykietę dla pętli, której można następnie użyć z break lub continue, by wskazać, że odnoszą się one do wskazanej pętli zamiast najbardziej zagnieżdżonej.
Etykiety pętli zaczynają się znakiem pojedynczego cytatu. Oto przykład:
fn main() {
    let mut count = 0;
    'counting_up: loop {
        println!("count = {count}");
        let mut remaining = 10;

        loop {
            println!("remaining = {remaining}");
            if remaining == 9 {
                break;
            }
            if count == 2 {
                break 'counting_up;
            }
            remaining -= 1;
        }

        count += 1;
    }
    println!("End count = {count}");
}
Pętla zewnętrzna ma etykietę counting_up i liczy w górę od 0 do 2.
Wewnętrzna pętla bez etykiety odlicza w dół od 10 do 9. Pierwszy break, bez etykiety, zakończy tylko wewnętrzną pętlę. Instrukcja break 'counting_up; wyjdzie z pętli zewnętrznej. Ten kod drukuje:
$ cargo run
   Compiling loops v0.1.0 (file:///projects/loops)
    Finished dev [unoptimized + debuginfo] target(s) in 0.58s
     Running `target/debug/loops`
count = 0
remaining = 10
remaining = 9
count = 1
remaining = 10
remaining = 9
count = 2
remaining = 10
End count = 2
Pętla Warunkowa while
Program często potrzebuje sprawdzić warunek wewnątrz pętli.
Pętla działa tak długa jak warunek daje true. Gdy warunek przestaje dawać true, program wywołuje break, zatrzymując pętlę. Można zaimplementować takie zachowania za pomocą kombinacji loop, if, else i break; zachęcam do spróbowania. Jednak jest ono na tyle powszechne, że Rust ma dla niego wbudowaną konstrukcję językową, zwaną pętlą while. Program z listingu 3-3 wykonuje trzy iteracje za pomocą pętli while, odliczając za każdym razem, a następnie, po zakończeniu pętli, drukuje komunikat i wychodzi.
Plik: src/main.rs
fn main() {
    let mut number = 3;

    while number != 0 {
        println!("{number}!");

        number -= 1;
    }

    println!("LIFTOFF!!!");
}
Listing 3-3: Użycie pętli while by wykonywać kod dopóki zachodzi warunek
Taka konstrukcja eliminuje wiele zagnieżdżeń, które byłyby konieczne w przypadku użycia loop, if, else i break, równocześnie poprawiając czytelność.
Pętla się wykonuje tak długo jak warunek daje true.
Przechodzenie Po Kolekcji Za Pomocą for
Do przejścia po kolekcji, takiej jak tablica, można użyć pętli while. Na przykład, pętla na listingu 3-4 wypisuje każdy element tablicy a.
Plik: src/main.rs
fn main() {
    let a = [10, 20, 30, 40, 50];
    let mut index = 0;

    while index < 5 {
        println!("wartość wynosi: {}", a[index]);

        index += 1;
    }
}
Listing 3-4: Przechodzenie po każdym elemencie kolekcji za pomocą pętli while
Ten kod liczy w górę po elementach tablicy. Rozpoczyna od indeksu 0 i wykonuje pętle aż do osiągnięcia ostatniego indeksu tablicy, tj. do momentu gdy index < 5 przestaje dawać true.
Uruchomienie tego kodu spowoduje wydrukowanie każdego elementu tablicy:
$ cargo run
   Compiling loops v0.1.0 (file:///projects/loops)
    Finished dev [unoptimized + debuginfo] target(s) in 0.32s
     Running `target/debug/loops`
wartość wynosi: 10
wartość wynosi: 20
wartość wynosi: 30
wartość wynosi: 40
wartość wynosi: 50
Wszystkie pięć wartości zawartych w tablicy pojawia się w terminalu, zgodnie z oczekiwaniami. Nawet jeśli index osiągnie w pewnym momencie wartość 5, pętla zatrzymuje się przed próbą pobrania z tablicy szóstej wartości.
Jednakże to rozwiązanie jest podatne na błędy; program może spanikować, jeśli indeks lub warunek będzie nieprawidłowy. Na przykład, jeśli skócimy tablicę a do czterech elementów, zapominając przy tym zaktualizować warunek na while index < 4, kod spanikuje.
To rozwiązanie może być również powolne, ponieważ kompilator może dodać kod sprawdzający, w każdej iteracji pętli, czy indeks znajduje się w granicach tablicy.
Zwięźlejszą alternatywą jest pętla for wykonująca jakiś kod dla każdego elementu w kolekcji. Listing 3-5 pokazuje przykład jej użycia.
Plik: src/main.rs
fn main() {
    let a = [10, 20, 30, 40, 50];

    for element in a.iter() {
        println!("wartość wynosi: {element}");
    }
}
Listing 3-5: Przechodzenie po każdym elemencie kolekcji za pomocą pętli for
Ten kod daje takie same wyjście jak ten na listingu 3-4. Co ważne, zwiększyliśmy bezpieczeństwo kodu i wyeliminowaliśmy zagrożenie wystąpienie błędów związanych z przekroczeniem końca tablicy albo niedojściem do niego i w konsekwencji nieosiągnięciem niektórych elementów.
W przeciwieństwie do metody użytej na listingu 3-4, korzystając z pętli for nie musimy martwić się poprawianiem innego kodu gdy zmieniamy liczbę elementów w tablicy.
Bezpieczeństwo i zwięzłość pętli for sprawiają, że jest ona najczęściej wykorzystywaną pętlą w Rust. Nawet gdy istnieje potrzeba wykonania jakiegoś kod określoną liczbę razy, jak w przykładzie odliczania, który na listingu 3-3 używał pętli while, większość rustowców użyłaby pętli for wraz z zawartym w bibliotece standardowej Range (z ang. zakres), który generuje wszystkie liczby w kolejności, zaczynając od jednej liczby i kończąc przed inną liczbą.
Oto jak wyglądałoby odliczanie przy użyciu pętli for i metody rev (o której jeszcze nie mówiliśmy) odwracającej zakres:
Plik: src/main.rs
fn main() {
    for number in (1..4).rev() {
        println!("{number}!");
    }
    println!("LIFTOFF!!!");
}
Ten kod jest nieco ładniejszy, nieprawdaż?
Podsumowanie
Udało się! To był długi rozdział: poznaliśmy zmienne, skalarne i złożone typy danych, funkcje, komentarze, wyrażenia if i pętle! Aby przećwiczyć pojęcia omawiane w tym rozdziale, spróbuj zbudować programy wykonujące następujące czynności:
- Przeliczanie temperatur pomiędzy stopniami Celsjusza i Fahrenheita.
- Generowanie n-tej liczby ciągu Fibonacciego.
- Drukowanie tekstu kolędy "The Twelve Days of Christmas" z wykorzystaniem powtórzeń w piosence.
Kiedy będziesz gotowy aby przejść dalej, porozmawiamy o koncepcji Rusta, która nie jest powszechna w innych językach programowania, o własności.
Zrozumienie systemu własności
System własności (ownership) jest najbardziej unikalną cechą Rusta, która pozwala zagwarantować bezpieczeństwo pamięci bez konieczności użycia automatycznego systemu odśmiecania (garbage collector). Zrozumienie, jak w Ruście funkcjonuje ten mechanizm jest zatem niezwykle istotne. W niniejszym rozdziale będziemy rozmawiać o własności oraz kilku powiązanych z nią funkcjonalnościach: pożyczaniu, wycinkach, a także o tym, jak Rust rozmieszcza dane w pamięci.
Czym jest własność?
Własność to zestaw reguł, które determinują, jak program Rusta zarządza pamięcią. Wszystkie programy muszą kontrolować sposób wykorzystywania pamięci komputera podczas swojego działania. Niektóre języki korzystają z automatycznego systemu odśmiecania (garbage collection), który regularnie poszukuje fragmentów pamięci, których działający program już nie używa. W innych językach, sam programista ręcznie zajmuje i zwalnia pamięć. Rust wykorzystuje trzecie podejście: pamięć jest zarządzana przez system własności, obejmujący zestaw zasad sprawdzanych przez kompilator w trakcie kompilacji. Jeśli którakolwiek z reguł zostanie naruszona, program nie skompiluje się. Jednocześnie żaden z aspektów związanych z systemem własności nie spowalnia działania programu.
Ponieważ własność jest nowym pojęciem dla wielu programistów, przyzwyczajenie się do niej zabiera trochę czasu. Dobra wiadomość jest taka, że w miarę nabywania doświadczenia z Rustem i zasadami systemu własności, rośnie też twoja zdolność do naturalnego tworzenia bezpiecznego i wydajnego kodu. Tak trzymaj!
Kiedy zrozumiesz system własności, będziesz mieć solidną podstawę ku zrozumieniu innych, unikatowych funkcjonalności Rusta. W tym rozdziale nauczysz się, czym jest własność za pomocą kilku przykładów, które skupiają się na bardzo często spotykanej strukturze danych: łańcuchach znaków (string).
Stos i sterta
W wielu językach programowania nie trzeba zbyt często myśleć o stosie i o stercie. Ale w przypadku języka systemowego takiego jak Rust, to, czy zmienna zapisana jest na stosie czy na stercie, ma wpływ na zachowanie całego języka i określa, dlaczego należy podjąć niektóre decyzje. W dalszej części rozdziału opiszemy części systemu własności w odniesieniu do stosu i sterty, zaczynamy więc od krótkiego, przygotowawczego wyjaśnienia.
Zarówno stos jak i sterta są częściami pamięci dostępnymi dla programu w trakcie działania, ale charakteryzują się one odmienną strukturą. Stos przechowuje dane w takiej kolejności, w jakiej tam trafiają, a usuwane są z niego w kolejności odwrotnej. Działanie te określa się nazwą last in, first out (ostatni na wejściu, pierwszy na wyjściu). Pomyśl o stosie talerzy: kiedy kładziesz na nim nowe talerze, umieszczasz je na szczycie stosu, a kiedy jest ci jakiś potrzebny, zdejmujesz go ze szczytu. Dodawanie lub usuwanie talerzy ze środka lub ze spodu stosu nie jest już takie łatwe. Dodawanie danych nosi nazwę odkładania na stos (pushing onto the stack), a usuwanie ich nazywane jest zdejmowaniem ze stosu (popping off the stack).
Każda dana umieszczona na stosie musi mieć znany, stały rozmiar. Dane, których rozmiar jest nieznany na etapie kompilacji lub może ulegać zmianie, muszą być przechowywane na stercie. Sterta jest mniej zorganizowana: kiedy coś się na niej umieszcza, należy poprosić o przydzielenie pewnego jej obszaru. Alokator pamięci znajduje na stercie wolne, wystarczająco duże miejsce, oznacza je jako będące w użyciu i zwraca wskaźnik zawierający adres wybranej lokalizacji. Proces ten nazywamy alokacją na stercie lub po prostu alokacją. Umieszanie danych na stosie nie jest uznawane za alokację. Ze względu na to, że zwrócony wskaźnik posiada znany, ustalony rozmiar, możemy przechować go na stosie. Jednak gdy chcemy dostać się do właściwych danych, musimy podążyć za wskaźnikiem.
Pomyśl o byciu rozsadzanym w restauracji. Przy wejściu podajesz ilość osób w swojej grupie, a pracownik znajduje pusty stolik, przy którym wszyscy się pomieszczą i prowadzi ich na miejsce. Jeśli ktoś z twojej grupy sie spóźni, aby was znaleźć, może zapytać, gdzie was posadzono.
Odkładanie na stosie jest szybsze od alokacji na stercie, ponieważ alokator nigdy nie musi szukać miejsca na dodanie nowych danych; to miejsce znajduje się zawsze na szczycie stosu. Alokacja na stercie natomiast wymaga więcej pracy, ponieważ system operacyjny musi w pierwszej kolejności znaleźć wystarczająco dużo miejsca, aby dane się zmieściły. a następnie przeprowadzić niezbędne operacje, by przygotować się na następną alokację.
Dostęp do danych na stercie jest wolniejszy od dostępu do danych na stosie, ponieważ należy je zlokalizować korzystając ze wskaźnika. Nowoczesne procesory działają szybciej, jeżeli nie muszą dużo skakać po pamięci. Kontynuując analogię, załóżmy, że kelner w restauracji zbiera zamówienia z wielu stolików. Bardziej wydajne jest zebranie wszystkich zamówień z jednego stolika, zanim przejdzie się do kolejnego. Zebranie pojedynczego zamówienia ze stolika A, następnie jednego ze stolika B, kolejnego znów ze stolika A i powtórnie ze stolika B, byłoby zdecydowanie wolniejszym procesem. Z tego samego względu, procesor wykonuje swoje zadanie lepiej, operując na danych sąsiadujących z innymi danymi (jak ma to miejsce na stosie), niż gdyby operował na danych oddalonych od siebie (co może się zdarzyć w przypadku sterty). Alokacja sporego obszaru pamięci na stercie również może potrwać.
Kiedy twój kod wywołuje funkcję, przekazywane do niej argumenty (łącznie z potencjalnymi wskaźnikami do danych na stercie) oraz jej wewnętrzne zmienne są odkładane na stosie. Gdy funkcja się kończy, wartości te są zdejmowane ze stosu.
Do problemów, którym przeciwstawia się system własności, należą: śledzenie, które fragmenty kodu używają których danych na stercie, minimalizowanie duplikowania się danych na stercie, a także pozbywanie się ze sterty nieużywanych danych, celem uniknięcia wyczerpania się pamięci. Po zrozumieniu pojęcia własności, nie będziesz juz musiał zbyt często myśleć o stosie czy o stercie. Jednak świadomość tego, że zarządzanie danymi na stercie jest istotą istnienia systemu własności, pomaga wyjaśnić, dlaczego działa on tak, jak działa.
Zasady systemu własności
W pierwszej kolejności przyjrzyjmy się zasadom systemu własności. Proszę mieć je na uwadze, kiedy będziemy omawiać ilustrujące je przykłady:
- Każda wartość w Ruście ma właściciela.
- W danym momencie może istnieć tylko jeden właściciel.
- Kiedy sterowanie wychodzi poza zasięg właściciela, wartość zostaje zwolniona.
Zasięg zmiennych
Teraz, kiedy znamy już podstawy składni, nie będziemy umieszczać w treści przykładów kodu fn main() {. Jeśli zatem przepisujesz kod na bieżąco, musisz ręcznie umieszczać zaprezentowane dalej fragmenty wewnątrz funkcji main. Dzięki temu, przykłady będą nieco bardziej zwięzłe, pozwalając nam skupić się na istocie sprawy zamiast na powtarzalnych frazach.
W pierwszym przykładzie systemu własności, przyjrzymy się zasięgowi kilku zmiennych. Zasięgiem elementu nazywamy obszar programu, wewnątrz którego dany element zachowuje ważność (istnieje). Powiedzmy, że mamy zmienną, która wygląda tak:
#![allow(unused)]
fn main() {
let s = "witaj";
}
Zmienna s odnosi się do literału łańcuchowego, którego wartość jest ustalona w samym kodzie programu. Zmienna zachowuje ważność od miejsca, w którym ją zadeklarowano, do końca bieżącego zasięgu. Listing 4-1 zawiera komentarze
wyjaśniające, gdzie zmienna s zachowuje ważność.
fn main() {
    {
                           // s nie ma tu jeszcze ważności - jeszcze jej nie zadeklarowano
        let s = "witaj";   // od tego momentu s ma ważność

        // jakieś operacje na s
    }                           // bieżący zasięg się kończy - s traci ważność
}
Listing 4-1: Zmienna, oraz zasięg, w którym zachowuje ona ważność
Innymi słowy, mamy do czynienia z dwoma istotnymi momentami w czasie:
- Kiedy zmienna
swchodzi w zasięg, zyskuje ważność. - Zmienna pozostaje ważna, dopóki nie wyjdzie z zasięgu.
Na tę chwilę zależność między zasięgiem a ważnością zmiennych jest podobna do
sytuacji w innych językach programowania. Posłużymy się tą wiedzą, wprowadzając
nowy typ danych: String (łańcuch znaków).
Typ String
Aby zilustrować zasady systemu własności, potrzebujemy typu danych, który jest bardziej złożony od tych, które omawiane były w sekcji „Typy danych” rozdziału 3. Wszystkie opisane tam typy przechowywane są na stosie i są z niego zdejmowane, kiedy skończy się ich zasięg. Potrzebny jest nam natomiast typ przechowujący zawarte w nim dane na stercie. Dowiemy się wówczas, skąd Rust wie, kiedy te dane usunąć.
W przykładzie użyjemy typu String, koncentrując się na tych jego elementach,
które odnoszą się do systemu własności. Te same elementy mają znaczenie dla
innych złożonych typów, które dostarcza biblioteka standardowa oraz tych, które
stworzysz sam. Typ String omawiany będzie dogłębnie w rozdziale 8.
Widzieliśmy już literały łańcuchowe, których dane na stałe umieszczone są w treści
programu. Takie zmienne są wygodne w użyciu, ale nieprzydatne w wielu
sytuacjach, w których używa się danych tekstowych. Jednym z powodów jest to, że
są one niemodyfikowalne. Innym, że nie każda zawartość łańcucha tekstowego jest
znana podczas pisania programu. Na przykład: co zrobić, jeśli chcemy pobrać dane
od użytkownika i je przechować? Dla takich sytuacji Rust przewiduje drugi typ
łańcuchowy: String. Typ ten alokowany jest na stercie i z tego względu może
przechowywać dane, których ilość jest nieznana podczas kompilacji. Można
przekształcić niemodyfikowalny literał łańcuchowy w zmienną typu String za pomocą
funkcji from. Wygląda to tak:
#![allow(unused)]
fn main() {
let s = String::from("witaj");
}
Podwójny dwukropek :: jest operatorem umożliwiającym wykorzystanie funkcji
from z przestrzeni nazw typu String, zamiast konieczności utworzenia
ogólnej funkcji o przykładowej nazwie string_from. Ten rodzaj składni będzie
szerzej omawiany w sekcji „Składnia metod” w
rozdziale 5 oraz podczas rozważań o przestrzeniach nazw modułów w sekcji
„Ścieżki odnoszenia się do elementów w hierarchii modułów”
w rozdziale 7.
Ten rodzaj łańcucha znaków można modyfikować:
fn main() {
    let mut s = String::from("witaj");

    s.push_str(", świecie!"); // push_str() dodaje literał do zmiennej String

    println!("{}", s); // To spowoduje wyświetlenie tekstu: `hello, world!`
}
Jaka jest zatem różnica? Dlaczego String może być modyfikowalny, a literał
nie? Różnica polega na sposobie, w jakim oba te typy korzystają z pamięci.
Pamięć i alokacja
W przypadku literału łańcuchowego, jego wartość znana jest już w czasie kompilacji, więc przechowywany tekst jest na stałe zakodowany w docelowym pliku wykonywalnym, co czyni literały szybkimi i wydajnymi. Ale cechy te wynikają z niemodyfikowalności literałów. Niestety, nie możemy w pliku binarnym umieścić bańki pamięci pod każdy potrzebny tekst, którego rozmiar jest nieznany podczas kompilacji i może się zmienić w trakcie działania programu.
Mając typ String, w celu obsługi modyfikowalnego i potencjalnie rosnącego
tekstu, musimy zaalokować pewną ilość pamięci na stercie, nieznaną podczas
kompilacji. To oznacza, że:
- O przydział pamięci należy poprosić alokator w trakcie wykonywania programu.
- Potrzebny jest sposób na oddanie pamięci do alokatora, kiedy
Stringnie będzie już potrzebny.
Pierwszą część robimy sami, wywołując funkcję String::from, której
implementacja zawiera prośbę o wymaganą pamięć. Podobne rozwiązanie jest w
w wielu innych językach programowania.
Druga część znacznie się za to różni. W językach wyposażonych w systemy
odśmiecania (garbage collector - GC), GC śledzi i zwalnia pamięć, która nie
jest już używana, a my nie musimy już o tym myśleć. W językach pozbawionych GC,
naszą odpowiedzialnością jest identyfikowanie nieużywanej już pamięci i
bezpośrednie wywoływanie zarówno kodu, który tę pamięć zwalnia, jak i tego,
który ją alokuje. Poprawne wykonanie tej operacji stanowiło historycznie trudny,
programistyczny problem. Jeśli zapomnimy, marnujemy pamięć. Jeśli zrobimy to za
wcześnie, zostaniemy z unieważnioną zmienną. Zrobimy to dwukrotnie - to też błąd.
Musimy połączyć w pary dokładnie jedną alokację z dokładnie jednym
zwolnieniem.
Rust prezentuje inne podejście: pamięć jest automatycznie zwalniana,
kiedy skończy się zasięg zmiennej będącej jej właścicielem. Oto wersja naszego
przykładu z listingu 4-1, który używa typu String zamiast literału:
fn main() {
    {
        let s = String::from("witaj"); // s ma ważność od tego momentu

        // jakieś operacje na s
    }                                  // bieżący zasięg się kończy - s traci
                                       // ważność
}
Istnieje naturalny moment, w którym można oddać pamięć wykorzystywaną przez
nasz String do alokatora - kiedy kończy się zasięg zmiennej s.
Kiedy zasięg jakiejś zmiennej się kończy, Rust wywołuje za nas specjalną
funkcję. Funkcja ta nosi nazwę drop (porzuć, upuść), a w jej treści autor typu
String umieścił kod zwalniający pamięć. Funkcja drop zostaje wywołana przez
Rusta automatycznie, przy klamrze zamykającej.
Uwaga: W C++ schemat dealokacji zasobów przy końcu czasu życia jakiegoś elementu jest czasem nazywany Inicjowaniem Przy Pozyskaniu Zasobu (Resource Acquisition Is Initialization (RAII)). Funkcja
dropz Rusta może wydać się znajoma osobom, które miały styczność ze schematami RAII.
Schemat ten ma ogromny wpływ na sposób pisania kodu w Ruście. Na tym etapie może wydawać się to proste, ale program może zachować się niespodziewanie w bardziej złożonych przypadkach, kiedy chcemy, aby kilka zmiennych używało tej samej danej, alokowanej na stercie. Zbadajmy teraz kilka takich sytuacji.
Przenoszenie Zmiennych i Danych
Kilka zmiennych może w Ruście odnosić się do tej samej danej na różne sposoby. Spójrzmy na przykład w listingu 4-2, z wykorzystaniem liczby całkowitej:
fn main() {
    let x = 5;
    let y = x;
}
Listing 4-2: Przypisanie całkowitej wartości zmiennej x
do zmiennej y
Z całą pewnością możemy odgadnąć, co ten kod robi: „przypisuje 5 do x,
a następnie wykonuje kopię wartości przechowywanej w x i przypisuje ją do
y.”. Mamy teraz dwie zmienne: x i y, obie o wartości 5. Dzieje się
dokładnie tak, ponieważ liczby całkowite są prostymi wartościami o
stałym rozmiarze, więc obie wartości 5 zostają odłożone na stos.
Teraz przyjrzyjmy się wersji z typem String:
fn main() {
    let s1 = String::from("witaj");
    let s2 = s1;
}
Wygląda to bardzo podobnie do wcześniejszego kodu, więc możemy zakładać, że jego
działanie też będzie podobne: w drugiej linii powstaje kopia wartości w s1 i
zostaje ona przypisana do s2. Ale tak się akurat nie dzieje.
Rysunek 4-1 objaśnia, co dzieje się we wnętrzu typu String. Typ String
składa się z trzech części, pokazanych po lewej stronie. Są to: wskaźnik do
pamięci przechowującej właściwy łańcuch znaków, znacznik jego długości
(length) i dane o ilości pamięci dostępnej dla danego ciągu (capacity). Ta
grupa danych przechowywana jest na stosie. Po prawej pokazano obszar pamięci na
stercie, który zawiera tekst.

Rysunek 4-1: Reprezentacja pamięci dla typu String
przechowującego wartość "witaj" przypisaną do s1
Length (długość) wskazuje, ile bajtów pamięci zajmuje bieżący ciąg znaków w
zmiennej typu String, natomiast capacity (pojemność) przechowuje dane o całkowitej
ilości pamięci, jaką alokator dla tej zmiennej przydzielił. Różnica
między długością i pojemnością ma znaczenie, ale nie w tym kontekście. Dlatego na
razie możemy zignorować pojemność.
Kiedy przypisujemy s1 do s2, dane ze zmiennej typu String zostają
skopiowane. Dotyczy to przechowywanych na stosie: wskaźnika, długości i
pojemności. Dane tekstowe, do których odnosi się wskaźnik nie są kopiowane.
Innymi słowy, reprezentację pamięci w tej sytuacji ilustruje Rysunek 4-2.

Rysunek 4-2: Reprezentacja w pamięci zmiennej s2
posiadającej kopię wskaźnika i znaczników długości i pojemności zmiennej s1
Rysunek 4-3 ukazuje nieprawdziwą reprezentację pamięci, w której Rust również
skopiował dane na stercie. Gdyby taka sytuacja miała miejsce, operacja
s2 = s1 mogłaby potencjalnie zająć dużo czasu, w przypadku sporej ilości
danych na stercie.

Rysunek 4-3: Hipotetyczny wynik operacji s2 = s1, gdyby
Rust również kopiował dane sterty
Wcześniej powiedzieliśmy, że kiedy zasięg zmiennej się kończy, Rust wywołuje
automatycznie funkcję drop i zwalnia obszar na stercie dla tej zmiennej. Ale
na Rysunku 4-2 przedstawiono sytuację, w której oba wskaźniki wskazują na ten
sam obszar. Jest to problematyczne: kiedy zasięg s2 i s1 się skończy,
nastąpi próba dwukrotnego zwolnienia tej samej pamięci. Sytuacja ta jest znana
jako błąd podwójnego zwolnienia i należy do grupy bugów bezpieczeństwa
pamięci, o których wcześniej wspomnieliśmy. Podwójne zwalnianie pamięci może
prowadzić do jej zepsucia, a w efekcie do potencjalnych luk bezpieczeństwa.
Aby zapewnić bezpieczeństwo pamięci, po linii let s2 = s1;, zamiast próbować skopiować zaalokowaną pamięć, Rust
traktuje zmienną s1 jako unieważnioną i, tym samym, nie musi nic zwalniać, kiedy zasięg s1 się kończy. Zobaczmy, co stanie się przy próbie użycia zmiennej s1 po utworzeniu zmiennej s2. Próba się nie powiedzie:
fn main() {
    let s1 = String::from("witaj");
    let s2 = s1;

    println!("{}, świecie!", s1);
}
Rust zwróci poniższy błąd, ponieważ nie zezwala na odnoszenie się do elementów przy użyciu unieważnionych zmiennych:
$ cargo run
   Compiling ownership v0.1.0 (file:///projects/ownership)
error[E0382]: borrow of moved value: `s1`
 --> src/main.rs:5:28
  |
2 |     let s1 = String::from("witaj");
  |         -- move occurs because `s1` has type `String`, which does not implement the `Copy` trait
3 |     let s2 = s1;
  |              -- value moved here
4 |
5 |     println!("{}, świecie!", s1);
  |                              ^^ value borrowed here after move
  |
  = note: this error originates in the macro `$crate::format_args_nl` which comes from the expansion of the macro `println` (in Nightly builds, run with -Z macro-backtrace for more info)
help: consider cloning the value if the performance cost is acceptable
  |
3 |     let s2 = s1.clone();
  |                ++++++++

For more information about this error, try `rustc --explain E0382`.
error: could not compile `ownership` due to previous error
Jeśli słyszałeś terminy „płytka kopia” oraz „głęboka kopia” pracując
z innymi językami, to z pewnością wiesz, że skopiowanie wskaźnika ze znacznikami długości
i pojemności, ale bez kopiowania danych, przypomina tworzenie płytkiej kopii.
Ale ponieważ Rust jednocześnie unieważnia źródłową zmienną, zamiast nazywać taki
proces płytką kopią, używa się terminu przeniesienie. W tym przypadku
moglibyśmy powiedzieć, że zmienna s1 została przeniesiona do s2. Rysunek
4-4 ilustruje, co tak naprawdę dzieje się w pamięci.

Rysunek 4-4: Reprezentacja w pamięci po unieważnieniu
zmiennej s1
To rozwiązuje nasz problem! Jeśli jedynie zmienna s2 zachowuje ważność, to w
momencie wyjścia z zasięgu, jako jedyna zwolni zajmowaną pamięć i po sprawie.
Dodatkowo, implikuje to decyzję w budowie języka: Rust nigdy automatycznie nie tworzy „głębokich” kopii twoich danych. Można zatem założyć, że automatyczny proces kopiowania nie będzie drogą operacją w sensie czasu jej trwania.
Klonowanie zmiennych i danych
W przypadku gdy chcemy wykonać głęboką kopię danych ze sterty dla typu
String, a nie tylko danych ze stosu, możemy skorzystać z często stosowanej
metody o nazwie clone (klonuj). Składnia metod będzie omawiana w rozdziale
5, ale ponieważ metody są popularnymi funkcjonalnościami wielu języków, zapewne
już je wcześniej widziałeś.
Oto przykład działania metody clone:
fn main() {
    let s1 = String::from("witaj");
    let s2 = s1.clone();

    println!("s1 = {}, s2 = {}", s1, s2);
}
Ten przykład działa bez problemu i ilustruje on celowe odtworzenie zachowania pokazanego na Rysunku 4-3, na którym dane ze sterty są kopiowane.
Kiedy widzisz odwołanie do metody clone, możesz się spodziewać, że wykonywana
operacja będzie kosztowna czasowo.
Dane przechowywane wyłącznie na stosie: Copy (kopiowanie)
Jest jeszcze jeden szczegół, którego nie omówiliśmy. Kod korzystający z liczb całkowitych, którego treść pokazano na listingu 4-2, działa i jest prawidłowy:
fn main() {
    let x = 5;
    let y = x;

    println!("x = {}, y = {}", x, y);
}
Zdaje się on przeczyć temu, czego przed chwilą się nauczyliśmy: nie mamy
wywołania clone, ale zmienna x zachowuje ważność i nie zostaje
przeniesiona do y.
Przyczyną jest to, że typy takie jak liczby całkowite, które mają znany rozmiar
już podczas kompilacji, są w całości przechowywane na stosie. Tworzenie kopii
ich wartości jest więc szybkie. To oznacza, że nie ma powodu unieważniać zmiennej
x po stworzeniu zmiennej y. Innymi słowy, w tym wypadku nie ma różnicy
między głęboką i płytką kopią, więc wywołanie metody clone nie różniłoby się
od zwykłego płytkiego kopiowania i można je zatem pominąć.
Rust zawiera specjalną adnotację zwaną „cechą Copy”, którą można
zaimplementować dla typów przechowywanych na stosie, takich jak liczby
całkowite (więcej o cechach będzie w rozdziale 10). Jeśli dany typ ma
zaimplementowaną cechę Copy, zmienną, którą przypisano do innej zmiennej,
można dalej używać.
Rust nie pozwoli dodać adnotacji Copy do żadnego typu, dla którego zaimplementowano (lub zaimplementowano dla jakiejkolwiek jego części tego typu) cechę Drop. Jeśli typ wymaga
wykonania konkretnych operacji po tym, jak reprezentującej go zmiennej kończy
się zasięg, a dodamy dla tego typu cechę Copy, uzyskamy błąd kompilacji. Aby
nauczyć się, jak implementować cechę Copy dla danego typu, zajrzyj do
„Cechy wyprowadzalne” w Dodatku C.
Które więc typy mają cechę Copy? Dla danego typu można dla pewności sprawdzić
w dokumentacji, ale jako regułę zapamiętaj, że każda grupa wartości skalarnych
może mieć cechę Copy i nic, co wymaga alokacji lub jest pewnego rodzaju
zasobem jej nie ma. Oto przykłady typów z zaimplementowaną cechą Copy:
- Wszystkie typy całkowite, takie jak
u32. - Typ logiczny,
bool, z wartościamitrueorazfalse. - Wszystkie typy zmiennoprzecinkowe, jak
f64. - Typ znakowy,
char. - Krotki, jeśli zawierają wyłącznie typy z cechą
Copy. Na przykład,(i32, i32)ma cechęCopy, ale(i32, String)już nie.
Własność i funkcje
Mechanika przekazywania wartości do funkcji jest podobna do przypisania wartości do zmiennej. Przekazanie zmiennej do funkcji przeniesie ją lub skopiuje, tak jak przy przypisywaniu. Listing 4-3 ukazuje przykład z kilkoma adnotacjami ilustrującymi, kiedy zaczynają się lub kończą zasięgi zmiennych:
Plik: src/main.rs
fn main() {
	let s = String::from("witaj");       // s pojawia się w zasięgu

	bierze_na_wlasnosc(s);      // Wartość zmiennej s przenosi się do funkcji...
	// ...i w tym miejscu zmienna jest unieważniona.

	let x = 5;                      // Zaczyna się zasięg zmiennej x.

	robi_kopie(x);           // Wartość x przeniosłaby się do funkcji, ale
	// typ i32 ma cechę Copy, więc w dalszym ciągu
	// można używać zmiennej x.

} // Tu kończy sie zasięg zmiennych x, a potem s. Ale ponieważ wartość s
  // została przeniesiona, nie dzieje się nic szczególnego.

fn bierze_na_wlasnosc(jakis_string: String) { // Zaczyna się zasięg some_string.
	println!("{}", jakis_string);
} // Tu kończy się zasięg jakis_string i wywołana zostaje funkcja `drop`.
  // Zajmowana pamięć zostaje zwolniona.

fn robi_kopie(jakas_calkowita: i32) { // Zaczyna się zasięg jakas_calkowita.
	println!("{}", jakas_calkowita);
} // Tu kończy się zasięg jakas_calkowita. Nic szczególnego się nie dzieje.
Listing 4-3: Funkcje z adnotacjami dotyczącymi własności i zasięgów
Gdybyśmy spróbowali użyć s po wywołaniu bierze_na_wlasnosc, Rust
wygenerowałby błąd kompilacji. Te statyczne kontrole chronią nas przed
popełnianiem błędów. Spróbuj dodać do main kod, który używa zmiennych s oraz
x, żeby zobaczyć, gdzie można ich używać, a gdzie zasady systemu własności nam
tego zabraniają.
Wartości zwracane i ich zasięg
Wartości zwracane mogą również przenosić własność. Listing 4-4 ilustruje przykład z podobnymi komentarzami do tych z listingu 4-3.
Plik: src/main.rs
fn main() {
    let s1 = daje_wlasnosc();       // daje_wlasnosc przenosi zwracaną
                                    // wartość do s1.

    let s2 = String::from("witaj"); // Rozpoczyna się zasięg s2.

    let s3 = bierze_i_oddaje(s2);   // s2 zostaje przeniesiona do
                                    // bierze_i_oddaje, która jednocześnie
                                    // przenosi swoją wartość zwracaną do s3.
} // Tutaj kończy się zasięg s3 i jej dane zostają zwolnione. Zasięg s2 też, ale
  // ponieważ jej dane przeniesiono, nic się nie dziejej. Zasięg s1 kończy się,
  // a jej dane zostają zwolnione.

fn daje_wlasnosc() -> String {                // daje_wlasnosc przenosi jej
                                              // wartość zwracaną do funkcji,
                                              // która ją wywołała.

    let jakis_string = String::from("wasze"); // Początek zasięgu jakis_string.

    jakis_string                              // jakis_string jest zwracany i
                                              // przeniesiony do funkcji
                                              // wywołującej.
}

// bierze_i_oddaje bierze dane w zmiennej String i zwraca je w innej.
fn bierze_i_oddaje(a_string: String) -> String { // Rozpoczyna się zasięg
                                                 // zmiennej a_string.

    a_string // a_string zostaje zwrócona i przeniesiona do funkcji wywołującej.
}
Listing 4-4: Przenoszenie własności wartości zwracanych
Własność zmiennej zachowuje się zawsze w ten sam sposób: przypisanie wartości do
innej zmiennej przenosi tę wartość. Kiedy kończy się zasięg zmiennej
zawierającej dane ze sterty, dane te zostaną zwolnione przez drop, chyba że
przekażemy je na własność innej zmiennej.
Przyjmowanie własności, a następnie oddawanie jej przy wywołaniu każdej funkcji jest trochę pracochłonne. A co jeśli chcemy zezwolić funkcji na użycie wartości, ale nie chcemy, by przejęła ją na własność? To dość denerwujące, kiedy wszystko, co przekazujemy, musi zostać powtórnie zabrane, jeśli chcemy tego ponownie użyć. Nie mówiąc już o danych generowanych przy okazji normalnego działania funkcji, które być może także chcielibyśmy zwrócić.
Z funkcji można zwrócić kilka wartości za pomocą krotki. Listing 4-5 ilustruje ten przypadek.
Plik: src/main.rs
fn main() {
    let s1 = String::from("witaj");

    let (s2, len) = oblicz_dlugosc(s1);

    println!("Długość '{}' wynosi {}.", s2, len);
}

fn oblicz_dlugosc(s: String) -> (String, usize) {
    let dlugosc = s.len(); // len() zwraca długość łańcucha znaków.

    (s, dlugosc)
}
Listing 4-5: Zwracanie własności przez argumenty
Wymaga to dużo niepotrzebnej pracy, podczas gdy koncept ten spotykany jest powszechnie. Na szczęście dla nas, Rust wyposażony jest w referencje, które świetnie obsługują takie przypadki.
Referencje i pożyczanie
Z rozwiązaniem z krotką zastosowanym na listingu 4-5 związana jest taka niedogodność,
że musieliśmy zwrócić String do funkcji wywołującej, by ta mogła dalej z niego korzystać
(po wywołaniu calculate_length). Było tak dlatego że wspomniany String był przenoszony do calculate_length.
Funkcję calculate_length można jednak zdefiniować tak, by jako parametr przekazywana była jedynie referencja do obiektu i dzięki temu nie był on przez calculate_length przejmowany na własność.
Referencja jest podobna do wskaźnika. Jest ona adresem pod którym przechowywane są dane i dzięki niej możemy uzyskać do nich dostęp. Dane te są własnością innej zmiennej.
W przeciwieństwie do wskaźnika, referencja daje gwarancję, że przez cały czas swojego życia, będzie wskazywać na poprawną wartość danego typu.
Oto jak zdefiniować i użyć funkcji calculate_length, która jako parametr otrzymuje referencję do obiektu:
Plik: src/main.rs
fn main() {
	let s1 = String::from("witaj");

	let len = calculate_length(&s1);

	println!("Długość '{}' wynosi {}.", s1, len);
}

fn calculate_length(s: &String) -> usize {
	s.len()
}
Po pierwsze proszę zauważyć, że krotki nie są nam już dalej potrzebne. Nie ma ich ani przy deklaracji zmiennej, ani w typie zwracanym przez funkcję calculate_length. Po drugie, proszę zwrócić uwagę, że przekazujemy do tej funkcji &s1 oraz, że typ jej parametru został zmieniony z String na &String.
Te ampersandy oznaczają referencje (ang. references) i pozwalają na odnoszenie się (referowanie) do wartości bez przejmowania jej na własność. Jest to zilustrowane na Rysunku 4-5.

Rysunek 4-5: &String s wskazuje na String s1
Uwaga: Przeciwieństwem referowania za pomocą
&jest dereferowanie, które realizowane jest za pomocą operatora dereferencji,*. W rozdziale 8 przedstawiono przykładowe zastosowania operatora dereferencji, zaś więcej szczegółów na jego temat można znaleźć w rozdziale 15.
Przyjrzyjmy się nieco bliżej temu wywołaniu funkcji:
fn main() {
	let s1 = String::from("witaj");

	let len = calculate_length(&s1);

	println!("Długość '{}' wynosi {}.", s1, len);
}

fn calculate_length(s: &String) -> usize {
	s.len()
}
Składnia &s1 tworzy referencję, która co prawda referuje do s1, ale nie posiada go na własność.
Skoro zaś go nie posiada, to wskazywana przez nią wartość nie zostanie zwolniona wraz z końcem zasięgu życia samej referencji.
Sygnatura funkcji także używa & do wskazania, że s jest referencją. Poniżej dodano kilka komentarzy z wyjaśnieniami:
fn main() {
	let s1 = String::from("witaj");

	let len = calculate_length(&s1);

	println!("Długość '{}' wynosi {}.", s1, len);
}

fn calculate_length(s: &String) -> usize { // s jest referencją do Stringa
	s.len()
} // Tu kończy się zasięg s. Ale ponieważ s nie posiada na własność tego
  // na co wskazuje, nic się nie dzieje.
Zasięg, w którym zmienna s posiada ważność, jest taki sam jak zasięg każdego innego parametru funkcji.
Jednakże, ponieważ s nie posiada tego, na co wskazuje, to nie jest to kasowane gdy s wyjdzie poza swój zasięg.
W przeciwieństwie do argumentów przekazywanych przez wartość, te przekazywane przez referencje nie są funkcji dawane na własność.
Dlatego też funkcja nie musi więcej zwracać ich za pomocą return, by je oddać.
Przekazywanie referencji jako parametrów funkcji nazywamy pożyczaniem (ang. borrowing). I jak w prawdziwym życiu, jeśli ktoś coś posiada, możemy to od niego pożyczyć. W końcu jednak musimy mu to także oddać.
Co więc się stanie gdy spróbujemy zmodyfikować coś, co pożyczyliśmy? Wypróbujmy kod z listingu 4-6. Uwaga: on nie zadziała!
Plik: src/main.rs
fn main() {
	let s = String::from("witaj");

	change(&s);
}

fn change(some_string: &String) {
	some_string.push_str(", świecie");
}
Listing 4-6: Próba modyfikacji pożyczonej wartości
Otrzymamy następujący błąd:
$ cargo run
   Compiling ownership v0.1.0 (file:///projects/ownership)
error[E0596]: cannot borrow `*some_string` as mutable, as it is behind a `&` reference
 --> src/main.rs:8:5
  |
7 | fn change(some_string: &String) {
  |                        ------- help: consider changing this to be a mutable reference: `&mut String`
8 |     some_string.push_str(", world");
  |     ^^^^^^^^^^^^^^^^^^^^^^^^^^^^^^^ `some_string` is a `&` reference, so the data it refers to cannot be borrowed as mutable

For more information about this error, try `rustc --explain E0596`.
error: could not compile `ownership` due to previous error
Tak jak zmienne, referencje są domyślnie niemutowalne. Nie możemy zmieniać czegoś do czego mamy referencję.
Referencje mutowalne
Możemy wyeliminować błąd z kodu z listingu 4-6 wprowadzając drobną poprawkę, by używać mutowalnej referencji (mutable reference):
Plik: src/main.rs
fn main() {
    let mut s = String::from("witaj");

    change(&mut s);
}

fn change(some_string: &mut String) {
	some_string.push_str(", świecie");
}
Po pierwsze, zmieniliśmy s by było mut. Następnie, w miejscu wywołania funkcji zmien utworzyliśmy mutowalną referencję za pomocą &mut s i ją przyjęliśmy za pomocą some_string: &mut String w sygnaturze funkcji.
Taka składnia czytelnie pokazuje, że funkcja zmien będzie zmieniać wartość, którą pożycza.
Jednakże mutowalne referencję posiadają jedno spore ograniczenie: w danym zasięgu można mieć tylko jedną mutowalną referencję do konkretnych danych. Ten kod nie skompiluje się:
Plik: src/main.rs
fn main() {
    let mut s = String::from("witaj");

    let r1 = &mut s;
    let r2 = &mut s;

    println!("{}, {}", r1, r2);
}
Otrzymamy następujący błąd:
$ cargo run
   Compiling ownership v0.1.0 (file:///projects/ownership)
error[E0499]: cannot borrow `s` as mutable more than once at a time
 --> src/main.rs:5:14
  |
4 |     let r1 = &mut s;
  |              ------ first mutable borrow occurs here
5 |     let r2 = &mut s;
  |              ^^^^^^ second mutable borrow occurs here
6 |
7 |     println!("{}, {}", r1, r2);
  |                        -- first borrow later used here

For more information about this error, try `rustc --explain E0499`.
error: could not compile `ownership` due to previous error
This error says that this code is invalid because we cannot borrow s as
mutable more than once at a time. The first mutable borrow is in r1 and must
last until it’s used in the println!, but between the creation of that
mutable reference and its usage, we tried to create another mutable reference
in r2 that borrows the same data as r1.
To ograniczenie pozwala na mutowalność jedynie w bardzo kontrolowany sposób. Może ono być kłopotliwe dla początkujących rustowców, gdyż większość innych języków nie nakłada podobnych ograniczeń. Korzyścią z tego ograniczenia jest to, że Rust może zapobiec tzw. wyścigom do danych (ang. data races) i to już na etapie kompilacji. Wyścig do danych podobny jest do wyścigu (ang. race condition) i ma miejsce, gdy zachodzą następujące trzy warunki:
- W tym samym czasie współistnieją dwa lub więcej wskaźniki umożliwiające dostęp do tych samych danych.
- Przynajmniej jeden z tych wskaźników jest używany do zapisu danych.
- Nie ma żadnego mechanizmu synchronizacji dostępu do danych.
Wyścigi danych powodują niezdefiniowane zachowania i mogą być trudne do zdiagnozowania, wyśledzenia w czasie wykonywania programu i naprawienia; Tymczasem Rust całkowicie im zapobiega, nie kompilując nawet kodu który je zawiera!
Oczywiście zawsze możemy użyć nawiasów klamrowych do stworzenia nowego zasięgu, pozwalając na wiele mutowalnych referencji, ale nie równocześnie:
fn main() {
    let mut s = String::from("witaj");

    {
        let r1 = &mut s;
    } // tu kończy się czas życia r1, więc odtąd możemy bez problemu utworzyć kolejną referencję

    let r2 = &mut s;
}
Podobne ograniczenie dotyczy mieszania referencji mutowalnych z niemutowalnymi. Następujący kod nie skompiluje się:
fn main() {
    let mut s = String::from("witaj");

    let r1 = &s; // no problem
    let r2 = &s; // no problem
    let r3 = &mut s; // DUŻY PROBLEM

    println!("{}, {}, i {}", r1, r2, r3);
}
Kompilator wyświetli następujący komunikat błędu:
$ cargo run
   Compiling ownership v0.1.0 (file:///projects/ownership)
error[E0502]: cannot borrow `s` as mutable because it is also borrowed as immutable
 --> src/main.rs:6:14
  |
4 |     let r1 = &s; // no problem
  |              -- immutable borrow occurs here
5 |     let r2 = &s; // no problem
6 |     let r3 = &mut s; // DUŻY PROBLEM
  |              ^^^^^^ mutable borrow occurs here
7 |
8 |     println!("{}, {}, i {}", r1, r2, r3);
  |                              -- immutable borrow later used here

For more information about this error, try `rustc --explain E0502`.
error: could not compile `ownership` due to previous error
Fiu, fiu! Mutowalnej referencji nie możemy mieć także gdy mamy niemutowalną.
Użytkownicy niemutowalnej referencji nie spodziewają się, że wartość do której ta referencja się odnosi, może się nagle zmienić! Jednakże, istnienie wielu niemutowalnych referencji niczemu nie zagraża, bo nie dają one możliwość zmiany danych i wpłynięcia na to, co odczytają inni.
Uwaga: zasięg życia referencji zaczyna się w miejscu jej utworzenia, kończy się zaś w miejscu jej ostatniego użycia. Przykładowo, następujący kod skompiluje się, bo ostatnie użycie niemutowalnej referencji, println!, występuje przed wprowadzeniem mutowalnej:
fn main() {
    let mut s = String::from("witaj");

    let r1 = &s; // no problem
    let r2 = &s; // no problem
    println!("{} and {}", r1, r2);
    // zmienne r1 i r2 dalej nie są używane

    let r3 = &mut s; // no problem
    println!("{}", r3);
}
Zasięgi życia niemutowalnych referencji r1 i r2 kończą się zaraz po println! w którym są one ostatni raz użyte, czyli przed utworzeniem mutowalnej referencji r3. Te zasięgi się nie zazębiają i dlatego kompilator ten kod akceptuje.
Błędy kompilacji związane z pożyczaniem mogą być czasami frustrujące. Pamiętajmy jednak, że nierzadko wskazują one potencjalne błędy, dokładnie wskazując problem, i to na wczesnym etapie, w czasie kompilacji, a nie wykonywania programu. Dzięki nim nie musimy odkrywać, dlaczego nasze dane są inne niż się spodziewaliśmy.
Wiszące referencje
W językach ze wskaźnikami, łatwo jest błędnie stworzyć wiszący wskaźnik, tj. taki, który odnosi się do miejsca w pamięci, które mogło być przekazane komuś innemu, poprzez zwolnienie pamięci przy jednoczesnym zachowaniu wskaźnika do niej. W Ruście natomiast, kompilator gwarantuje, że referencje nigdy nie będą wiszące: kompilator zawsze dba o to, aby jakiekolwiek dane nie wyszły poza zasięg wcześniej, niż referencje do tych danych.
Spróbujmy utworzyć wiszącą referencję. Rust nam to uniemożliwi, zgłaszając następujący błąd kompilacji:
Plik: src/main.rs
fn main() {
    let reference_to_nothing = dangle();
}

fn dangle() -> &String {
    let s = String::from("witaj");

    &s
}
Komunikat błędu:
$ cargo run
   Compiling ownership v0.1.0 (file:///projects/ownership)
error[E0106]: missing lifetime specifier
 --> src/main.rs:5:16
  |
5 | fn dangle() -> &String {
  |                ^ expected named lifetime parameter
  |
  = help: this function's return type contains a borrowed value, but there is no value for it to be borrowed from
help: consider using the `'static` lifetime
  |
5 | fn dangle() -> &'static String {
  |                 +++++++

For more information about this error, try `rustc --explain E0106`.
error: could not compile `ownership` due to previous error
This error message refers to a feature we haven’t covered yet: lifetimes. We’ll discuss lifetimes in detail in Chapter 10. But, if you disregard the parts about lifetimes, the message does contain the key to why this code is a problem:
Ten komunikat odnosi się do czegoś, czego jeszcze nie omawialiśmy: czasów życia (ang. lifetimes). Będziemy omawiać je szczegółowo w rozdziale 10. Pomijając jednak części o czasie życia, wiadomość zawiera jasne wskazanie problemu związanego z naszym kodem:
this function's return type contains a borrowed value, but there is no value
for it to be borrowed from
Przyjrzyjmy się dokładnie temu, co dzieje się na każdym etapie kodu dangle:
Plik: src/main.rs
fn main() {
    let reference_to_nothing = dangle();
}

fn dangle() -> &String { // dangle zwraca referencję do Stringa

    let s = String::from("witaj"); // s to nowy String

    &s // zwracamy referencję do Stringa s
} // Tutaj s wychodzi z zasięgu i jest zwalniane. Znika z pamięci.
  // Niebezpieczeństwo!
Jako że s jest tworzony wewnątrz dangle, to jest on zwalniany wraz z końcem dangle.
Jednocześnie próbujemy zwrócić referencję do s. Ta referencja wskazywałaby na nieprawidłowy String. To niedobre!
Rust nie pozwoli nam tego zrobić.
Rozwiązaniem jest zwrócenie Stringa bezpośrednio:
fn main() {
    let string = no_dangle();
}

fn no_dangle() -> String {
    let s = String::from("witaj");

    s
}
To działa bez żadnych problemów. Własność jest przenoszona na zewnątrz i nic nie jest zwalniane.
Zasady dotyczące referencji
Podsumujmy informacje na temat referencji:
- W każdej chwili możesz mieć albo jedną referencję mutowalną albo dowolną liczbę referencji niemutowalnych.
- Referencje zawsze muszą być poprawne.
Wkrótce przyjrzymy się innemu rodzajowi referencji: wycinkowi (ang. slice).
Wycinki
Kolejnym typem danych, który nie przejmuje własności jest wycinek (ang. slice). Wycinki pozwalają na odniesienie się do wybranej ciągłej sekwencji elementów w kolekcji, bez konieczności odnoszenia się do całej kolekcji.
Rozważmy mały problem programistyczny: napisać funkcję, która pobiera łańcuch znaków zawierający słowa rozdzielone spacjami i zwraca pierwsze słowo, które się w nim znajdzie. Jeśli funkcja nie znajdzie znaku spacji w łańcuchu, należy założyć, że cały łańcuch stanowi jedno słowo i zwrócić go w całości.
Pomyślmy nad sygnaturą tej funkcji (na razie bez użycia wycinków, by zrozumieć problem, który one rozwiązują):
fn first_word(s: &String) -> ?Funkcja first_word przyjmuje parametr typu &String, co jest w porządku, bo funkcja ta nie potrzebuje tego łańcucha na własność. Ale jakiego typu wynik powinna zwrócić? Naprawdę brakuje nam sposobu na mówienie o części łańcucha. Możemy jednak zwrócić indeks końca słowa wskazanego przez spację. Próbujmy tego dokonać na listingu 4-7.
Plik: src/main.rs
fn first_word(s: &String) -> usize {
    let bytes = s.as_bytes();

    for (i, &item) in bytes.iter().enumerate() {
        if item == b' ' {
            return i;
        }
    }

    s.len()
}

fn main() {}
Listing 4-7: Funkcja first_word zwracająca indeks bajta w parametrze typu String
By przejść przez String element po elemencie i spróbować znaleźć spacje, konwertujemy nasz String na tablicę bajtów używając metody as_bytes.
fn first_word(s: &String) -> usize {
    let bytes = s.as_bytes();

    for (i, &item) in bytes.iter().enumerate() {
        if item == b' ' {
            return i;
        }
    }

    s.len()
}

fn main() {}
Następnie tworzymy iterator po tablicy bajtów za pomocą metody iter:
fn first_word(s: &String) -> usize {
    let bytes = s.as_bytes();

    for (i, &item) in bytes.iter().enumerate() {
        if item == b' ' {
            return i;
        }
    }

    s.len()
}

fn main() {}
Iteratory omówimy szczegółowo w rozdziale 13.
Na razie wiedzmy, że iter jest metodą, która daje nam każdy element w kolekcji, zaś enumerate opakowuje wynik iter i daje każdy element jako część krotki.
Pierwszy element tej krotki to indeks, a drugi element to referencja do elementu z kolekcji.
Użycie enumerate jest wygodniejsze od samodzielnego obliczanie indeksu.
Metoda enumerate daje krotkę, którą destrukturyzujemy za pomocą wzorca.
Wzorce omówimy szczegółowo w rozdziale 6.
W pętli for używamy wzorca dopasowanego do krotki, w którym i jest dopasowane do zawartego w niej indeksu, zaś &item do bajtu.
Ponieważ z .iter().enumerate() otrzymujemy referencję do elementu (bajtu), we wzorcu używamy &.
Wewnątrz pętli for szukamy bajtu będącego spacją poprzez porównywanie do reprezentującego go literału. Gdy znajdziemy spację, zwracamy jej pozycję.
W przeciwnym razie zwracamy długość łańcucha otrzymaną za pomocą s.len().
fn first_word(s: &String) -> usize {
    let bytes = s.as_bytes();

    for (i, &item) in bytes.iter().enumerate() {
        if item == b' ' {
            return i;
        }
    }

    s.len()
}

fn main() {}
Mamy teraz wprawdzie sposób na znalezienie indeksu końca pierwszego słowa, ale nie jest on wolny od wad.
Zwracamy osobną liczbę typu usize, która ma jednak znaczenie jedynie w kontekście &String.
Innymi słowy, ponieważ jest to wartość niezależna od naszego Stringa, to nie ma gwarancji, że w przyszłości zachowa ona ważność. Rozważmy program z listingu 4-8, który używa funkcji first_word z listingu 4-7.
Plik: src/main.rs
fn first_word(s: &String) -> usize {
    let bytes = s.as_bytes();

    for (i, &item) in bytes.iter().enumerate() {
        if item == b' ' {
            return i;
        }
    }

    s.len()
}

fn main() {
    let mut s = String::from("witaj świecie");

    let word = first_word(&s); // word otrzyma wartość 5

    s.clear(); // to czyści łańcuch s, czyniąc go równym ""

    // tutaj word wciąż ma wartość 5, ale nie ma już łańcucha
    // dla którego 5 coś znaczy. word zupełnie straciło ważność!
}
Listing 4-8: Zachowanie wyniku zwróconego przez funkcję
first_word i zmiana wartości Stringa
Ten program kompiluje się bez błędów i zrobiłby to również, gdybyśmy użyli zmiennej word po wywołaniu s.clear().
Ponieważ word nie jest w ogóle związany ze stanem s, word nadal zawiera wartość 5.
Moglibyśmy spróbować użyć tej wartości 5 aby wyodrębnić pierwsze słowo z s, ale byłby to błąd, ponieważ zawartość s zmieniła się od czasu gdy zapisaliśmy 5 w word.
Martwienie się o to, że indeks w word przestanie być zsynchronizowany z danymi w s jest uciążliwe i podatne na błędy!
Zarządzanie tymi indeksami byłoby jeszcze bardziej uciążliwe, gdybyśmy chcieli napisać funkcję second_word (z ang. drugie słowo). Jej sygnatura musiałaby wyglądać tak:
fn second_word(s: &String) -> (usize, usize) {Teraz śledzimy indeks początkowy i końcowy. Jest więc więcej wartości, które zostały obliczone na podstawie danych w określonym stanie, ale nie są w ogóle związane z tym stanem. Mamy trzy niepowiązane zmienne wymagające synchronizacji.
Na szczęście Rust ma rozwiązanie tego problemu: wycinki łańcuchów (ang. string slices).
Wycinki Łańcuchów
Wycinek łańcucha (ang. string slice) jest referencją do części Stringa i wygląda tak:
fn main() {
    let s = String::from("hello world");

    let hello = &s[0..5];
    let world = &s[6..11];
}
Zamiast referencji do całego Stringa, hello jest referencją do jego części, opisanej fragmentem [0..5].
Wycinek tworzymy podając zakres w nawiasach [indeks_początkowy..indeks_końcowy] i obejmuje on indeksy od indeks_początkowy włącznie do indeks_końcowy wyłącznie.
Wewnętrznie, struktura danych wycinka przechowuje indeks jego początku i jego długość, która jest równa indeks_końcowy minus indeks_początkowy.
Więc w przypadku let world = &s[6..11];, world jest wycinkiem składającym się ze wskaźnik do bajtu o indeksie 6 w s i z długości 5.
Rysunek 4-6 pokazuje to w formie diagramu.

Rysunek 4-6: Wycinek łańcucha wskazujący część Stringa
Jeżeli indeksem początkowym jest 0 to można je opcjonalnie pominąć.
Innymi słowy, dwa wycinki podane poniżej są takie same:
#![allow(unused)]
fn main() {
let s = String::from("witaj");

let slice = &s[0..2];
let slice = &s[..2];
}
Analogicznie, jeśli wycinek zawiera ostatni bajt Stringa, to można zrezygnować z podania indeksu końcowego.
Dwa wycinki podane poniżej także są sobie równoważne:
#![allow(unused)]
fn main() {
let s = String::from("witaj");

let len = s.len();

let slice = &s[3..len];
let slice = &s[3..];
}
Można również pominąć oba indeksy, aby uzyskać wycinek obejmujący cały łańcuch. Następujące wycinki także są sobie równoważne:
#![allow(unused)]
fn main() {
let s = String::from("witaj");

let len = s.len();

let slice = &s[0..len];
let slice = &s[..];
}
Uwaga: Indeksy zakresu wycinka łańcucha muszą znajdować się na granicach znaków UTF-8. Próba utworzenia wycinka w środku wielobajtowego znaku spowoduje zakończenie programu z błędem. We wprowadzeniu do wycinków łańcuchów zawartym w niniejszym rozdziale ograniczamy się jedynie do znaków ASCII, zaś bardziej szczegółowe omówienie obsługi UTF-8 znajduje się w sekcji "Przechowywanie Tekstów UTF-8 za Pomocą Łańcuchów" rozdziału 8.
Mając na uwadze powyższe informacje, przepiszmy first_word tak, aby zwracał wycinek.
Typ oznaczający "wycinek łańcucha" zapisujemy jako &str:
Plik: src/main.rs
fn first_word(s: &String) -> &str {
    let bytes = s.as_bytes();

    for (i, &item) in bytes.iter().enumerate() {
        if item == b' ' {
            return &s[0..i];
        }
    }

    &s[..]
}

fn main() {}
Indeks końca słowa otrzymujemy w taki sam sposób, jak na listingu 4-7, czyli odnajdując pierwsze wystąpienie spacji. Gdy znajdziemy spację, zwracamy wycinek łańcucha używając początku łańcucha i indeksu spacji jako odpowiednio indeksu początkowego i końcowego.
Teraz, gdy wywołujemy first_word, otrzymujemy w wyniku pojedynczą wartość, związaną z danymi wejściowymi. Wartość ta składa się z referencji do punktu początkowego wycinka i liczby elementów w wycinku.
Zwrócenie wycinka zadziałałoby również w przypadku funkcji second_word:
fn second_word(s: &String) -> &str {Mamy teraz proste API, które jest znacznie odporniejsze na błędy, ponieważ kompilator zapewni, że referencje do Stringa pozostaną ważne.
Proszę przypomnieć sobie błąd w programie z listingu 4-8, kiedy uzyskaliśmy indeks do końca pierwszego słowa, ale potem wyczyściliśmy łańcuch i nasz indeks utracił ważność. Tamten kod był logicznie niepoprawny, ale jego błędy początkowo się nie ujawniały. Problemy ujawniłyby się dopiero gdybyśmy spróbowali użyć indeksu pierwszego słowa z wyczyszczonym łańcuchem. Wycinki zapobiegają podobnym błędom i dają nam znać, że mamy problem z naszym kodem znacznie wcześniej. Funkcja first_word używająca wycinków obnaża wspomniane błędy już podczas kompilacji:
Plik: src/main.rs
fn first_word(s: &String) -> &str {
    let bytes = s.as_bytes();

    for (i, &item) in bytes.iter().enumerate() {
        if item == b' ' {
            return &s[0..i];
        }
    }

    &s[..]
}

fn main() {
    let mut s = String::from("hello world");

    let word = first_word(&s);

    s.clear(); // error!

    println!("the first word is: {}", word);
}
Oto błąd kompilatora:
$ cargo run
   Compiling ownership v0.1.0 (file:///projects/ownership)
error[E0502]: cannot borrow `s` as mutable because it is also borrowed as immutable
  --> src/main.rs:18:5
   |
16 |     let word = first_word(&s);
   |                           -- immutable borrow occurs here
17 |
18 |     s.clear(); // error!
   |     ^^^^^^^^^ mutable borrow occurs here
19 |
20 |     println!("the first word is: {}", word);
   |                                       ---- immutable borrow later used here

For more information about this error, try `rustc --explain E0502`.
error: could not compile `ownership` due to previous error
Proszę sobie przypomnieć, że jedna z reguł pożyczania mówi, że jeśli mamy do czegoś niemutowalną referencję, to nie możemy równocześnie mieć do tego referencji mutowalnej. Ponieważ clear skraca Stringa, to musi przyjąć go poprzez mutowalną referencję.
Makro println! używa referencji do word po wywołaniu clear, więc niemutowalna referencja musi być nadal aktywna.
Rust nie pozwala, aby mutowalna referencja w clear i niemutowalna referencja w word istniały w tym samym czasie i dlatego kompilacja kończy się niepowodzeniem. Rust nie tylko uczynił nasze API łatwiejszym w użyciu, ale także sprawił, że cała klasa błędów zostanie wykryta już w czasie kompilacji!
Literały Łańcuchowe jako Wycinki
Przypomnijmy, że mówiliśmy o literałach łańcuchowych przechowywanych wewnątrz binarki. Zaś teraz, mając wiedzę o wycinkach, możemy właściwie zrozumieć literały łańcuchowe:
#![allow(unused)]
fn main() {
let s = "Witaj, świecie!";
}
Typem s jest tutaj &str: jest to wycinek wskazujący na konkretny punkt w binarce.
Dlatego też literały łańcuchowe nie są modyfikowalne; &str jest referencją niemutowalną.
Wycinki Łańcuchów jako Parametry
Wiedza, że wycinki można uzyskać zarówno z literałów jak i wartości String prowadzi do jeszcze jednego ulepszenia first_word, którego można dokonać w jego sygnaturze:
fn first_word(s: &String) -> &str {Jednak bardziej doświadczony Rustowiec dokonałby kolejnej zmiany i w zamian napisałby sygnaturę pokazaną na listingu 4-9, która może być używana zarówno z parametrem typu &String, jak i &str.
fn first_word(s: &str) -> &str {
    let bytes = s.as_bytes();

    for (i, &item) in bytes.iter().enumerate() {
        if item == b' ' {
            return &s[0..i];
        }
    }

    &s[..]
}

fn main() {
    let my_string = String::from("witaj świecie");

    // `first_word` pracuje na wycinkach obejmujących `String`i w części lub całości
    let word = first_word(&my_string[0..6]);
    let word = first_word(&my_string[..]);
    // `first_word` pracuje też na referencjach do `String`ów, które są równoważne
    // wycinkom obejmującym całość tych `String`ów
    let word = first_word(&my_string);

    let my_string_literal = "witaj świecie";

    // `first_word` pracuje też na wycinkach literałów łańcuchowych
    let word = first_word(&my_string_literal[0..6]);
    let word = first_word(&my_string_literal[..]);

    // Ponieważ literały łańcuchowe *są* równocześnie wycinkami łańcuchów,
    // to też zadziała, i to bez składni tworzącej wycinek!
    let word = first_word(my_string_literal);
}
Listing 4-9: Ulepszenie funkcji first_word poprzez użycie wycinka łańcucha jako typu parametru s
Jeśli mamy wycinek łańcucha, to możemy go przekazać bezpośrednio.
Jeśli mamy Stringa, to możemy przekazać wycinek tego Stringa lub referencję do tego Stringa.
Ta elastyczność wykorzystuje deref coercions, własność, którą omówimy w sekcji "Implicit Deref Coercions with Functions and Methods" rozdziału 15.
Zdefiniowanie funkcji przyjmującej wycinek łańcucha zamiast referencji do Stringa czyni nasze API bardziej ogólnym i użytecznym bez utraty jakiejkolwiek funkcjonalności:
Plik: src/main.rs
fn first_word(s: &str) -> &str {
    let bytes = s.as_bytes();

    for (i, &item) in bytes.iter().enumerate() {
        if item == b' ' {
            return &s[0..i];
        }
    }

    &s[..]
}

fn main() {
    let my_string = String::from("witaj świecie");

    // `first_word` pracuje na wycinkach obejmujących `String`i w części lub całości
    let word = first_word(&my_string[0..6]);
    let word = first_word(&my_string[..]);
    // `first_word` pracuje też na referencjach do `String`ów, które są równoważne
    // wycinkom obejmującym całość tych `String`ów
    let word = first_word(&my_string);

    let my_string_literal = "witaj świecie";

    // `first_word` pracuje też na wycinkach literałów łańcuchowych
    let word = first_word(&my_string_literal[0..6]);
    let word = first_word(&my_string_literal[..]);

    // Ponieważ literały łańcuchowe *są* równocześnie wycinkami łańcuchów,
    // to też zadziała, i to bez składni tworzącej wycinek!
    let word = first_word(my_string_literal);
}
Inne Wycinki
Wycinki łańcuchów są oczywiście specyficzne dla łańcuchów. Istnieje jednak bardziej ogólny typ wycinka. Rozważmy tablicę:
#![allow(unused)]
fn main() {
let a = [1, 2, 3, 4, 5];
}
Tak samo jak możemy chcieć odwołać się do części łańcucha, możemy też chcieć odwołać się do części tablicy. Robimy to w ten sposób:
#![allow(unused)]
fn main() {
let a = [1, 2, 3, 4, 5];

let slice = &a[1..3];

assert_eq!(slice, &[2, 3]);
}
Ten wycinek ma typ &[i32]. Działa w taki sam sposób, jak wycinki łańcuchów, przechowując referencję do pierwszego elementu i długość.
Używamy tego typu wycinków do wszelkiego rodzaju pozostałych kolekcji.
Kolekcje te omówimy szczegółowo, gdy będziemy rozmawiać o wektorach w rozdziale 8.
Podsumowanie
Koncepcje własności, pożyczania i wycinków zapewniają bezpieczeństwo pamięci w programach Rusta w czasie kompilacji. Język Rust daje taką samą kontrolę nad wykorzystaniem pamięci jak inne języki programowania systemowego. Ale posiadanie właściciela danych automatycznie zwalniającego je gdy wychodzi poza zasięg oznacza, że nie ma potrzeby pisania i debugowania dodatkowego kodu, aby uzyskać tę kontrolę.
Własność wpływa na to, jak działa wiele innych części Rusta.
Będziemy więc mówić o tych koncepcjach dalej przez resztę książki.
Przejdźmy teraz do rozdziału 5, który omawia grupowanie danych w strukturach (struct).
Używanie struktur do przechowywania powiązanych danych
Struktura (ang. struct lub structure) to złożony typ danych, który pozwala spakować razem powiązane ze sobą wartości i nadać im konkretną nazwę. Jeśli znasz już jakiś obiektowy język programowania, to możesz wyobrazić sobie strukturę jako grupę atrybutów pewnego obiektu. W tym rozdziale porównamy ze sobą struktury i znane nam już krotki (ang. tuples) i pokażemy kiedy struktury są lepszym wyborem do grupowania danych.
Pokażemy też, jak definiować i używać struktur. Przedyskutujemy jak definiować powiązane z nimi funkcje opisujące zachowania związane ze strukturą, w tym metody. Struktury i typy wyliczeniowe (omówione w rozdziale 6) są cegiełkami służącymi do tworzenia nowych typów w twoim programie, dzięki którym maksymalnie wykorzystasz Rustowy mechanizm sprawdzania zgodności typów w czasie kompilacji.
Definiowanie i tworzenie instancji struktur
Struktury są podobne do krotek, które omawiane były w rozdziale 3. Podobnie do krotek, poszczególne części struktur mogą różnić się typami. W odróżnieniu od krotek, każdy fragment danych musisz nazwać, aby jasne było co każdy oznacza. W wyniku tego nazewnictwa struktury są bardziej elastyczne od krotek. Nie musisz polegać na kolejności danych, aby dostać się do wartości danej struktury.
Aby zdefiniować strukturę posługujemy się słowem kluczowym struct, po którym wstawiamy nazwę struktury.
Nazwa struktury powinna odzwierciedlać znaczenie grupy danych znajdujących się w danej strukturze.
Następnie, w nawiasach klamrowych definiujemy nazwy i typy fragmentów danych, które nazywamy atrybutami.
Na przykład, w listingu 5-1 widzimy strukturę, w której znajdują się przykładowe dane profilu użytkownika.
Filename: src/main.rs
struct User {
    active: bool,
    username: String,
    email: String,
    sign_in_count: u64,
}

fn main() {}
Listing 5-1: User definicja struktury
Aby wykorzystać strukturę po jej zdefiniowaniu tworzymy instancję tej struktury poprzez podanie konkretnych wartości dla każdego pola. Tworzymy strukturę przez podanie jej nazwy, następnie nawiasy klamrowe zawierające pary klucz: wartość, gdzie klucze to nazwy pól, a wartości to dane, które chcemy umieścić w tych polach. Nie musimy podawać atrybutów w tej samej kolejności w jakiej zostały one zdefiniowane podczas deklaracji struktury. Innymi słowy, definicja struktury jest ogólnym szablonem, a instancje jakby wypełniają dany szablon jakimiś danymi tworząc wartości typu struktury. Przykładowa deklaracja użytkownika pokazana jest w listingu 5-2.
Filename: src/main.rs
struct User {
    active: bool,
    username: String,
    email: String,
    sign_in_count: u64,
}

fn main() {
    let user1 = User {
        active: true,
        username: String::from("jakisusername"),
        email: String::from("ktos@example.com"),
        sign_in_count: 1,
    };
}
Listing 5-2: Tworzenie instancji struktury User
Aby uzyskać dostęp dowybranej wartości ze struktury używamy kropki.
Na przykład, jeśli chcielibyśmy zdobyć tylko adres email użytkownika moglibyśmy napisać user1.email gdziekolwiek ta wartość byłaby nam potrzebna.
Jeśli instancja jest mutowalna możemy zmienić wartość używając kropki i przypisując do wybranego pola.
Listing 5-3 pokazuje jak zmienić pole email w mutowalnej instancji struktury User.
Filename: src/main.rs
struct User {
    active: bool,
    username: String,
    email: String,
    sign_in_count: u64,
}

fn main() {
    let mut user1 = User {
        active: true,
        username: String::from("jakisusername"),
        email: String::from("ktos@example.com"),
        sign_in_count: 1,
    };

    user1.email = String::from("nastepnyemail@example.com");
}
Listing 5-3: Zmiana wartości pola email instancji struktury User.
Należy pamiętać, że cała instancja musi być mutowalna; Rust nie pozwala nam zaznaczyć poszczególnych pól jako mutowalnych. Jak z każdym wyrażeniem, możemy skonstruować nową instancję struktury jako ostatnie wyrażenie w ciele funkcji, aby dana instancja została zwrócona przez funkcję.
Listing 5-4 ukazuje funkcję build_user zwracającą instancję struktury User z pewnym emailem i nazwą użytkownika.
Polu active przypisana jest wartość true, a polu sign_in_count przypisana jest wartość 1.
Filename: src/main.rs
struct User {
    active: bool,
    username: String,
    email: String,
    sign_in_count: u64,
}

fn build_user(email: String, username: String) -> User {
    User {
        active: true,
        username: username,
        email: email,
        sign_in_count: 1,
    }
}

fn main() {
    let user1 = build_user(
        String::from("ktos@example.com"),
        String::from("jakisusername123"),
    );
}
Listing 5-4: Funkcja build_user, która jako argument
przyjmuje email i nazwę użytkownika, a zwraca instancję struktury User
Nadanie parametrom funkcji tej samej nazwy co polom struktury ma sens, ale
przez to musimy powtarzać nazwy pól email i username, co jest trochę męczące.
Jeśli jakaś struktura miałaby więcej atrybutów powtarzanie każdego z nich
byłoby jeszcze bardziej męczące. Na szczęście, istnieje wygodny skrótowiec!
Skrócona inicjalizacja pól
Ponieważ nazwy parametrów i pól struktury są takie same, w listingu 5-4 możemy użyć składni tzw. skróconej inicjializacji pól (ang. field init shorthand), aby zmienić funkcję build_user, tak aby nie zmieniać jej zachowania, ale też nie powtarzając username i email. Taki zabieg widzimy w listingu 5-5.
Filename: src/main.rs
struct User {
    active: bool,
    username: String,
    email: String,
    sign_in_count: u64,
}

fn build_user(email: String, username: String) -> User {
    User {
        active: true,
        username,
        email,
        sign_in_count: 1,
    }
}

fn main() {
    let user1 = build_user(
        String::from("ktos@example.com"),
        String::from("jakisusername123"),
    );
}
Listing 5-5: Funkcja build_user używająca skróconej inicjalizacji pól username oraz email, które mają takie same nazwy jak parametry funkcji
Tutaj tworzymy nową instancję struktury User, która posiada pole o nazwie email. Chcemy nadać polu email wartość znajdującą się w parametrze email funkcji build_user. Skoro pole email i parametr email mają takie same nazwy wystarczy, że napiszemy email jedynie raz zamiast musieć napisać email: email.
Tworzenie instancji z innej instancji przy użyciu składni zmiany struktury
Czasem bardzo przydatnym jest stworzenie nowej struktury, która jest w zasadzie kopią innej struktury, w której chcemy zmienić tylko niektóre pola. Do tego celu zastosujemy składnię zmiany struktury.
Listing 5-6 obrazuje tworzenie instancji struktury User zapisanej do zmiennej user2 bez użycia naszej nowej składni. Nadajemy nowe wartości polom email i username, ale poza tym zostawiamy te same wartości w instancji user1, które przypisaliśmy w listingu 5-2.
Filename: src/main.rs
struct User {
    active: bool,
    username: String,
    email: String,
    sign_in_count: u64,
}

fn main() {
    // --snip--

    let user1 = User {
        email: String::from("ktos@example.com"),
        username: String::from("jakisusername123"),
        active: true,
        sign_in_count: 1,
    };

    let user2 = User {
        active: user1.active,
        username: user1.username,
        email: String::from("kolejny@example.com"),
        sign_in_count: user1.sign_in_count,
    };
}
Listing 5-6: Tworzenie nowej instancji struktury User używając niektórych wartości z instancji user1
Przy użyciu składni zmiany struktury możemy osiągnąć ten sam efekt mniejszym nakładem kodu,
co widzimy w listingu 5-7. Składnia .. oznacza, że pozostałym polom, którym nie oznaczyliśmy ręcznie
wartości przypisane zostaną wartości z danej, oznaczonej instancji.
Filename: src/main.rs
struct User {
    active: bool,
    username: String,
    email: String,
    sign_in_count: u64,
}

fn main() {
    // --snip--

    let user1 = User {
        email: String::from("ktos@example.com"),
        username: String::from("jakisusername123"),
        active: true,
        sign_in_count: 1,
    };

    let user2 = User {
        email: String::from("kolejny@example.com"),
        ..user1
    };
}
Listing 5-7: Użycie składni zmiany struktury w celu przypisania w User
nowej wartości email, jednocześnie używając wartości pozostałych pól z user1
Kod przedstawiony w listingu 5-7 tworzy też instancję w zmiennej user2, która
zmienia wartości w polach email i username, ale pozostawia wartości
w polach active i sign_in_count ze zmiennej user1. The ..user1 must come last
to specify that any remaining fields should get their values from the
corresponding fields in user1, but we can choose to specify values for as
many fields as we want in any order, regardless of the order of the fields in
the struct’s definition.
Note that the struct update syntax uses = like an assignment; this is because
it moves the data, just as we saw in the „Variables and Data Interacting with
Move” section. In this example, we can no longer use
user1 as a whole after creating user2 because the String in the
username field of user1 was moved into user2. If we had given user2 new
String values for both email and username, and thus only used the
active and sign_in_count values from user1, then user1 would still be
valid after creating user2. Both active and sign_in_count are types that
implement the Copy trait, so the behavior we discussed in the „Stack-Only
Data: Copy” section would apply.
Wykorzystanie braku nazywania pól w struktorach krotkowych do tworzenia nowych typów
Możesz też stworzyć struktury podobne do krotek, nazywane struktorami krotkowymi (ang. tuple structs). Atutem strukturr krotkowych jest przypisanie znaczenia polom bez ich nazywania, a jedynie przez przypisanie polom ich typu. Struktury krotkowe przydatne są najbardziej, kiedy: chciałbyś użyć krotkę, chcesz nadać jej nazwę i odróżnić ją od innych poprzez posiadanie innego typu, oraz kiedy nazywanie każdego pola (jak w normalnej strukturze) byłoby zbyt rozwlekłe lub zbędne.
Aby zdefiniować strukturę krotkową, najpierw wpisz słowo kluczowe struct, po nim nazwę struktury, a następnie typy w krotce.
Dla przykładu, tutaj pokazane są działania na dwóch strukturach-krotkach, tj. Color i Point:
Filename: src/main.rs
struct Color(i32, i32, i32);
struct Point(i32, i32, i32);

fn main() {
    let black = Color(0, 0, 0);
    let origin = Point(0, 0, 0);
}
Zauważ, że black i origin mają różne typy, bo są instancjami różnych struktur krotkowych.
Każda zdefiniowana struktura ma własny, niepowtarzalny typ, nawet gdy pola w dwóch strukturach mają identyczne typy.
Na przykład, funkcja przyjmująca parametr typu Color nie może także przyjąć argumentu typu Point, mimo że np. oba typy mogą składać się z trzech wartości typu i32.
Oprócz tego wyjątku struktury krotkowe zachowują się całkiem jak krotki: można użyć składni przypisania destrukturyzującego aby przypisać pola zmiennym, a także indeksu pola poprzedzonego ., aby uzyskać do niego dostęp.
Struktura jednostkowa bez żadnych pól
Możesz także definiować struktury nie posiadające żadnych pól!
Są to tzw. struktury jednostkowe (ang. unit-like structs), bo zachowują się podobnie do (), czyli typu jednostkowego wspomnianego w rozdziale „The Tuple Type”.
Struktury jednostkowe mogą być przydatne, gdy chcemy zaimplementować cechę na jakimś typie, ale nie potrzebujemy przechowywać żadnych danych. Cechy omawiamy w rozdziale 10.
Here’s an example of declaring and instantiating a unit struct named AlwaysEqual:
Filename: src/main.rs
struct AlwaysEqual;

fn main() {
    let subject = AlwaysEqual;
}
To define AlwaysEqual, we use the struct keyword, the name we want, and
then a semicolon. No need for curly brackets or parentheses! Then we can get an
instance of AlwaysEqual in the subject variable in a similar way: using the
name we defined, without any curly brackets or parentheses. Imagine that later
we’ll implement behavior for this type such that every instance of
AlwaysEqual is always equal to every instance of any other type, perhaps to
have a known result for testing purposes. We wouldn’t need any data to
implement that behavior! You’ll see in Chapter 10 how to define traits and
implement them on any type, including unit-like structs.
Własność danych struktury
W definicji struktury
Userw listingu 5-1 użyliśmy posiadanego typuStringa zamiast wycinka łańcuchowego&str. To świadomy wybór, gdyż chcemy, aby instancje struktury posiadały wszystkie swoje dane oraz żeby te dane były ważne, jeśli sama struktura jest ważna.Struktury mogą przechowywać referencje do danych należących do czegoś innego, ale do tego potrzebne byłyby informacje o długości życia zmiennych (ang. lifetime). Jest to funkcja Rusta, o której powiemy więcej w rozdziale 10. Długość życia gwarantuje nam, że dane wskazywane przez referencję są ważne dopóki struktura istnieje. Spróbujmy przechować referencję do struktury bez podania informacji o długości życia tak jak tutaj, co nie zadziała:
Nazwa pliku: src/main.rs
struct User {
    active: bool,
    username: &str,
    email: &str,
    sign_in_count: u64,
}

fn main() {
    let user1 = User {
        active: true,
        username: "jakisusername123",
        email: "ktos@example.com",
        sign_in_count: 1,
    };
}
Kompilator da ci znać, że potrzebuje specyfikatoru długości życia:
$ cargo run
   Compiling struktury v0.1.0 (file:///projects/struktury)
error[E0106]: missing lifetime specifier
 --> src/main.rs:3:15
  |
3 |     username: &str,
  |               ^ expected named lifetime parameter
  |
help: consider introducing a named lifetime parameter
  |
1 ~ struct User<'a> {
2 |     active: bool,
3 ~     username: &'a str,
  |

error[E0106]: missing lifetime specifier
 --> src/main.rs:4:12
  |
4 |     email: &str,
  |            ^ expected named lifetime parameter
  |
help: consider introducing a named lifetime parameter
  |
1 ~ struct User<'a> {
2 |     active: bool,
3 |     username: &str,
4 ~     email: &'a str,
  |

For more information about this error, try `rustc --explain E0106`.
error: could not compile `structs` due to 2 previous errors
W rozdziale 10 pokażemy jak pozbyć się tych błędów, aby przechować referencje do innych struktur, ale póki co pozbędziemy się ich po prostu używając posiadanych typów, takich jak
Stringzamiast referencji typu&str.
Przykładowy program wykorzystujący struktury
Aby pokazać, kiedy warto skorzystać ze struktur, napiszmy program, który policzy pole prostokąta. Zaczniemy od pojedynczych zmiennych, potem przekształcimy program tak, aby używał struktur.
Stwórzmy projekt aplikacji binarnej przy użyciu Cargo. Nazwijmy go prostokąty. Jako wejście przyjmie on szerokość i wysokość danego prostokąta i wyliczy jego pole. Listing 5-8 pokazuje krótki program obrazujący jeden ze sposobów, w jaki możemy to wykonać.
Plik: src/main.rs
fn main() {
    let width1 = 30;
    let height1 = 50;

    println!(
        "Pole prostokąta wynosi {} pikseli kwadratowych.",
        area(width1, height1)
    );
}

fn area(width: u32, height: u32) -> u32 {
    width * height
}
Listing 5-8: Obliczanie pola prostokąta o szerokości i wysokości podanych jako osobne argumenty
Uruchommy program komendą cargo run:
$ cargo run
   Compiling rectangles v0.1.0 (file:///projects/rectangles)
    Finished dev [unoptimized + debuginfo] target(s) in 0.42s
     Running `target/debug/rectangles`
Pole prostokąta wynosi 1500 pikseli kwadratowych.
Pomimo że program z listingu 5-8 wygląda dobrze i poprawnie oblicza pole prostokąta
wywołując funkcję area, do której podaje oba wymiary, to możemy napisać go czytelniej.
Problem w tym kodzie widnieje w sygnaturze funkcji area:
fn main() {
    let width1 = 30;
    let height1 = 50;

    println!(
        "Pole prostokąta wynosi {} pikseli kwadratowych.",
        area(width1, height1)
    );
}

fn area(width: u32, height: u32) -> u32 {
    width * height
}
Funkcja area ma wyliczyć pole jakiegoś prostokąta, ale przecież funkcja którą my napisaliśmy ma dwa parametry.
Parametry są ze sobą powiązane, ale ta zależność nie widnieje nigdzie w naszym programie. Łatwiej byłoby ten kod zrozumieć i nim się posługiwać, jeśli szerokość i wysokość byłyby ze sobą zgrupowane.
Już omówiliśmy jeden ze sposobów, w jaki można to wykonać w sekcji „Krotka” rozdziału 3, czyli poprzez wykorzystanie krotek.
Refaktoryzacja z krotkami
Listing 5-9 pokazuje jeszcze jedną wersję programu wykorzystującego krotki.
Plik: src/main.rs
fn main() {
    let rect1 = (30, 50);

    println!(
        "Pole prostokąta wynosi {} pikseli kwadratowych.",
        area(rect1)
    );
}

fn area(dimensions: (u32, u32)) -> u32 {
    dimensions.0 * dimensions.1
}
Listing 5-9: Określenie szerokości i wysokości prostokąta przy użyciu krotki
Ten program jest, w pewnych aspektach, lepszy. Krotki dodają odrobinę organizacji, oraz pozwalają nam podać funkcji tylko jeden argument. Z drugiej zaś strony ta wersja jest mniej czytelna: elementy krotki nie mają nazw, a nasze obliczenia stały się enigmatyczne, bo wymiary prostokąta reprezentowane są przez elementy krotki.
Ewentualne pomylenie wymiarów prostokąta nie ma znaczenia przy obliczaniu jego pola,
ale sytuacja by się zmieniła gdybyśmy chcieli na przykład narysować go na ekranie.
Musielibyśmy zapamiętać, że szerokość znajduje się w elemencie krotki o indeksie
0, a wysokość pod indeksem 1.
Jeśli ktoś inny pracowałby nad tym kodem musiałby rozgryźć to samemu,
a także to zapamiętać. Nie byłoby zaskakujące omyłkowe pomieszanie tych dwóch wartości,
wynikające z braku zawarcia znaczenia danych w naszym kodzie.
Refaktoryzacja ze strukturami: ukazywanie znaczenia
Struktur używamy, aby przekazać znaczenie poprzez etykietowanie danych. Możemy przekształcić używaną przez nas krotkę nazywając zarówno całość jak i pojedyncze jej części, tak jak w listingu 5-10.
Plik: src/main.rs
struct Rectangle {
    width: u32,
    height: u32,
}

fn main() {
    let rect1 = Rectangle {
        width: 30,
        height: 50,
    };

    println!(
        "Pole prostokąta wynosi {} pikseli kwadratowych.",
        area(&rect1)
    );
}

fn area(rectangle: &Rectangle) -> u32 {
    rectangle.width * rectangle.height
}
Listing 5-10: Definicja struktury Rectangle.
Powyżej zdefiniowaliśmy strukturę i nazwaliśmy ją Rectangle.
Wewnątrz nawiasów klamrowych zdefiniowaliśmy pola width i height, oba mające typ u32.
Następnie w funkcji main stworzyliśmy konkretną instancję struktury Rectangle, w której szerokość wynosi 30, zaś wysokość 50.
Nasza funkcja area przyjmuje teraz jeden parametr,
który nazwaliśmy rectangle, którego typ to niezmienne zapożyczenie
instancji struktury Rectangle.
Jak wspomnieliśmy w rozdziale 4, chcemy jedynie pożyczyć strukturę bez
przenoszenia jej własności. Takim sposobem main pozostaje właścicielem i może dalej
używać rect1, i dlatego używamy & w sygnaturze funkcji podczas jej wywołania.
Funkcja area dostaje się do pól width i height instancji struktury Rectangle.
Proszę przy okazji zauważyć, że dostęp do pól pożyczonej instancji struktury nie powoduje przeniesienia wartości pól, dlatego często widuje się pożyczanie struktur.
Teraz sygnatura funkcji area dobrze opisuje nasze zamiary:
obliczenie pola danego prostokąta Rectangle poprzez wykorzystanie jego szerokości i wysokości. Bez niejasności przedstawiamy relację między szerokością a wysokością i przypisujemy logiczne nazwy wartościom zamiast indeksowania krotek wartościami 0 oraz 1. To wygrana dla przejrzystości.
Dodawanie przydatnej funkcjonalności za pomocą cech wyprowadzalnych
Miło byłoby móc wyświetlić instancję struktury Rectangle w trakcie
debugowania naszego programu i zobaczyć wartość każdego pola.
Listing 5-11 próbuje użyć makra println!, którego używaliśmy w poprzednich rozdziałach.
To jednakowoż nie zadziała.
Plik: src/main.rs
struct Rectangle {
    width: u32,
    height: u32,
}

fn main() {
    let rect1 = Rectangle {
        width: 30,
        height: 50,
    };

    println!("rect1 to {}", rect1);
}
Listing 5-11: Próba wyświetlenia instancji Rectangle
Podczas próby kompilacji tego kodu wyświetlany jest błąd z poniższym komunikatem:
error[E0277]: `Rectangle` doesn't implement `std::fmt::Display`
Makro println! może formatować na wiele sposobów, a domyślnie para nawiasów klamrowych
daje println! znać, że chcemy wykorzystać formatowanie Display (ang. wyświetlenie).
Jest to tekst przeznaczony dla docelowego użytkownika.
Widziane przez nas wcześniej prymitywne typy implementują Display automatycznie,
bo przecież jest tylko jeden sposób wyświetlenia użytkownikowi symbolu 1 czy
jakiegokolwiek innego prymitywnego typu.
Ale kiedy w grę wchodzą struktury, sposób w jaki println! powinno formatować
tekst jest mniej oczywiste, bo wyświetlać strukturę można na wiele sposobów:
z przecinkami, czy bez?
Chcesz wyświetlić nawiasy klamrowe?
Czy każde pole powinno być wyświetlone?
Przez tę wieloznaczność Rust nie zakłada z góry co jest dla nas najlepsze,
więc z tego powodu struktury nie implementują automatycznie cechy Display
wykorzystywanej przez println!.
Jeśli będziemy czytać dalej znajdziemy taką przydatną informację:
   = help: the trait `std::fmt::Display` is not implemented for `Rectangle`
   = note: in format strings you may be able to use `{:?}` (or {:#?} for pretty-print) instead
Jesteśmy poinformowani, że podana przez nas struktura nie może być użyta
z domyślnym formaterem i zasugerowane jest nam użycie specyfikatora formatowania :?.
To tak też zróbmy! Wywołanie makra println! teraz będzie wyglądać następująco:
println!("rect1 to {:?}", rect1);.
Wprowadzenie specyfikatora :? wewnątrz pary nawiasów klamrowych
przekazuje println!, że chcemy użyć formatu wyjścia o nazwie Debug.
Cecha Debug pozwala nam wypisać strukturę w sposób użyteczny dla deweloperów,
pozwalając nam na obejrzenie jej wartości podczas debugowania kodu.
Skompilujmy kod z tymi zmianami. A niech to! Nadal pojawia się komunikat o błędzie:
error[E0277]: `Rectangle` doesn't implement `Debug`
Ale kompilator ponownie daje nam pomocny komunikat:
   = help: the trait `Debug` is not implemented for `Rectangle`
   = note: add `#[derive(Debug)]` to `Rectangle` or manually `impl Debug for Rectangle`
Powyższy komunikat informuje nas, że cecha Debug nie jest zaimplementowana dla
struktury Rectangle i zaleca nam dodanie adnotacji. Rust doprawdy zawiera
funkcjonalność pozwalającą wyświetlić informacje pomocne w debugowaniu, ale
wymaga od nas, abyśmy ręcznie i wyraźnie zaznaczyli naszą decyzję
o dodaniu tej funkcjonalności do naszej struktury.
W tym celu dodajemy zewnętrzny atrybut #[derive(Debug)] przed samą definicją
struktury, jak w listingu 5-12.
Plik: src/main.rs
#[derive(Debug)]
struct Rectangle {
    width: u32,
    height: u32,
}

fn main() {
    let rect1 = Rectangle {
        width: 30,
        height: 50,
    };

    println!("rect1 to {:?}", rect1);
}
Listing 5-12: Dodanie atrybutu nadającego cechę Debug
i wyświetlanie instancji Rectangle formatowaniem przeznaczonym do celów debugowania
Teraz kiedy uruchomimy program nie wyskoczy nam żaden błąd, a naszym oczom ukaże się poniższy tekst:
$ cargo run
   Compiling rectangles v0.1.0 (file:///projects/rectangles)
    Finished dev [unoptimized + debuginfo] target(s) in 0.48s
     Running `target/debug/rectangles`
rect1 is Rectangle { width: 30, height: 50 }
No nieźle! Nie jest to może najpiękniejsza reprezentacja, ale spełnia swoje zadanie i
pokazuje wartości wszystkich pól tej instancji,
co zdecydowanie by pomogło gdybyśmy polowali na bugi.
Kiedy w grę wchodzą większe struktury miło byłoby też mieć troszkę czytelniejszy wydruk;
w takich sytuacjach możemy użyć {:#?} zamiast {:?} w makrze println!.
Użycie stylu {:#?} w naszym przykładzie wypisze:
$ cargo run
   Compiling rectangles v0.1.0 (file:///projects/rectangles)
    Finished dev [unoptimized + debuginfo] target(s) in 0.48s
     Running `target/debug/rectangles`
rect1 is Rectangle {
    width: 30,
    height: 50,
}
Another way to print out a value using the Debug format is to use the dbg!
macro, which takes ownership of an expression (as opposed
to println!, which takes a reference), prints the file and line number of
where that dbg! macro call occurs in your code along with the resultant value
of that expression, and returns ownership of the value.
Note: Calling the
dbg!macro prints to the standard error console stream (stderr), as opposed toprintln!, which prints to the standard output console stream (stdout). We’ll talk more aboutstderrandstdoutin the „Writing Error Messages to Standard Error Instead of Standard Output” section in Chapter 12.
Here’s an example where we’re interested in the value that gets assigned to the
width field, as well as the value of the whole struct in rect1:
#[derive(Debug)]
struct Rectangle {
    width: u32,
    height: u32,
}

fn main() {
    let scale = 2;
    let rect1 = Rectangle {
        width: dbg!(30 * scale),
        height: 50,
    };

    dbg!(&rect1);
}
We can put dbg! around the expression 30 * scale and, because dbg!
returns ownership of the expression’s value, the width field will get the
same value as if we didn’t have the dbg! call there. We don’t want dbg! to
take ownership of rect1, so we use a reference to rect1 in the next call.
Here’s what the output of this example looks like:
$ cargo run
   Compiling rectangles v0.1.0 (file:///projects/rectangles)
    Finished dev [unoptimized + debuginfo] target(s) in 0.61s
     Running `target/debug/rectangles`
[src/main.rs:10] 30 * scale = 60
[src/main.rs:14] &rect1 = Rectangle {
    width: 60,
    height: 50,
}
We can see the first bit of output came from src/main.rs line 10 where we’re
debugging the expression 30 * scale, and its resultant value is 60 (the
Debug formatting implemented for integers is to print only their value). The
dbg! call on line 14 of src/main.rs outputs the value of &rect1, which is
the Rectangle struct. This output uses the pretty Debug formatting of the
Rectangle type. The dbg! macro can be really helpful when you’re trying to
figure out what your code is doing!
Oprócz cechy Debug, Rust dostarcza cały szereg innych cech, które możemy nadać za pomocą atrybutu derive, by wzbogacić nasze typy o dodatkową funkcjonalność.
Te cechy i ich zachowania opisane są w Załączniku C. Jak dodawać takim cechom własne implementacje oraz także jak tworzyć własne cechy omówimy w rozdziale 10.
There are also many attributes other than derive; for more information, see the „Attributes” section of the Rust Reference.
Nasza funkcja area jest dość specyficzna: oblicza pola jedynie prostokątów.
Skoro i tak nie zadziała ona z żadnym innym typem, przydatne
byłoby bliższe połączenie poleceń zawartych w tej funkcji z naszą strukturą Rectangle.
Kontynuacja tej refaktoryzacji zmieni funkcję area w metodę area, którą
zdefiniujemy w naszym typie Rectangle.
Składnia metod
Metody są podobne do funkcji: też deklarujemy je słowem kluczowym fn,
po którym umieszczamy nazwę, a czasem parametry i typ zwracanej wartości.
Tak jak funkcje, zawierają jakieś polecenia wykonywane przy wywołaniu.
Metody jednak różnią się od funkcji tym, że definiujemy je wewnątrz struktur
(lub enumeracji czy obiektów-cech, które omówimy odpowiednio w rozdziałach 6 i 17), a ich pierwszym parametrem jest zawsze self reprezentujące instancję
struktury, na której metoda jest wywołana.
Definiowanie metod
Zmieńmy funkcję area przyjmującą jako parametr instancję struktury Rectangle,
w taki sposób aby od teraz area było metodą zdefiniowaną na strukturze Rectangle.
To przedstawia listing 5-13.
Plik: src/main.rs
#[derive(Debug)]
struct Rectangle {
    width: u32,
    height: u32,
}

impl Rectangle {
    fn area(&self) -> u32 {
        self.width * self.height
    }
}

fn main() {
    let rect1 = Rectangle {
        width: 30,
        height: 50,
    };

    println!(
        "Pole prostokąta wynosi {} pikseli kwadratowych.",
        rect1.area()
    );
}
Listing 5-13: Definicja metody area w strukturze Rectangle
Aby zdefiniować funkcję w kontekście Rectangle otwieramy blok impl (czyli implementacji) dla Rectangle.
Wszystko wewnątrz tego bloku będzie związane z typem Rectangle.
Następnie przenosimy funkcję area do nawiasów klamrowych
należących do bloku impl i jako pierwszy parametr funkcji dodajemy
self w jej sygnaturze i wszędzie w jej wnętrzu. W funkcji main,
zamiast jak poprzednio wywołania funkcji area, a jako argument
podawania jej rect1, możemy użyć składni metody aby wywołać metodę area
na instancji struktury Rectangle.
Składnia metody pojawia się po nazwie instancji: dodajemy kropkę, a po niej nazwę samej metody, oraz
nawiasy i argumenty jeśli są wymagane.
W sygnaturze funkcji area używamy &self zamiast rectangle: &Rectangle.
The &self is actually short for self: &Self. Within an impl block, the
type Self is an alias for the type that the impl block is for. Methods must
have a parameter named self of type Self for their first parameter, so Rust
lets you abbreviate this with only the name self in the first parameter spot.
Note that we still need to use the & in front of the self shorthand to
indicate that this method borrows the Self instance, just as we did in
rectangle: &Rectangle.
Metody mogą wejść w posiadanie self, pożyczyć self niemutowalnie, lub pożyczyć self mutowalnie,
tak jakby to był jakikolwiek inny parametr.
W tym wypadku używamy &self z tego samego powodu, co &Rectangle
w wersji z funkcją. Nie chcemy ani zostać właścicielem struktury,
ani do niej pisać, a jedynie z niej czytać.
Jeśli chcielibyśmy zmienić dane instancji w trakcie wywoływania
metody użylibyśmy &mut self jako pierwszego parametru.
Tworzenie metody która wchodzi w posiadanie instancji przy użyciu self
jest dość rzadkie; tej techniki używamy głównie jedynie, kiedy metoda przeobraża self
w coś innego i chcesz zabronić wywołującemu metody wykorzystanie oryginalnej instancji
po jej transformacji.
Podstawowym celem używania metod zamiast funkcji, oprócz używania składni metody oraz braku wymogu podawania typu self w każdej sygnaturze, jest organizacja.
Umieściliśmy wszystko, co związane jest z instancją danego typu w jednym bloku impl.
Dzięki temu oszczędzamy przyszłym użytkownikom kodu szukania zachowań struktury Rectangle po różnych zakątkach naszej biblioteki.
Uwaga: Możemy nadać metodzie taką samą nazwę, jak ma jedno z pól struktury.
Na przykład w Rectangle możemy zdefiniować metodę width:
Plik: src/main.rs
#[derive(Debug)]
struct Rectangle {
    width: u32,
    height: u32,
}

impl Rectangle {
    fn width(&self) -> bool {
        self.width > 0
    }
}

fn main() {
    let rect1 = Rectangle {
        width: 30,
        height: 50,
    };

    if rect1.width() {
        println!("The rectangle has a nonzero width; it is {}", rect1.width);
    }
}
Tu zdecydowaliśmy aby metoda width zwracała true jeśli wartość w polu width instancji jest większa niż 0 oraz false gdy jest równa 0: możemy użyć pola wewnątrz metody o tej samej nazwie w dowolnym celu.
W main, Rust wie, że mamy na myśli metodę width, gdy bezpośrednio za rect1.width są nawiasy,
oraz, że mamy na myśli pole width, gdy nawiasów nie ma.
Często, ale nie zawsze, gdy nadajemy metodzie taką samą nazwę jak polu, to chcemy aby ograniczyła ona swoje działanie jedynie do zwrócenia wartość pola. Metody takie nazywane są getterami (ang. getters). Rust, w przeciwieństwie to niektórych innych języków, nie implementuje getterów automatycznie dla pól struktury. Gettery są przydatne, ponieważ można uczynić pole prywatnym, zaś metodę publiczną, i w ten sposób umożliwić dostęp tylko do odczytu do tego pola, w publicznym API typu. Publiczne i prywatne modyfikatory dostępu do pól i metod omówimy w rozdziale 7.
Co z operatorem
->?W C i C++ istnieją dwa różne operatory używane do wywoływania metod: symbolu
.używamy do bezpośredniego wywoływania metody na obiekcie, zaś symbolu->, jeśli metodę wywołujemy na wskaźniku do obiektu, który najpierw musimy poddać dereferencji. Innymi słowy, jeśliobjectjest wskaźnikiem,object->something()jest podobne do(*object).something().Rust nie ma operatora równoważnego z
->; a za to w Ruście spotkasz funkcję automatycznej referencji i dereferencji. Wywoływanie metod jest jednym z niewielu miejsc, w których Rust wykorzystuje tę funkcję.Działa to następująco: kiedy wywołujesz metodę kodem
object.something(), Rust automatycznie dodaje&,&mut, lub*abyobjectpasował do sygnatury metody. Inaczej mówiąc, oba te przykłady są równoważne:#![allow(unused)] fn main() { #[derive(Debug,Copy,Clone)] struct Point { x: f64, y: f64, } impl Point { fn distance(&self, other: &Point) -> f64 { let x_squared = f64::powi(other.x - self.x, 2); let y_squared = f64::powi(other.y - self.y, 2); f64::sqrt(x_squared + y_squared) } } let p1 = Point { x: 0.0, y: 0.0 }; let p2 = Point { x: 5.0, y: 6.5 }; p1.distance(&p2); (&p1).distance(&p2); }Pierwszy wygląda o wiele bardziej przejrzyście. Zastosowana w niej jest automatyczna referencja, ponieważ metoda ma wyraźnie oznaczonego odbierającego (ang. receiver) - typ
self. Mając informacje o odbierającym oraz o nazwie metody Rust jest w stanie jednoznacznie stwierdzić, czy metoda odczytuje (&self), zmienia (&mut self) lub konsumuje (self). Wymaganie przez Rusta oznaczenia pożyczania w odbierającym metody jest w dużej części dlaczego mechanizm posiadania jest tak ergonomiczny w używaniu.
Metody z wieloma parametrami
Poćwiczymy używanie metod implementując drugą metodę na strukturze Rectangle.
Tym razem chcemy, żeby instancja struktury Rectangle przyjęła inną instancję Rectangle,
i zwróciła: wartość true, jeśli ta inna instancja Rectangle
całkowicie mieści się w instancji self; a jeśli nie, wartość false.
Innymi słowy, zakładając, że wcześniej zdefiniowaliśmy metodę can_hold, chcemy
być w stanie napisać program przedstawiony w listingu 5-14.
Plik: src/main.rs
fn main() {
    let rect1 = Rectangle {
        width: 30,
        height: 50,
    };
    let rect2 = Rectangle {
        width: 10,
        height: 40,
    };
    let rect3 = Rectangle {
        width: 60,
        height: 45,
    };
    println!("Czy rect2 zmieści się wewnątrz rect1? {}", rect1.can_hold(&rect2));
    println!("Czy rect3 zmieści się wewnątrz rect1? {}", rect1.can_hold(&rect3));
}
Listing 5-14: Użycie jeszcze nieistniejącej metody can_hold
Skoro wymiary rect2 są mniejsze od wymiarów rect1, a rect3 jest szerszy
od rect1, spodziewamy się następującego wyniku wykonania powyższej funkcji main.
Czy rect2 zmieści się wewnątrz rect1? true
Czy rect3 zmieści się wewnątrz rect1? false
Chcemy zdefiniować metodę, więc umieścimy ją w bloku impl Rectangle.
Metodę nazwiemy can_hold, i przyjmie ona jako parametr niemutowalne wypożyczenie
innej instancji Rectangle. Aby dowiedzieć się jaki dokładnie typ powinien
znajdować się w parametrze, spójrzmy na kod wywołujący metodę:
rect1.can_hold(&rect2), przekazuje &rect2 będące niezmiennym wypożyczeniem
rect2, czyli pewnej instancji Rectangle. Zależy nam jedynie
na odczytaniu wartości zawartych w rect2 (do ich zmieniania wymagane byłoby mutowalne wypożyczenie),
a chcemy, żeby main pozostało właścicielem rect2, abyśmy mogli ponownie wykorzystać rect2
po wywołaniu metody can_hold. Wartość zwracana przez can_hold będzie typem
Boolean, a sama implementacja sprawdzi czy wysokość i szerokość instancji
self są większe niż odpowiednio wysokość i szerokość innej instancji Rectangle.
Dodanie nowej metody can_hold do bloku impl z
listingu 5-13 pokazane jest w listingu 5-15.
Plik: src/main.rs
#[derive(Debug)]
struct Rectangle {
    width: u32,
    height: u32,
}

impl Rectangle {
    fn area(&self) -> u32 {
        self.width * self.height
    }

    fn can_hold(&self, other: &Rectangle) -> bool {
        self.width > other.width && self.height > other.height
    }
}

fn main() {
    let rect1 = Rectangle {
        width: 30,
        height: 50,
    };
    let rect2 = Rectangle {
        width: 10,
        height: 40,
    };
    let rect3 = Rectangle {
        width: 60,
        height: 45,
    };

    println!("Czy rect2 zmieści się wewnątrz rect1? {}", rect1.can_hold(&rect2));
    println!("Czy rect3 zmieści się wewnątrz rect1? {}", rect1.can_hold(&rect3));
}
Listing 5-15: Implementacja metody can_hold na instancji
Rectangle, która przyjmuje inną instancję Rectangle jako parametr
Po uruchomieniu tego kodu funkcją main z listingu 5-14, naszym oczom ukaże się oczekiwany przez nas tekst.
Metody mogą przyjmować wiele parametrów, które dodać możemy do ich sygnatur po parametrze self.
Te parametry niczym nie różnią się od parametrów funkcji.
Funkcje powiązane
Wszystkie funkcje zdefiniowane w bloku impl nazywamy funkcjami powiązanymi (ang. associated functions).
Można definiować funkcje powiązane, które nie mają parametru self (więc nie są metodami), bo nie potrzebują do działania instancji typu. Już mialiśmy okazję używać funkcji powiązanej. Była nią String::from zdefiniowana dla typu String.
Funkcje powiązane są często wykorzystywane do zdefiniowania konstruktorów zwracających nową
instancję pewnej struktury. Zwykle nazywa sie je new, ale new nie jest specjalną nazwą wbudowaną w język.
Na przykład, możemy stworzyć funkcję powiązaną square, która przyjmie tylko jeden wymiar jako parametr i przypisze go zarówno do wysokości i szerokości, umożliwiając stworzenie kwadratowego Rectangle bez podawania dwa razy tej samej wartości:
Plik: src/main.rs
#[derive(Debug)]
struct Rectangle {
    width: u32,
    height: u32,
}

impl Rectangle {
    fn square(size: u32) -> Self {
        Self {
            width: size,
            height: size,
        }
    }
}

fn main() {
    let sq = Rectangle::square(3);
}
Słowa kluczowe Self w typie zwracanym i w ciele funkcji są aliasami do typu, który pojawia się po słowie kluczowym impl, czyli w tym przypadku do Rectangle.
Aby wywołać funkcję powiązaną używamy składni :: po nazwie struktury, np.
let sq = Rectangle::square(3). Ta funkcja znajduje się w przestrzeni nazw
struktury: składnia :: używana jest zarówno w kontekście funkcji powiązanych,
ale i też w przestrzeniach nazw modułów. Moduły omówimy w rozdziale 7.
Wiele bloków impl
Każda struktura może mieć wiele bloków impl. Dla przykładu, kod w listingu 5-15 jest równoważny z kodem w listingu 5-16 zawierającym każdą metodę w innym bloku impl.
#[derive(Debug)] struct Rectangle { width: u32, height: u32, } impl Rectangle { fn area(&self) -> u32 { self.width * self.height } } impl Rectangle { fn can_hold(&self, other: &Rectangle) -> bool { self.width > other.width && self.height > other.height } } fn main() { let rect1 = Rectangle { width: 30, height: 50, }; let rect2 = Rectangle { width: 10, height: 40, }; let rect3 = Rectangle { width: 60, height: 45, }; println!("Czy rect2 zmieści się wewnątrz rect1? {}", rect1.can_hold(&rect2)); println!("Czy rect3 zmieści się wewnątrz rect1? {}", rect1.can_hold(&rect3)); }
Listing 5-16: Wersja kodu z listingu 5-15 z wieloma blokami impl
W tym przypadku nie ma powodu, by metody były od siebie odseparowane w różne bloki impl,
ale jest to poprawna składnia. Przypadek przydatnego wykorzystania wielu bloków impl
omówimy w rozdziale 10, w którym omówimy typy uniwersalne i cechy.
Podsumowanie
Dzięki strukturom możesz tworzyć własne typy, potrzebne do rozwiązania problemów w Twojej domenie.
Kiedy używasz struktury grupujesz powiązane elementy danych, a każdemu elementowi nadajesz nazwę, co sprawia, że twój kod staje się przejrzysty.
W blokach impl można zdefiniować funkcje powiązane z naszym typem, których szczególnym rodzajem są metody pozwalające określić zachowanie instancji struktury.
Ale struktury to nie jest jedyny sposób na tworzenie własnych typów: poznamy kolejną funkcjonalność Rusta - enumeracje, czyli kolejne niezbędne narzędzie w twojej kolekcji.
Wyliczenia i dopasowywanie wzorców
W tym rozdziale przyjrzymy się wyliczeniom (ang. enumerations),
czasem streszczanym także do samego: enum.
Wyliczeniami można zdefiniować jakiś typ wymieniając wszystkie jego wartości.
Najpierw zdefiniujemy i wykorzystamy wyliczenia, pokazując że mogą one przekazywać zarówno
znaczenie, jak i dane. Później omówimy szczególnie przydatne wyliczenie, mianowicie Option, które
deklaruje, że dana wartość może albo być obecna albo nieobecna.
Po tym, zerkniemy na to, jak dopasowywanie wzorców w wyrażeniach match pozwala wybrać kod do uruchomienia
dla różnych wartości wyliczeń. A na koniec, zajmiemy się wyrażeniem if let,
które jest kolejnym poręcznym i zwięzłym idiomem przydatnym w pracy z wyliczeniami.
Definiowanie wyliczeń
Podczas gdy struktury pozwalają na grupowanie powiązanych pól i danych, jak Rectangle z jego szerokością i wysokością, typy wyliczeniowe pozwalają na określenie wartości jako jednej z możliwych. Na przykład, za ich pomocą możemy wyrazić, że Rectangle (prostokąt) jest jednym z możliwych kształtów, które obejmują również Circle (koło) i Triangle (trójkąt).
Weźmy na tapetę pewną sytuację, w której wyliczenia są przydatniejsze i bardziej odpowiednie niż struktury. Załóżmy, że chcemy wykonywać operacje na adresach IP. Obecnie istnieją dwa standardy adresów IP: wersja czwarta i szósta. Ponieważ to jedyne możliwe typy adresów IP na jakie napotka się nasz program, to możemy wyliczyć (ang. enumerate) wszystkie możliwe wartości, stąd nazwa wyliczeń/enumeracji.
Dany adres IP może być albo w wersji czwartej albo w szóstej, ale nigdy w obu naraz. Ta właściwość adresów IP sprawia, że wyliczenia będą dobrym wyborem, skoro mogą przyjąć tylko jedną wartość ze wszystkich swoich wariantów. Zarówno adresy wersji czwartej, jak i wersji szóstej to nadal adresy IP, więc kod zajmujący się operacjami niezależnymi od typu adresu powinien traktować oba adresy jakby były tym samym typem.
Możemy wyrazić tę myśl w kodzie definując wyliczenie IpAddrKind i
wymieniając wszystkie możliwe typy adresów IP: V4 oraz V6. To są warianty tego enuma:
enum IpAddrKind { V4, V6, } fn main() { let four = IpAddrKind::V4; let six = IpAddrKind::V6; route(IpAddrKind::V4); route(IpAddrKind::V6); } fn route(ip_kind: IpAddrKind) {}
IpAddrKind jest teraz niestandardowym typem danych dostępnym dla nas w całym kodzie.
Wartości wyliczeń
Możemy stworzyć instancje obu wariantów IpAddrKind następująco:
enum IpAddrKind { V4, V6, } fn main() { let four = IpAddrKind::V4; let six = IpAddrKind::V6; route(IpAddrKind::V4); route(IpAddrKind::V6); } fn route(ip_kind: IpAddrKind) {}
Proszę zauważyć, że warianty wyliczenia dostępne są w przestrzeni jego nazwy, a więc korzystamy z dwóch dwukropków pomiędzy nazwą enuma a jego wariantem. To jest przydatne, bo teraz zarówno wartość IpAddrKind::V4, jak i IpAddrKind::V6 mają ten sam typ: IpAddrKind. A co za tym idzie, możemy napisać funkcję przyjmującą jako argument dowolny IpAddrKind.
enum IpAddrKind { V4, V6, } fn main() { let four = IpAddrKind::V4; let six = IpAddrKind::V6; route(IpAddrKind::V4); route(IpAddrKind::V6); } fn route(ip_kind: IpAddrKind) {}
tę funkcję możemy wywołać z dowolnym wariantem:
enum IpAddrKind { V4, V6, } fn main() { let four = IpAddrKind::V4; let six = IpAddrKind::V6; route(IpAddrKind::V4); route(IpAddrKind::V6); } fn route(ip_kind: IpAddrKind) {}
Enumeracje mają jeszcze więcej zalet. Przyjrzyjmy się naszemu typowi adresu IP dokładniej. Na chwilę obecną nie jesteśmy w stanie przechować samego adresu IP, czyli jego danych; możemy przechować jedynie jego rodzaj. Skoro dopiero co w rozdziale 5 poznaliśmy struktury, moglibyśmy pokusić się by ich użyć, tak jak pokazano na listingu 6-1.
fn main() { enum IpAddrKind { V4, V6, } struct IpAddr { kind: IpAddrKind, address: String, } let home = IpAddr { kind: IpAddrKind::V4, address: String::from("127.0.0.1"), }; let loopback = IpAddr { kind: IpAddrKind::V6, address: String::from("::1"), }; }
Listing 6-1: Przechowywanie danych i wariantu IpAddrKind
adresu IP przy użyciu struktury
Zdefiniowaliśmy strukturę IpAddr mającą dwa pola: kind (ang. rodzaj) typu IpAddrKind (wyliczenie zdefiniowane przez nas wcześniej) oraz address przechowującą wartość typu String.
Stworzyliśmy dwie instancje tej struktury.
Pierwsza, home, do pola kind ma przypisaną wartość IpAddrKind::V4, zaś do address wartość 127.0.0.1.
Druga instancja, loopback ma inny wariant IpAddrKind jako wartość pola kind,
ta wartość wynosi V6; oraz jako adres przypisany ma String ::1.
Tym samym użyliśmy struktury aby zgrupować wartości kind i address, dzięki czemu typ adresu i sam adres są ze sobą powiązane.
Jednakże, tę samą myśl jesteśmy w stanie wyrazić zwięzłej za pomocą samego enuma:
zamiast wstawiając enuma do struktury, możemy umieścić dane w każdym z wariantów enuma.
Ta nowa definicja enuma IpAddr zawiera zarówno w wariancie V4 jak i V6 nową wartość o typie String:
fn main() { enum IpAddr { V4(String), V6(String), } let home = IpAddr::V4(String::from("127.0.0.1")); let loopback = IpAddr::V6(String::from("::1")); }
Bezpośrednio dołączamy dane do każdego wariantu enuma, więc dodatkowa struktura staje się niepotrzebna.
Tutaj łatwo można też dostrzec inny szczegół działania enuma: nazwa każdego jego wariantu, jest również funkcją konstruującą instancję enuma. Czyli, IpAddr::V4() jest wywołaniem funkcji, która przyjmuje argument String i zwraca instancję typu IpAddr. Ta funkcja konstruującą jest zdefiniowana automatycznie.
Wykorzystanie enuma zamiast struktury niesie ze sobą jeszcze jedną korzyść:
z każdym wariantem mogą być powiązane inne typy oraz ilości danych.
Adresy IP wersji czwartej zawsze będą miały cztery liczby, o wartościach pomiędzy
0 a 255. Zapisanie adresu V4 jako czterech wartości u8, a adresu V6
nadal jako typ String byłoby niemożliwe przy użyciu struktury.
W przypadku wyliczeń jest to proste:
fn main() { enum IpAddr { V4(u8, u8, u8, u8), V6(String), } let home = IpAddr::V4(127, 0, 0, 1); let loopback = IpAddr::V6(String::from("::1")); }
Pokazaliśmy kilka różnych sposobów definiowania struktur danych przechowujących
adresy IP czwartej i szóstej wersji. Jak się jednak okazuje, przechowywanie adresów IP
wraz z rodzajem ich wersji jest tak powszechne, że biblioteka standardowa ma gotową
definicję czekającą tylko na to, aby jej użyć!
Spójrzmy na definicję IpAddr w bibliotece standardowej: ma dokładnie taką samą nazwę
i takie sama warianty, ale przechowuje dane o adresach za pomocą dwóch różnych struktur,
zdefiniowanych osobno oraz umieszczonych w wariantach wyliczenia.
#![allow(unused)] fn main() { struct Ipv4Addr { // --snip-- } struct Ipv6Addr { // --snip-- } enum IpAddr { V4(Ipv4Addr), V6(Ipv6Addr), } }
Jak demonstruje powyższy wycinek kodu, w wariantach enuma można umieścić każdy typ danych, np.: ciąg znaków (string), typ liczbowy, lub strukturę. W enumie można umieścić nawet innego enuma! Ponadto, typy w standardowej bibliotece często nie są wcale bardziej skomplikowane od wymyślonych samodzielnie.
Mimo że standardowa biblioteka definiuje własny IpAddr, nadal możemy
stworzyć i używać własnej definicji bez żadnych konfliktów, bo nie zaimportowaliśmy
definicji z biblioteki standardowej do zasięgu (ang. scope).
Więcej informacji o importowaniu typów do zasięgu zawiera rozdział 7.
Spójrzmy na innego enuma, na przykładzie listingu 6-2: ten w swoich wariantach zawierał będzie wiele różnych typów.
enum Message { Quit, Move { x: i32, y: i32 }, Write(String), ChangeColor(i32, i32, i32), } fn main() {}
Listing 6-2: Enum Message, którego warianty zawierają
różne ilości i typy wartości
Ten enum definiuje cztery warianty, każdy z innymi typami:
Quit, nie zawiera w sobie żadnych danych.Movezawiera nazwane pola, zupełnie jak struktura.Writezawiera w sobie jedenString.ChangeColorzawiera trzy wartości o typachi32.
Na przykładzie enuma w listingu 6-2 widzimy, że definiowanie wariantów jest podobne do definiowania
kilku struktur, z taką różnicą, że nie używamy słowa kluczowego struct oraz, że
wszystkie warianty zgrupowane są w typie Message.
Poniższe struktury mogą zawierać te same dane co powyższe typy enuma:
struct QuitMessage; // struktura jednostkowa struct MoveMessage { x: i32, y: i32, } struct WriteMessage(String); // struktura krotkowa struct ChangeColorMessage(i32, i32, i32); // struktura krotkowa fn main() {}
Ale jeśli użylibyśmy różnych struktur, to, w przeciwieństwie do enuma, każda z nich miałaby inny typ.
Zdefiniowanie funkcji mogącej przyjąć jako parametr
różne rodzaje wiadomości, nie byłoby tak proste jak przy użyciu
enuma Message zdefiniowanego w listingu 6-2.
Jest jeszcze jedno podobieństwo między wyliczeniami, a strukturami: tak jak
można zdefiniować metody dla struktur używając bloku impl, można je też zdefiniować
dla typu wyliczeniowego. Spójrzmy na metodę o nazwie call zdefiniowaną na naszym enumie Message:
fn main() { enum Message { Quit, Move { x: i32, y: i32 }, Write(String), ChangeColor(i32, i32, i32), } impl Message { fn call(&self) { // tutaj można zdefiniować ciało metody } } let m = Message::Write(String::from("witaj")); m.call(); }
Ciało metody użyje wartości self, aby uzyskać wariant enuma, na którym ta metoda została wywołana.
W tym przykładzie przypisaliśmy do zmiennej m wartość
Message::Write(String::from("witaj")), która, w wywołaniu m.call()
stanie się parametrem self, dostępnym w ciele metody call.
Spójrzmy na kolejne wyliczenie z biblioteki standardowej,
które jest bardzo przydatne i często używane, czyli Option.
Wyliczenie Option i jego przewagi nad wartościami Null
W tej sekcji znajduje się analiza typu Option, kolejnego enuma z biblioteki standardowej.
Typ Option używany jest w wielu miejscach, ponieważ opisuje bardzo częsty scenariusz, w którym dana wartość może być zarówno czymś albo niczym.
Na przykład, jeśli zażądamy pierwszego elementu niepustej listy, to otrzymamy jego wartość. Jeśli zażądamy pierwszego elementu pustej listy, nie otrzymamy nic. Wyrażenie tej koncepcji za pomocą systemu typów Rusta sprawia, że kompilator jest w stanie sprawdzić, czy wzięliśmy pod uwagę wszystkie przypadki, co pozwala zapobiegać błędom (bugom) pojawiającym się bardzo często w innych językach programowania.
Przez konstrukcję języka programowania często rozumie się decyzje o zawarciu w nim jakichś funkcjonalności.
Ale równie istotne jest to, jakie funkcjonalności się w nim nie znalazły.
Rust nie ma wartości null znanej z wielu innych języków.
Null to wartość oznaczająca brak wartości - jest to wartość pusta.
W językach z pustymi wartościami, zmienne zawsze mogą być w jednym z dwóch stanów: null lub nie-null.
W swojej prezentacji z 2009 roku "Puste referencje: Błąd warty miliard dolarów" (oryg. „Null References: The Billion Dollar Mistake,”), Tony Hoare, wynalazca nulla, powiedział:
Ten błąd warty jest miliard dolarów. W tamtych czasach projektowałem pierwszy kompleksowy system typów referencji dla języków obiektowych. Moim celem było zapewnienie gwarancji, że każde użycie referencji byłoby całkowicie bezpieczne, co automatycznie sprawdzałby kompilator. Ale nie mogłem oprzeć się pokusie implementacji pustych referencji, z prostej przyczyny: było to łatwe do zaimplementowania. Ta decyzja doprowadziła do tylu niezliczonych błędów, luk i awarii systemów, że łącznie przez ostatnie czterdzieści lat pewnie spowodowała ból i szkody warte miliard dolarów.
Problem z pustymi wartościami polega na tym, że próba użycia nulla tak, jak gdyby nie był nullem, spowoduje błąd. Ponieważ ta właściwość, null lub nie-null, jest wszechobecna, niezwykle łatwo jest popełnić ten rodzaj błędu.
Jednak koncepcja, którą null próbuje wyrazić, jest przydatna: null oznacza że wartość jest obecnie nieważna lub nieobecna.
Problemem nie jest sam pomysł, ale ta konkretna implementacja pustych wartości.
Rust nie ma jako takich pustych wartości null, ale istnieje w Ruście wyliczenie,
które wyraża pojęcie obecności lub braku obecności danej wartości.
Tym wyliczeniem jest Option<T> zdefiniowane przez bibliotekę standardową]option
w następujący sposób:
#![allow(unused)] fn main() { enum Option<T> { None, Some(T), } }
Enum Option<T> jest tak przydatny, że znajduje się w prelude;
nie trzeba samemu go importować. Ponadto, to samo dotyczy jego wariantów:
Some i None można użyć bez prefiksu Option::.
Enum Option<T> jest zwykłym wyliczeniem, a Some(T) oraz None
to nadal zwykłe warianty Option<T>.
Składnia <T> jest funkcjonalnością Rusta, której jeszcze nie omówiliśmy.
Jest to tzw. parametr generyczny. Bardziej szczegółowo omówimy je w rozdziale 10.
Póki co, wszystko co musisz o nich wiedzieć to to, że <T> oznacza, że wariant Some
enuma Option może zawierać w sobie jedną wartość dowolnego typu.
Co więcej, Option<T> jest różnych typów dla różnych, konkretnych typów T.
Oto niektóre przykłady używania wartości Option do przechowywania typów liczbowych oraz łańcuchowych (stringów):
fn main() { let some_number = Some(5); let some_char = Some('e'); let absent_number: Option<i32> = None; }
Zmienna some_number jest typu Option<i32>, zaś some_char jest typu Option<char>, który jest innym typem.
Rust może wydedukować te typy, ponieważ określiliśmy wartość wewnątrz wariantu Some. W przypadku absent_number, Rust wymaga od nas adnotacji o całościowym type Option: kompilator nie może wywnioskować typu, jaki będzie posiadał wariant Some widząc tylko wartość None. Tutaj mówimy więc Rustowi, że chcemy aby absent_number było typu Option<i32>.
Widząc Some, wiemy że wartość jest obecna oraz że znajduje się ona w Some. Za to None, w pewnym sensie oznacza to samo co null, czyli brak prawidłowej wartości. To dlaczego Option<T> jest lepszy od nulla?
W skrócie, Option<T> i T (gdzie T może być dowolnym typem)
są różnymi typami, więc kompilator nie pozwoli nam użyć Option<T> tak jakby
była to prawidłowa wartość typu T. Na przykład, ten kod się nie skompiluje, bo próbujemy w nim
dodać do siebie wartość typu i8 oraz Option<i8>:
fn main() {
let x: i8 = 5;
let y: Option<i8> = Some(5);
let sum = x + y;
}Uruchamiając ten kod, otrzymamy następujący komunikat o błędzie:
$ cargo run
Compiling enums v0.1.0 (file:///projects/enums)
error[E0277]: cannot add `Option<i8>` to `i8`
--> src/main.rs:5:17
|
5 | let sum = x + y;
| ^ no implementation for `i8 + Option<i8>`
|
= help: the trait `Add<Option<i8>>` is not implemented for `i8`
= help: the following other types implement trait `Add<Rhs>`:
<&'a i8 as Add<i8>>
<&i8 as Add<&i8>>
<i8 as Add<&i8>>
<i8 as Add>
For more information about this error, try `rustc --explain E0277`.
error: could not compile `enums` due to previous error
Bezlitośnie! Ten komunikat oznacza, że Rust nie wie jak ma dodać do siebie typy i8
oraz Option<i8>, ponieważ to dwa różne typy. Kiedy w Ruście posługujemy się typem takim jak i8, kompilator zawsze
gwarantuje, że jest to prawidłowa wartość. Możemy być pewni swego i kontynuować kodowanie bez
sprawdzania czy dana wartość jest pusta. Jedynie kiedy posługujemy się typem Option<i8>
(czy jakimkolwiek innym typem zawartym wewnątrz Option) musimy się martwić o ewentualny brak wartości,
zaś kompilator upewni się, że uwzględniliśmy ten przypadek przed użyciem wartości.
Innymi słowy, musimy skonwertować wartość typu Option<T> na T zanim
przyjmie ona zachowania charakterystyczne dla typu T.
W większości przypadków pozwala to na pozbycie się jednego z najczęstszych problemów z nullem: zakładanie, że jakaś wartość istnieje, kiedy
tak na prawdę nie istnieje.
Wyeliminowanie ryzyka nieprawidłowego założenia, że dana wartość nie jest pusta, daje nam większą pewność co do napisanego kodu. Aby dana wartość mogła nie istnieć musimy wyrazić na to zgodę definiując daną wartość jako typ Option<T>.
Następnie, używając tej wartości, musimy jawnie obsłużyć przypadek, gdy wartość jest null.
Wszędzie, gdzie typem wartości nie jest Option<T>, można bezpiecznie założyć, że wartość nie jest pusta.
To była celowa decyzja projektowa dla Rust, aby ograniczyć wszechobecność null i zwiększyć bezpieczeństwo napisanego kodu.
Więc mając wartość typu Option<T>, jak można dostać się do wartości typu T
znajdującej się w wariancie Some? Enum Option<T> ma wiele przydatnych metod odpowiednich dla różnych sytuacji;
można je znaleźć w dokumentacji. Zapoznanie się z metodami
typu Option<T> jest bardzo przydatne w przygodzie z Rustem.
Zwykle, aby użyć wartości typu Option<T>, musimy napisać kod sprawdzający oba warianty.
Jedna część kodu będzie odpowiedzialna za wariant Some(T) i będzie ona miała
dostęp do wewnętrznej wartości typu T.
Druga część będzie odpowiedzialna za wariant None i ona oczywiście nie będzie miała dostępu
do wartości typu T. Wyrażenie match jest konstrukcją sterującą wykonaniem, pozwalającą na tego typu zachowanie.
Wyrażenie match uruchomi różny kod w zależności od tego, który wariant ma dany enum.
I ten kod będzie będzie miał dostęp do danych znajdujących się w dopasowanym wariancie.
Konstrukcja Przepływu Sterowania match
Rust posiada niezwykle potężną konstrukcję przepływu sterowania match, która pozwala na porównanie wartości z serią wzorców, a następnie wykonanie kodu przypisanego do pasującego wzorca.
Wzorce mogą składać się z literałów, nazw zmiennych, wieloznaczników (ang. woldcards) i wielu innych rzeczy;
rozdział 18 objaśnia działanie wszystkich rodzajów wzorców.
Siła match wynika z ekspresyjności wzorców i faktu, że kompilator sprawdza, czy wszystkie możliwe przypadki są obsługiwane.
Na wyrażeniu match można spojrzeć jak na maszynę do sortowania monet:
monety zjeżdżają po torze wzdłuż którego znajdują się różnej wielkości otwory i każda wpada w pierwszy napotkany otwór, do którego pasuje. W ten sam sposób wartości przechodzą przez każdy wzorzec w match, aż do napotkania pierwszego wzorca, do którego wartość "pasuje". Po jego napotkaniu, wartość wpada do powiązanego z tym wzorcem bloku kodu, który zostaje wykonany.
Skoro mowa o monetach, to użyjmy ich jako przykładu z wykorzystaniem match!
Możemy napisać funkcję, która pobiera nieznaną amerykańską monetę i tak jak maszyna licząca określa, jaka to moneta, oraz zwraca jej wartość w centach, jak pokazano na listingu 6-3.
enum Coin { Penny, Nickel, Dime, Quarter, } fn value_in_cents(coin: Coin) -> u8 { match coin { Coin::Penny => 1, Coin::Nickel => 5, Coin::Dime => 10, Coin::Quarter => 25, } } fn main() {}
Listing 6-3: Wyrażenie match dopasowujące warianty enuma do wzorców
Rozłóżmy match w funkcji value_in_cents na czynniki pierwsze.
Najpierw umieszczamy słowo kluczowe match, po którym następuje wyrażenie, którym w tym przypadku jest wartość coin.
To wyrażenie pełni podobną rolę do wyrażenia warunkowego używanego z if, ale jest duża różnica: w if warunek musi dawać wartość boolowską, zaś tutaj wyraźnie może być dowolnego typu. Typem coin w tym przykładzie jest enum Coin, który zdefiniowaliśmy w pierwszej linii.
Następne są odnogi match. Odnoga składa się z dwóch części: wzorca i kodu. Pierwsza odnoga ma wzorzec, którym jest wartość Coin::Penny, a następnie operator =>, który oddziela wzorzec i kod do uruchomienia. Kodem w tym przypadku jest po prostu wartość 1. Każda odnoga jest oddzielone od następnej przecinkiem.
Wykonanie wyrażenia match polega na porównaniu wartości wynikowej z wzorcem każdej z odnóg, w kolejności ich wystąpienia.
Jeśli wzorzec pasuje do wartości, wykonywany jest kod związany z tym wzorcem.
Jeśli wzorzec nie pasuje do wartości, wykonanie przechodzi do następnej odnogi, zupełnie jak w maszynie do sortowania monet.
Możemy mieć tyle odnóg ile potrzebujemy. Na listingu 6-3, nasz match ma ich cztery.
Kod związany z każdą odnogą jest wyrażeniem, a wartość wynikowa wyrażenia w pasującej odnodze jest wartością, która zostaje zwrócona z całego wyrażenia match.
Zazwyczaj nie używamy nawiasów klamrowych, jeśli kod ramienia odnogi jest krótki, tak jak na listingu 6-3, gdzie każda odnoga jedynie zwraca wartość. Chcąc uruchomić wiele linii kodu w jednej odnodze należy użyć nawiasów klamrowych, a przecinek po odnodze jest wtedy opcjonalny. Na przykład poniższy kod drukuje „Szczęśliwy pens!“ za każdym razem, gdy metoda jest wywoływana z Coin::Penny, ale wciąż zwraca ostatnią wartość bloku, 1:
enum Coin { Penny, Nickel, Dime, Quarter, } fn value_in_cents(coin: Coin) -> u8 { match coin { Coin::Penny => { println!("Szczęśliwy pens!"); 1 } Coin::Nickel => 5, Coin::Dime => 10, Coin::Quarter => 25, } } fn main() {}
Wzorce Deklarujące Zmienne
Inną przydatną cechą odnóg match jest to, że mogą one tworzyć zmienne zainicjowane fragmentami wartości pasującej do wzorca. Tym samym pozwalają wyodrębnić wartości z wariantów enuma.
By to zilustrować, zmienimy jeden z wariantów naszego wyliczenia tak, aby przechowywał on wewnątrz dane.
Od 1999 do 2008 roku Stany Zjednoczone biły ćwierćdolarówki mające po jednej ze stron różne wzory dla każdego z 50 stanów.
Żadna inna moneta nie miała wzorów stanowych, więc tylko ćwiartki będą miały dodatkową wartość. Możemy ją uwzględnić w naszym typie enum poprzez zmianę wariantu Quarter tak, aby zawierał wartość typu UsState, co zrobiliśmy na listingu 6-4.
#[derive(Debug)] // byśmy mogli za chwilę zobaczyć stan enum UsState { Alabama, Alaska, // --snip-- } enum Coin { Penny, Nickel, Dime, Quarter(UsState), } fn main() {}
Listing 6-4: Enum Coin z wariantem Quarter trzymającym wartość typu UsState
Wyobraźmy sobie, że znajomy chce zebrać wszystkie 50 ćwiartek stanowych. Segregując nasze drobniaki według typów monet, będziemy podawać nazwę stanu związanego z każdą ćwiartką, by nasz przyjaciel mógł dodać ją do swojej kolekcji, gdy jeszcze takiej ćwiartki nie posiada.
W kodzie wyrażenia match dodajemy zmienną o nazwie state do wzorca dopasowującego wariant Coin::Quarter.
Kiedy Coin::Quarter zostanie dopasowane, zmienna state zostanie utworzona i zainicjowana wartością wskazującą stan, z którego pochodzi ćwiartka.
Następnie state może zostać użyte w kodzie tej odnogi, co pokazuje przykład:
#[derive(Debug)] enum UsState { Alabama, Alaska, // --snip-- } enum Coin { Penny, Nickel, Dime, Quarter(UsState), } fn value_in_cents(coin: Coin) -> u8 { match coin { Coin::Penny => 1, Coin::Nickel => 5, Coin::Dime => 10, Coin::Quarter(state) => { println!("Ćwiartka ze stanu {:?}!", state); 25 } } } fn main() { value_in_cents(Coin::Quarter(UsState::Alaska)); }
W wywołaniu value_in_cents(Coin::Quarter(UsState::Alaska)), coin miałoby wartość Coin::Quarter(UsState::Alaska).
Próby dopasowania tej wartości do kolejnych odnóg match zakończyłyby się sukcesem dopiero po dotarciu do Coin::Quarter(state).
Wtedy zostałaby utworzona zmienna state o wartość UsState::Alaska.
Ta zmienna zostałaby użyta w wyrażeniu println!, dając mu dostęp do wartości przechowywanej wewnątrz wariantu Quarter enuma Coin.
Dopasowywanie do Option<T>
W poprzedniej sekcji chcieliśmy wydobyć wewnętrzną wartość typu T z wariantu Some enuma Option<T>; możemy również obsłużyć Option<T> używając match, podobnie jak zrobiliśmy to z typem wyliczeniowym Coin!
Zamiast porównywać monety, będziemy porównywać warianty Option<T>, ale sposób działania wyrażenia match będzie taki sam.
Powiedzmy, że chcemy napisać funkcję, która przyjmuje Option<i32> i jeśli w środku jest jakaś wartość, to dodaje do niej 1.
Jeśli w środku nie ma żadnej wartości, funkcja powinna zwrócić wartość None, nie robiąc nic więcej.
Dzięki match taka funkcja jest bardzo łatwa do napisania i wygląda jak na listingu 6-5.
fn main() { fn plus_one(x: Option<i32>) -> Option<i32> { match x { None => None, Some(i) => Some(i + 1), } } let five = Some(5); let six = plus_one(five); let none = plus_one(None); }
Listing 6-5: Funkcja używająca wyrażenia match dla Option<i32>
Przeanalizujmy bardziej szczegółowo pierwsze wykonanie plus_one.
W wywołaniu plus_one(five), zmienna x ma wartość Some(5) i zostanie porównana z każdą odnogą match:
fn main() {
fn plus_one(x: Option<i32>) -> Option<i32> {
match x {
None => None,
Some(i) => Some(i + 1),
}
}
let five = Some(5);
let six = plus_one(five);
let none = plus_one(None);
}Wartość Some(5) nie pasuje do wzorca None, nastąpi więc przejęcie do kolejnej odnogi:
fn main() {
fn plus_one(x: Option<i32>) -> Option<i32> {
match x {
None => None,
Some(i) => Some(i + 1),
}
}
let five = Some(5);
let six = plus_one(five);
let none = plus_one(None);
}Czy Some(5) pasuje do Some(i)? Tak! To ten sam wariant.
Zostaje zadeklarowana zmienna i, zainicjowana wartością zawartą w Some, czyli 5.
Następnie wykonywany jest kod w wybranej odnodze match, który dodaje 1 do wartości i i tworzymy nową wartość Some z uzyskaną sumą 6 w środku.
Rozważmy teraz drugie wywołanie plus_one z listingu 6-5, w którym x jest None.
Następuje jego porównanie do pierwszej odnogi match:
fn main() {
fn plus_one(x: Option<i32>) -> Option<i32> {
match x {
None => None,
Some(i) => Some(i + 1),
}
}
let five = Some(5);
let six = plus_one(five);
let none = plus_one(None);
}Pasuje! Nie ma żadnej wartości do zwiększenia, więc program zatrzymuje się i zwraca wartość None po prawej stronie =>.
Ponieważ pierwsza odnoga pasowała, to pozostałe nie są już sprawdzane.
Używanie match z typami wyliczeniowymi jest przydatne w wielu sytuacjach.
Często można spotkać następujący scenariusz: enum jest dopasowywany za pomocą match, następnie z jego wewnętrznymi danymi związywana jest zmienna, która jest używana w kodzie przewidzianym dla wybranego wariantu. Początkowo może się to wydawać nieco trudne, ale po przyzwyczajeniu, okazuje się bardzo wygodne. Jest to niezmiennie ulubione narzędzie Rustowców.
Match Jest Wyczerpujący
Jest jeszcze jeden aspekt match, który musimy omówić: wzorce odnóg muszą uwzględniać wszystkie możliwości.
Rozważmy następującą, błędną wersję naszej funkcji plus_one, która się nie skompiluje:
fn main() {
fn plus_one(x: Option<i32>) -> Option<i32> {
match x {
Some(i) => Some(i + 1),
}
}
let five = Some(5);
let six = plus_one(five);
let none = plus_one(None);
}Ten kod spowoduje błąd, bo nie uwzględnia przypadku None.
Na szczęście Rust z łatwością zauważy problem.
Jeśli spróbujemy skompilować ten kod, otrzymamy taki błąd:
$ cargo run
Compiling enums v0.1.0 (file:///projects/enums)
error[E0004]: non-exhaustive patterns: `None` not covered
--> src/main.rs:3:15
|
3 | match x {
| ^ pattern `None` not covered
|
note: `Option<i32>` defined here
--> /rustc/d5a82bbd26e1ad8b7401f6a718a9c57c96905483/library/core/src/option.rs:518:1
|
= note:
/rustc/d5a82bbd26e1ad8b7401f6a718a9c57c96905483/library/core/src/option.rs:522:5: not covered
= note: the matched value is of type `Option<i32>`
help: ensure that all possible cases are being handled by adding a match arm with a wildcard pattern or an explicit pattern as shown
|
4 ~ Some(i) => Some(i + 1),
5 ~ None => todo!(),
|
For more information about this error, try `rustc --explain E0004`.
error: could not compile `enums` due to previous error
Rust wie, że nie uwzględniliśmy wszystkich możliwych przypadków, a nawet wie, o którym wzorcu zapomnieliśmy!
Dopasowania w Rustowym match są wyczerpujące: musimy wyczerpać wszelkie możliwości, aby kod był poprawny.
Szczególnie w przypadku Option<T>, gdy Rust pilnuje byśmy jawnie obsłużyli przypadek None, chroni nas przed błędnym założeniem, że wartość zawsze jest dostępna, uniemożliwiając tym samym omawiany wcześniej błąd wart miliarda dolarów.
Wzorce Pasujące do Wszystkiego i Placeholder _
Możemy też podjąć specjalne czynności jedynie dla kilku konkretnych wartości enuma, zaś dla wszystkich pozostałych wykonać jedno domyślne działanie.
Wyobraźmy sobie, że implementujemy grę, w której, jeśli wyrzucimy 3 na kostce, nasz gracz nie porusza się, ale za to dostaje nowy kapelusz. Jeśli wyrzucimy 7, nasz gracz traci kapelusz. Dla wszystkich innych wartości, nasz gracz przesuwa się po planszy o wyrzuconą liczbę oczek. Oto match, który implementuje tę logikę, z wynikiem rzutu kostką zakodowanym na sztywno zamiast wylosowanym, oraz całą pozostałą logiką reprezentowaną przez funkcje, których ciał nie podano, ponieważ ich implementacja wykracza poza zakres omawianego przykładu:
fn main() { let dice_roll = 9; match dice_roll { 3 => add_fancy_hat(), 7 => remove_fancy_hat(), other => move_player(other), } fn add_fancy_hat() {} fn remove_fancy_hat() {} fn move_player(num_spaces: u8) {} }
Dla dwóch pierwszych odnóg wzorcami są literały 3 i 7.
Dla ostatniej odnogi, która obejmuje każdą inną możliwą wartość, wzorcem jest zmienna, którą nazwaliśmy other.
Kod uruchomiony dla tej odnogi przekazuje wartość other do funkcji move_player.
Ten kod kompiluje się, pomimo że nie wymieniliśmy wszystkich możliwych wartości, jakie może przyjąć u8, ponieważ ostatni wzorzec dopasuje wszystkie wartości, które nie zostały wymienione. Dzięki temu pasującemu do wszystkiego wzorcowi spełniony jest wymóg, że match musi być wyczerpujący.
Proszę zauważyć, że odnoga pasująca do wszystkiego powinna być ostatnia, ponieważ wzorce są analizowane po kolei.
Jeśli umieścilibyśmy ją wcześniej, dalsze odnogi nigdy by nie zostały wybrane.
Dlatego Rust ostrzega, gdy dodamy odnogi po takiej, która pasuje do wszystkiego.
Rust posiada również wzorzec, którego możemy użyć, gdy chcemy dopasować wszystko, ale nie chcemy używać dopasowanej wartości: _ jest specjalnym wzorcem, który pasuje do dowolnej wartości i równocześnie nie przypisuje sobie wartością. Jego użycie mówi Rustowi, że nie zamierzamy używać wartości, więc Rust nie będzie ostrzegał o nieużywanej zmiennej.
Zmieńmy zasady gry: teraz po wyrzuceniu czegokolwiek innego niż 3 lub 7, należy rzucić ponownie.
I wtedy nie ma znaczenia co wypadło, więc zmienna other nie jest dalej potrzebna i możemy ją zastąpić symbolem _:
fn main() { let dice_roll = 9; match dice_roll { 3 => add_fancy_hat(), 7 => remove_fancy_hat(), _ => reroll(), } fn add_fancy_hat() {} fn remove_fancy_hat() {} fn reroll() {} }
Ten przykład również spełnia wymóg wyczerpywalności, ponieważ wszystkie pozostałe wartości są w ostatniej odnodze ignorowane jawnie; nie zapomnieliśmy o niczym.
Na koniec zmienimy jeszcze raz zasady gry tak, aby wyrzucenie czegokolwiek innego niż 3 lub 7, nie miało żadnych następstw.
Możemy to wyrazić używając jako kodu w odnodze _ wartości jednostkowej (czyli pustej krotki, o czym wspominaliśmy w sekcji „Krotki“):
fn main() { let dice_roll = 9; match dice_roll { 3 => add_fancy_hat(), 7 => remove_fancy_hat(), _ => (), } fn add_fancy_hat() {} fn remove_fancy_hat() {} }
Tutaj mówimy Rustowi wprost, że nie będziemy używać żadnej wartości, która nie pasuje do wzorców poprzednich odnóg, i nie chcemy uruchamiać żadnego kodu w tym przypadku.
Więcej o wzorcach i dopasowywaniu powiemy w rozdziale 18.
Na razie jednak przejdziemy do składni if let, która może być przydatna w sytuacjach, w których wyrażenie match jest zbyt rozwlekłe.
Zwięzła Kontrola Przepływu z if let
Składnia if let łączy if i let, by obsłużyć wartości pasujące do wzorca. Składnia ta jest zwięzła, ale (bez powtarzania if let) pozwala podać tylko jeden wzorzec.
Rozważmy program z listingu 6-6, który dopasowuje wartość zmiennej config_max typu Option<u8>, ale chce wykonać kod tylko jeśli ta wartość jest wariantem Some.
fn main() { let config_max = Some(3u8); match config_max { Some(max) => println!("Maksimum jest ustawione na {}", max), _ => (), } }
Listing 6-6: match wykonujący kod jedynie gdy wartość jest Some
Jeśli wariantem jest Some, to wypisujemy zawartą w nim wartość przypisując ją uprzednio do zmiennej max we wzorcu.
Z wariantem None nie chcemy nic robić. Aby spełnić jednak wymóg wyczerpywalności wyrażenia match, musimy dodać niewiele znaczące, szablonowe _ => () po przetworzeniu tylko jednego wariantu, co jest irytuje.
W zamian możemy napisać to samo krócej używając if let.
Następujący kod zachowuje się tak samo jak match z listingu 6-6:
fn main() { let config_max = Some(3u8); if let Some(max) = config_max { println!("Maksimum jest ustawione na {}", max); } }
Składnia if let przyjmuje wzorzec i wyrażenie oddzielone znakiem równości.
Działa tak samo jak match, gdzie wyrażenie jest podane do match, a wzorzec jest jego pierwszą odnogą.
W tym przypadku wzorzec to Some(max), a max zostaje zainicjowane wartością z wnętrza Some.
Możemy wtedy użyć max w ciele bloku if let w taki sam sposób, w jaki użyliśmy max w odpowiedniej odnodze match.
Kod w bloku if let nie jest uruchamiany, jeśli wartość nie pasuje do wzorca.
Używanie if let oznacza mniej pisania, mniej wcięć i mniej niewiele znaczącego, szablonowego kodu.
Jednakże, w stosunku do match, tracimy sprawdzanie wyczerpywalności.
Wybór pomiędzy match a if let zależy tego, co jest dla nas w danej sytuacji ważniejsze, uzyskanie zwięzłości czy sprawdzanie wyczerpywalności.
Innymi słowy, można myśleć o if let jako o składniowym lukrze dla match, który uruchamia kod tylko gdy wartość pasuje do podanego wzorca, równocześnie nie robiąc nic gdy nie pasuje.
Można także do if let dołączyć else.
Blok kodu stojący za else pełni taką samą rolę, jak blok dla odnogi _ w wyrażeniu match równoważnym do danego if let z else.
Proszę sobie przypomnieć definicję typu wyliczeniowego Coin z listingu 6-4, w którym wariant Quarter posiada wartość UsState.
Za pomocą następującego wyrażenia match możemy policzyć wszystkie widziane monety niebędące ćwiartkami, jednocześnie informując o stanie, z którego pochodzą ćwiartki:
#[derive(Debug)] enum UsState { Alabama, Alaska, // --snip-- } enum Coin { Penny, Nickel, Dime, Quarter(UsState), } fn main() { let coin = Coin::Penny; let mut count = 0; match coin { Coin::Quarter(state) => println!("Ćwiartka ze stanu {:?}!", state), _ => count += 1, } }
To samo możemy też uzyskać za pomocą wyrażenia if let z else:
#[derive(Debug)] enum UsState { Alabama, Alaska, // --snip-- } enum Coin { Penny, Nickel, Dime, Quarter(UsState), } fn main() { let coin = Coin::Penny; let mut count = 0; if let Coin::Quarter(state) = coin { println!("Ćwiartka ze stanu {:?}!", state); } else { count += 1; } }
O if let warto pamiętać w sytuacji, w której wyrażenie logiki za pomocą match jest zbyt rozwlekłe.
Podsumowanie
Pokazaliśmy, jak używać enumeracji do tworzenia typów, których zmienne mogą być jedną z zestawu wyliczonych wartości.
Wskazaliśmy też, jak typ Option<T> biblioteki standardowej wykorzystuje systemu typów, aby uniknąć błędów.
W zależności od tego, ile przypadków trzeba obsłużyć, można użyć match lub if let do wyodrębnienia i użycia wartości zawartych wewnątrz wariantów enuma.
Programy Rusta mogą teraz wyrażać koncepcje w danej domenie za pomocą struktur i enumów. Utworzenie niestandardowych typów i użycie ich w API zapewnia bezpieczeństwo: kompilator dba o to, aby funkcje otrzymywały tylko wartości oczekiwanego typu.
Przejdźmy teraz do omówienia modułów Rusta, które pozwalają wyrazić API, które jest dobrze zorganizowane, proste w użyciu i eksponuje tylko to, czego potrzebują użytkownicy.
Zarządzanie Rozrastającymi Się Projektami Za Pomocą Pakietów, Skrzyń i Modułów
W miarę pisania dużych programów, coraz ważniejsza staje się organizacja kodu. Dzięki pogrupowaniu powiązanych funkcjonalności i porozdzielaniu kodu, ułatwiamy odnalezienie w nim miejsc odpowiedzialnych za daną funkcjonalność, a zatem i ewentualne dokonanie zmian sposobu jej działania.
Programy, które dotychczas napisaliśmy, mieściły się w jednym module, w jednym pliku. Gdy projekt się rozrasta, warto uporządkować kod, dzieląc go na wiele modułów, a następnie wiele plików. Pakiet może zawierać wiele skrzyń binarnych i opcjonalnie jedną skrzynię biblioteczną. W miarę jak pakiet rośnie, można wyodrębnić jego części do oddzielnych skrzyń, które stają się zewnętrznymi zależnościami. Ten rozdział omawia wszystkie te techniki. Dla bardzo dużych projektów składających się z zestawu powiązanych ze sobą pakietów, które są rozwijane wspólnie, Cargo udostępnia przestrzenie robocze, które omówimy w sekcji „Przestrzenie Robocze Cargo“ rozdziału 14.
Omówimy również enkapsulację szczegółów implementacji, która pozwala na ponowne użycie kodu na wyższym poziomie: po zaimplementowaniu operacji, inny kod może wywołać nasz kod poprzez jego publiczny interfejs, bez konieczności znajomości szczegółów implementacji. Sposób, w jaki piszemy kod określa, które części są publiczne do wykorzystania przez inny kod, a które są prywatnymi szczegółami implementacji i, w związku z tym, zastrzegamy sobie prawo do ich swobodnej zmiany. Wszystko to jest kolejnym sposobem na ograniczenie liczby szczegółów, które musimy mieć w głowie.
Powiązanym pojęciem jest zasięg: osadzony kontekst, w którym pisany jest kod i który zawiera zestaw nazw, o których mówimy, że są „w zasięgu“. Czytając, pisząc i kompilując kod, programiści i kompilatory muszą wiedzieć, czy dana nazwa w danym miejscu odnosi się do zmiennej, funkcji, struktury, enumeracji, modułu, stałej lub innego elementu i co ten element oznacza. Można tworzyć zasięgi i decydować, które nazwy są w zasięgu a które poza nim. Nie można mieć jednak dwóch elementów o tej samej nazwie w tym samym zasięgu; ale dostępne są narzędzia do rozwiązywania konfliktów nazw.
Rust posiada szereg rozwiązań, które pozwalają zarządzać organizacją kodu. W szczególności pozwalają one decydować które szczegóły są eksponowane, które są prywatne, oraz jakie nazwy znajdują się w poszczególnych zasięgach. Te rozwiązania czasami nazywane są zbiorczo systemem modułów i obejmują:
- Pakiety (ang. packages): Funkcjonalność Cargo umożliwiająca budowanie, testowanie i udostępnianie skrzyń
- Skrzynie (ang. crates): Drzewo modułów tworzących bibliotekę lub plik wykonywalny
- Moduły (ang. modules) i użycia (ang. use): Pozwala kontrolować organizację, zasięg i prywatność ścieżek
- Ścieżki (ang. paths): Sposób nazywania elementu, takiego jak struktura, funkcja lub moduł
W tym rozdziale omówimy wszystkie te rozwiązania i interakcje między nimi. Wyjaśnimy też jak używać ich do zarządzania zasięgiem. Na koniec powinieneś dogłębnie zrozumieć system modułów i być w stanie pracować z zasięgami jak zawodowiec!
Pakiety i Skrzynie
Pierwszymi elementami systemu modułów, które omówimy są pakiety i skrzynie.
Skrzynka (ang. crate) jest najmniejszą jednostką kodu braną jednorazowo pod uwagę przez kompilator Rusta.
Nawet jeżeli uruchomimy rustc zamiast cargo i podamy pojedynczy plik z kodem źródłowym (tak jak zrobiliśmy to w sekcji „Pisanie i uruchamianie programu w Rust“ rozdziału 1), kompilator potraktuje ten plik jako skrzynię.
Skrzynie mogą zawierać moduły, a moduły mogą być zdefiniowane w innych plikach, które są kompilowane razem ze skrzynią, co zostanie pokazane dalej.
Skrzynia może przybrać jedną z dwóch form: skrzyni binarnej lub skrzyni bibliotecznej.
Skrzynie binarne (ang. binary crate) to programy, które można skompilować do postaci wykonywalnej, możliwej do uruchomienia. Może to być np. program linii poleceń lub serwer. Każda skrzynia binarna musi posiadać funkcję o nazwie main, która definiuje, co się stanie, gdy program zostanie uruchomiony. Wszystkie skrzynie, które stworzyliśmy do tej pory były skrzyniami binarnymi.
Skrzynie biblioteczne (ang. library crate) nie mają funkcji main i nie kompilują się do pliku wykonywalnego. Zamiast tego definiują funkcjonalność przewidzianą do współdzielenia przez wiele projektów. Na przykład skrzynia rand, której używaliśmy w rozdziale 2, zapewnia funkcjonalność generującą liczby losowe.
Gdy Rustowcy mówią po prostu „skrzynia“, zazwyczaj mają na myśli właśnie skrzynię biblioteczną i używają „skrzyni“ zamiennie z ogólnym, programistycznym pojęciem „biblioteki“.
Korzeń skrzyni (ang. crate root) jest plikiem źródłowym, od którego kompilator Rust rozpoczyna i który stanowi główny moduł skrzyni (moduły wyjaśnimy dogłębnie w sekcji „Defining Modules to Control Scope and Privacy“).
Pakiet (ang. package) jest zapewniającym pewną funkcjonalność zestawem jednej lub więcej skrzyń. Pakiet zawiera plik Cargo.toml, który opisuje jak te skrzynie zbudować. Cargo w rzeczywistości jest pakietem, który zawiera binarną skrzynię z narzędziem wiersza poleceń, służącym do budowania kodu. Pakiet Cargo zawiera również skrzynię biblioteczną, od której zależy skrzynia binarna. Inne projekty mogą zależeć od skrzyni bibliotecznej Cargo, aby używać tej samej logiki, której używa narzędzie wiersza poleceń Cargo.
Pakiet może zawierać dowolną liczbę skrzyń binarnych i co najwyżej jedną skrzynię biblioteczną. Pakiet musi zawierać przynajmniej jedną skrzynię, niezależnie od tego czy jest to skrzynia biblioteczna czy binarna.
Prześledźmy, co się dzieje, gdy tworzymy pakiet.
Najpierw wpisujemy polecenie cargo new:
$ cargo new my-project
Created binary (application) `my-project` package
$ ls my-project
Cargo.toml
src
$ ls my-project/src
main.rs
Po uruchomieniu cargo new, użyliśmy ls aby zobaczyć co Cargo utworzyło. W katalogu projektu znajduje się plik Cargo.toml konstytuujący pakiet. Jest też katalog src, który zawiera main.rs. Po otworzeniu Cargo.toml w edytorze tekstu, można zauważyć, że nie ma tam wzmianki o src/main.rs. Cargo stosuje konwencję, zgodnie z którą src/main.rs jest korzeniem skrzyni binarnej o tej samej nazwie co pakiet. Podobnie, Cargo wie, że jeśli katalog pakietu zawiera src/lib.rs, to pakiet zawiera bibliotekę o tej samej nazwie co pakiet, a src/lib.rs jest korzeniem jej skrzyni. Cargo przekazuje pliki skrzyni do rustc, aby zbudować bibliotekę lub program.
Tutaj mamy pakiet, który zawiera tylko src/main.rs, co oznacza, że zawiera tylko skrzynię binarną o nazwie my-project. Jeśli pakiet zawiera src/main.rs i src/lib.rs, to ma dwie skrzynie: binarną i biblioteczną, obie o tej samej nazwie co pakiet. Pakiet może mieć wiele skrzyń binarnych poprzez umieszczenie plików w katalogu src/bin: każdy plik będzie oddzielną skrzynią binarną.
Definiowanie Modułów by Kontrolować Zasięg i Prywatności
W tym rozdziale porozmawiamy o modułach i innych częściach systemu modułów, mianowicie o ścieżkach, które pozwalają na nazywanie elementów; słowie kluczowym use, które włącza ścieżkę w zasięg; oraz słowie kluczowym pub, które upublicznia elementy.
Omówimy również słowo kluczowe as, pakiety zewnętrzne i operator glob.
Zaczniemy od podania listy reguł, będącej swoistą ściągą, przydatną podczas organizowania własnego kodu. Następnie szczegółowo wyjaśnimy poszczególne reguły.
Ściąga z Modułów
Przedstawiamy tutaj krótkie kompendium omawiające jak moduły, ścieżki, słowo kluczowe use i słowo kluczowe pub działają w kompilatorze i jak większość programistów organizuje swój kod.
Jest to świetne miejsce, do którego można sięgnąć, aby przypomnieć sobie, jak działają moduły.
Zaś przykłady każdej z podanych reguł będziemy omawiać w dalszej części rozdziału.
- Start z korzenia skrzyni: Podczas kompilowania skrzyni, kompilator najpierw zagląda do pliku głównego skrzyni (zazwyczaj src/lib.rs dla skrzyni bibliotecznej lub src/main.rs dla skrzyni binarnej) w poszukiwaniu kodu do skompilowania.
- Deklarowanie modułów: W pliku głównym skrzyni, można deklarować nowe moduły; powiedzmy, że zadeklarujemy moduł „garden“ (z ang. ogród) za pomocą
mod garden;. Kompilator będzie szukał kodu tego modułu w następujących miejscach:- Zaraz za
mod garden, w nawiasach klamrowych, które zastępują średnik pomod garden - W pliku src/garden.rs
- W pliku src/garden/mod.rs
- Zaraz za
- Deklarowanie podmodułów: W każdym pliku innym niż główny plik skrzyni, można zadeklarować podmoduły. Na przykład, można zadeklarować
mod vegetables;(z ang. warzywa) w src/garden.rs. Kompilator będzie szukał kodu podmodułu w katalogu o nazwie zgodnej z modułem nadrzędnym, w następujących miejscach:- Zaraz za
mod vegetables, w nawiasach klamrowych, które zastępują średnik pomod vegetables - W pliku src/garden/vegetables.rs
- W pliku src/garden/vegetables/mod.rs
- Zaraz za
- Ścieżki do kodu w modułach: Gdy moduł jest częścią skrzyni, można odwołać się do kodu w tym module z dowolnego innego miejsca tej skrzyni, gdy tylko pozwalają na to zasady prywatności, używając ścieżki do kodu. Na przykład, do typu
Asparagus(z ang. szparag) w podmodulevegetablesmoduługardenmożna odwołać się za pomocącrate::garden::vegetables::Asparagus. - Prywatne a publiczne: Kod zawarty w module domyślnie jest prywatny i niedostępny dla modułów nadrzędnych. Aby upublicznić moduł, trzeba go zadeklarować za pomocą
pub modzamiastmod. By upublicznić zawarte w module elementy, należy umieścićpubprzed ich deklaracjami. - Słowo kluczowe
use: Słowo kluczoweusetworzy skróty do elementów, ograniczając tym samym powtarzanie długich ścieżek. W dowolnym zasięgu, w którym typcrate::garden::vegetables::Asparagusjest dostępny, można z pomocąuse crate::garden::vegetables::Asparagus;utworzyć do niego skrót i, od tego momentu, pisaćAsparagus, aby ten typ wykorzystać.
Powyższe zasady zilustrujemy na przykładzie skrzyni binarnej o nazwie backyard (z ang. podwórko). Katalog tej skrzyni, również nazwany backyard, zawiera następujące pliki i katalogi:
backyard
├── Cargo.lock
├── Cargo.toml
└── src
├── garden
│ └── vegetables.rs
├── garden.rs
└── main.rs
Plikiem głównym tej skrzyni jest src/main.rs o następującej zawartości:
Plik: src/main.rs
use crate::garden::vegetables::Asparagus;
pub mod garden;
fn main() {
let plant = Asparagus {};
println!("I'm growing {:?}!", plant);
}Linia pub mod garden; mówi kompilatorowi, aby uwzględnił kod, który znajduje się w src/garden.rs, czyli:
Filename: src/garden.rs
pub mod vegetables;Tutaj, pub mod vegetables; oznacza uwzględnienie także kodu z src/garden/vegetables.rs. Oto ten kod:
#[derive(Debug)]
pub struct Asparagus {}Teraz dogłębniej omówmy powyższe reguły i zademonstrujmy je w działaniu!
Grupowanie Spokrewnionego Kodu w Modułach
Moduły pozwalają nam tak zorganizować kod w obrębie skrzyni, by był czytelny i łatwy do wielokrotnego wykorzystania. Moduły pozwalają nam również kontrolować prywatność elementów, ponieważ kod wewnątrz modułu jest domyślnie prywatny. Elementy prywatne stanowią wewnętrzne szczegóły implementacji, niedostępne z zewnątrz. Możemy zdecydować się na upublicznienie modułów i zawartych w nich elementów, aby zewnętrzny kod mógł je wykorzystywać i być od nich zależny.
Jako przykład napiszmy skrzynię biblioteczną, dostarczającą funkcjonalność restauracji. Zdefiniujemy sygnatury funkcji, ale pozostawimy ich ciała puste, aby skupić się na organizacji kodu, a nie na implementacji restauracji.
W branży restauracyjnej niektóre części restauracji określane są jako front of house, a inne jako back of house. Front of house to obszar, w którym przebywają klienci; w nim gospodarze sadzają gości, kelnerzy przyjmują zamówienia i płatności, a barmani przygotowują drinki. Back of house to miejsca, w których pracują kucharze przygotowujący posiłki, zmywacze myjący naczynia, oraz kierownicy wykonujący prace administracyjne.
Aby zorganizować naszą skrzynię zgodnie z powyższym podziałem, uporządkujemy jej funkcjonalności w zagnieżdżonych modułach.
Utworzymy nową bibliotekę o nazwie restaurant, uruchamiając cargo new restaurant --lib; następnie wpiszemy kod z listingu 7-1 do src/lib.rs, aby zdefiniować niektóre moduły i sygnatury funkcji. Oto sekcja frontowa:
Plik: src/lib.rs
mod front_of_house {
mod hosting {
fn add_to_waitlist() {}
fn seat_at_table() {}
}
mod serving {
fn take_order() {}
fn serve_order() {}
fn take_payment() {}
}
}Listing 7-1: Moduł front_of_house zawierający inne moduły, które zawierają funkcje
Moduł definiujemy za pomocą słowa kluczowego mod, po którym następuje nazwa modułu (w tym przypadku front_of_house). Następnie umieszczamy ciało modułu w nawiasach klamrowych. Wewnątrz modułów możemy umieszczać inne moduły, co w tym przypadku uczyniliśmy z modułami hosting i serving. Moduły mogą również zawierać definicje innych elementów, takich jak strukty, enumy, stałe, cechy i—jak na listingu 7-1—funkcje.
Moduły pozwalają na pogrupowanie powiązanych ze sobą definicji i nazwanie relacji pomiędzy nimi. Dzięki pogrupowaniu, programiści mogą łatwiej poruszać się po kodzie i nie muszą czytać wszystkiego by odnaleźć interesujące ich definicje. Zaś dodając nową funkcjonalność wiedzą, gdzie umieścić kod.
Wcześniej wspomnieliśmy, że src/main.rs i src/lib.rs nazywane są korzeniami skrzyni. Przyczyną nadania im takiej nazwy jest fakt, że zawartość każdego z tych plików konstytuuje moduł o nazwie crate, będący korzeniem struktury złożonej z modułów skrzyni, zwanej drzewem modułów.
Listing 7-2 pokazuje drzewo modułów dla struktury z listingu 7-1.
crate
└── front_of_house
├── hosting
│ ├── add_to_waitlist
│ └── seat_at_table
└── serving
├── take_order
├── serve_order
└── take_payment
Listing 7-2: Drzewo modułów dla kodu pokazanego na listingu 7-1
Drzewo to pokazuje w jaki sposób moduły zagnieżdżone są w innych; na przykład, hosting jest zagnieżdżony w front_of_house. Drzewo ukazuje również, że niektóre moduły są równorzędne, co oznacza, że są zdefiniowane w tym samym module; hosting i serving są równorzędne, bo oba są zdefiniowanym w front_of_house.
Jeśli moduł A jest zawarty wewnątrz modułu B, mówimy, że moduł A jest podrzędny w stosunku do modułu B oraz, że moduł B jest nadrzędny w stosunku do modułu A.
Proszę zauważyć, że korzeniem drzewa modułów jest zdefiniowany domyślnie i niejawnie moduł o nazwie crate.
Drzewo modułów przypomina drzewo katalogów w systemie plików na komputerze. Podobnie do katalogów w systemie plików, moduły służą organizacji (w ich przypadku, chodzi o organizację kodu). I analogicznie do plików w katalogach, potrzebujemy sposobu na odnajdywanie naszych modułów.
Ścieżki Do Elementów W Drzewie Modułów
Podobnie jak podczas nawigowania po systemie plików, elementy w drzewie modułów wskazujemy za pomocą ścieżek. Aby wywołać funkcję, musimy znać do niej ścieżkę.
Każda ścieżka jest jednego z następujących dwóch rodzajów:
- Ścieżka bezwzględna jest pełną ścieżką startującą od korzenia skrzyni; dla kodu z zewnętrznej skrzyni, notacja ścieżki bezwzględnej zaczyna się od nazwy skrzyni, a dla kodu z bieżącej skrzyni, od słowa
crate. - Ścieżka względna startuje z bieżącego modułu i jej zapis zaczyna się od
self,super, lub identyfikatora w bieżącym module.
Zarówno ścieżki bezwzględne jak i względne notujemy za pomocą jednego lub więcej identyfikatorów oddzielonych podwójnymi dwukropkami (::).
Powróćmy do listingu 7-1 i załóżmy, że chcemy wywołać funkcję add_to_waitlist.
By to uczynić, musimy wpierw odpowiedzieć na pytanie: jaka jest ścieżka do funkcji add_to_waitlist?
Listing 7-3 obejmuje skrót listingu 7-1, pozbawiony niektórych modułów i funkcji.
Prezentujemy dwa sposoby wywołania funkcji add_to_waitlist z nowej funkcji eat_at_restaurant zdefiniowanej w korzeniu skrzyni.
Pomimo że ścieżki podane w przykładzie są poprawne, to jego skompilowanie nie jest możliwe, ze względu na inny problem.
Za chwilę wyjaśnimy jaki.
Funkcja eat_at_restaurant jest częścią publicznego API naszej skrzyni bibliotecznej, więc oznaczyliśmy ją słowem kluczowym pub.
Bardziej szczegółowo omawiamy to słowo w sekcji "Exposing Paths with the pub Keyword".
Plik: src/lib.rs
mod front_of_house {
mod hosting {
fn add_to_waitlist() {}
}
}
pub fn eat_at_restaurant() {
// Ścieżka bezwzględna
crate::front_of_house::hosting::add_to_waitlist();
// Ścieżka względna
front_of_house::hosting::add_to_waitlist();
}Listing 7-3: Wywołanie funkcji add_to_waitlist przy wykorzystaniu bezwzględnej oraz względnej ścieżki
W pierwszym wywołaniu funkcji add_to_waitlist w eat_at_restaurant, używamy ścieżki bezwzględnej.
Ponieważ funkcja add_to_waitlist jest zdefiniowana w tej samej skrzyni co eat_at_restaurant, to zapis tej ścieżki zaczynamy słowem crate.
Po tym słowie wymieniamy kolejne moduły, aż dotrzemy do add_to_waitlist.
Można sobie wyobrazić system plików o takiej samej strukturze: aby uruchomić program add_to_waitlist, podalibyśmy ścieżkę /front_of_house/hosting/add_to_waitlist; użycie nazwy crate by zacząć od korzenia skrzyni jest jak użycie / by zacząć od korzenia systemu plików.
W drugim wywołaniu funkcji add_to_waitlist w eat_at_restaurant, używamy ścieżki względnej.
Ścieżka ta zaczyna się od front_of_house, czyli nazwy modułu zdefiniowanego na tym samym poziomie drzewa modułów co eat_at_restaurant.
Jej odpowiednikiem w systemie plików byłoba ścieżka front_of_house/hosting/add_to_waitlist.
Rozpoczęcie od nazwy modułu oznacza, że ścieżka jest względna.
Decyzja czy użyć ścieżki względnej czy bezwzględnej zależy od projektu.
Od tego, czy bardziej prawdopodobne jest przeniesienie kodu definiującego element osobno czy razem z kodem, który go używa.
Na przykład, jeśli przeniesiemy moduł front_of_house i funkcję eat_at_restaurant do modułu o nazwie customer_experience, będziemy musieli zaktualizować bezwzględną ścieżkę do add_to_waitlist, ale ścieżka względna nadal będzie poprawna.
Jeśli jednak przeniesiemy samą funkcję eat_at_restaurant do modułu o nazwie dining, bezwzględna ścieżka do wywołania add_to_waitlist pozostanie taka sama, zaś względna ścieżka będzie wymagała uaktualnienia.
Ogólnie powinniśmy preferować podawanie ścieżek bezwzględnych, ponieważ jest bardziej prawdopodobne, że będziemy chcieli przenieść definicje kodu i wywołania elementów niezależnie od siebie.
Spróbujmy skompilować listing 7-3 i dowiedzmy się, dlaczego nie jest to jeszcze możliwe. Otrzymany błąd jest pokazany na listingu 7-4.
$ cargo build
Compiling restaurant v0.1.0 (file:///projects/restaurant)
error[E0603]: module `hosting` is private
--> src/lib.rs:9:28
|
9 | crate::front_of_house::hosting::add_to_waitlist();
| ^^^^^^^ private module
|
note: the module `hosting` is defined here
--> src/lib.rs:2:5
|
2 | mod hosting {
| ^^^^^^^^^^^
error[E0603]: module `hosting` is private
--> src/lib.rs:12:21
|
12 | front_of_house::hosting::add_to_waitlist();
| ^^^^^^^ private module
|
note: the module `hosting` is defined here
--> src/lib.rs:2:5
|
2 | mod hosting {
| ^^^^^^^^^^^
For more information about this error, try `rustc --explain E0603`.
error: could not compile `restaurant` due to 2 previous errors
Listing 7-4: Błędy kompilatora otrzymane podczas próby zbudowania kodu z listing 7-3
Komunikaty błędów mówią, że moduł hosting jest prywatny.
Innymi słowy, mamy poprawne ścieżki do modułu hosting i funkcji add_to_waitlist, ale Rust nie pozwoli nam ich użyć, ponieważ nie ma dostępu do prywatnych sekcji.
W Ruście wszystkie elementy (funkcje, metody, strukty, enumy, moduły i stałe) są domyślnie prywatne, niedostępne dla modułów nadrzędnych.
Dlatego by uczynić element taki jak funkcja lub struktura prywatnym, wystarczy umieścić go w module.
Elementy w module nadrzędnym nie mogą używać prywatnych elementów wewnątrz modułów podrzędnych, ale elementy w modułach podrzędnych mogą używać elementów w swoich modułach nadrzędnych. Dzieje się tak dlatego, że moduły podrzędne opakowują i ukrywają swoje szczegóły implementacji, ale moduły podrzędne widzą kontekst, w którym są zdefiniowane. Kontynuując naszą metaforę, pomyślmy o zasadach prywatności jak o zapleczu restauracji: to, co się tam dzieje, jest prywatne, niedostępne dla klientów restauracji. Ale menedżerowie biura mogą zobaczyć i zrobić wszystko w restauracji, którą prowadzą.
System modułów w Ruście ukrywa domyślnie wewnętrzne szczegóły implementacji.
Dzięki temu wiadomo, które części wewnętrznego kodu można bezpiecznie zmienić, nie psując przy tym kodu zewnętrznego.
Równocześnie, za pomocą słowa kluczowego pub można upublicznić element, tym samym udostępniając nadrzędnym modułom część wewnętrznego kodu z modułu podrzędnego.
Eksponowanie Ścieżek Za Pomocą Słowa Kluczowego pub.
Wróćmy do błędu z listingu 7-4, który mówił, że moduł hosting jest prywatny.
Chcemy, aby funkcja eat_at_restaurant w module nadrzędnym miała dostęp do funkcji add_to_waitlist w module podrzędnym.
Dlatego oznaczamy moduł hosting słowem kluczowym pub, co pokazano na listingu 7-5.
Plik: src/lib.rs
mod front_of_house {
pub mod hosting {
fn add_to_waitlist() {}
}
}
pub fn eat_at_restaurant() {
// Ścieżka bezwzględna
crate::front_of_house::hosting::add_to_waitlist();
// Ścieżka względna
front_of_house::hosting::add_to_waitlist();
}Listing 7-5: Deklarowanie modułu hosting jako pub by użyć go z eat_at_restaurant
Niestety, próba skompilowania kodu z listingu 7-5 nadal kończy się błędem, co pokazano na listingu 7-6.
$ cargo build
Compiling restaurant v0.1.0 (file:///projects/restaurant)
error[E0603]: function `add_to_waitlist` is private
--> src/lib.rs:9:37
|
9 | crate::front_of_house::hosting::add_to_waitlist();
| ^^^^^^^^^^^^^^^ private function
|
note: the function `add_to_waitlist` is defined here
--> src/lib.rs:3:9
|
3 | fn add_to_waitlist() {}
| ^^^^^^^^^^^^^^^^^^^^
error[E0603]: function `add_to_waitlist` is private
--> src/lib.rs:12:30
|
12 | front_of_house::hosting::add_to_waitlist();
| ^^^^^^^^^^^^^^^ private function
|
note: the function `add_to_waitlist` is defined here
--> src/lib.rs:3:9
|
3 | fn add_to_waitlist() {}
| ^^^^^^^^^^^^^^^^^^^^
For more information about this error, try `rustc --explain E0603`.
error: could not compile `restaurant` due to 2 previous errors
Listing 7-6: Błędy kompilatora przy budowaniu kodu z listing 7-5
Co się stało? Dodanie słowa kluczowego pub przed mod hosting upublicznia moduł.
Dzięki tej zmianie, jeśli mamy dostęp do front_of_house, to mamy też dostęp do hosting.
Ale zawartość hosting nadal jest prywatna; upublicznienie modułu nie upublicznia jego zawartości.
Słowo kluczowe pub dla modułu pozwala jedynie na odwołanie się do niego przez kod w modułach nadrzędnych, a nie na dostęp do jego wewnętrznego kodu.
Ponieważ moduły są kontenerami, nie wystarczy upublicznić jedynie modułu; należy pójść dalej i zdecydować się na upublicznienie jednego lub więcej elementów z jego wnętrza.
Błędy na listingu 7-6 mówią, że funkcja add_to_waitlist jest prywatna.
Tak samo jak modułów, zasady prywatności dotyczą również struktur, typów wyliczeniowych, funkcji i metod.
Upublicznijmy również funkcję add_to_waitlist, dodając przed jej definicją słowo kluczowe pub, jak na listingu 7-7.
Filename: src/lib.rs
mod front_of_house {
pub mod hosting {
pub fn add_to_waitlist() {}
}
}
pub fn eat_at_restaurant() {
// Ścieżka bezwzględna
crate::front_of_house::hosting::add_to_waitlist();
// Ścieżka względna
front_of_house::hosting::add_to_waitlist();
}Listing 7-7: Dodanie słowa kluczowego pub do mod hosting i fn add_to_waitlist pozwala nam wywołać tę funkcję z eat_at_restaurant
Teraz kod się kompiluje! Aby zobaczyć dlaczego dodanie słowa kluczowego pub spowodowało, że można użyć ścieżek zawartych w eat_at_restaurant z poszanowaniem reguł prywatności, przeanalizujmy ścieżki bezwzględne i względne.
Nasza ścieżka bezwzględna zaczyna się od crate, czyli korzenia drzewa modułów naszej skrzyni.
Moduł front_of_house jest zdefiniowany w korzeniu skrzyni.
Mimo że front_of_house nie jest publiczny, to ponieważ funkcja eat_at_restaurant jest zdefiniowana w tym samym module co front_of_house (czyli eat_at_restaurant i front_of_house są równorzędne), możemy odwoływać się do front_of_house z eat_at_restaurant.
Następny jest moduł hosting oznaczony symbolem pub.
A ponieważ możemy uzyskać dostęp do modułu nadrzędnego w stosunku do hosting, to możemy też uzyskać dostęp do hosting.
Ostatecznie, ponieważ funkcja add_to_waitlist jest oznaczona jako pub i możemy uzyskać dostęp do jej modułu nadrzędnego, to mamy prawo ją wywołać!
W przypadku ścieżki względnej, logika jest taka sama jak w przypadku ścieżki bezwzględnej, z wyjątkiem pierwszego kroku: zamiast zaczynać od korzenia skrzyni, ścieżka zaczyna się od front_of_house.
Rozpoczęcie ścieżki względnej od modułu, w którym zdefiniowany jest eat_at_restaurant (a tak jest w przypadku front_of_house) oczywiście zadziała.
Następnie, ponieważ hosting i add_to_waitlist są oznaczone jako pub, to reszta ścieżki również zadziała, tak jak i samo wywołanie funkcji!
Jeśli planujesz udostępnić swoją skrzynię biblioteczną, aby inne projekty mogły korzystać z twojego kodu, twoje publiczne API jest umową z użytkownikami skrzyni, która określa, w jaki sposób mogą oni korzystać z twojego kodu. Jest wiele aspektów dotyczących zarządzania zmianami w publicznym API tak, by ułatwić utrzymanie od niego zależności. Rozważania na ich temat wykraczają jednak poza zakres tej książki; zainteresowanych tym tematem odsyłamy do The Rust API Guidelines.
Pakiety z Programami i Bibliotekami - Najlepsze Praktyki
Wspomnieliśmy, że pakiet może równocześnie zawierać zarówno korzeń skrzyni binarnej src/main.rs jak i korzeń skrzyni bibliotecznej src/lib.rs, i obie skrzynie będą miały domyślnie nazwę pakietu. Zazwyczaj takie pakiety w skrzyni binarnej będą miały jedynie kod niezbędny do uruchomienia programu wykonywalnego i wywołania kodu ze skrzyni bibliotecznej. Dzięki temu inne projekty będą mogły wykorzystać prawie całą funkcjonalność zapewnianą przez pakiet, ponieważ kod skrzyni bibliotecznej może być współdzielony.
Drzewo modułów powinno być zdefiniowane w src/lib.rs. Wtedy skrzynia binarna będzie miała dostęp do wszystkich jego publiczne elementów, rozpoczynając ich ścieżki od nazwy pakietu. Skrzynia binarna może użytkować skrzynię biblioteczną na takich samych zasadach jak skrzynia całkowicie zewnętrzna, tj. może korzystać tylko z publicznego interfejsu API. To pomaga zaprojektować dobry interfejs API; jesteś nie tylko jego autorem, ale także użytkownikiem!
W rozdziale 12 zademonstrujemy taką organizację na przykładzie programu wiersza poleceń.
Rozpoczynanie Ścieżek Względnych Od super
Możemy skonstruować względne ścieżki, które zaczynają się w module nadrzędnym, a nie w bieżącym lub korzeniu skrzyni, poprzez użycie super na początku ścieżki.
To tak jakby rozpocząć ścieżkę systemu plików od ...
Użycie super pozwala odwołać się do elementu znajdującego się w module nadrzędnym i ułatwia modyfikację drzewa modułów, gdy moduł jest ściśle związany ze swoim modułem nadrzędnym, który chcemy przenieść w inne miejsce drzewa.
Rozważmy kod z listingu 7-8, który modeluje sytuację, w której szef kuchni naprawia błędne zamówienie i osobiście przynosi je klientowi.
Funkcja fix_incorrect_order zdefiniowana w module back_of_house wywołuje funkcję deliver_order zdefiniowaną w module nadrzędnym, rozpoczynając ścieżkę do deliver_order od super:
Plik: src/lib.rs
fn deliver_order() {}
mod back_of_house {
fn fix_incorrect_order() {
cook_order();
super::deliver_order();
}
fn cook_order() {}
}Listing 7-8: Wywołanie funkcji przy użyciu ścieżki względnej zaczynającej się od super
Funkcja fix_incorrect_order znajduje się w module back_of_house.
Za pomocą super osiągamy jego modułu nadrzędny, którym w tym przypadku jest crate, czyli korzeń.
W nim zaś odnajdujemy deliver_order.
Sukces!!! Zakładamy, że podczas ewentualnej reorganizację drzewa modułów skrzyni, moduł back_of_house i funkcja deliver_order prawdopodobnie zachowają względem siebie tę samą relację i zostaną przeniesione razem.
Dlatego użyliśmy super, abyśmy mieli mniej miejsc do zaktualizowania, jeśli ten kod zostanie przeniesiony w przyszłości do innego modułu.
Upublicznianie Struktur i Typów Wyliczeniowych
Możemy również użyć pub by oznaczyć struktury i enumy jako publiczne.
Wiążą się z tym jednak pewne dodatkowe szczegóły.
Jeśli użyjemy pub przed definicją struktury, uczynimy ją publiczną, ale jej pola pozostaną prywatne.
W zależności od potrzeb, możemy uczynić każde z pól publicznym lub nie.
Na listingu 7-9 zdefiniowano publiczną strukturę back_of_house::Breakfast, której pole toast jest publiczne, zaś seasonal_fruit prywatne.
To modeluje restaurację, w której klient może wybrać rodzaj dołączonego do posiłku chleba, ale szef kuchni decyduje o tym, jakie owoce towarzyszą posiłkowi na podstawie tego, co akurat jest w sezonie i na stanie.
Dostępne owoce często się zmieniają, więc klienci nie mogą ich wybrać, ani nawet zobaczyć, jakie owoce dostaną.
Plik: src/lib.rs
mod back_of_house {
pub struct Breakfast {
pub toast: String,
seasonal_fruit: String,
}
impl Breakfast {
pub fn summer(toast: &str) -> Breakfast {
Breakfast {
toast: String::from(toast),
seasonal_fruit: String::from("peaches"),
}
}
}
}
pub fn eat_at_restaurant() {
// Zamów śniadanie w lecie z tostem żytnim
let mut meal = back_of_house::Breakfast::summer("Rye");
// Zmiana zdania na temat tego, jaki chleb chcemy
meal.toast = String::from("Wheat");
println!("I'd like {} toast please", meal.toast);
// Następna linia nie skompiluje się, jeśli ją odkomentujemy;
// nie możemy bowiem przeglądać ani modyfikować sezonowych owoców,
// które są dołączone do posiłku
// meal.seasonal_fruit = String::from("blueberries");
}Listing 7-9: Struktura, której część pól jest publiczna, zaś część prywatna
Ponieważ w strukturze back_of_house::Breakfast, pole toast jest publiczne, to w eat_at_restaurant jest ono dostępne do zapisu i odczyt przy użyciu notacji kropkowej.
Równocześnie nie możemy użyć pola seasonal_fruit w eat_at_restaurant, ponieważ jest ono prywatne.
Proszę spróbować odkomentować linię modyfikującą wartość pola seasonal_fruit i zobaczyć do jakiego błędu to doprowadzi!
Inaczej jest w przypadku typów wyliczeniowych.
Jeśli uczynimy enum publicznym, to wszystkie jego warianty także staną się publiczne.
Wystarczy postawić pub przed słowem kluczowym enum, tak jak pokazano na listingu 7-10.
Plik: src/lib.rs
mod back_of_house {
pub enum Appetizer {
Soup,
Salad,
}
}
pub fn eat_at_restaurant() {
let order1 = back_of_house::Appetizer::Soup;
let order2 = back_of_house::Appetizer::Salad;
}Listing 7-10: Oznaczenie enum jako publicznego, upublicznia też wszystkie jego warianty
Ponieważ upubliczniliśmy enum Appetizer, to możemy używać wariantów Soup i Salad w eat_at_restaurant.
Typ wyliczeniowy, którego nie wszystkie warianty byłyby publiczne, nie byłyby zbyt użyteczny.
Równocześnie byłoby denerwujące, gdybyśmy musieli za każdym razem opatrywać wszystkie warianty enuma adnotacją pub.
Dlatego domyślnie warianty enuma są publiczne.
Inaczej jest ze strukturami, które często są użyteczne, pomimo że ich pola nie są publiczne.
Dlatego pola struktury podążają za ogólną zasadą, że wszystko jest domyślnie prywatne, chyba że opatrzone jest adnotacją pub.
Jest jeszcze jedna nieomówiona kwestia związana z pub, która związana jest z ostatnią funkcjonalnością systemu modułów pozostałą do opisania, czyli ze słowem kluczowym use.
Najpierw omówimy use samo w sobie, a następnie pokażemy jak połączyć pub i use.
Włączanie Ścieżek do Zasięgu za Pomocą Słowa Kluczowego use
Konieczność ciągłego wypisywania ścieżek, by wywołać funkcję może być uciążliwa.
Na listingu 7-7, niezależnie od tego, czy wybraliśmy bezwzględną czy względną ścieżkę do funkcji add_to_waitlist, za każdym razem, wywołując ją, musieliśmy napisać także front_of_house i hosting.
Na szczęście istnieje sposób na uproszczenie tego procesu: możemy raz utworzyć skrót do ścieżki za pomocą słowa kluczowego use i używać go wielokrotnie w obrębie zasięgu.
Na listingu 7-11 włączamy moduł crate::front_of_house::hosting w zasięg funkcji eat_at_restaurant, więc musimy podać jedynie hosting::add_to_waitlist, aby wywołać funkcję add_to_waitlist z eat_at_restaurant.
Plik: src/lib.rs
mod front_of_house {
pub mod hosting {
pub fn add_to_waitlist() {}
}
}
use crate::front_of_house::hosting;
pub fn eat_at_restaurant() {
hosting::add_to_waitlist();
}Listing 7-11: Włączanie modułu w zasięg za pomocą use
Dodanie do zasięgu use i ścieżki jest podobne do tworzenia dowiązania symbolicznego w systemie plików.
Dodanie use crate::front_of_house::hosting w korzeniu skrzyni sprawia, że hosting staje się poprawną nazwą w tym zasięgu, tak jakby moduł hosting był zdefiniowany w korzeniu skrzyni.
Ścieżki wprowadzone w zasięg za pomocą use podlegają takim samym zasadą prywatność, jak wszystkie inne ścieżki.
Warto podkreślić, że use tworzy skrót tylko w zasięgu, w którym występuje.
Na listingu 7-12 przeniesiono funkcję eat_at_restaurant do nowego modułu podrzędnego o nazwie customer, który tworzy zasięg odrębny od tego, w którym użyto use. Dlatego ciało funkcji nie skompiluje się:
Plik: src/lib.rs
mod front_of_house {
pub mod hosting {
pub fn add_to_waitlist() {}
}
}
use crate::front_of_house::hosting;
mod customer {
pub fn eat_at_restaurant() {
hosting::add_to_waitlist();
}
}Listing 7-12: use obowiązuje jedynie w zasięgu, w którym się znajduje
Błąd kompilatora pokazuje, że skrót nie ma zastosowania w obrębie modułu customer:
$ cargo build
Compiling restaurant v0.1.0 (file:///projects/restaurant)
warning: unused import: `crate::front_of_house::hosting`
--> src/lib.rs:7:5
|
7 | use crate::front_of_house::hosting;
| ^^^^^^^^^^^^^^^^^^^^^^^^^^^^^^
|
= note: `#[warn(unused_imports)]` on by default
error[E0433]: failed to resolve: use of undeclared crate or module `hosting`
--> src/lib.rs:11:9
|
11 | hosting::add_to_waitlist();
| ^^^^^^^ use of undeclared crate or module `hosting`
For more information about this error, try `rustc --explain E0433`.
warning: `restaurant` (lib) generated 1 warning
error: could not compile `restaurant` due to previous error; 1 warning emitted
Proszę zauważyć, że pojawiło się również ostrzeżenie, że use nie jest używany w swoim zasięgu!
Aby rozwiązać ten problem, należy przenieść use do modułu customer, lub z modułu customer odwołać się do skrótu w module nadrzędnym za pomocą super::hosting.
Tworzenie Idiomatycznych Ścieżek use
Patrząc na listing 7-11, można się zastanawiać, dlaczego zdefiniowaliśmy use crate::front_of_house::hosting, a następnie w eat_at_restaurant wywołaliśmy hosting::add_to_waitlist, zamiast od razu podać w use całą ścieżkę do add_to_waitlist, tak jak na listingu 7-13.
Plik: src/lib.rs
mod front_of_house {
pub mod hosting {
pub fn add_to_waitlist() {}
}
}
use crate::front_of_house::hosting::add_to_waitlist;
pub fn eat_at_restaurant() {
add_to_waitlist();
}Listing 7-13: Nieidiomatyczne włączenie w zasięg funkcji add_to_waitlist za pomocą use
Działanie kodu na obu listingach, 7-11 i 7-13, jest takie samo.
Jednakże tylko listing 7-11 pokazuje idiomatyczne wykorzystanie use do włączenia funkcji w zasięg.
Włączenie do zasięgu jej modułu nadrzędnego sprawia, że wywołując tę funkcję musimy podać nazwę jej modułu.
To zaś jasno mówi, iż funkcja ta nie jest zdefiniowana lokalnie, a jednocześnie ogranicza konieczność podawania pełnej ścieżki.
Dla odmiany kod na listingu 7-13 jest niejasny co do miejsca, w którym zdefiniowano add_to_waitlist.
Z drugiej strony, gdy za pomocą use wskazujemy struktury, enumy i inne elementy, idiomatycznie jest podać pełną ścieżkę.
Listing 7-14 pokazuje idiomatyczny sposób włączania w zasięg skrzyni binarnej struktury HashMap z biblioteki standardowej.
Plik: src/main.rs
use std::collections::HashMap; fn main() { let mut map = HashMap::new(); map.insert(1, 2); }
Listing 7-14: Idiomatyczne włączenie HashMap w zasięg
Za tym idiomem nie stoi żaden mocny argument: jest to po prostu przyjęta konwencja, zaś ludzie przyzwyczaili się do czytania i pisania zgodnego z nią kodu.
Jednakże nie możemy podążyć za tą konwencją, gdy za pomocą use chcemy wprowadzić w zasięg dwa elementy o tej samej nazwie.
Rust nam na to nie pozwoli.
Listing 7-15 pokazuje, jak włączyć w zasięg i odwoływać się do dwóch typów Result, które mają tę samą nazwę, ale pochodzą z różnych modułów.
Plik: src/lib.rs
use std::fmt;
use std::io;
fn function1() -> fmt::Result {
// --snip--
Ok(())
}
fn function2() -> io::Result<()> {
// --snip--
Ok(())
}Listing 7-15: Wprowadzenie w ten sam zasięg dwóch typów o tej samej nazwie wymaga określania ich przy użyciu ich modułów nadrzędnych.
Jak widać, używanie modułów nadrzędnych pozwala rozróżnić dwa typy Result.
Gdybyśmy zamiast tego napisali use std::fmt::Result i use std::io::Result, mielibyśmy w tym samym zasięgu dwa różne typy Result i Rust nie wiedziałby, który z nich mamy na myśli, gdy piszemy Result.
Nadawanie Nowych Nazw Za Pomocą Słowa Kluczowego as
Istnieje też inne rozwiązanie problemu wprowadzania dwóch typów o tej samej nazwie w ten sam zasięg za pomocą use: po ścieżce możemy podać as i nową nazwę lokalną, alias dla typu. Listing 7-16 pokazuje kod równoważny temu z listingu 7-15, ale wykorzystujący zmianę nazwy jednego z dwóch typów Result przy użyciu as.
Plik: src/lib.rs
use std::fmt::Result;
use std::io::Result as IoResult;
fn function1() -> Result {
// --snip--
Ok(())
}
fn function2() -> IoResult<()> {
// --snip--
Ok(())
}Listing 7-16: Zmiana nazwy typu za pomocą słowa kluczowego as, gdy jest on włączany w zasięg
W drugiej deklaracji use typowi std::io::Result nadajemy nową nazwę IoResult, niekolidującą z nazwą Result z std::fmt, którą również włączamy w ten sam zasięg.
Kod pokazany na obu listingach, 7-15 i 7-16, uważany jest za idiomatyczny.
Więc w takim przypadku wybór zależy jedynie od naszych osobistych preferencji!
Re-eksportowanie Nazw Za Pomocą pub use
Kiedy za pomocą słowa kluczowego use włączamy nazwę w zasięg, to w nowym zasięgu jest ona prywatna.
Aby kodowi wywołującemu nasz kod umożliwić odwołanie się do tej nazwy tak, jakby była zdefiniowana w jego zasięgu, możemy połączyć pub i use.
Technika ta nazywana jest reeksportem, ponieważ wprowadzamy element w zasięg, ale również udostępniamy ten element innym, by mogli go włączyć w swój zasięg.
Listing 7-17 pokazuje kod z listingu 7-11 z zmienionym use w module głównym na pub use.
Filename: src/lib.rs
mod front_of_house {
pub mod hosting {
pub fn add_to_waitlist() {}
}
}
pub use crate::front_of_house::hosting;
pub fn eat_at_restaurant() {
hosting::add_to_waitlist();
}Listing 7-17: Wykorzystanie pub use by udostępnić nazwę do użycia przez dowolny kod z nowego zasięgu
Przed zmianą, zewnętrzny kod, by wywołać funkcję add_to_waitlist, musiałby użyć ścieżki
restaurant::front_of_house::hosting::add_to_waitlist().
Po zmianie, gdy pub use reeksportował moduł hosting z modułu głównego, zewnętrzny kod może w zamian użyć ścieżki restaurant::hosting::add_to_waitlist().
Reeksportowanie jest przydatne, gdy wewnętrzna struktura twojego kodu różni się od tego, jak wywołujący go programiści postrzegają jego domenę.
Na przykład w naszej metaforze restauracyjnej, ludzie prowadzący restaurację dzielą ją na „front of house“ i „back of house“.
Ale klienci odwiedzający restaurację prawdopodobnie nie będą myśleć o częściach restauracji w ten sam sposób.
Dzięki pub use, możemy napisać nasz kod korzystając z innej struktury, od tej, którą ujawnimy.
Czynimy to, by nasza biblioteka była dobrze zorganizowana zarówno dla programistów pracujących nad nią, jak i tych ją wywołujących.
Przyjrzymy się innemu przykładowi pub use i temu, jak wpływa on na dokumentację skrzyni w sekcji „Eksportowanie Wygodnego Publicznego API Za Pomocą pub use“ rozdziału 14.
Używanie Pakietów Zewnętrznych
W rozdziale 2 zaprogramowaliśmy grę w zgadywanie, która wykorzystywała zewnętrzny pakiet o nazwie rand do uzyskiwania liczb losowych. Aby użyć rand w naszym projekcie, dodaliśmy następującą linię do Cargo.toml:
Plik: Cargo.toml
rand = "0.8.5"
Dodanie rand jako zależności w Cargo.toml powoduje, że Cargo pobiera pakiet rand wraz ze wszystkimi jego zależnościami z crates.io i udostępnia rand naszemu projektowi.
Następnie, aby włączyć definicje z rand w zasięg naszego pakietu, dodaliśmy linię use ze ścieżką rozpoczynającą się od nazwy skrzyni, czyli rand, i wymieniliśmy elementy, które chcemy włączyć w zasięg.
Przypomnijmy, że w sekcji „Generowanie Losowej Liczby“ rozdziału 2, włączyliśmy w zasięg cechę Rng i wywołaliśmy funkcję rand::thread_rng:
use std::io;
use rand::Rng;
fn main() {
println!("Zgadnij liczbę!");
let secret_number = rand::thread_rng().gen_range(1..=100);
println!("Sekretna liczba to: {secret_number}");
println!("Podaj swoją liczbę:");
let mut guess = String::new();
io::stdin()
.read_line(&mut guess)
.expect("Błąd wczytania linii");
println!("Wybrana przez ciebie liczba: {guess}");
}Członkowie społeczności Rusta udostępnili na stronie crates.io wiele pakietów, a użycie dowolnego z nich we własnym pakiecie wymaga wykonania tych samych kroków: dodania go do pliku Cargo.toml i włączenia w zasięg jego wybranych elementów za pomocą use.
Proszę zauważyć, że standardowa biblioteka std również jest skrzynią, która jest zewnętrzna względem naszego pakietu.
Ponieważ standardowa biblioteka jest dostarczana z językiem Rust, nie musimy dodawać std do Cargo.toml.
Musimy jednak odwoływać się do niej za pomocą use, aby wprowadzić jej elementy w zasięg naszego pakietu.
Na przykład, możemy skorzystać z HashMap za pomocą następującej linii:
#![allow(unused)] fn main() { use std::collections::HashMap; }
Jest to ścieżka bezwzględna rozpoczynająca się od std, czyli nazwy skrzyni biblioteki standardowej.
Porządkowania Długich List use za Pomocą Zagnieżdżonych Ścieżek
Gdy używamy wielu elementów zdefiniowanych w tej samej skrzyni lub w tym samym module, wymienienie każdego elementu w osobnej linii pochłania sporo miejsca. Na przykład, te dwie deklaracje use, które mieliśmy w grze zgadywance na listingu 2-4, włączają w zasięg elementy z std:
Plik: src/main.rs
use rand::Rng;
// --snip--
use std::cmp::Ordering;
use std::io;
// --snip--
fn main() {
println!("Guess the number!");
let secret_number = rand::thread_rng().gen_range(1..=100);
println!("The secret number is: {secret_number}");
println!("Please input your guess.");
let mut guess = String::new();
io::stdin()
.read_line(&mut guess)
.expect("Failed to read line");
println!("You guessed: {guess}");
match guess.cmp(&secret_number) {
Ordering::Less => println!("Too small!"),
Ordering::Greater => println!("Too big!"),
Ordering::Equal => println!("You win!"),
}
}Zamiast nich, możemy użyć zagnieżdżonych ścieżek, aby włączyć te same elementy w jednym wierszu. Robimy to, podając wspólną część ścieżki, po której następują dwa dwukropki, a następnie nawiasy klamrowe obejmujące listę różniących się fragmentów ścieżek, co pokazano na listingu 7-18.
Plik: src/main.rs
use rand::Rng;
// --snip--
use std::{cmp::Ordering, io};
// --snip--
fn main() {
println!("Guess the number!");
let secret_number = rand::thread_rng().gen_range(1..=100);
println!("The secret number is: {secret_number}");
println!("Please input your guess.");
let mut guess = String::new();
io::stdin()
.read_line(&mut guess)
.expect("Failed to read line");
let guess: u32 = guess.trim().parse().expect("Please type a number!");
println!("You guessed: {guess}");
match guess.cmp(&secret_number) {
Ordering::Less => println!("Too small!"),
Ordering::Greater => println!("Too big!"),
Ordering::Equal => println!("You win!"),
}
}Listing 7-18: Podanie ścieżki zagnieżdżonej w celu włączenia w zasięg wielu elementów z tym samym prefiksem
W większych programach, wprowadzenie wielu elementów tej samej skrzyni lub modułu w zasięg przy użyciu zagnieżdżonych ścieżek może znacznie zmniejszyć liczbę napisanych linii use!
Ścieżki można zagnieżdżać na dowolnym poziomie, co jest przydatne przy łączeniu dwóch deklaracji use dzielących podścieżkę.
Na przykład, listing 7-19 pokazuje dwie instrukcje use: pierwsza włącza w zasięg std::io, zaś druga std::io::Write.
Plik: src/lib.rs
use std::io;
use std::io::Write;Listing 7-19: Dwie deklaracje use, z których jedna włącza podścieżkę drugiej
Częścią wspólną tych dwóch ścieżek jest std::io, co daje całą pierwszą ścieżkę.
Aby zawrzeć te dwie ścieżki w jednej deklaracji use, można użyć self w zagnieżdżonej ścieżce, tak jak pokazano na listingu 7-20.
Plik: src/lib.rs
use std::io::{self, Write};Listing 7-20: Zawarcie ścieżek z listingu 7-19 w jednej deklaracji use
Ta linia włącza std::io i std::io::Write w zasięg.
Operator Glob
Jeśli chcemy włączyć w zasięg wszystkie elementy publiczne zdefiniowane w ścieżce, możemy podać tę ścieżkę, a za nią * zwaną operatorem glob:
#![allow(unused)] fn main() { use std::collections::*; }
Ta deklaracja use wprowadza do bieżącego zasięgu wszystkie publiczne elementy zdefiniowane w std::collections.
Operatora glob należy używać z rozwagą!
Glob może utrudnić ustalenie, które nazwy są w zasięgu i gdzie zostały zdefiniowane.
Operator globy jest często używany podczas testowania, aby wprowadzić wszystko, co jest testowane, do modułu tests;
o czym będziemy mówić w sekcji "How to Write Tests" rozdziału 11.
Operator glob jest też czasami używany jako część wzorca prelude, opisanego w dokumentacji biblioteki standardowej.
Umieszczanie Modułów w Osobnych Plikach
Jak dotąd, wszystkie przykłady w tym rozdziale definiowały wiele modułów w pojedynczym pliku. Kiedy moduły stają się duże, warto przenieść ich definicje do osobnych plików, aby ułatwić poruszanie się po kodzie.
Na przykład, zacznijmy od kodu z listingu 7-17, który zawiera wiele modułów restauracji. Zamiast trzymać wszystkie moduły w pliku głównym skrzyni, przeniesiemy je do plików. W tym przypadku plikiem głównym skrzyni jest src/lib.rs, ale ta procedura działa również w przypadku skrzyń binarnych, których plikiem głównym jest src/main.rs.
Najpierw przeniesiemy moduł front_of_house do jego własnego pliku.
Usuwamy kod modułu front_of_house zawarty w nawiasach klamrowych, pozostawiając tylko deklarację mod front_of_house;, tak że src/lib.rs zawiera kod pokazany na listingu 7-21.
Ten kod nie się skompiluje, dopóki nie utworzymy src/front_of_house.rs, o zawartości pokazanej na listingu 7-22.
Plik: src/lib.rs
mod front_of_house;
pub use crate::front_of_house::hosting;
pub fn eat_at_restaurant() {
hosting::add_to_waitlist();
}Listing 7-21: Deklaracja modułu front_of_house, którego ciało znajdzie się w src/front_of_house.rs
Następnie umieszczamy kod, który znajdował się w nawiasach klamrowych, w nowym pliku o nazwie src/front_of_house.rs, jak pokazano na Listingu 7-22.
Kompilator wie, że ma szukać kodu w tym pliku, ponieważ natrafił w korzeniu skrzyni na deklarację modułu o nazwie front_of_house.
Plik: src/front_of_house.rs
pub mod hosting {
pub fn add_to_waitlist() {}
}Listing 7-22: Definicje wewnątrz modułu front_of_house w src/front_of_house.rs
Warto zauważyć, że plik za pomocą deklaracji mod wystarczy załadować w jednym miejscu drzewa modułów.
Kiedy kompilator wie, że plik jest częścią projektu (i wie gdzie w drzewie modułów rezyduje kod, ponieważ umieszczono tam deklarację mod), inne pliki w projekcie powinny odwoływać się do kodu załadowanego z pliku używając ścieżki do miejsca, w którym został zadeklarowany, tak jak to zostało opisane w sekcji „Paths for Referring to an Item in the Module Tree“.
Innymi słowy, mod nie jest znaną z niektórych języków programowania operacją „include“.
Następnie przeniesiemy moduł hosting do jego własnego pliku.
Proces będzie nieco inny, bo hosting jest modułem podrzędnym w stosunku do front_of_house, a nie modułem głównym.
Umieścimy plik dla hosting w nowym katalogu, nazwanym zgodnie z jego przodkami w drzewie modułów, czyli w src/front_of_house/.
Przenoszenie hosting rozpoczynamy od zmieniamy src/front_of_house.rs tak, aby zawierał tylko deklarację modułu hosting:
Plik: src/front_of_house.rs
pub mod hosting;Następnie tworzymy katalog src/front_of_house, a w nim plik hosting.rs zawierający definicje z modułu hosting:
Plik: src/front_of_house/hosting.rs
pub fn add_to_waitlist() {}Jeśli zamiast tego umieścilibyśmy hosting.rs w katalogu src, to kompilator oczekiwałby, że kod hosting.rs zostanie zadeklarowany w module hosting znajdującym się w korzeniu skrzyni, a nie w module front_of_house.
Reguły kompilatora dotyczące tego, które pliki sprawdzać pod kątem kodu poszczególnych modułów, sprawiają, że drzewo modułów jest odzwierciedlone przez katalogi i pliki.
Alternatywne Ścieżki do Plików
Dotychczas omówiliśmy najbardziej idiomatyczne nazewnictwo ścieżek do plików, które używa kompilator Rusta. Ale Rust obsługuje również nazewnictwo w starszym stylu. Kompilator będzie szukał kodu dla modułu
front_of_housezadeklarowanego w korzeniu skrzyni, w:
- src/front_of_house.rs (co omówiliśmy)
- src/front_of_house/mod.rs (starszy styl, nadal obsługiwany)
Kompilator będzie szukał kodu dla modułu
hostingzadeklarowanego w modulefront_of_house, w:
- src/front_of_house/hosting.rs (co omówiliśmy)
- src/front_of_house/hosting/mod.rs (starszy styl, nadal obsługiwany)
Próba użycia obu stylów dla tego samego modułu poskutkuje błędem kompilatora. Używanie mieszanki obu stylów dla różnych modułów w tym samym projekcie jest dozwolone, ale może być mylące dla osób nawigujących po projekcie.
Głównym minusem używania plików o nazwie mod.rs jest to, że może być ich w projekcie wiele. To zaś może prowadzić do pomyłek, gdy kilka z nich będzie równocześnie otwartych w edytorze.
Przenieśliśmy kod każdego modułu do osobnego pliku, ale drzewo modułów nie zmieniło się.
Wywołania funkcji w eat_at_restaurant będą działać bez żadnych modyfikacji, mimo że ich definicje znajdują się w różnych plikach.
Dzięki tej technice można przenosić moduły do nowych plików w miarę jak rosną ich rozmiary.
Proszę zauważyć, że deklaracja pub use crate::front_of_house::hosting w src/lib.rs również nie uległa zmianie, oraz że use nie ma wpływu na to, które pliki są kompilowane jako część skrzyni.
Słowo kluczowe mod deklaruje moduły, a Rust szuka kodu wchodzącego w skład każdego z nich w pliku nazwanym tak jak moduł.
Podsumowanie
Rust pozwala podzielić pakiet na wiele skrzyń, a każdą ze skrzyń na moduły, tak aby można było odwoływać się do elementów zdefiniowanych w jednym module z innego modułu.
Pozwalają na to ścieżki bezwzględne i względne.
Ścieżki te mogą być włączone w zasięg za pomocą deklaracji use, dzięki czemu można w nim używać krótszej ścieżki, co jest przydatne gdy elementy są używane w nim wielokrotnie.
Kod modułu jest domyślnie prywatny, ale można upublicznić jego definicje za pomocą słowa kluczowego pub.
W następnym rozdziale przyjrzymy się niektórym, zawartym w bibliotece standardowej, strukturom danych realizującym kolekcje, które można wykorzystać w swoim starannie zorganizowanym kodzie.
Często Wykorzystywane Kolekcje
Biblioteka standardowa Rusta zawiera wiele bardzo użytecznych struktur danych zwanych kolekcjami. Podczas gdy większość innych typów danych reprezentuje pojedynczą wartość, kolekcje zwykle przechowują ich wiele. Równocześnie, w przeciwieństwie do wbudowanych typów tablic i krotek, kolekcje przechowują dane na stercie. To oznacza, że ilość tych danych nie musi być znana w czasie kompilacji i może rosnąć lub maleć w trakcie działania programu. Każdy rodzaj kolekcji cechują inne możliwości oraz koszty, zaś dobranie odpowiedniej kolekcji do sytuacji jest umiejętnością, której nabycie zwykle zajmuje trochę czasu. W tym rozdziale omówimy trzy kolekcje, które są bardzo często wykorzystywane w programach napisanych w Ruście:
- Wektor (vector) przechowuje pewną liczbę wartości, jedna obok drugiej.
- Łańcuch (string) jest kolekcją znaków. O typie
Stringwspominaliśmy już wcześniej, ale w tym rozdziale omówimy go dogłębnie. - Mapa haszująca (hash map) wiąże wartości z kluczami, stanowiąc tym samym szczególną implementację bardziej ogólnej struktury danych zwanej mapą.
Informacje na temat innych rodzai kolekcji zawartych w bibliotece standardowej, można znaleźć w jej dokumentacji.
Omówimy, jak tworzyć i aktualizować wektory, łańcuchy i mapy haszujące, a także co czyni każdą z tych kolekcji wyjątkową.
Przechowywanie List Wartości w Wektorach
Pierwszym typem kolekcji, któremu się przyjrzymy jest Vec<T>, znany również jako wektor.
Wektory pozwalają przechować pewną liczbę wartości, umieszczając je w pamięci jedna obok drugiej.
Wektory mogą zawierać tylko wartości tego samego typu.
Są one przydatne, gdy mamy listę elementów, takich jak linie tekstu z pliku lub ceny towarów w koszyku zakupowym.
Tworzenie Nowego Wektora
Aby utworzyć nowy pusty wektor, wywołujemy funkcję Vec::new, tak jak pokazano na Listingu 8-1.
fn main() { let v: Vec<i32> = Vec::new(); }
Listing 8-1: Utworzenie nowego, pustego wektora do przechowywania wartości typu i32
Proszę zauważyć, że dodaliśmy w kodzie adnotację typu.
Ponieważ nie wstawiamy do tego wektora żadnych wartości, Rust nie wie, jakiego rodzaju elementy zamierzamy przechowywać.
Co zaś istotne, wektory są implementowane z wykorzystaniem generyczności; w rozdziale 10 opowiem jak jej użyć we własnych typach.
Na razie wystarczy wiedzieć, że typ Vec<T> z biblioteki standardowej może przechowywać elementy dowolnego, zadanego typu.
Ten typ możemy wskazać w nawiasach kątowych podczas tworzenia wektora.
Na listingu 8-1 powiedzieliśmy Rustowi, że Vec<T> w v będzie przechowywał elementy typu i32.
Zazwyczaj jednak Vec<T> będzie tworzony z wartościami początkowymi i Rust wywnioskuje typ przechowywanej wartości.
Adnotacja typu nie będzie wtedy wymagana.
Rust dostarcza wygodne makro vec!, tworzące nowy wektor z podanymi wartościami.
Przykładowo, na listing 8-2 tworzony jest Vec<i32> zawierający 1, 2, i 3.
Typem wartości jest tam i32, ponieważ jest to domyślny typ dla liczb całkowitych, co omówiliśmy w sekcji „Typy danych“ rozdziału 3.
fn main() { let v = vec![1, 2, 3]; }
Listing 8-2: Tworzenie nowego wektora zawierającego wartości
Ponieważ podano początkowe wartości typu i32, to Rust może wywnioskować, że typem v jest Vec<i32>, nawet bez adnotacji typu.
Za chwilę omówimy, jak modyfikować wektor.
Uaktualnianie Wektora
Listing 8-3 pokazuje jak utworzyć wektor, a następnie dodać do niego elementy za pomocą metody push.
fn main() { let mut v = Vec::new(); v.push(5); v.push(6); v.push(7); v.push(8); }
Listing 8-3: Dodawanie elementów do wektora za pomocą metody push
Jak w przypadku każdej zmiennej, jeśli chcemy mieć możliwość zmiany jej wartości, musimy uczynić ją mutowalną za pomocą słowa kluczowego mut, tak jak zostało to omówione w rozdziale 3.
Ponieważ wszystkie dodawane liczby są typu i32, to Rust wywnioskuje odpowiedni typ wektora, nawet bez adnotacji Vec<i32>.
Czytanie Elementów Wektora
Istnieją dwa sposoby odwołania się do wartości przechowywanej w wektorze: poprzez indeksowanie lub użycie metody get.
W poniższych przykładach, dla przejrzystości, opatrzyliśmy adnotacjami typy wartości zwracanych przez te funkcje.
Listing 8-4 pokazuje obie metody dostępu do wartości w wektorze. Pierwsza wykorzystuje składnie indeksowania, druga zaś metodę get.
fn main() { let v = vec![1, 2, 3, 4, 5]; let third: &i32 = &v[2]; println!("The third element is {third}"); let third: Option<&i32> = v.get(2); match third { Some(third) => println!("The third element is {third}"), None => println!("There is no third element."), } }
Listing 8-4: Użycie indeksowania lub metody get by uzyskać dostęp do elementu w wektorze
W tym miejscu warto zwrócić uwagę na kilka szczegółów.
Ponieważ wektory są indeksowane od zera, to by uzyskać trzeci element, używamy indeksu 2.
Użycie & i [] daje referencję do elementu znajdującego się pod zadanym indeksem.
Metoda get, której argumentem jest żądany indeks, zwraca Option<&T>, który możemy użyć z match.
Powodem, dla którego Rust udostępnia dwa sposoby odwoływania się do elementu, jest danie możliwość wyboru, jak ma zachować się program, podczas próby użycia indeksu spoza zakresu indeksów istniejących elementów. Na przykład zobaczmy co się stanie, gdy za pomocą każdej z tych technik spróbujemy uzyskać dostęp do elementu o indeksie 100 z wektora o pięciu elementach, jak pokazano na listingu 8-5.
fn main() { let v = vec![1, 2, 3, 4, 5]; let does_not_exist = &v[100]; let does_not_exist = v.get(100); }
Listing 8-5: Próba uzyskania dostęp do elementu o indeksie 100 z wektora o pięciu elementach
Kiedy uruchomimy ten kod, odwołanie się do nieistniejącego elementu pierwszą metodą [] spowoduje, że program spanikuje.
Tej metody najlepiej więc użyć, gdy chcemy, aby podczas próby dostępu do elementu poza końcem wektora, program został zakończony.
Dla odmiany metoda get wywołana z nieistniejącym indeksem nie panikuje, tylko zwraca None.
To przydaje się, gdy sporadyczny dostęp do elementu poza zakresem wektora jest spodziewany.
Należy wtedy wyposażyć kod w logikę obsługującą oba możliwe rezultaty tej metody, zarówno Some(&element) jak i None, tak jak to omówiono w rozdziale 6.
Na przykład, indeks może pochodzić od osoby wprowadzającej numer.
Jeśli przypadkowo wprowadzi ona zbyt dużą liczbę i program otrzyma wartość None, można zakomunikować ile elementów znajduje się w bieżącym wektorze i dać użytkownikowi kolejną szansę na wprowadzenie poprawnej wartości.
Będzie to dla niego bardziej przyjazne niż zakończenie programu z powodu literówki!
Nadzorca pożyczania, egzekwując zasady własności i reguły pożyczania (omówione w rozdziale 4), zapewni że wszelkie reference do zawartości wektora, będą poprawne. Proszę przypomnieć sobie regułę mówiącą, że nie można mieć mutowalnych i niemutowalnych referencji w tym samym zasięgu. Ta zasada ujawnia się na listingu 8-6, gdzie trzymając niemutowalną referencję do pierwszego elementu wektora, próbujemy dodać element na jego koniec. Jeśli dodatkowo spróbujemy odwołać się do tego elementu w dalszej części funkcji, to ten program się nie skompiluje:
fn main() {
let mut v = vec![1, 2, 3, 4, 5];
let first = &v[0];
v.push(6);
println!("The first element is: {first}");
}Listing 8-6: Próba dodania do wektora, do którego elementu trzymamy referencję
Próba skompilowania tego kodu daje następujący błąd:
$ cargo run
Compiling collections v0.1.0 (file:///projects/collections)
error[E0502]: cannot borrow `v` as mutable because it is also borrowed as immutable
--> src/main.rs:6:5
|
4 | let first = &v[0];
| - immutable borrow occurs here
5 |
6 | v.push(6);
| ^^^^^^^^^ mutable borrow occurs here
7 |
8 | println!("The first element is: {first}");
| ----- immutable borrow later used here
For more information about this error, try `rustc --explain E0502`.
error: could not compile `collections` due to previous error
Wydaje się, że kod na listingu 8-6 powinien działać: dlaczego referencja do pierwszego elementu miałaby się przejmować zmianami na końcu wektora? Błąd wynika ze sposobu działania wektorów: ponieważ wektory umieszczają wartości w pamięci obok siebie, to dodanie nowego elementu na końcu wektora może wymagać przydzielenia nowej pamięci i skopiowania do niej uprzednio dodanych elementów, gdy zabraknie miejsca tam, gdzie są one obecnie przechowywane. W takim przypadku referencja do pierwszego elementu wskazywałaby na zwolniony obszar pamięci. Zaś reguły pożyczania uniemożliwiają doprowadzenie programu do takiej sytuacji.
Uwaga: Więcej o implementacji typu
Vec<T>można znaleźć w “The Rustonomicon”.
Iterowanie po Zawartych w Wektorze Wartościach
Aby uzyskać dostęp kolejno do wszystkich elementów wektora, to zamiast używać ich indeksów, lepiej go przeiterować.
Listing 8-7 pokazuje, jak za pomocą pętli for uzyskać niemutowalne referencje do wszystkich liczb (typu i32) zawartych w wektorze i te liczby wypisać.
fn main() { let v = vec![100, 32, 57]; for i in &v { println!("{i}"); } }
Listing 8-7: Wypisanie zawartości wektora za pomocą pętli for iterującej po jego elementach
Iterując po mutowalnych referencjach do elementów, możemy również zmodyfikować wszystkie elementy mutowalnego wektora. Pętla for na listingu 8-8 dodaje do każdego 50.
fn main() { let mut v = vec![100, 32, 57]; for i in &mut v { *i += 50; } }
Listing 8-8: Iterowanie po mutowalnych referencjach do elementów wektora
Aby za pomocą operatora += zmienić wartość, do której odnosi się mutowalna referencja i, wpierw musimy się do tej wartości dostać za pomocą operatora dereferencji *.
Więcej o operatorze dereferencji powiemy w sekcji "Following the Pointer to the Value with the Dereference Operator" rozdziału 15.
Dzięki regułom nadzorcy pożyczania, zarówno niemutowalne jak i mutowalne iterowanie po wektorze, jest bezpieczne.
Gdybyśmy na listingu 8-7 lub 8-8 spróbowali w ciałach pętli for wstawiać do wektora elementy lub je usuwać, otrzymalibyśmy błąd kompilatora podobny do tego, który powodował kod na listingu 8-6.
Ponieważ pętla for posiada referencję do wektora, to nie można go równocześnie modyfikować inaczej, niż poprzez tę referencję.
Przechowywanie Wartości Różnych Typów za Pomocą Typu Wyliczeniowego
Wektory mogą przechowywać tylko wartości tego samego typu, co może być uciążliwe; nierzadko zdarza się potrzeba przechowani listy elementów różnych typów. Na szczęście warianty wyliczenia są zdefiniowane w ramach tego samego typu enum, więc kiedy potrzebujemy jednego typu do reprezentowania elementów różnych typów, możemy zdefiniować i użyć enuma!
Na przykład, załóżmy, że chcemy uzyskać wartości z wiersza arkusza kalkulacyjnego, w którym niektóre kolumny w wierszu zawierają liczby całkowite, niektóre liczby zmiennoprzecinkowe, zaś niektóre łańcuchy. Możemy zdefiniować typ wyliczeniowy, którego warianty będą trzymać wartości różnych typów, a jednocześnie wszystkie te warianty będą traktowane jako ten sam typ. Następnie możemy utworzyć wektor takich enumów, efektywnie przechowujący wartości różnych typów. Takie działanie ilustruje listing 8-9.
fn main() { enum SpreadsheetCell { Int(i32), Float(f64), Text(String), } let row = vec![ SpreadsheetCell::Int(3), SpreadsheetCell::Text(String::from("blue")), SpreadsheetCell::Float(10.12), ]; }
Listing 8-9: Zdefiniowanie enum do przechowywania wartości różnych typów w jednym wektorze
Rust już w czasie kompilacji musi wiedzieć, jakiego typu elementy są dozwolone w wektorze, aby dokładnie przewidzieć, ile pamięci na stercie będzie potrzebne do ich przechowania.
Dlatego musimy jednoznacznie te typy określić.
Gdyby Rust pozwolił wektorowi przechowywać elementy dowolnych typów, istniałoby zagrożenie, że jeden lub więcej typów spowodowałoby błędy w operacjach wykonywanych na elementach wektora.
Użycie enum plus wyrażenia match oznacza, że Rust zapewni w czasie kompilacji, że każdy możliwy przypadek zostanie obsłużony, jak omówiono w rozdziale 6.
Gdybyśmy nie znali wyczerpującego zestawu typów, których wartości w czasie wykonywania programu będą dodawane do wektora, to nie moglibyśmy użyć omówionej techniki wykorzystującej enum. Instead, you can use a trait object, which we’ll cover in Chapter 17.
Teraz, gdy omówiliśmy wybrane, częste sposoby używania wektorów, warto przejrzeć dokumentację API, gdyż zawarty w bibliotece standardowej Vec<T> posiada znacznie więcej użytecznych metod.
Na przykład jego metoda pop usuwa i zwraca ostatni element.
Wraz z Wektorem Zwalniane Są Jego Elementy
Jak każda inna struktura, wektor jest zwalniany gdy wychodzi poza zasięg, jak to zostało zaznaczone na listingu 8-10.
fn main() { { let v = vec![1, 2, 3, 4]; // do stuff with v } // <- v goes out of scope and is freed here }
Listing 8-10: Pokazanie, gdzie jest zwalniany wektor i jego elementy
Gdy wektor jest zwalniany, cała jego zawartość również jest zwalniana, co oznacza usunięcie z pamięci przechowywanych w nim liczb. Nadzorca pożyczania nie pozwoli używać żadnych referencji do zawartości wektora, który utracił ważność.
Przejdźmy do kolejnego typu kolekcji: Stringa!
Przechowywanie Tekstów UTF-8 za Pomocą Łańcuchów
W rozdziale 4 poświęciliśmy trochę czasu łańcuchom (ang. strings), ale teraz zagłębimy się w ten temat. Świeżo upieczeni Rustowcy bardzo często zatrzymują się na łańcuchach i nie mogą ruszyć dalej z trzech powodów: Rust ma skłonność do ujawniania możliwych błędów, łańcuchy są o wiele bardziej złożoną strukturą danych niż wielu programistów przyznaje, a także system kodowania UTF-8. Jeśli uczyliście się wcześniej innych języków programowania, taka mieszanka może wydawać się trudna.
Łańcuchy znaków omówimy w kontekście kolekcji, ponieważ są one zaimplementowane
jako kolekcja bajtów i paru metod zapewniających przydatną funkcjonalność,
kiedy bajty są interpretowane jako tekst. W tej sekcji, poruszymy też kwestię
operacji wykonywanych na String, takich jak tworzenie, modyfikowanie i
czytanie i które są dostępne w każdej kolekcji. Określimy też różnice między
String a innymi kolekcjami, a dokładniej jak rozbieżność między interpretacją
danych w String przez człowieka i przez komputer komplikuje indeksowanie w
String.
Czym Jest Łańcuch Znaków?
Zacznijmy od wyjaśnienia czym jest łańcuch znaków. W rdzeniu językowym
Rusta znajdziemy tylko jeden rodzaj łańcucha znaków i jest nim wycinek
łańcucha str , który zazwyczaj znaleźć można w formie zapożyczonej &str.
W rozdziale 4 wspominaliśmy o wycinkach łańcuchów, które są referencją do
pewnego łańcucha tekstu UTF-8 i zapisanego w innym miejscu. Na przykład,
literały łańcuchów są zapisane w pliku binarnym programu, a więc są wycinkami
łańcuchów.
Rodzaj łańcucha znaków String jest zapewniany przez bibliotekę standardową
Rusta a nie wkodowany w rdzeń języka. Przechowuje tekst UTF-8, może się powiększać,
mutować, a także być własnością. Rozmawiając o łańcuchach Rustowcy nie odwołują
się do jednego konkretnego jego typu, mogą mieć na myśli alboString albo wycinek
łańcucha &str. Chociaż ta sekcja poświęcona jest w dużej mierze String, oba
typy są często wykorzystywane w bibliotece standardowej Rusta i oba przechowują
tekst UTF-8
Tworzenie Nowego Łańcucha Znaków
Jeśli przyjrzymy się operacjom dostępnym w Vec<T> i w String,
zauważymy, że wiele z nich się powtarza. Dzieje się tak, ponieważ String
opakowuje wektor bajtów i posiada dodatkowo pewne zabezpieczenia,
ograniczenia, a także możliwości. Przykładem funkcji działającej
tak samo na Vec<T> i String jest funkcja new
za pomocą której możemy stworzyć nowe instancje i która jest
pokazana na listingu 8-11.
fn main() { let mut s = String::new(); }
Listing 8-11: Tworzenie nowego, pustego String
Powyższa linijka kodu tworzy nowy, pusty łańcuch s, do którego możemy
wprowadzić dane. Częściej jednak mamy już jakieś wstępne dane, z którymi
chcielibyśmy stworzyć łańcuch. By to osiągnąć, możemy posłużyć się metodą
to_string, dostępną w każdym typie, który implementuje cechę Display
tak jak robią to literały łańcuchów. Na listingu 8-12 znajdziemy dwa przykłady
zastosowania tej metody.
fn main() { let data = "wstępna zawartość"; let s = data.to_string(); // ta metoda działa również bezpośrednio na literał: let s = "wstępna zawartość".to_string(); }
Listing 8-12: Użycie metody to_string w celu stworzenia
String z literału łańcuchowego
Powyższy kod tworzy łańcuch zawierający wstępna zawartość.
By stworzyć String z literału łańcuchowego możemy również użyć funkcji
String::from. Kod widoczny na listingu 8-13 stanowi równowartość kodu
z listingu 8-12. Pierwszy utylizuje to_string a drugi String::from.
fn main() { let s = String::from("initial contents"); }
Listing 8-13: Użycie funkcji String::from
w celu stworzenia String z literału łańcuchowego
Ponieważ istnieje mnóstwo zastosowań łańcuchów, możemy do nich
używać wielu interfejsów generycznych. W konsekwencji, mamy przed
sobą cały szereg opcji i choć niektóre z nich mogą wydawać się
niepotrzebne, wszystkie mają swoją rolę do odegrania! W przypadku gdy
String::from i to_string wykonują tę samą czynność, wybór
między nimi sprowadza się do kwestii stylu i czytelności.
Należy pamiętać, że łańcuchy są zakodowane w UTF-8 i dzięki temu możemy wprowadzić do nich jakiekolwiek poprawnie zakodowane dane, co pokazane jest na listingu 8-14.
fn main() { let hello = String::from("السلام عليكم"); let hello = String::from("Dobrý den"); let hello = String::from("Hello"); let hello = String::from("שָׁלוֹם"); let hello = String::from("नमस्ते"); let hello = String::from("こんにちは"); let hello = String::from("안녕하세요"); let hello = String::from("你好"); let hello = String::from("Olá"); let hello = String::from("Здравствуйте"); let hello = String::from("Hola"); }
Listing 8-14: Przechowywanie odpowiednika “Dzień dobry/Cześć” w różnych językach za pomocą łańcuchów
Wszystkie powyższe wartości String są poprawne.
Modyfikowanie Łańcucha Znaków
Podobnie do Vec<T>, String może się powiększać a jego zawartość
zmieniać jeśli wprowadzimy do niego więcej danych. Ponadto, możemy użyć
operatora + i makra format! , żeby w poręczny sposób połączyć ze sobą
wartości String.
Dodawanie Elementów do Łańcucha za Pomocą push_str i push
Używając metody push_str możemy powiększyć String i dodać do niego
wycinek łańcucha tak jak jest to pokazane na listingu 8-15.
fn main() { let mut s = String::from("foo"); s.push_str("bar"); }
Listing 8-15: Dodawanie wycinka łańcucha do String
za pomocą metody push_str
Po napisaniu powyższych dwóch linijek kodu, s będzie zawierać w sobie
foobar. Przy push_str używamy wycinka łańcucha ponieważ możemy nie
chcieć, żeby metoda przejęła własność nad tym parametrem. Za przykład
weźmy kod pokazany na listingu 8-16, gdzie chcemy móc ponownie użyć
s2 po dołączeniu jego zawartości do s1.
fn main() { let mut s1 = String::from("foo"); let s2 = "bar"; s1.push_str(s2); println!("s2 is {s2}"); }
Listing 8-16: Użycie wycinka łańcucha po
dołączeniu jego zawartości do String
Gdyby metoda push_str przejęła własność nad s2, wyświetlenie
jego zawartości w ostatniej linijce byłoby niemożliwe. Zamiast
tego, kod działa tak jak tego oczekiwaliśmy!
Metoda push przyjmuje pojedynczy znak jako parametr i dodaje go do
String. Kod na listingu 8-17 dodaje literę "l" do String za pomocą metody push.
fn main() { let mut s = String::from("lo"); s.push('l'); }
Listing 8-17: Dodanie jednego znaku do wartości String za pomocą
push
W rezultacie, s będzie zawierać w sobie lol.
Łączenie za Pomocą Operatora + lub Makra format!
Często wykonywaną operacją jest łączenie dwóch istniejących już łańcuchów.
Pierwszym sposobem by to osiągnąć jest użycie operatora + tak jak jest
to pokazane na listingu 8-18.
fn main() { let s1 = String::from("Witaj, "); let s2 = String::from("Świecie!"); let s3 = s1 + &s2; // zauważ, że s1 został tutaj przeniesiony i nie możemy go użyć ponownie }
Listing 8-18: Użycie operatora + by połączyć dwie wartości
String i w ten sposób stworzyć nową wartość String
Łańcuch s3 będzie teraz zawierał Witaj, Świecie!. Utrata ważności przez s1
po dodaniu do łańcucha i użycie referencji do s2 są spowodowane sygnaturą
metody wywoływanej przy użyciu operatora +. Operator + używa metody add, której sygnatura wygląda mniej więcej tak:
fn add(self, s: &str) -> String {W bibliotece standardowej, add jest definiowane za pomocą typów generycznych
i powiązanych. Tutaj wymieniliśmy je na typy konkretne, co jest prawidłowym
zjawiskiem przy wywoływaniu metody add z wartościami String.
Typami generycznymi zajmiemy się w rozdziale 10. Powyższa sygnatura
dostarcza nam wskazówek potrzebnych do zrozumienia podchwytliwych
elementów operatora +.
Po pierwsze, znak & stojący przed s2 oznacza, że do pierwszego
łańcucha dodajemy referencję do drugiego łańcucha. Dzieje się tak za sprawą
parametru s funkcji add. Dodanie do siebie dwóch wartości String jest
niemożliwe, jedyne co możemy dodać do String to &str. Ale przecież typem &s2
jest &String a nie &str tak jak było pokazane w drugim parametrze funkcji add.
Dlaczego w takim razie listing 8-18 kompiluje się?
Możemy użyć &s2 podczas wywoływania funkcji add ponieważ kompilator potrafi
wymusić zmianę argumentu &String w argument &str. Podczas wywoływania metody
add Rust wymusza dereferencję, która w tym przypadku zmienia &s2 w &s2[..].
Wymuszanie dereferencji omówimy szczegółowo w rozdziale 15. Ponieważ add nie
przejmuje własności nad parametrem s, s2 wciąż będzie poprawnym String
po tej operacji.
Po drugie, z sygnatury wynika, że add przejmuje własność nad self,
ponieważ self nie zawiera &. Oznacza to, że w listingu 8-18 funkcja add
przejmuje własność nad s1 i s1 traci ważność. Chociaż moglibyśmy pomyśleć, że
let s3 = s1 + &s2; zduplikuje oba łańcuchy i stworzy nowy, nic takiego się nie
dzieje. Zamiast tego, instrukcja przejmuje własność nad s1 dodaje do niego kopię
zawartości s2, a potem oddaje własność nad rezultatem. Innymi słowy, let s3 = s1 + & s2; sprawia wrażenie tworzenia wielu duplikatów, ale tego nie robi. Ta implementacja
jest wydajniejsza od kopiowania.
Przy łączeniu ze sobą wielu łańcuchów, operator + przestaje być poręczny:
fn main() { let s1 = String::from("tic"); let s2 = String::from("tac"); let s3 = String::from("toe"); let s = s1 + "-" + &s2 + "-" + &s3; }
Po napisaniu powyższego kodu, s będzie zawierać tic-tac-toe. Niestety, ilość
znaków + i " utrudnia zrozumienie co się dzieje. Do bardziej złożonego łączenia
łańcuchów, możemy użyć makra format!:
fn main() { let s1 = String::from("tic"); let s2 = String::from("tac"); let s3 = String::from("toe"); let s = format!("{s1}-{s2}-{s3}"); }
Powyższy kod również przypisuje s wartość tic-tac-toe. Działanie makra format!
można porównać do println! z taką różnicą, że makro zwróci String razem z jego
zawartością zamiast tylko wyświetlić rezultat. Użycie format! znacznie ułatwia
czytanie kodu. Co więcej, kod generowany przez format! utylizuje referencje, żeby
wywołanie metody nie przejęło własności na żadnym z jego parametrów.
Indeksowanie do Łańcuchów
W wielu językach programowania można uzyskać dostęp do pojedynczych znaków w łańcuchu
używając indeksu i tworząc referencję do interesujących nas znaków. Jest to operacja
poprawna i powszechnie używana, ale nie zadziała w Ruście. Jeśli spróbujemy użyć
składni indeksowej by uzyskać dostęp do części String w Ruście, wyświetli nam się
błąd. Spójrzmy na niepoprawny kod na listingu 8-19.
fn main() {
let s1 = String::from("hello");
let h = s1[0];
}Listing 8-19: Próba użycia składni indeksowej z
String
Przy kompilowaniu powyższego kodu, otrzymamy poniższy błąd:
$ cargo run
Compiling collections v0.1.0 (file:///projects/collections)
error[E0277]: the type `String` cannot be indexed by `{integer}`
--> src/main.rs:3:13
|
3 | let h = s1[0];
| ^^^^^ `String` cannot be indexed by `{integer}`
|
= help: the trait `Index<{integer}>` is not implemented for `String`
= help: the following other types implement trait `Index<Idx>`:
<String as Index<RangeFrom<usize>>>
<String as Index<RangeFull>>
<String as Index<RangeInclusive<usize>>>
<String as Index<RangeTo<usize>>>
<String as Index<RangeToInclusive<usize>>>
<String as Index<std::ops::Range<usize>>>
For more information about this error, try `rustc --explain E0277`.
error: could not compile `collections` due to previous error
Powyższy błąd i notatka przekazują nam, że łańcuchy w Ruście nie obsługują indeksowania. Dlaczego? By odpowiedzieć na to pytanie, musimy porozmawiać o tym jak Rust przechowuje łańcuchy w pamięci.
Wewnętrzna Reprezentacja
String opakowuje Vec<u8>. Przyjrzyjmy się paru poprawnym łańcuchom UTF-8 z
listingu 8-14. Jako pierwszy, omówimy poniższy łańcuch:
fn main() { let hello = String::from("السلام عليكم"); let hello = String::from("Dobrý den"); let hello = String::from("Hello"); let hello = String::from("שָׁלוֹם"); let hello = String::from("नमस्ते"); let hello = String::from("こんにちは"); let hello = String::from("안녕하세요"); let hello = String::from("你好"); let hello = String::from("Olá"); let hello = String::from("Здравствуйте"); let hello = String::from("Hola"); }
W tym przypadku, funkcja len zwróci wynik 4, co oznacza, że wektor przechowujący
“Hola” ma długość czterech bajtów. Każda z tych liter waży jeden bajt jeśli
została zakodowana w UTF-8. Następna linijka kodu może cię zaskoczyć. (Zauważ, że ten
łańcuch rozpoczyna litera Ze alfabetu rosyjskiego a nie arabska cyfra 3).
fn main() { let hello = String::from("السلام عليكم"); let hello = String::from("Dobrý den"); let hello = String::from("Hello"); let hello = String::from("שָׁלוֹם"); let hello = String::from("नमस्ते"); let hello = String::from("こんにちは"); let hello = String::from("안녕하세요"); let hello = String::from("你好"); let hello = String::from("Olá"); let hello = String::from("Здравствуйте"); let hello = String::from("Hola"); }
Zapytany o długość tego łańcucha, mógłbyś odpowiedzieć 12 bajtów, ale tak naprawdę są to 24 bajty. Ponieważ każda wartość skalarna Unicode w tym łańcuchu zajmuje dwa bajty pamięci, potrzeba 24 bajtów by zakodować “Здравствуйте” w UTF-8. Dlatego też, indeks do bajtów łańcucha nie zawsze będzie korelował z poprawną wartością skalarną Unicode. W ramach przykładu, spójrz na poniższy kod:
let hello = "Здравствуйте";
let answer = &hello[0];Wiesz już, że answer nie zwróci pierwszej litery czyli З. Ponieważ “Здравствуйте”
jest zakodowane w UTF-8, pierwszym bajtem З jest 208 a drugim 151. Wydawałoby
się zatem, że answer powinien zwracać 208, ale samo 208 nie jest poprawnym
znakiem. Użytkownik prawdopodobnie nie chce, żeby program wyświetlił 208 kiedy
prosi się go o pierwszą literę w łańcuchu, ale są to jedyne dane jakie Rust posiada
przy indeksie bajtu 0. Wyświetlenie wartości bajtu zazwyczaj nie jest pożądane
nawet jeśli łańcuch zawiera tylko litery alfabetu łacińskiego. Gdyby &"hello"[0]
było poprawnie napisanym kodem i wyświetlało wartość bajtu, zwróciłoby 104 zamiast
h.
Aby uniknąć zwracania niespodziewanych wartości i błędów, które nie rzucają się w oczy, Rust nie kompiluje tego kodu i zapobiega nieporozumieniom na wczesnym etapie rozwoju programu.
Bajty i Wartości Skalarne i Zbitki Grafemów! O Matko!
Porozmawiajmy teraz o kolejnej ważnej kwestii związanej z UTF-8, a mianowicie o sposobach patrzenia na łańcuchy przez Rusta. Spośród nich możemy wyłonić trzy naprawdę istotne perspektywy: łańcuchy jako bajty, wartości skalarne i jako zbitki grafemów (jednostka, której najbliżej do litery).
Przykładowo, słowo hindi “नमस्ते” zapisane w piśmie dewanagari jest
przechowywane jako wektor wartości u8, który wygląda tak:
[224, 164, 168, 224, 164, 174, 224, 164, 184, 224, 165, 141, 224, 164, 164,
224, 165, 135]
Powyżej widzimy 18 bajtów i sposób w jaki komputery koniec końców
przechowują te dane. Jeśli spojrzymy na te bajty jako wartości
skalarne Unicode, które są rodzajem char Rusta, będą one wyglądać tak:
['न', 'म', 'स', '्', 'त', 'े']
Mamy tutaj sześć wartości char, ale czwarta i szósta nie są
literami. Są znakami diakrytycznymi, które same w sobie nie
mają sensu. Wreszcie, jeśli spojrzymy na nie jako na zbitki
grafemów, otrzymamy coś co można by nazwać czterema literami,
z których składa się słowo “नमस्ते”:
["न", "म", "स्", "ते"]
Rust pozwala na różne interpretacje surowych danych z łańcucha, które są przechowywane przez komputer. Dzięki temu, każdy program może wybrać interpretację, której potrzebuje bez względu na to w jakim ludzkim języku te dane są napisane.
Ostatnim powodem, dla którego Rust nie pozwala indeksować do String
w celu uzyskania dostępu do znaku jest wymóg by operacje indeksowania
(O(1)) zawsze zajmowały tyle samo czasu. W przypadku String nie
można tego zagwarantować, ponieważ Rust musiałby przejść przez zawartość
łańcucha od początku do indeksu by określić ilość poprawnych znaków w łańcuchu.
Cięcie Łańcuchów
Indeksowanie do łańcucha często jest złym pomysłem ponieważ nie wiadomo jaki powinien być rodzaj wyniku takiej operacji. Czy powinna to być wartość bajtu, znak, zbitek grafemów czy wycinek łańcucha? Dlatego jeśli naprawdę musisz użyć indeksów by stworzyć wycinki łańcucha, Rust prosi cię o konkrety.
Zamiast indeksować za pomocą [] z pojedynczą cyfrą, możesz użyć []
z zakresem by stworzyć wycinek łańcucha zawierający konkretne bajty:
#![allow(unused)] fn main() { let hello = "Здравствуйте"; let s = &hello[0..4]; }
Tutaj, s będzie &str, która zawiera pierwsze cztery bajty
łańcucha. Wcześniej, wspomnieliśmy, że każda z tych liter waży
2 bajty, co oznacza, że s będzie równe Зд.
Jeśli mielibyśmy spróbować wyciąć tylko część bajtów litery za pomocą czegoś w rodzaju
&hello[0..1], Rust spanikowałby w trakcie wykonywania programu.
Zachowałby się tak samo gdybyś spróbował uzyskać dostęp do indeksu wykraczającego poza wektor:
$ cargo run
Compiling collections v0.1.0 (file:///projects/collections)
Finished dev [unoptimized + debuginfo] target(s) in 0.43s
Running `target/debug/collections`
thread 'main' panicked at 'byte index 1 is not a char boundary; it is inside 'З' (bytes 0..2) of `Здравствуйте`', src/main.rs:4:14
note: run with `RUST_BACKTRACE=1` environment variable to display a backtrace
Używaj zakresów do tworzenia wycinków łańcuchów ostrożnie, bo może to zakończyć się błędem.
Sposoby na Iterację po Łańcuchach
Na łańcuchach najlepiej operuje się jeśli dokładnie określimy czy wynikiem operacji
mają być bajty czy znaki. Jeśli chcesz uzyskać wartości skalarne Unicode, zastosuj metodę
chars. Wywołanie chars na “Зд” rozdziela i zwraca dwie wartości typu char.
By uzyskać dostęp do każdego elementu, możesz iterować po wyniku:
#![allow(unused)] fn main() { for c in "Зд".chars() { println!("{c}"); } }
Powyższy kod wyświetli:
З
д
Ewentualnie, bardziej może ci odpowiadać metoda bytes, która wyświetla każdy surowy bajt:
#![allow(unused)] fn main() { for b in "Зд".bytes() { println!("{b}"); } }
Powyższy kod wyświetli cztery bajty, które znajdują się w tym łańcuchu:
208
151
208
180
Nie zapomnij, że poprawne wartości skalarne Unicode mogą składać się z więcej niż jednego bajta.
Proces otrzymania zbitka grafemów z łańcucha, jak przy piśmie dewanagari, jest złożony więc ta funkcjonalność nie jest dostępna w bibliotece standardowej. Jeżeli potrzebujesz tej funkcjonalności, na crates.io możesz znaleźć odpowiednie skrzynie.
Łańcuchy Nie Są Takie Proste
Podsumowując, łańcuchy są skomplikowane. Różne języki programowania wybierają
różne sposoby na pokazanie tej złożoności programiście. Rust wybrał poprawne
obchodzenie się z danymi ze String jako domyślne zachowanie wszystkich
programów w nim napisanych. Oznacza to, że programiści muszą mieć z góry przemyślane
co zrobią z danymi w UTF-8. Ten kompromis ujawnia więcej złożoności łańcuchów niż
sposoby wybrane przez inne języki programowania, ale zapobiega konieczności radzenia
sobie z błędami obejmującymi znaki inne niż ASCII na późniejszym etapie cyklu rozwoju
oprogramowania.
Dobre wieści są takie, że biblioteka standardowa oferuje wiele funkcjonalności
opartych na typach String i &str by pomóc ci poprawnie zająć się takimi
złożonymi sytuacjami. Upewnij się, że przejrzałeś dokumentację i zapoznałeś się z
takimi użytecznymi metodami jak contains, żeby przeszukać łańcuch i replace
by zastąpić części łańcucha innym łańcuchem.
Przejdźmy teraz do czegoś nieco łatwiejszego: mapy z haszowaniem!
Przechowywanie Kluczy z Powiązanymi Wartościami w Mapach z Haszowaniem
Ostatnią z naszych popularnych kolekcji jest mapa z haszowaniem. Typ HashMap<K, V>
przechowuje mapowanie kluczy typu K na wartości typu V przy użyciu funkcji
haszującej, która określa sposób umieszczania tych kluczy i wartości w pamięci.
Wiele języków programowania obsługuje tego rodzaju struktury danych, ale często
używają one innych nazw, takich jak hash, mapa, obiekt, tablica hash,
słownik lub tablica asocjacyjna, by wymienić tylko kilka.
Mapy z haszowaniem są przydatne, gdy chcesz wyszukać dane nie za pomocą indeksu, jak w przypadku wektorów, ale za pomocą klucza, który może być dowolnego typu. Na przykład, w grze można śledzić wyniki każdej drużyny w mapie z haszowaniem, w której każdy klucz to nazwa drużyny, a wartości to wyniki każdej drużyny. Podając nazwę drużyny, można pobrać jej wynik.
W tej sekcji omówimy podstawowy interfejs API map z haszowaniem, ale wiele innych ciekawostek
kryje się w funkcjach zdefiniowanych na HashMap<K, V> przez bibliotekę standardową.
Jak zawsze, sprawdź dokumentację biblioteki standardowej, aby uzyskać więcej informacji.
Tworzenie Nowej Mapy z Haszowaniem
Jednym ze sposobów utworzenia pustej mapy z haszowaniem jest użycie new i dodanie elementów za pomocą
insert. Na listingu 8-20 śledzimy wyniki dwóch drużyn o
nazwach Blue i Yellow. Niebieska drużyna zaczyna z 10 punktami, a żółta
z 50.
fn main() { use std::collections::HashMap; let mut scores = HashMap::new(); scores.insert(String::from("Blue"), 10); scores.insert(String::from("Yellow"), 50); }
Listing 8-20: Tworzenie nowej mapy z haszowaniem i wstawianie kluczy i wartości
Zauważ, że musimy najpierw zadeklarować use HashMap z części kolekcji biblioteki standardowej.
Spośród naszych trzech popularnych kolekcji, ta jest najrzadziej używana,
więc nie jest uwzględniona w funkcjach automatycznie wprowadzanych do zakresu w preludium.
Mapy z haszowaniem mają również mniejsze wsparcie ze strony biblioteki standardowej;
na przykład nie ma wbudowanego makra do ich konstruowania.
Podobnie jak wektory, mapy z haszowaniem przechowują swoje dane na stercie.
Ta HashMap ma klucze typu String i wartości typu i32. Podobnie jak wektory,
mapy z haszowaniem są jednorodne: wszystkie klucze i wartości muszą mieć ten sam typ.
Uzyskiwanie Dostępu do Wartości w Mapie z Haszowaniem
Możemy uzyskać wartość z mapy z haszowaniem poprzez podanie jej klucza do metody get,
jak pokazano na listingu 8-21.
fn main() { use std::collections::HashMap; let mut scores = HashMap::new(); scores.insert(String::from("Blue"), 10); scores.insert(String::from("Yellow"), 50); let team_name = String::from("Blue"); let score = scores.get(&team_name).copied().unwrap_or(0); }
Listing 8-21: Uzyskanie dostępu do wyniku drużyny niebieskiej przechowywanego w mapie z haszowaniem
W tym przypadku score będzie miał wartość powiązaną z niebieską drużyną,
a wynikiem będzie 10. Metoda get zwraca Option<&V>; jeśli nie ma
wartości dla tego klucza w mapie z haszowaniem, get zwróci None. Ten program
obsługuje Option, wywołując copied, aby uzyskać Option<i32> zamiast Option<&i32>,
a następnie unwrap_or, aby ustawić score na zero, jeśli scores nie ma wpisu dla klucza.
Możemy iterować po każdej parze klucz-wartość w mapie z haszowaniem w podobny sposób jak
z wektorami, używając pętli for:
fn main() { use std::collections::HashMap; let mut scores = HashMap::new(); scores.insert(String::from("Blue"), 10); scores.insert(String::from("Yellow"), 50); for (key, value) in &scores { println!("{key}: {value}"); } }
Ten kod wydrukuje każdą parę w dowolnej kolejności:
Yellow: 50
Blue: 10
Mapy z Haszowaniem i System Własności
Dla typów, które implementują cechę Copy, jak i32, wartości są kopiowane
do mapy z haszowaniem. Dla wartości będących własnością, takich jak String,
wartości zostaną przeniesione i mapa z haszowaniem będzie właścicielem tych wartości,
jak pokazano na listingu 8-22.
fn main() { use std::collections::HashMap; let field_name = String::from("Ulubiony kolor"); let field_value = String::from("Niebieski"); let mut map = HashMap::new(); map.insert(field_name, field_value); // field_name i field_value są w tym momencie unieważnione, spróbuj ich użyć // i zobacz, jaki błąd kompilatora otrzymasz! }
Listing 8-22: Pokazanie, że klucze i wartości są własnością mapy z haszowaniem po ich wstawieniu
Nie jesteśmy w stanie użyć zmiennych field_name i field_value po tym, jak
zostały one przeniesione do mapy z haszowaniem za pomocą wywołania insert.
Jeśli wstawimy odniesienia do wartości w mapie z haszowaniem, wartości nie zostaną przeniesione do mapy z haszowaniem. Wartości, na które wskazują odniesienia, muszą być ważne przez co najmniej tak długo, jak ważna jest mapa z haszowaniem. Więcej o tych kwestiach powiemy w "Walidacja referencji za pomocą cyklu życia" w rozdziale 10.
Aktualizowanie Mapy z Haszowaniem
Chociaż liczba par kluczy i wartości może rosnąć, każdy unikalny klucz może
mieć tylko jedną wartość powiązaną z nim w danym momencie (ale nie odwrotnie:
na przykład zarówno drużyna Niebieska, jak i Żółta mogą mieć wartość 10
przechowywaną w mapie z haszowaniem scores).
Kiedy chcesz zmienić dane w mapie z haszowaniem, musisz zdecydować, w jaki sposób obsłużyć przypadek, gdy klucz ma już przypisaną wartość. Można zastąpić starą wartość nową wartością, całkowicie ignorując starą wartość. Można zachować starą wartość i zignorować nową, dodając nową wartość tylko wtedy, gdy klucz nie ma jeszcze wartości. Można też połączyć starą i nową wartość. Przyjrzyjmy się, jak wykonać każdą z tych metod!
Zastępowanie Wartości
Jeśli wstawimy klucz i wartość do mapy z haszowaniem, a następnie wstawimy ten sam klucz
z inną wartością, wartość powiązana z tym kluczem zostanie zastąpiona.
Mimo że kod na listingu 8-23 wywołuje insert dwa razy, mapa z haszowaniem
będzie zawierała tylko jedną parę klucz-wartość, ponieważ za każdym razem wstawiamy
wartość klucza drużyny Blue.
fn main() { use std::collections::HashMap; let mut scores = HashMap::new(); scores.insert(String::from("Blue"), 10); scores.insert(String::from("Blue"), 25); println!("{:?}", scores); }
Listing 8-23: Zastępowanie wartości przechowywanej z określonym kluczem
Ten kod wypisze {„Blue”: 25}. Oryginalna wartość 10 została
nadpisana.
Dodawanie Klucza i Wartości Tylko w Przypadku Braku Klucza
Powszechne jest sprawdzanie, czy dany klucz już istnieje w mapie z haszowaniem z wartością, a następnie podjęcie następujących działań: jeśli klucz istnieje w mapie haszującej, istniejąca wartość powinna pozostać bez zmian; jeśli klucz nie istnieje, należy wstawić go wraz z wartością.
Mapy z haszowaniem mają do tego specjalne API o nazwie entry, które przyjmuje klucz,
który chcemy sprawdzić jako parametr. Wartością zwrotną metody entry jest enum
o nazwie Entry, która reprezentuje wartość, która może istnieć lub nie. Powiedzmy, że
chcemy sprawdzić, czy klucz dla drużyny Yellow ma wartość z nią powiązaną.
Jeśli nie, chcemy wstawić wartość 50, i to samo dla zespołu
Blue team. Używając API entry, kod wygląda jak na listingu 8-24.
fn main() { use std::collections::HashMap; let mut scores = HashMap::new(); scores.insert(String::from("Blue"), 10); scores.entry(String::from("Yellow")).or_insert(50); scores.entry(String::from("Blue")).or_insert(50); println!("{:?}", scores); }
Listing 8-24: Używanie metody entry do wstawiania tylko wtedy, gdy klucz nie ma jeszcze wartości
Metoda or_insert na Entry jest zdefiniowana by zwracać mutowalne odniesienie do
wartości odpowiedniego klucza Entry, jeśli ten klucz istnieje, a jeśli nie, to
wstawia parametr jako nową wartość dla tego klucza i zwraca mutowalne
odniesienie do nowej wartości. Ta technika jest znacznie czystsza niż samodzielne pisanie
logiki, a ponadto lepiej współgra ze sprawdzaniem zapożyczeń.
Uruchomienie kodu z listingu 8-24 spowoduje wypisanie {„Yellow”: 50, „Niebieski”: 10}.
Pierwsze wywołanie entry wstawi klucz dla drużyny Yellow z wartością
50, ponieważ żółta drużyna nie ma jeszcze wartości. Drugie wywołanie
entry nie zmieni mapy z haszowaniem, ponieważ drużyna Blue ma już wartość
wartość 10.
Aktualizacja Wartości na Podstawie Starej Wartości
Innym częstym przypadkiem użycia map z haszowaniem jest wyszukiwanie wartości klucza,
a następnie aktualizacja na podstawie starej wartości. Na przykład, listing 8-25 pokazuje kod,
który zlicza ile razy każde słowo pojawia się w tekście. Używamy mapy z haszowaniem z
słowami jako kluczami i zwiększamy wartość, aby śledzić, ile razy widzieliśmy to słowo.
Jeśli widzimy dane słowo po raz pierwszy, najpierw wstawiamy wartość wartość 0.
fn main() { use std::collections::HashMap; let text = "hello world wonderful world"; let mut map = HashMap::new(); for word in text.split_whitespace() { let count = map.entry(word).or_insert(0); *count += 1; } println!("{:?}", map); }
Listing 8-25: Zliczanie wystąpień słów przy użyciu mapy z haszowaniem, która przechowuje słowa i liczby
Ten kod wypisze {„world”: 2, „hello”: 1, „wonderful”: 1}. Możesz zobaczyć
te same pary klucz-wartość wydrukowane w innej kolejności: przypomnijmy sobie z sekcji
„Uzyskiwanie dostępu do wartości z mapy z haszowaniem”, że
iteracja po mapie z haszowaniem odbywa się w dowolnej kolejności.
Metoda split_whitespace zwraca iterator nad subwycinkami, oddzielonymi
białymi znakami, wartości w text. Metoda or_insert zwraca mutowalną referencję
(&mut V) do wartości dla określonego klucza. Tutaj przechowujemy
mutowalną referencję w zmiennej count, więc aby przypisać ją do tej wartości,
musimy najpierw odnieść się do count używając gwiazdki (*). Zmienna
wychodzi poza zakres na końcu pętli for, więc wszystkie te
zmiany są bezpieczne i dozwolone przez reguły pożyczania.
Funkcje Haszujące
Domyślnie, HashMap używa funkcji haszującej o nazwie SipHash, która może zapewnić
odporność na ataki typu DoS (denial-of-service) z użyciem hash tablic
1. Nie jest to najszybszy dostępny algorytm haszujący,
ale kompromis dla lepszego bezpieczeństwa, który wiąże się ze spadkiem
wydajności ale jest tego wart. Jeśli profilujesz swój kod i stwierdzisz, że domyślna
funkcja haszująca jest zbyt wolna dla twoich celów, możesz przełączyć się na inną funkcję
określając inny hasher. hasher jest typem, który implementuje cechę
BuildHasher. Porozmawiamy o cechach i sposobach ich implementacji w
Rozdział 10. Nie musisz koniecznie implementować
własnego hashera od zera; crates.io
zawiera biblioteki współdzielone przez innych użytkowników Rusta, które dostarczają
hashery implementujące wiele powszechnych algorytmów haszujących.
Podsumowanie
Wektory, ciągi znaków i mapy z haszowaniem zapewniają dużą funkcjonalność niezbędną w programach do przechowywania, pobierania i modyfikowania danych. Oto kilka ćwiczeń, które powinieneś być teraz w stanie rozwiązać:
- Dla podanej listy liczb całkowitych, użyj wektora i zwróć medianę (po posortowaniu, wartość na środkowej pozycji) i dominantę (wartość, która występuje najczęściej; pomocna będzie tutaj mapa z haszowaniem) listy.
- Przekonwertuj ciągi znaków na łacinę świńską. Pierwsza spółgłoska każdego słowa jest przenoszona na na koniec słowa i dodawane jest ay, więc first staje się irst-fay. Słowa zaczynające się od samogłoski mają zamiast tego dodane hay na końcu (apple staje się apple-hay). Należy pamiętać o szczegółach kodowania UTF-8!
- Korzystając z mapy z haszowaniem i wektorów, utwórz interfejs tekstowy, aby umożliwić użytkownikowi dodawanie pracowników do działów w firmie; na przykład „Dodaj Sally do działu inżynierii” lub »Dodaj Amir do działu sprzedaży«. Następnie pozwól użytkownikowi pobrać listę wszystkich osób w dziale lub wszystkich osób w firmie według działu, posortowanych alfabetycznie.
Dokumentacja API biblioteki standardowej opisuje metody wektorów, łańcuchów i mapy z haszowaniem, które będą pomocne w tych ćwiczeniach!
Wchodzimy w bardziej złożone programy, w których operacje mogą się nie powieść, więc jest to idealny czas na omówienie obsługi błędów. Zrobimy to w następnej kolejności!
Obsługa błędów
Prędzej czy później napotkasz błędy w oprogramowaniu, które tworzysz, dlatego Rust posiada szereg funkcji pozwalających radzić sobie z sytuacjami, w których coś pójdzie nie tak. W wielu przypadkach Rust wymaga, abyś potwierdził możliwość wystąpienia błędu i podjął pewne działania, zanim kod zostanie skompilowany. To sprawia, że Twój program jest bardziej niezawodny, zapewniając wykrycie błędów i odpowiednią ich obsługę przed wdrożeniem na środowisko produkcyjne!
Rust dzieli błędy na dwie główne kategorie: błędy możliwe do naprawienia i błędy nienaprawialne. W przypadku błędu, które można naprawić, np. plik nieodnaleziony, najprawdopodobniej chcemy po prostu zgłosić problem użytkownikowi i ponowić operacje. Błędy nienaprawialne są zawsze objawami problemów, takimi jak próba uzyskania dostępu do lokalizacji znajdującej się poza końcem tablicy, dlatego chcemy natychmiast zatrzymać program.
Większość języków nie rozróżnia tych dwóch rodzajów błędów i obsługuje oba w ten
sam sposób, wykorzystując mechanizmy takie jak wyjątki (ang. exception). Rust
nie ma wyjątków. Zamiast tego ma typ Result<T, E> dla możliwych do naprawienia
błędów i makro panic!, które zatrzymuje wykonywanie, gdy program napotka
nieodwracalny błąd. W tym rozdziale omówiono wywoływanie makra panic!, a
następnie omówiono zwracanie wartości Result<T, E>. Dodatkowo przeanalizowano
kwestie, które należy wziąć pod uwagę przy podejmowaniu decyzji, czy spróbować
zakończyć program na wybrany sposób, po wystąpieniu błędu, czy zatrzymać
wykonywanie.
Nieodwracalne Błędy z panic!
Czasami w kodzie dzieją się złe rzeczy i nic nie można na to poradzić.
W takich przypadkach Rust posiada makro panic!. Istnieją dwa sposoby na wywołanie go
w praktyce: podejmując działanie, które powoduje, że nasz kod wpada w panikę (np.
dostęp do tablicy poza jej końcem) lub poprzez jawne wywołanie makra panic!.
W obu przypadkach wywołujemy panikę w naszym programie. Domyślnie, te paniki
wypisują komunikat o niepowodzeniu, zwijają, czyszczą stos i kończą działanie. Poprzez
zmienną środowiskową, można również nakazać Rustowi wyświetlanie stosu wywołań, gdy wystąpi
panika aby ułatwić odnalezienie źródła paniki.
Zwijanie Stosu lub Przerwanie w Odpowiedzi na Panikę
Domyślnie, gdy wystąpi panika, program rozpoczyna zwijanie, co oznacza, że Rust cofa się w górę stosu i czyści dane każdej napotkanej funkcji. Jednak cofanie się i czyszczenie to dużo pracy. Rust dlatego pozwala wybrać alternatywę natychmiastowego przerwania, co kończy program bez czyszczenia.
Pamięć, z której korzystał program, będzie musiała zostać wyczyszczona przez system operacyjny. Jeśli w swoim projekcie chcesz, aby wynikowy plik binarny był tak mały jak to tylko możliwe, możesz przełączyć się ze zwijania na przerywanie w przypadku paniki poprzez dodanie
panic = 'abort'do odpowiednich sekcji[profile]w pliku Cargo.toml. Na przykład, jeśli chcesz przerwać po panice w trybie zwijania, dodaj to:[profile.release] panic = 'abort'
Spróbujmy wywołać panic! w prostym programie:
Filename: src/main.rs
fn main() { panic!("crash and burn"); }
Po uruchomieniu programu zobaczysz coś takiego:
$ cargo run
Compiling panic v0.1.0 (file:///projects/panic)
Finished dev [unoptimized + debuginfo] target(s) in 0.25s
Running `target/debug/panic`
thread 'main' panicked at 'crash and burn', src/main.rs:2:5
note: run with `RUST_BACKTRACE=1` environment variable to display a backtrace
Wywołanie panic! powoduje wyświetlenie komunikatu o błędzie zawarty w dwóch ostatnich wierszach.
Pierwsza linia pokazuje komunikat paniki i miejsce w naszym kodzie źródłowym, w którym
wystąpiła panika: src/main.rs:2:5 wskazuje, że jest to druga linia,
piąty znak w pliku src/main.rs.
W tym przypadku wskazana linia jest częścią naszego kodu, a jeśli do niej przejdziemy
zobaczymy wywołanie makra panic!. W innych przypadkach wywołanie panic! może znajdować
się w kodzie wywoływanym przez nasz kod, a nazwa pliku i numer linii zgłoszone przez
komunikat o błędzie będą kodem innej osoby, w którym wywoływane jest makro panic!,
a nie linią naszego kodu, która ostatecznie doprowadziła do wywołania panic!.
Możemy użyć stosu wywołań funkcji, z których pochodzi wywołanie panic!,
aby dowiedzieć się, która część naszego kodu powoduje problem. Stosy wywołań omówimy
bardziej szczegółowo w następnej części.
Używanie Stosu Wywołań panic!
Spójrzmy na inny przykład, aby zobaczyć, jak to jest, gdy wywołanie panic!
pochodzi z biblioteki z powodu błędu w naszym kodzie, a nie z naszego kodu
wywołującego makro bezpośrednio.
Listing 9-1 zawiera kod, który próbuje uzyskać
dostęp do indeksu w wektorze poza zakresem prawidłowych indeksów.
Filename: src/main.rs
fn main() { let v = vec![1, 2, 3]; v[99]; }
Listing 9-1: Próba uzyskania dostępu do elementu poza
końcem wektora, co spowoduje wywołanie panic!.
Tutaj próbujemy uzyskać dostęp do setnego elementu naszego wektora (który
znajduje się w indeksie 99, ponieważ indeksowanie zaczyna się od zera),
ale wektor ma tylko 3 elementy. W tej sytuacji Rust wpadnie w panikę.
Użycie [] powinno zwrócić element, ale jeśli podasz nieprawidłowy indeks,
Rust nie będzie w stanie zwrócić żadnego elementu, który byłby poprawny.
W języku C próba odczytu poza końcem struktury danych jest niezdefiniowanym zachowaniem. Można uzyskać to, co znajduje się w miejscu w pamięci, które odpowiadałoby temu elementowi w strukturze danych, nawet jeśli pamięć nie należy do tej struktury. Nazywa się to przepełnieniem bufora i może prowadzić do luk w zabezpieczeniach, jeśli atakujący jest w stanie manipulować indeksem w taki sposób, aby odczytać dane, do których nie powinien mieć dostępu, a które są przechowywane za strukturą danych.
Aby chronić swój program przed tego rodzaju lukami, jeśli spróbujesz odczytać element w indeksie, który nie istnieje, Rust zatrzyma wykonywanie i odmówi kontynuowania. Wypróbujmy to i zobaczmy:
$ cargo run
Compiling panic v0.1.0 (file:///projects/panic)
Finished dev [unoptimized + debuginfo] target(s) in 0.27s
Running `target/debug/panic`
thread 'main' panicked at 'index out of bounds: the len is 3 but the index is 99', src/main.rs:4:5
note: run with `RUST_BACKTRACE=1` environment variable to display a backtrace
Ten błąd wskazuje na linię 4 naszego pliku main.rs, gdzie próbujemy uzyskać
dostęp do indeksu 99. Następna linia notatki mówi nam, że możemy ustawić
zmienną środowiskową RUST_BACKTRACE, aby uzyskać stos wysołań tego,
co dokładnie spowodowało błąd. Stos wywołań to lista wszystkich funkcji,
które zostały wywołane, aby dotrzeć do tego punktu. Stos wywołań w Ruście działa
podobnie jak w innych językach: kluczem do odczytania stosu wywołań jest
rozpoczęcie od góry i czytanie, aż zobaczysz pliki, które napisałeś. Jest to miejsce,
w którym pojawił się problem. Linie powyżej tego miejsca to kod, który został wywołany
przez twój kod; linie poniżej to kod, który wywołał twój kod. Te linie przed i po mogą
zawierać kod rdzenia Rusta, kod biblioteki standardowej lub używane skrzynki.
Spróbujmy uzyskać stos wywołań, ustawiając zmienną środowiskową RUST_BACKTRACE
na dowolną wartość z wyjątkiem 0. Listing 9-2 pokazuje dane wyjściowe podobne do tego, co zobaczysz.
$ RUST_BACKTRACE=1 cargo run
thread 'main' panicked at 'index out of bounds: the len is 3 but the index is 99', src/main.rs:4:5
stack backtrace:
0: rust_begin_unwind
at /rustc/e092d0b6b43f2de967af0887873151bb1c0b18d3/library/std/src/panicking.rs:584:5
1: core::panicking::panic_fmt
at /rustc/e092d0b6b43f2de967af0887873151bb1c0b18d3/library/core/src/panicking.rs:142:14
2: core::panicking::panic_bounds_check
at /rustc/e092d0b6b43f2de967af0887873151bb1c0b18d3/library/core/src/panicking.rs:84:5
3: <usize as core::slice::index::SliceIndex<[T]>>::index
at /rustc/e092d0b6b43f2de967af0887873151bb1c0b18d3/library/core/src/slice/index.rs:242:10
4: core::slice::index::<impl core::ops::index::Index<I> for [T]>::index
at /rustc/e092d0b6b43f2de967af0887873151bb1c0b18d3/library/core/src/slice/index.rs:18:9
5: <alloc::vec::Vec<T,A> as core::ops::index::Index<I>>::index
at /rustc/e092d0b6b43f2de967af0887873151bb1c0b18d3/library/alloc/src/vec/mod.rs:2591:9
6: panic::main
at ./src/main.rs:4:5
7: core::ops::function::FnOnce::call_once
at /rustc/e092d0b6b43f2de967af0887873151bb1c0b18d3/library/core/src/ops/function.rs:248:5
note: Some details are omitted, run with `RUST_BACKTRACE=full` for a verbose backtrace.
Listing 9-2: Stos wywołań wygenerowany przez wywołanie panic! wyświetlany,
gdy ustawiona jest zmienna środowiskowa RUST_BACKTRACE.
To bardzo dużo danych wyjściowych! Dokładne dane wyjściowe mogą się różnić
w zależności od systemu operacyjnego i wersji Rusta. Aby uzyskać stosy wywołań
z tymi informacjami, symbole debugowania muszą być włączone. Symbole debugowania
są domyślnie włączone podczas korzystania z cargo build lub cargo run
bez flagi --release, tak jak tutaj.
W danych wyjściowych na listingu 9-2, linia 6 stosu wywołań wskazuje na linię w naszym projekcie, która powoduje problem: linia 4 pliku src/main.rs. Jeśli nie chcemy, aby nasz program wpadł w panikę, powinniśmy rozpocząć nasze dochodzenie w miejscu wskazywanym przez pierwszą linię wspominającą o napisanym przez nas pliku. Na listingu 9-1, gdzie celowo napisaliśmy kod, który spowodowałby panikę, sposobem na naprawienie paniki jest nie żądanie elementu spoza zakresu indeksów wektora. Gdy kod będzie wpadał w panikę w przyszłości, trzeba będzie dowiedzieć się, jakie działania kod wykonuje z jakimi wartościami, aby wywołać panikę i co kod powinien zrobić zamiast tego.
Wrócimy do panic! i omówimy kiedy powinniśmy, a kiedy nie powinniśmy używać panic!
do obsługi warunków błędu w sekcji "To panic! or Not topanic!"
w dalszej części tego rozdziału. Następnie przyjrzymy się, jak odzyskać
dane po błędzie przy użyciu Result.
Odwracalne Błędy z Result
Większość błędów nie jest na tyle poważna, by wymagać całkowitego zatrzymania programu. Czasami, gdy funkcja zawodzi, dzieje się tak z powodu, który można łatwo zinterpretować i na który można łatwo zareagować. Na przykład, jeśli próbujesz otworzyć plik i operacja ta kończy się niepowodzeniem, ponieważ plik nie istnieje, możesz chcieć utworzyć plik zamiast kończyć proces.
Przypomnijmy z „Obsługa potencjalnych błędów z użyciem Result” w rozdziale 2, że enum Result jest zdefiniowane jako posiadające dwa
warianty, Ok i Err, w następujący sposób:
#![allow(unused)] fn main() { enum Result<T, E> { Ok(T), Err(E), } }
T i E są parametrami typów generycznych: omówimy je bardziej szczegółowo w rozdziale 10. W tym momencie należy wiedzieć, że T reprezentuje typ wartości, która zostanie zwrócona w przypadku sukcesu w wariancie Ok, a E reprezentuje typ błędu, który zostanie zwrócony w przypadku niepowodzenia w wariancie Err.
Ponieważ Result ma te ogólne parametry typu, możemy użyć typu Result i funkcji zdefiniowanych na nim w wielu różnych sytuacjach, o różnych zwracanych wartościach sukcesu i błędu.
Wywołajmy funkcję, która zwraca wartość Result, ponieważ funkcja może się nie powieść.
Na listingu 9-3 próbujemy otworzyć plik.
Plik: src/main.rs
use std::fs::File; fn main() { let greeting_file_result = File::open("hello.txt"); }
Listing 9-3: Otwarcie pliku
Typem zwracanym przez File::open jest Result<T, E>. Ogólny parametr T
został wypełniony przez implementację File::open typem wartości sukcesu,
std::fs::File, który jest uchwytem pliku. Typ E użyty w wartości błędu to
std::io::Error. Ten typ zwrotu oznacza, że wywołanie funkcji File::open
może się powieść i zwrócić uchwyt pliku, z którego możemy czytać lub do
którego możemy pisać. Wywołanie funkcji może również zakończyć się niepowodzeniem:
na przykład plik może nie istnieć lub możemy nie mieć uprawnień dostępu do pliku.
Funkcja File::open musi mieć sposób na poinformowanie nas o powodzeniu
lub niepowodzeniu i jednocześnie przekazać nam uchwyt pliku lub informacje o błędzie.
Te informacje są dokładnie tym, co przekazuje wyliczenie Result.
W przypadku gdy File::open się powiedzie, wartością w zmiennej greeting_file_result będzie instancja Ok zawierająca uchwyt pliku. W przypadku niepowodzenia, wartość w greeting_file_result będzie instancją Err, która zawiera więcej informacji o rodzaju błędu, który wystąpił.
Musimy dodać do kodu z listingu 9-3 różne akcje w zależności od wartości zwracanej przez File::open. Listing 9-4 pokazuje jeden ze sposobów obsługi Result przy użyciu podstawowego narzędzia, wyrażenia match, które omówiliśmy w rozdziale 6.
Plik: src/main.rs
use std::fs::File; fn main() { let greeting_file_result = File::open("hello.txt"); let greeting_file = match greeting_file_result { Ok(file) => file, Err(error) => panic!("Problem opening the file: {:?}", error), }; }
Listing 9-4: Użycie wyrażenia match do obsługi wariantów Result, które mogą zostać zwrócone
Zauważ, że podobnie jak wyliczenie Option, wyliczenie Result i jego warianty zostały wprowadzone do zakresu przez preludium, więc nie musimy podawać Result:: przed wariantami Ok i Err w elementach match.
Gdy wynikiem jest Ok, kod ten zwróci wewnętrzną wartość file z wariantu Ok, a następnie przypiszemy tę wartość uchwytu pliku do zmiennej greeting_file. Po match, możemy użyć uchwytu pliku do odczytu lub zapisu.
Drugie pole match obsługuje przypadek, w którym otrzymujemy wartość Err z File::open. W tym przykładzie wybraliśmy wywołanie makra panic!. Jeśli w naszym bieżącym katalogu nie ma pliku o nazwie hello.txt i uruchomimy ten kod, zobaczymy następujące dane wyjściowe z makra panic!:
$ cargo run
Compiling error-handling v0.1.0 (file:///projects/error-handling)
Finished dev [unoptimized + debuginfo] target(s) in 0.73s
Running `target/debug/error-handling`
thread 'main' panicked at 'Problem opening the file: Os { code: 2, kind: NotFound, message: "No such file or directory" }', src/main.rs:8:23
note: run with `RUST_BACKTRACE=1` environment variable to display a backtrace
Jak zwykle, te dane wyjściowe mówią nam dokładnie, co poszło nie tak.
Dopasowanie na Podstawie Różnych Błędów
Kod z listingu 9-4 zgłosi panic! bez względu na przyczynę niepowodzenia File::open. Chcemy jednak podjąć różne działania dla różnych przyczyn niepowodzenia: jeśli File::open nie powiodło się, ponieważ plik nie istnieje, chcemy utworzyć plik i zwrócić uchwyt do nowego pliku. Jeśli File::open nie powiodło się z jakiegokolwiek innego powodu - na przykład, ponieważ nie mieliśmy uprawnień do otwarcia pliku - nadal chcemy, aby kod zgłosił panic! w taki sam sposób, jak na listingu 9-4. W tym celu dodajemy wewnętrzne wyrażenie match, pokazane na listingu 9-5.
Plik: src/main.rs
use std::fs::File;
use std::io::ErrorKind;
fn main() {
let greeting_file_result = File::open("hello.txt");
let greeting_file = match greeting_file_result {
Ok(file) => file,
Err(error) => match error.kind() {
ErrorKind::NotFound => match File::create("hello.txt") {
Ok(fc) => fc,
Err(e) => panic!("Problem creating the file: {:?}", e),
},
other_error => {
panic!("Problem opening the file: {:?}", other_error);
}
},
};
}Listing 9-5: Obsługa różnych rodzajów błędów na różne sposoby
Typ wartości zwracanej przez File::open wewnątrz wariantu Err to io::Error, który jest strukturą dostarczaną przez bibliotekę standardową. Struktura ta posiada metodę kind, którą możemy wywołać, aby uzyskać wartość io::ErrorKind. Enum io::ErrorKind jest dostarczane przez bibliotekę standardową i posiada warianty reprezentujące różne rodzaje błędów, które mogą wynikać z operacji io. Wariant, którego chcemy użyć to ErrorKind::NotFound, który wskazuje, że plik, który próbujemy otworzyć jeszcze nie istnieje. Dopasowujemy się więc do greeting_file_result, ale mamy też wewnętrzne dopasowanie do error.kind().
Warunkiem, który chcemy sprawdzić w wewnętrznym dopasowaniu jest to, czy wartość zwrócona przez error.kind() jest wariantem NotFound wyliczenia ErrorKind. Jeśli tak, próbujemy utworzyć plik za pomocą File::create. Jednakże, ponieważ File::create może również zawieść, potrzebujemy drugiego argumentu w wewnętrznym wyrażeniu match. Jeśli plik nie może zostać utworzony, drukowany jest inny komunikat o błędzie. Drugie dopasowanie zewnętrznego wyrażenia match pozostaje takie samo, więc program panikuje przy każdym błędzie poza błędem braku pliku.
Alternatywy do Użycia
matchzResult<T, E>Tak dużo tych
match! Wyrażeniematchjest bardzo użyteczne, ale także bardzo prymitywne. W rozdziale 13 dowiesz się o domknięciach, które są używane z wieloma metodami zdefiniowanymi wResult<T, E>. Metody te mogą być bardziej zwięzłe niż użyciematchpodczas obsługi wartościResult<T, E>w kodzie.Na przykład, oto inny sposób na napisanie tej samej logiki, jak pokazano na listingu 9-5, tym razem przy użyciu domknięć i metody
unwrap_or_else:use std::fs::File; use std::io::ErrorKind; fn main() { let greeting_file = File::open("hello.txt").unwrap_or_else(|error| { if error.kind() == ErrorKind::NotFound { File::create("hello.txt").unwrap_or_else(|error| { panic!("Problem creating the file: {:?}", error); }) } else { panic!("Problem opening the file: {:?}", error); } }); }Chociaż ten kod zachowuje się tak samo jak z listingu 9-5, nie zawiera żadnych wyrażeń
matchi jest bardziej czytelny. Wróć do tego przykładu po przeczytaniu rozdziału 13 i poszukaj metodyunwrap_or_elsew dokumentacji biblioteki standardowej. Wiele z tych metod może oczyścić ogromne zagnieżdżone wyrażeniamatch, gdy masz do czynienia z błędami.
Skróty do Obsłużenia Paniki z Błędu: unwrap and expect
Używanie match działa wystarczająco dobrze, ale może być nieco rozwlekłe i nie zawsze dobrze komunikuje intencje. Typ Result<T, E> ma zdefiniowanych wiele metod pomocniczych do wykonywania różnych, bardziej specyficznych zadań. Metoda unwrap jest metodą skrótu zaimplementowaną podobnie jak wyrażenie match, które napisaliśmy na listingu 9-4. Jeśli wartość Result jest wariantem Ok, unwrap zwróci wartość wewnątrz Ok. Jeśli Result jest wariantem Err, unwrap wywoła dla nas makro panic!. Oto przykład użycia unwrap:
Plik: src/main.rs
use std::fs::File; fn main() { let greeting_file = File::open("hello.txt").unwrap(); }
Jeśli uruchomimy ten kod bez pliku hello.txt, zobaczymy komunikat o błędzie
z wywołania panic!, które wykonuje metoda unwrap:
thread 'main' panicked at 'called `Result::unwrap()` on an `Err` value: Os {
code: 2, kind: NotFound, message: "No such file or directory" }',
src/main.rs:4:49
Podobnie, metoda expect pozwala nam również wybrać komunikat błędu panic!.
Używanie expect zamiast unwrap i dostarczanie dobrych komunikatów o błędach
może przekazać twoje intencje i ułatwić śledzenie źródła paniki.
Składnia expect wygląda następująco:
Plik: src/main.rs
use std::fs::File; fn main() { let greeting_file = File::open("hello.txt") .expect("hello.txt should be included in this project"); }
Używamy expect w taki sam sposób jak unwrap: by zwrócić uchwyt pliku lub wywołać
makro panic!. Komunikat błędu użyty przez expect w wywołaniu panic! będzie parametrem,
który przekażemy do expect, zamiast domyślnego komunikatu panic!, którego używa unwrap.
Oto jak to wygląda:
thread 'main' panicked at 'hello.txt should be included in this project: Os {
code: 2, kind: NotFound, message: "No such file or directory" }',
src/main.rs:5:10
W kodzie produkcyjnym, większość Rustowców wybiera expect zamiast unwrap
i podaje więcej kontekstu na temat tego, dlaczego operacja ma się zawsze udać.
W ten sposób, jeśli twoje założenia okażą się błędne, masz więcej informacji
do wykorzystania podczas debugowania.
Propagowanie Błędów
Gdy implementacja funkcji wywołuje coś, co może się nie powieść, zamiast obsługiwać błąd w samej funkcji, można zwrócić błąd do kodu wywołującego, aby mógł zdecydować, co zrobić. Jest to znane jako propagowanie błędu i daje większą kontrolę kodowi wywołującemu, gdzie może być więcej informacji lub logiki, która dyktuje sposób obsługi błędu niż to, co jest dostępne w kontekście twojego kodu.
Na przykład, listing 9-6 pokazuje funkcję, która odczytuje nazwę użytkownika z pliku. Jeśli plik nie istnieje lub nie można go odczytać, funkcja ta zwróci te błędy do kodu, który ją wywołał.
Plik: src/main.rs
#![allow(unused)] fn main() { use std::fs::File; use std::io::{self, Read}; fn read_username_from_file() -> Result<String, io::Error> { let username_file_result = File::open("hello.txt"); let mut username_file = match username_file_result { Ok(file) => file, Err(e) => return Err(e), }; let mut username = String::new(); match username_file.read_to_string(&mut username) { Ok(_) => Ok(username), Err(e) => Err(e), } } }
Listing 9-6: Funkcja zwracająca błędy do kodu wywołującego
przy użyciu match
Ta funkcja może być napisana w znacznie krótszy sposób, ale zaczniemy od zrobienia
wielu z nich ręcznie, aby zbadać obsługę błędów; na koniec pokażemy krótszy sposób.
Przyjrzyjmy się najpierw typowi zwracanemu funkcji: Result<String, io::Error>.
Oznacza to, że funkcja zwraca wartość typu Result<T, E>, gdzie parametr generyczny
T został wypełniony konkretnym typem String, a typ generyczny E został wypełniony
konkretnym typem io::Error.
Jeśli ta funkcja powiedzie się bez żadnych problemów, kod wywołujący tę funkcję
otrzyma wartość Ok, która zawiera String - nazwę użytkownika, którą ta funkcja
odczytała z pliku. Jeśli ta funkcja napotka jakiekolwiek problemy, kod wywołujący
otrzyma wartość Err, która zawiera instancję io::Error, która zawiera więcej
informacji o problemach. Wybraliśmy io::Error jako typ zwracany tej funkcji,
ponieważ tak się składa, że jest to typ wartości błędu zwracanej z obu operacji,
które wywołujemy w ciele tej funkcji, a które mogą się nie powieść:
funkcji File::open i metody read_to_string.
Ciało funkcji rozpoczyna się od wywołania funkcji File::open. Następnie obsługujemy
wartość Result za pomocą match podobnego do match z listingu 9-4. Jeśli
File::open się powiedzie, uchwyt pliku w zmiennej wzorca file staje się wartością
w zmiennej mutowalnej username_file i funkcja jest kontynuowana. W przypadku Err,
zamiast wywoływać panic!, używamy słowa kluczowego return, aby całkowicie powrócić
z funkcji i przekazać wartość błędu z File::open, teraz w zmiennej wzorca e,
z powrotem do kodu wywołującego jako wartość błędu tej funkcji.
Jeśli więc mamy uchwyt pliku w username_file, funkcja tworzy nowy String w zmiennej
username i wywołuje metodę read_to_string na uchwycie pliku w username_file,
aby odczytać zawartość pliku do username. Metoda read_to_string również zwraca Result,
ponieważ może się nie powieść, nawet jeśli File::open się powiedzie. Potrzebujemy
więc kolejnego match do obsługi tego Result: jeśli read_to_string się powiedzie,
to nasza funkcja się powiedzie i zwrócimy nazwę użytkownika z pliku, która jest teraz
w username zawinięta w Ok. Jeśli read_to_string się nie powiedzie, zwracamy
wartość błędu w ten sam sposób, w jaki zwróciliśmy wartość błędu w match, który
obsłużył wartość zwracaną File::open. Nie musimy jednak wyraźnie używać wyrażenia
return, ponieważ jest to ostatnie wyrażenie w funkcji.
Kod, który wywołuje ten kod będzie następnie obsługiwał otrzymanie wartości Ok zawierającej
nazwę użytkownika lub wartości Err zawierającej io::Error. Do kodu wywołującego należy
decyzja, co zrobić z tymi wartościami. Jeśli kod wywołujący otrzyma wartość Err,
może na przykład wywołać panic! i zawiesić program, użyć domyślnej nazwy użytkownika lub
wyszukać nazwę użytkownika z innego miejsca niż plik. Nie mamy wystarczających informacji
na temat tego, co kod wywołujący faktycznie próbuje zrobić, więc propagujemy wszystkie
informacje o powodzeniu lub błędzie w górę, aby mógł je odpowiednio obsłużyć.
Ten wzorzec propagacji błędów jest tak powszechny w Rust, że zapewnia operator znaku
zapytania ?, aby to ułatwić.
Skrót do Propagawania Błędów: Operator ?
Listing 9-7 pokazuje implementację read_username_from_file, która ma taką samą
funkcjonalność jak na listingu 9-6, ale ta implementacja używa operatora ?.
Plik: src/main.rs
#![allow(unused)] fn main() { use std::fs::File; use std::io::{self, Read}; fn read_username_from_file() -> Result<String, io::Error> { let mut username_file = File::open("hello.txt")?; let mut username = String::new(); username_file.read_to_string(&mut username)?; Ok(username) } }
Listing 9-7: Funkcja zwracająca błędy do kodu wywołującego
przy użyciu operatora ?
Wyrażenie ? umieszczone po wartości Result jest zdefiniowane tak, aby działało
w prawie taki sam sposób jak wyrażenia match, które zdefiniowaliśmy do obsługi
wartości Result na listingu 9-6. Jeśli wartością Result jest Ok, wartość
wewnątrz Ok zostanie zwrócona z tego wyrażenia, a program będzie kontynuowany.
Jeśli wartością jest Err, Err zostanie zwrócone z całej funkcji, tak jakbyśmy
użyli słowa kluczowego return, więc wartość błędu zostanie rozpropagowana
do kodu wywołującego.
Istnieje różnica między tym, co robi wyrażenie match z listingu 9-6, a tym,
co robi operator ?: wartości błędów, które mają wywołany operator ? przechodzą
przez funkcję from, zdefiniowaną w cechach From w bibliotece standardowej,
która jest używana do konwersji wartości z jednego typu na inny. Gdy operator ?
wywołuje funkcję from, otrzymany typ błędu jest konwertowany na typ błędu
zdefiniowany w typie zwracanym bieżącej funkcji. Jest to przydatne, gdy funkcja
zwraca jeden typ błędu, aby reprezentować wszystkie sposoby, w jakie funkcja
może zawieść, nawet jeśli jej części mogą zawieść z wielu różnych powodów.
Na przykład, możemy zmienić funkcję read_username_from_file z listingu 9-7,
aby zwracała niestandardowy typ błędu o nazwie OurError, który zdefiniujemy.
Jeśli zdefiniujemy również impl From<io::Error> for OurError, aby skonstruować
instancję OurError z io::Error, wtedy wywołania operatora ? w ciele
read_username_from_file wywołają from i przekonwertują typy błędów bez potrzeby
dodawania dodatkowego kodu do funkcji.
W kontekście Listingu 9-7, ? na końcu wywołania File::open zwróci wartość
wewnątrz Ok do zmiennej username_file. Jeśli wystąpi błąd, operator ? powróci
wcześniej z całej funkcji i przekaże dowolną wartość Err do kodu wywołującego.
To samo dotyczy ? na końcu wywołania read_to_string.
Operator ? eliminuje wiele szablonów i upraszcza implementację tej funkcji.
Moglibyśmy nawet jeszcze bardziej skrócić ten kod, łącząc wywołania metod
bezpośrednio po ?, jak pokazano na listingu 9-8.
Plik: src/main.rs
#![allow(unused)] fn main() { use std::fs::File; use std::io::{self, Read}; fn read_username_from_file() -> Result<String, io::Error> { let mut username = String::new(); File::open("hello.txt")?.read_to_string(&mut username)?; Ok(username) } }
Listing 9-8: Łączenie wywołań metod po operatorze ?
Przenieśliśmy tworzenie nowego String w username na początek funkcji;
ta część nie uległa zmianie. Zamiast tworzyć zmienną username_file,
połączyliśmy wywołanie read_to_string bezpośrednio z wynikiem File::open(„hello.txt”)?.
Nadal mamy ? na końcu wywołania read_to_string i nadal zwracamy wartość Ok
zawierającą username, gdy zarówno File::open jak i read_to_string się powiodą,
zamiast zwracać błędy. Funkcjonalność jest ponownie taka sama jak na listingu 9-6
i listingu 9-7; jest to po prostu inny, bardziej ergonomiczny sposób zapisu.
Listing 9-9 pokazuje sposób na uczynienie tego jeszcze krótszym przy użyciu fs::read_to_string.
Plik: src/main.rs
#![allow(unused)] fn main() { use std::fs; use std::io; fn read_username_from_file() -> Result<String, io::Error> { fs::read_to_string("hello.txt") } }
Listing 9-9: Użycie fs::read_to_string zamiast otwierania
i odczytywania pliku
Odczytywanie pliku do łańcucha jest dość powszechną operacją, więc biblioteka
standardowa dostarcza wygodną funkcję fs::read_to_string, która otwiera plik,
tworzy nowy String, odczytuje zawartość pliku, umieszcza zawartość w tym String
i zwraca go. Oczywiście użycie fs::read_to_string nie daje nam możliwości wyjaśnienia
całej obsługi błędów, więc najpierw zrobiliśmy to w dłuższy sposób.
Gdzie Operator ? Może Być Używany
Operator ? może być używany tylko w funkcjach, których typ zwracany jest zgodny
z wartością, na której ? jest używany. Dzieje się tak dlatego, że operator ?
jest zdefiniowany do wczesnego zwracania wartości z funkcji, w taki sam sposób jak
wyrażenie match, które zdefiniowaliśmy na listingu 9-6. Na listingu 9-6, wyrażenie
match używało wartości Result, a element wczesnego powrotu zwracał wartość Err(e).
Typ zwracany funkcji musi być Result, aby był kompatybilny z tym return.
Na Listingu 9-10 przyjrzyjmy się błędowi, który otrzymamy, jeśli użyjemy operatora ?
w funkcji main z typem zwracanym niezgodnym z typem wartości, na której używamy ?:
Plik: src/main.rs
use std::fs::File;
fn main() {
let greeting_file = File::open("hello.txt")?;
}Listing 9-10: Próba użycia ? w funkcji main zwracającej ()
nie zostanie skompilowana
Ten kod otwiera plik, co może się nie udać. Operator ? podąża za wartością Result
zwracaną przez File::open, ale ta funkcja main ma typ zwracany (), a nie Result.
Kiedy skompilujemy ten kod, otrzymamy następujący komunikat o błędzie:
$ cargo run
Compiling error-handling v0.1.0 (file:///projects/error-handling)
error[E0277]: the `?` operator can only be used in a function that returns `Result` or `Option` (or another type that implements `FromResidual`)
--> src/main.rs:4:48
|
3 | fn main() {
| --------- this function should return `Result` or `Option` to accept `?`
4 | let greeting_file = File::open("hello.txt")?;
| ^ cannot use the `?` operator in a function that returns `()`
|
= help: the trait `FromResidual<Result<Infallible, std::io::Error>>` is not implemented for `()`
For more information about this error, try `rustc --explain E0277`.
error: could not compile `error-handling` due to previous error
Ten błąd wskazuje, że możemy używać operatora ? tylko w funkcji, która zwraca
Result, Option lub inny typ, który implementuje FromResidual.
Aby naprawić błąd, masz dwie możliwości. Jedną z nich jest zmiana typu zwracanego funkcji,
aby był zgodny z wartością, na której używasz operatora ?, o ile nie masz żadnych
ograniczeń, które by to uniemożliwiały. Inną techniką jest użycie match lub jednej
z metod Result<T, E> do obsługi Result<T, E> w dowolny odpowiedni sposób.
Komunikat o błędzie wspomina, że ? może być również używany z wartościami
Option<T>. Podobnie jak w przypadku użycia ? na Result, możesz użyć ? na
Option tylko w funkcji, która zwraca Option. Zachowanie operatora ? po wywołaniu
na Option<T> jest podobne do jego zachowania po wywołaniu na Result<T, E>: jeśli
wartością jest None, to None zostanie zwrócone wcześniej z funkcji w tym momencie.
Jeśli wartością jest Some, wartość wewnątrz Some jest wartością wynikową wyrażenia
i funkcja jest kontynuowana. Listing 9-11 zawiera przykład funkcji, która znajduje
ostatni znak pierwszej linii w podanym tekście:
fn last_char_of_first_line(text: &str) -> Option<char> { text.lines().next()?.chars().last() } fn main() { assert_eq!( last_char_of_first_line("Hello, world\nHow are you today?"), Some('d') ); assert_eq!(last_char_of_first_line(""), None); assert_eq!(last_char_of_first_line("\nhi"), None); }
Listing 9-11: Użycie operatora ? na wartości Option<T>
Ta funkcja zwraca Option<char>, ponieważ możliwe jest, że jest tam znak, ale możliwe
jest również, że go tam nie ma. Ten kod pobiera argument text z wycinka łańcucha
i wywołuje na nim metodę lines, która zwraca iterator nad liniami w łańcuchu.
Ponieważ funkcja ta chce sprawdzić pierwszą linię, wywołuje next na iteratorze,
aby uzyskać pierwszą wartość z iteratora. Jeśli text jest pustym łańcuchem,
to wywołanie next zwróci None, w którym to przypadku użyjemy ? by zatrzymać
i zwrócić None z last_char_of_first_line. Jeśli text nie jest pustym łańcuchem,
next zwróci wartość Some zawierającą wycinek łańcucha pierwszej linii w text.
Znak ? wyodrębnia wycinek łańcucha i możemy wywołać chars na tym wycinku łańcucha,
aby uzyskać iterator jego znaków. Interesuje nas ostatni znak w tej pierwszej linii,
więc wywołujemy last, aby zwrócić ostatni element w iteratorze. Jest to Option,
ponieważ możliwe jest, że pierwsza linia jest pustym ciągiem, na przykład jeśli text
zaczyna się od pustej linii, ale zawiera znaki w innych liniach, jak w „\nhi”.
Jednakże, jeśli w pierwszej linii znajduje się ostatni znak, zostanie on zwrócony
w wariancie Some. Operator ? w środku daje nam zwięzły sposób na wyrażenie tej
logiki, pozwalając nam zaimplementować funkcję w jednej linii. Gdybyśmy nie mogli
użyć operatora ? w Option, musielibyśmy zaimplementować tę logikę używając więcej
wywołań metod lub wyrażenia match.
Zauważ, że możesz użyć operatora ? na Result w funkcji, która zwraca Result i możesz
użyć operatora ? na Option w funkcji, która zwraca Option, ale nie można ich dowolnie mieszać.
Operator ? nie konwertuje automatycznie Result na Option lub odwrotnie;
w takich przypadkach można użyć metod takich jak ok na Result lub ok_or na Option,
aby dokonać konwersji w sposób jawny.
Jak dotąd, wszystkie funkcje main, których używaliśmy zwracały (). Funkcja main
jest wyjątkowa, ponieważ jest punktem wejścia i wyjścia programów wykonywalnych i istnieją
ograniczenia dotyczące tego, jaki może być jej typ zwracany, aby programy zachowywały się
zgodnie z oczekiwaniami.
Na szczęście main może również zwrócić Result<(), E>. Listing 9-12 zawiera kod z listingu 9-10,
ale zmieniliśmy typ zwracanego main na Result<(), Box<dyn Error>> i dodaliśmy wartość zwracaną
Ok(()) na końcu. Ten kod zostanie teraz skompilowany:
use std::error::Error;
use std::fs::File;
fn main() -> Result<(), Box<dyn Error>> {
let greeting_file = File::open("hello.txt")?;
Ok(())
}Listing 9-12: Zmiana main by zwracał Result<(), E> pozwala
na użycie operatora ? na wartościach Result.
Typ Box<dyn Error> jest trait object, o którym będziemy mówić w sekcji
„Using Trait Objects that Allow for Values of Different Types”
w rozdziale 17. Na razie można odczytać Box<dyn Error> jako „dowolny rodzaj błędu”.
Użycie ? na wartości Result w funkcji main z typem błędu Box<dyn Error>
jest dozwolone, ponieważ pozwala na wczesne zwrócenie dowolnej wartości Err.
Nawet jeśli ciało tej funkcji main będzie zwracać tylko błędy typu std::io::Error,
poprzez określenie Box<dyn Error>, ta sygnatura będzie nadal poprawna, nawet jeśli więcej
kodu zwracającego inne błędy zostanie dodane do ciała main.
Gdy funkcja main zwraca Result<(), E>, program wykonywalny zakończy działanie
z wartością 0 jeśli main zwróci Ok()) i zakończy działanie z wartością
niezerową jeśli main zwróci Err. Programy wykonywalne napisane w C zwracają liczby
całkowite, gdy kończą działanie: programy, które zakończą działanie pomyślnie zwracają
liczbę całkowitą 0, a programy, które zwrócą błąd zwracają liczbę całkowitą inną niż 0.
Rust również zwraca liczby całkowite z plików wykonywalnych, aby być zgodnym z tą konwencją.
Funkcja main może zwracać dowolne typy, które implementują
cechę std::process::Termination trait, który zawiera
funkcję report zwracającą ExitCode. Więcej informacji na temat implementacji
cechy Termination dla własnych typów można znaleźć w dokumentacji biblioteki standardowej.
Teraz, gdy omówiliśmy szczegóły wywoływania panic! lub zwracania Result,
powróćmy do tematu tego, jak zdecydować, który z nich jest odpowiedni do użycia
w poszczególnych przypadkach.
To panic! or Not to panic!
So how do you decide when you should call panic! and when you should return
Result? When code panics, there’s no way to recover. You could call panic!
for any error situation, whether there’s a possible way to recover or not, but
then you’re making the decision that a situation is unrecoverable on behalf of
the calling code. When you choose to return a Result value, you give the
calling code options. The calling code could choose to attempt to recover in a
way that’s appropriate for its situation, or it could decide that an Err
value in this case is unrecoverable, so it can call panic! and turn your
recoverable error into an unrecoverable one. Therefore, returning Result is a
good default choice when you’re defining a function that might fail.
In situations such as examples, prototype code, and tests, it’s more
appropriate to write code that panics instead of returning a Result. Let’s
explore why, then discuss situations in which the compiler can’t tell that
failure is impossible, but you as a human can. The chapter will conclude with
some general guidelines on how to decide whether to panic in library code.
Examples, Prototype Code, and Tests
When you’re writing an example to illustrate some concept, also including robust
error-handling code can make the example less clear. In
examples, it’s understood that a call to a method like unwrap that could
panic is meant as a placeholder for the way you’d want your application to
handle errors, which can differ based on what the rest of your code is doing.
Similarly, the unwrap and expect methods are very handy when prototyping,
before you’re ready to decide how to handle errors. They leave clear markers in
your code for when you’re ready to make your program more robust.
If a method call fails in a test, you’d want the whole test to fail, even if
that method isn’t the functionality under test. Because panic! is how a test
is marked as a failure, calling unwrap or expect is exactly what should
happen.
Cases in Which You Have More Information Than the Compiler
It would also be appropriate to call unwrap or expect when you have some
other logic that ensures the Result will have an Ok value, but the logic
isn’t something the compiler understands. You’ll still have a Result value
that you need to handle: whatever operation you’re calling still has the
possibility of failing in general, even though it’s logically impossible in
your particular situation. If you can ensure by manually inspecting the code
that you’ll never have an Err variant, it’s perfectly acceptable to call
unwrap, and even better to document the reason you think you’ll never have an
Err variant in the expect text. Here’s an example:
fn main() { use std::net::IpAddr; let home: IpAddr = "127.0.0.1" .parse() .expect("Hardcoded IP address should be valid"); }
We’re creating an IpAddr instance by parsing a hardcoded string. We can see
that 127.0.0.1 is a valid IP address, so it’s acceptable to use expect
here. However, having a hardcoded, valid string doesn’t change the return type
of the parse method: we still get a Result value, and the compiler will
still make us handle the Result as if the Err variant is a possibility
because the compiler isn’t smart enough to see that this string is always a
valid IP address. If the IP address string came from a user rather than being
hardcoded into the program and therefore did have a possibility of failure,
we’d definitely want to handle the Result in a more robust way instead.
Mentioning the assumption that this IP address is hardcoded will prompt us to
change expect to better error handling code if in the future, we need to get
the IP address from some other source instead.
Guidelines for Error Handling
It’s advisable to have your code panic when it’s possible that your code could end up in a bad state. In this context, a bad state is when some assumption, guarantee, contract, or invariant has been broken, such as when invalid values, contradictory values, or missing values are passed to your code—plus one or more of the following:
- The bad state is something that is unexpected, as opposed to something that will likely happen occasionally, like a user entering data in the wrong format.
- Your code after this point needs to rely on not being in this bad state, rather than checking for the problem at every step.
- There’s not a good way to encode this information in the types you use. We’ll work through an example of what we mean in the “Encoding States and Behavior as Types” section of Chapter 17.
If someone calls your code and passes in values that don’t make sense, it’s
best to return an error if you can so the user of the library can decide what
they want to do in that case. However, in cases where continuing could be
insecure or harmful, the best choice might be to call panic! and alert the
person using your library to the bug in their code so they can fix it during
development. Similarly, panic! is often appropriate if you’re calling
external code that is out of your control and it returns an invalid state that
you have no way of fixing.
However, when failure is expected, it’s more appropriate to return a Result
than to make a panic! call. Examples include a parser being given malformed
data or an HTTP request returning a status that indicates you have hit a rate
limit. In these cases, returning a Result indicates that failure is an
expected possibility that the calling code must decide how to handle.
When your code performs an operation that could put a user at risk if it’s
called using invalid values, your code should verify the values are valid first
and panic if the values aren’t valid. This is mostly for safety reasons:
attempting to operate on invalid data can expose your code to vulnerabilities.
This is the main reason the standard library will call panic! if you attempt
an out-of-bounds memory access: trying to access memory that doesn’t belong to
the current data structure is a common security problem. Functions often have
contracts: their behavior is only guaranteed if the inputs meet particular
requirements. Panicking when the contract is violated makes sense because a
contract violation always indicates a caller-side bug and it’s not a kind of
error you want the calling code to have to explicitly handle. In fact, there’s
no reasonable way for calling code to recover; the calling programmers need
to fix the code. Contracts for a function, especially when a violation will
cause a panic, should be explained in the API documentation for the function.
However, having lots of error checks in all of your functions would be verbose
and annoying. Fortunately, you can use Rust’s type system (and thus the type
checking done by the compiler) to do many of the checks for you. If your
function has a particular type as a parameter, you can proceed with your code’s
logic knowing that the compiler has already ensured you have a valid value. For
example, if you have a type rather than an Option, your program expects to
have something rather than nothing. Your code then doesn’t have to handle
two cases for the Some and None variants: it will only have one case for
definitely having a value. Code trying to pass nothing to your function won’t
even compile, so your function doesn’t have to check for that case at runtime.
Another example is using an unsigned integer type such as u32, which ensures
the parameter is never negative.
Creating Custom Types for Validation
Let’s take the idea of using Rust’s type system to ensure we have a valid value one step further and look at creating a custom type for validation. Recall the guessing game in Chapter 2 in which our code asked the user to guess a number between 1 and 100. We never validated that the user’s guess was between those numbers before checking it against our secret number; we only validated that the guess was positive. In this case, the consequences were not very dire: our output of “Too high” or “Too low” would still be correct. But it would be a useful enhancement to guide the user toward valid guesses and have different behavior when a user guesses a number that’s out of range versus when a user types, for example, letters instead.
One way to do this would be to parse the guess as an i32 instead of only a
u32 to allow potentially negative numbers, and then add a check for the
number being in range, like so:
use rand::Rng;
use std::cmp::Ordering;
use std::io;
fn main() {
println!("Guess the number!");
let secret_number = rand::thread_rng().gen_range(1..=100);
loop {
// --snip--
println!("Please input your guess.");
let mut guess = String::new();
io::stdin()
.read_line(&mut guess)
.expect("Failed to read line");
let guess: i32 = match guess.trim().parse() {
Ok(num) => num,
Err(_) => continue,
};
if guess < 1 || guess > 100 {
println!("The secret number will be between 1 and 100.");
continue;
}
match guess.cmp(&secret_number) {
// --snip--
Ordering::Less => println!("Too small!"),
Ordering::Greater => println!("Too big!"),
Ordering::Equal => {
println!("You win!");
break;
}
}
}
}The if expression checks whether our value is out of range, tells the user
about the problem, and calls continue to start the next iteration of the loop
and ask for another guess. After the if expression, we can proceed with the
comparisons between guess and the secret number knowing that guess is
between 1 and 100.
However, this is not an ideal solution: if it was absolutely critical that the program only operated on values between 1 and 100, and it had many functions with this requirement, having a check like this in every function would be tedious (and might impact performance).
Instead, we can make a new type and put the validations in a function to create
an instance of the type rather than repeating the validations everywhere. That
way, it’s safe for functions to use the new type in their signatures and
confidently use the values they receive. Listing 9-13 shows one way to define a
Guess type that will only create an instance of Guess if the new function
receives a value between 1 and 100.
#![allow(unused)] fn main() { pub struct Guess { value: i32, } impl Guess { pub fn new(value: i32) -> Guess { if value < 1 || value > 100 { panic!("Guess value must be between 1 and 100, got {}.", value); } Guess { value } } pub fn value(&self) -> i32 { self.value } } }
Listing 9-13: A Guess type that will only continue with
values between 1 and 100
First, we define a struct named Guess that has a field named value that
holds an i32. This is where the number will be stored.
Then we implement an associated function named new on Guess that creates
instances of Guess values. The new function is defined to have one
parameter named value of type i32 and to return a Guess. The code in the
body of the new function tests value to make sure it’s between 1 and 100.
If value doesn’t pass this test, we make a panic! call, which will alert
the programmer who is writing the calling code that they have a bug they need
to fix, because creating a Guess with a value outside this range would
violate the contract that Guess::new is relying on. The conditions in which
Guess::new might panic should be discussed in its public-facing API
documentation; we’ll cover documentation conventions indicating the possibility
of a panic! in the API documentation that you create in Chapter 14. If
value does pass the test, we create a new Guess with its value field set
to the value parameter and return the Guess.
Next, we implement a method named value that borrows self, doesn’t have any
other parameters, and returns an i32. This kind of method is sometimes called
a getter, because its purpose is to get some data from its fields and return
it. This public method is necessary because the value field of the Guess
struct is private. It’s important that the value field be private so code
using the Guess struct is not allowed to set value directly: code outside
the module must use the Guess::new function to create an instance of
Guess, thereby ensuring there’s no way for a Guess to have a value that
hasn’t been checked by the conditions in the Guess::new function.
A function that has a parameter or returns only numbers between 1 and 100 could
then declare in its signature that it takes or returns a Guess rather than an
i32 and wouldn’t need to do any additional checks in its body.
Summary
Rust’s error handling features are designed to help you write more robust code.
The panic! macro signals that your program is in a state it can’t handle and
lets you tell the process to stop instead of trying to proceed with invalid or
incorrect values. The Result enum uses Rust’s type system to indicate that
operations might fail in a way that your code could recover from. You can use
Result to tell code that calls your code that it needs to handle potential
success or failure as well. Using panic! and Result in the appropriate
situations will make your code more reliable in the face of inevitable problems.
Now that you’ve seen useful ways that the standard library uses generics with
the Option and Result enums, we’ll talk about how generics work and how you
can use them in your code.
Generic Types, Traits, and Lifetimes
Every programming language has tools for effectively handling the duplication of concepts. In Rust, one such tool is generics: abstract stand-ins for concrete types or other properties. We can express the behavior of generics or how they relate to other generics without knowing what will be in their place when compiling and running the code.
Functions can take parameters of some generic type, instead of a concrete type
like i32 or String, in the same way a function takes parameters with
unknown values to run the same code on multiple concrete values. In fact, we’ve
already used generics in Chapter 6 with Option<T>, Chapter 8 with Vec<T>
and HashMap<K, V>, and Chapter 9 with Result<T, E>. In this chapter, you’ll
explore how to define your own types, functions, and methods with generics!
First, we’ll review how to extract a function to reduce code duplication. We’ll then use the same technique to make a generic function from two functions that differ only in the types of their parameters. We’ll also explain how to use generic types in struct and enum definitions.
Then you’ll learn how to use traits to define behavior in a generic way. You can combine traits with generic types to constrain a generic type to accept only those types that have a particular behavior, as opposed to just any type.
Finally, we’ll discuss lifetimes: a variety of generics that give the compiler information about how references relate to each other. Lifetimes allow us to give the compiler enough information about borrowed values so that it can ensure references will be valid in more situations than it could without our help.
Removing Duplication by Extracting a Function
Generics allow us to replace specific types with a placeholder that represents multiple types to remove code duplication. Before diving into generics syntax, then, let’s first look at how to remove duplication in a way that doesn’t involve generic types by extracting a function that replaces specific values with a placeholder that represents multiple values. Then we’ll apply the same technique to extract a generic function! By looking at how to recognize duplicated code you can extract into a function, you’ll start to recognize duplicated code that can use generics.
We begin with the short program in Listing 10-1 that finds the largest number in a list.
Filename: src/main.rs
fn main() { let number_list = vec![34, 50, 25, 100, 65]; let mut largest = &number_list[0]; for number in &number_list { if number > largest { largest = number; } } println!("The largest number is {}", largest); assert_eq!(*largest, 100); }
Listing 10-1: Finding the largest number in a list of numbers
We store a list of integers in the variable number_list and place a reference
to the first number in the list in a variable named largest. We then iterate
through all the numbers in the list, and if the current number is greater than
the number stored in largest, replace the reference in that variable.
However, if the current number is less than or equal to the largest number seen
so far, the variable doesn’t change, and the code moves on to the next number
in the list. After considering all the numbers in the list, largest should
refer to the largest number, which in this case is 100.
We've now been tasked with finding the largest number in two different lists of numbers. To do so, we can choose to duplicate the code in Listing 10-1 and use the same logic at two different places in the program, as shown in Listing 10-2.
Filename: src/main.rs
fn main() { let number_list = vec![34, 50, 25, 100, 65]; let mut largest = &number_list[0]; for number in &number_list { if number > largest { largest = number; } } println!("The largest number is {}", largest); let number_list = vec![102, 34, 6000, 89, 54, 2, 43, 8]; let mut largest = &number_list[0]; for number in &number_list { if number > largest { largest = number; } } println!("The largest number is {}", largest); }
Listing 10-2: Code to find the largest number in two lists of numbers
Although this code works, duplicating code is tedious and error prone. We also have to remember to update the code in multiple places when we want to change it.
To eliminate this duplication, we’ll create an abstraction by defining a function that operates on any list of integers passed in a parameter. This solution makes our code clearer and lets us express the concept of finding the largest number in a list abstractly.
In Listing 10-3, we extract the code that finds the largest number into a
function named largest. Then we call the function to find the largest number
in the two lists from Listing 10-2. We could also use the function on any other
list of i32 values we might have in the future.
Filename: src/main.rs
fn largest(list: &[i32]) -> &i32 { let mut largest = &list[0]; for item in list { if item > largest { largest = item; } } largest } fn main() { let number_list = vec![34, 50, 25, 100, 65]; let result = largest(&number_list); println!("The largest number is {}", result); assert_eq!(*result, 100); let number_list = vec![102, 34, 6000, 89, 54, 2, 43, 8]; let result = largest(&number_list); println!("The largest number is {}", result); assert_eq!(*result, 6000); }
Listing 10-3: Abstracted code to find the largest number in two lists
The largest function has a parameter called list, which represents any
concrete slice of i32 values we might pass into the function. As a result,
when we call the function, the code runs on the specific values that we pass
in.
In summary, here are the steps we took to change the code from Listing 10-2 to Listing 10-3:
- Identify duplicate code.
- Extract the duplicate code into the body of the function and specify the inputs and return values of that code in the function signature.
- Update the two instances of duplicated code to call the function instead.
Next, we’ll use these same steps with generics to reduce code duplication. In
the same way that the function body can operate on an abstract list instead
of specific values, generics allow code to operate on abstract types.
For example, say we had two functions: one that finds the largest item in a
slice of i32 values and one that finds the largest item in a slice of char
values. How would we eliminate that duplication? Let’s find out!
Generic Data Types
We use generics to create definitions for items like function signatures or structs, which we can then use with many different concrete data types. Let’s first look at how to define functions, structs, enums, and methods using generics. Then we’ll discuss how generics affect code performance.
In Function Definitions
When defining a function that uses generics, we place the generics in the signature of the function where we would usually specify the data types of the parameters and return value. Doing so makes our code more flexible and provides more functionality to callers of our function while preventing code duplication.
Continuing with our largest function, Listing 10-4 shows two functions that
both find the largest value in a slice. We'll then combine these into a single
function that uses generics.
Filename: src/main.rs
fn largest_i32(list: &[i32]) -> &i32 { let mut largest = &list[0]; for item in list { if item > largest { largest = item; } } largest } fn largest_char(list: &[char]) -> &char { let mut largest = &list[0]; for item in list { if item > largest { largest = item; } } largest } fn main() { let number_list = vec![34, 50, 25, 100, 65]; let result = largest_i32(&number_list); println!("The largest number is {}", result); assert_eq!(*result, 100); let char_list = vec!['y', 'm', 'a', 'q']; let result = largest_char(&char_list); println!("The largest char is {}", result); assert_eq!(*result, 'y'); }
Listing 10-4: Two functions that differ only in their names and the types in their signatures
The largest_i32 function is the one we extracted in Listing 10-3 that finds
the largest i32 in a slice. The largest_char function finds the largest
char in a slice. The function bodies have the same code, so let’s eliminate
the duplication by introducing a generic type parameter in a single function.
To parameterize the types in a new single function, we need to name the type
parameter, just as we do for the value parameters to a function. You can use
any identifier as a type parameter name. But we’ll use T because, by
convention, type parameter names in Rust are short, often just a letter, and
Rust’s type-naming convention is UpperCamelCase. Short for “type,” T is the
default choice of most Rust programmers.
When we use a parameter in the body of the function, we have to declare the
parameter name in the signature so the compiler knows what that name means.
Similarly, when we use a type parameter name in a function signature, we have
to declare the type parameter name before we use it. To define the generic
largest function, place type name declarations inside angle brackets, <>,
between the name of the function and the parameter list, like this:
fn largest<T>(list: &[T]) -> &T {We read this definition as: the function largest is generic over some type
T. This function has one parameter named list, which is a slice of values
of type T. The largest function will return a reference to a value of the
same type T.
Listing 10-5 shows the combined largest function definition using the generic
data type in its signature. The listing also shows how we can call the function
with either a slice of i32 values or char values. Note that this code won’t
compile yet, but we’ll fix it later in this chapter.
Filename: src/main.rs
fn largest<T>(list: &[T]) -> &T {
let mut largest = &list[0];
for item in list {
if item > largest {
largest = item;
}
}
largest
}
fn main() {
let number_list = vec![34, 50, 25, 100, 65];
let result = largest(&number_list);
println!("The largest number is {}", result);
let char_list = vec!['y', 'm', 'a', 'q'];
let result = largest(&char_list);
println!("The largest char is {}", result);
}Listing 10-5: The largest function using generic type
parameters; this doesn’t yet compile
If we compile this code right now, we’ll get this error:
$ cargo run
Compiling chapter10 v0.1.0 (file:///projects/chapter10)
error[E0369]: binary operation `>` cannot be applied to type `&T`
--> src/main.rs:5:17
|
5 | if item > largest {
| ---- ^ ------- &T
| |
| &T
|
help: consider restricting type parameter `T`
|
1 | fn largest<T: std::cmp::PartialOrd>(list: &[T]) -> &T {
| ++++++++++++++++++++++
For more information about this error, try `rustc --explain E0369`.
error: could not compile `chapter10` due to previous error
The help text mentions std::cmp::PartialOrd, which is a trait, and we’re
going to talk about traits in the next section. For now, know that this error
states that the body of largest won’t work for all possible types that T
could be. Because we want to compare values of type T in the body, we can
only use types whose values can be ordered. To enable comparisons, the standard
library has the std::cmp::PartialOrd trait that you can implement on types
(see Appendix C for more on this trait). By following the help text's
suggestion, we restrict the types valid for T to only those that implement
PartialOrd and this example will compile, because the standard library
implements PartialOrd on both i32 and char.
In Struct Definitions
We can also define structs to use a generic type parameter in one or more
fields using the <> syntax. Listing 10-6 defines a Point<T> struct to hold
x and y coordinate values of any type.
Filename: src/main.rs
struct Point<T> { x: T, y: T, } fn main() { let integer = Point { x: 5, y: 10 }; let float = Point { x: 1.0, y: 4.0 }; }
Listing 10-6: A Point<T> struct that holds x and y
values of type T
The syntax for using generics in struct definitions is similar to that used in function definitions. First, we declare the name of the type parameter inside angle brackets just after the name of the struct. Then we use the generic type in the struct definition where we would otherwise specify concrete data types.
Note that because we’ve used only one generic type to define Point<T>, this
definition says that the Point<T> struct is generic over some type T, and
the fields x and y are both that same type, whatever that type may be. If
we create an instance of a Point<T> that has values of different types, as in
Listing 10-7, our code won’t compile.
Filename: src/main.rs
struct Point<T> {
x: T,
y: T,
}
fn main() {
let wont_work = Point { x: 5, y: 4.0 };
}Listing 10-7: The fields x and y must be the same
type because both have the same generic data type T.
In this example, when we assign the integer value 5 to x, we let the compiler
know that the generic type T will be an integer for this instance of
Point<T>. Then when we specify 4.0 for y, which we’ve defined to have the
same type as x, we’ll get a type mismatch error like this:
$ cargo run
Compiling chapter10 v0.1.0 (file:///projects/chapter10)
error[E0308]: mismatched types
--> src/main.rs:7:38
|
7 | let wont_work = Point { x: 5, y: 4.0 };
| ^^^ expected integer, found floating-point number
For more information about this error, try `rustc --explain E0308`.
error: could not compile `chapter10` due to previous error
To define a Point struct where x and y are both generics but could have
different types, we can use multiple generic type parameters. For example, in
Listing 10-8, we change the definition of Point to be generic over types T
and U where x is of type T and y is of type U.
Filename: src/main.rs
struct Point<T, U> { x: T, y: U, } fn main() { let both_integer = Point { x: 5, y: 10 }; let both_float = Point { x: 1.0, y: 4.0 }; let integer_and_float = Point { x: 5, y: 4.0 }; }
Listing 10-8: A Point<T, U> generic over two types so
that x and y can be values of different types
Now all the instances of Point shown are allowed! You can use as many generic
type parameters in a definition as you want, but using more than a few makes
your code hard to read. If you're finding you need lots of generic types in
your code, it could indicate that your code needs restructuring into smaller
pieces.
In Enum Definitions
As we did with structs, we can define enums to hold generic data types in their
variants. Let’s take another look at the Option<T> enum that the standard
library provides, which we used in Chapter 6:
#![allow(unused)] fn main() { enum Option<T> { Some(T), None, } }
This definition should now make more sense to you. As you can see, the
Option<T> enum is generic over type T and has two variants: Some, which
holds one value of type T, and a None variant that doesn’t hold any value.
By using the Option<T> enum, we can express the abstract concept of an
optional value, and because Option<T> is generic, we can use this abstraction
no matter what the type of the optional value is.
Enums can use multiple generic types as well. The definition of the Result
enum that we used in Chapter 9 is one example:
#![allow(unused)] fn main() { enum Result<T, E> { Ok(T), Err(E), } }
The Result enum is generic over two types, T and E, and has two variants:
Ok, which holds a value of type T, and Err, which holds a value of type
E. This definition makes it convenient to use the Result enum anywhere we
have an operation that might succeed (return a value of some type T) or fail
(return an error of some type E). In fact, this is what we used to open a
file in Listing 9-3, where T was filled in with the type std::fs::File when
the file was opened successfully and E was filled in with the type
std::io::Error when there were problems opening the file.
When you recognize situations in your code with multiple struct or enum definitions that differ only in the types of the values they hold, you can avoid duplication by using generic types instead.
In Method Definitions
We can implement methods on structs and enums (as we did in Chapter 5) and use
generic types in their definitions, too. Listing 10-9 shows the Point<T>
struct we defined in Listing 10-6 with a method named x implemented on it.
Filename: src/main.rs
struct Point<T> { x: T, y: T, } impl<T> Point<T> { fn x(&self) -> &T { &self.x } } fn main() { let p = Point { x: 5, y: 10 }; println!("p.x = {}", p.x()); }
Listing 10-9: Implementing a method named x on the
Point<T> struct that will return a reference to the x field of type
T
Here, we’ve defined a method named x on Point<T> that returns a reference
to the data in the field x.
Note that we have to declare T just after impl so we can use T to specify
that we’re implementing methods on the type Point<T>. By declaring T as a
generic type after impl, Rust can identify that the type in the angle
brackets in Point is a generic type rather than a concrete type. We could
have chosen a different name for this generic parameter than the generic
parameter declared in the struct definition, but using the same name is
conventional. Methods written within an impl that declares the generic type
will be defined on any instance of the type, no matter what concrete type ends
up substituting for the generic type.
We can also specify constraints on generic types when defining methods on the
type. We could, for example, implement methods only on Point<f32> instances
rather than on Point<T> instances with any generic type. In Listing 10-10 we
use the concrete type f32, meaning we don’t declare any types after impl.
Filename: src/main.rs
struct Point<T> { x: T, y: T, } impl<T> Point<T> { fn x(&self) -> &T { &self.x } } impl Point<f32> { fn distance_from_origin(&self) -> f32 { (self.x.powi(2) + self.y.powi(2)).sqrt() } } fn main() { let p = Point { x: 5, y: 10 }; println!("p.x = {}", p.x()); }
Listing 10-10: An impl block that only applies to a
struct with a particular concrete type for the generic type parameter T
This code means the type Point<f32> will have a distance_from_origin
method; other instances of Point<T> where T is not of type f32 will not
have this method defined. The method measures how far our point is from the
point at coordinates (0.0, 0.0) and uses mathematical operations that are
available only for floating point types.
Generic type parameters in a struct definition aren’t always the same as those
you use in that same struct’s method signatures. Listing 10-11 uses the generic
types X1 and Y1 for the Point struct and X2 Y2 for the mixup method
signature to make the example clearer. The method creates a new Point
instance with the x value from the self Point (of type X1) and the y
value from the passed-in Point (of type Y2).
Filename: src/main.rs
struct Point<X1, Y1> { x: X1, y: Y1, } impl<X1, Y1> Point<X1, Y1> { fn mixup<X2, Y2>(self, other: Point<X2, Y2>) -> Point<X1, Y2> { Point { x: self.x, y: other.y, } } } fn main() { let p1 = Point { x: 5, y: 10.4 }; let p2 = Point { x: "Hello", y: 'c' }; let p3 = p1.mixup(p2); println!("p3.x = {}, p3.y = {}", p3.x, p3.y); }
Listing 10-11: A method that uses generic types different from its struct’s definition
In main, we’ve defined a Point that has an i32 for x (with value 5)
and an f64 for y (with value 10.4). The p2 variable is a Point struct
that has a string slice for x (with value "Hello") and a char for y
(with value c). Calling mixup on p1 with the argument p2 gives us p3,
which will have an i32 for x, because x came from p1. The p3 variable
will have a char for y, because y came from p2. The println! macro
call will print p3.x = 5, p3.y = c.
The purpose of this example is to demonstrate a situation in which some generic
parameters are declared with impl and some are declared with the method
definition. Here, the generic parameters X1 and Y1 are declared after
impl because they go with the struct definition. The generic parameters X2
and Y2 are declared after fn mixup, because they’re only relevant to the
method.
Performance of Code Using Generics
You might be wondering whether there is a runtime cost when using generic type parameters. The good news is that using generic types won't make your program run any slower than it would with concrete types.
Rust accomplishes this by performing monomorphization of the code using generics at compile time. Monomorphization is the process of turning generic code into specific code by filling in the concrete types that are used when compiled. In this process, the compiler does the opposite of the steps we used to create the generic function in Listing 10-5: the compiler looks at all the places where generic code is called and generates code for the concrete types the generic code is called with.
Let’s look at how this works by using the standard library’s generic
Option<T> enum:
#![allow(unused)] fn main() { let integer = Some(5); let float = Some(5.0); }
When Rust compiles this code, it performs monomorphization. During that
process, the compiler reads the values that have been used in Option<T>
instances and identifies two kinds of Option<T>: one is i32 and the other
is f64. As such, it expands the generic definition of Option<T> into two
definitions specialized to i32 and f64, thereby replacing the generic
definition with the specific ones.
The monomorphized version of the code looks similar to the following (the compiler uses different names than what we’re using here for illustration):
Filename: src/main.rs
enum Option_i32 { Some(i32), None, } enum Option_f64 { Some(f64), None, } fn main() { let integer = Option_i32::Some(5); let float = Option_f64::Some(5.0); }
The generic Option<T> is replaced with the specific definitions created by
the compiler. Because Rust compiles generic code into code that specifies the
type in each instance, we pay no runtime cost for using generics. When the code
runs, it performs just as it would if we had duplicated each definition by
hand. The process of monomorphization makes Rust’s generics extremely efficient
at runtime.
Traits: Defining Shared Behavior
A trait defines functionality a particular type has and can share with other types. We can use traits to define shared behavior in an abstract way. We can use trait bounds to specify that a generic type can be any type that has certain behavior.
Note: Traits are similar to a feature often called interfaces in other languages, although with some differences.
Defining a Trait
A type’s behavior consists of the methods we can call on that type. Different types share the same behavior if we can call the same methods on all of those types. Trait definitions are a way to group method signatures together to define a set of behaviors necessary to accomplish some purpose.
For example, let’s say we have multiple structs that hold various kinds and
amounts of text: a NewsArticle struct that holds a news story filed in a
particular location and a Tweet that can have at most 280 characters along
with metadata that indicates whether it was a new tweet, a retweet, or a reply
to another tweet.
We want to make a media aggregator library crate named aggregator that can
display summaries of data that might be stored in a NewsArticle or Tweet
instance. To do this, we need a summary from each type, and we’ll request
that summary by calling a summarize method on an instance. Listing 10-12
shows the definition of a public Summary trait that expresses this behavior.
Filename: src/lib.rs
pub trait Summary {
fn summarize(&self) -> String;
}Listing 10-12: A Summary trait that consists of the
behavior provided by a summarize method
Here, we declare a trait using the trait keyword and then the trait’s name,
which is Summary in this case. We’ve also declared the trait as pub so that
crates depending on this crate can make use of this trait too, as we’ll see in
a few examples. Inside the curly brackets, we declare the method signatures
that describe the behaviors of the types that implement this trait, which in
this case is fn summarize(&self) -> String.
After the method signature, instead of providing an implementation within curly
brackets, we use a semicolon. Each type implementing this trait must provide
its own custom behavior for the body of the method. The compiler will enforce
that any type that has the Summary trait will have the method summarize
defined with this signature exactly.
A trait can have multiple methods in its body: the method signatures are listed one per line and each line ends in a semicolon.
Implementing a Trait on a Type
Now that we’ve defined the desired signatures of the Summary trait’s methods,
we can implement it on the types in our media aggregator. Listing 10-13 shows
an implementation of the Summary trait on the NewsArticle struct that uses
the headline, the author, and the location to create the return value of
summarize. For the Tweet struct, we define summarize as the username
followed by the entire text of the tweet, assuming that tweet content is
already limited to 280 characters.
Filename: src/lib.rs
pub trait Summary {
fn summarize(&self) -> String;
}
pub struct NewsArticle {
pub headline: String,
pub location: String,
pub author: String,
pub content: String,
}
impl Summary for NewsArticle {
fn summarize(&self) -> String {
format!("{}, by {} ({})", self.headline, self.author, self.location)
}
}
pub struct Tweet {
pub username: String,
pub content: String,
pub reply: bool,
pub retweet: bool,
}
impl Summary for Tweet {
fn summarize(&self) -> String {
format!("{}: {}", self.username, self.content)
}
}Listing 10-13: Implementing the Summary trait on the
NewsArticle and Tweet types
Implementing a trait on a type is similar to implementing regular methods. The
difference is that after impl, we put the trait name we want to implement,
then use the for keyword, and then specify the name of the type we want to
implement the trait for. Within the impl block, we put the method signatures
that the trait definition has defined. Instead of adding a semicolon after each
signature, we use curly brackets and fill in the method body with the specific
behavior that we want the methods of the trait to have for the particular type.
Now that the library has implemented the Summary trait on NewsArticle and
Tweet, users of the crate can call the trait methods on instances of
NewsArticle and Tweet in the same way we call regular methods. The only
difference is that the user must bring the trait into scope as well as the
types. Here’s an example of how a binary crate could use our aggregator
library crate:
use aggregator::{Summary, Tweet};
fn main() {
let tweet = Tweet {
username: String::from("horse_ebooks"),
content: String::from(
"of course, as you probably already know, people",
),
reply: false,
retweet: false,
};
println!("1 new tweet: {}", tweet.summarize());
}This code prints 1 new tweet: horse_ebooks: of course, as you probably already know, people.
Other crates that depend on the aggregator crate can also bring the Summary
trait into scope to implement Summary on their own types. One restriction to
note is that we can implement a trait on a type only if at least one of the
trait or the type is local to our crate. For example, we can implement standard
library traits like Display on a custom type like Tweet as part of our
aggregator crate functionality, because the type Tweet is local to our
aggregator crate. We can also implement Summary on Vec<T> in our
aggregator crate, because the trait Summary is local to our aggregator
crate.
But we can’t implement external traits on external types. For example, we can’t
implement the Display trait on Vec<T> within our aggregator crate,
because Display and Vec<T> are both defined in the standard library and
aren’t local to our aggregator crate. This restriction is part of a property
called coherence, and more specifically the orphan rule, so named because
the parent type is not present. This rule ensures that other people’s code
can’t break your code and vice versa. Without the rule, two crates could
implement the same trait for the same type, and Rust wouldn’t know which
implementation to use.
Default Implementations
Sometimes it’s useful to have default behavior for some or all of the methods in a trait instead of requiring implementations for all methods on every type. Then, as we implement the trait on a particular type, we can keep or override each method’s default behavior.
In Listing 10-14 we specify a default string for the summarize method of the
Summary trait instead of only defining the method signature, as we did in
Listing 10-12.
Filename: src/lib.rs
pub trait Summary {
fn summarize(&self) -> String {
String::from("(Read more...)")
}
}
pub struct NewsArticle {
pub headline: String,
pub location: String,
pub author: String,
pub content: String,
}
impl Summary for NewsArticle {}
pub struct Tweet {
pub username: String,
pub content: String,
pub reply: bool,
pub retweet: bool,
}
impl Summary for Tweet {
fn summarize(&self) -> String {
format!("{}: {}", self.username, self.content)
}
}Listing 10-14: Defining a Summary trait with a default
implementation of the summarize method
To use a default implementation to summarize instances of NewsArticle, we
specify an empty impl block with impl Summary for NewsArticle {}.
Even though we’re no longer defining the summarize method on NewsArticle
directly, we’ve provided a default implementation and specified that
NewsArticle implements the Summary trait. As a result, we can still call
the summarize method on an instance of NewsArticle, like this:
use aggregator::{self, NewsArticle, Summary};
fn main() {
let article = NewsArticle {
headline: String::from("Penguins win the Stanley Cup Championship!"),
location: String::from("Pittsburgh, PA, USA"),
author: String::from("Iceburgh"),
content: String::from(
"The Pittsburgh Penguins once again are the best \
hockey team in the NHL.",
),
};
println!("New article available! {}", article.summarize());
}This code prints New article available! (Read more...).
Creating a default implementation doesn’t require us to change anything about
the implementation of Summary on Tweet in Listing 10-13. The reason is that
the syntax for overriding a default implementation is the same as the syntax
for implementing a trait method that doesn’t have a default implementation.
Default implementations can call other methods in the same trait, even if those
other methods don’t have a default implementation. In this way, a trait can
provide a lot of useful functionality and only require implementors to specify
a small part of it. For example, we could define the Summary trait to have a
summarize_author method whose implementation is required, and then define a
summarize method that has a default implementation that calls the
summarize_author method:
pub trait Summary {
fn summarize_author(&self) -> String;
fn summarize(&self) -> String {
format!("(Read more from {}...)", self.summarize_author())
}
}
pub struct Tweet {
pub username: String,
pub content: String,
pub reply: bool,
pub retweet: bool,
}
impl Summary for Tweet {
fn summarize_author(&self) -> String {
format!("@{}", self.username)
}
}To use this version of Summary, we only need to define summarize_author
when we implement the trait on a type:
pub trait Summary {
fn summarize_author(&self) -> String;
fn summarize(&self) -> String {
format!("(Read more from {}...)", self.summarize_author())
}
}
pub struct Tweet {
pub username: String,
pub content: String,
pub reply: bool,
pub retweet: bool,
}
impl Summary for Tweet {
fn summarize_author(&self) -> String {
format!("@{}", self.username)
}
}After we define summarize_author, we can call summarize on instances of the
Tweet struct, and the default implementation of summarize will call the
definition of summarize_author that we’ve provided. Because we’ve implemented
summarize_author, the Summary trait has given us the behavior of the
summarize method without requiring us to write any more code.
use aggregator::{self, Summary, Tweet};
fn main() {
let tweet = Tweet {
username: String::from("horse_ebooks"),
content: String::from(
"of course, as you probably already know, people",
),
reply: false,
retweet: false,
};
println!("1 new tweet: {}", tweet.summarize());
}This code prints 1 new tweet: (Read more from @horse_ebooks...).
Note that it isn’t possible to call the default implementation from an overriding implementation of that same method.
Traits as Parameters
Now that you know how to define and implement traits, we can explore how to use
traits to define functions that accept many different types. We'll use the
Summary trait we implemented on the NewsArticle and Tweet types in
Listing 10-13 to define a notify function that calls the summarize method
on its item parameter, which is of some type that implements the Summary
trait. To do this, we use the impl Trait syntax, like this:
pub trait Summary {
fn summarize(&self) -> String;
}
pub struct NewsArticle {
pub headline: String,
pub location: String,
pub author: String,
pub content: String,
}
impl Summary for NewsArticle {
fn summarize(&self) -> String {
format!("{}, by {} ({})", self.headline, self.author, self.location)
}
}
pub struct Tweet {
pub username: String,
pub content: String,
pub reply: bool,
pub retweet: bool,
}
impl Summary for Tweet {
fn summarize(&self) -> String {
format!("{}: {}", self.username, self.content)
}
}
pub fn notify(item: &impl Summary) {
println!("Breaking news! {}", item.summarize());
}Instead of a concrete type for the item parameter, we specify the impl
keyword and the trait name. This parameter accepts any type that implements the
specified trait. In the body of notify, we can call any methods on item
that come from the Summary trait, such as summarize. We can call notify
and pass in any instance of NewsArticle or Tweet. Code that calls the
function with any other type, such as a String or an i32, won’t compile
because those types don’t implement Summary.
Trait Bound Syntax
The impl Trait syntax works for straightforward cases but is actually syntax
sugar for a longer form known as a trait bound; it looks like this:
pub fn notify<T: Summary>(item: &T) {
println!("Breaking news! {}", item.summarize());
}This longer form is equivalent to the example in the previous section but is more verbose. We place trait bounds with the declaration of the generic type parameter after a colon and inside angle brackets.
The impl Trait syntax is convenient and makes for more concise code in simple
cases, while the fuller trait bound syntax can express more complexity in other
cases. For example, we can have two parameters that implement Summary. Doing
so with the impl Trait syntax looks like this:
pub fn notify(item1: &impl Summary, item2: &impl Summary) {Using impl Trait is appropriate if we want this function to allow item1 and
item2 to have different types (as long as both types implement Summary). If
we want to force both parameters to have the same type, however, we must use a
trait bound, like this:
pub fn notify<T: Summary>(item1: &T, item2: &T) {The generic type T specified as the type of the item1 and item2
parameters constrains the function such that the concrete type of the value
passed as an argument for item1 and item2 must be the same.
Specifying Multiple Trait Bounds with the + Syntax
We can also specify more than one trait bound. Say we wanted notify to use
display formatting as well as summarize on item: we specify in the notify
definition that item must implement both Display and Summary. We can do
so using the + syntax:
pub fn notify(item: &(impl Summary + Display)) {The + syntax is also valid with trait bounds on generic types:
pub fn notify<T: Summary + Display>(item: &T) {With the two trait bounds specified, the body of notify can call summarize
and use {} to format item.
Clearer Trait Bounds with where Clauses
Using too many trait bounds has its downsides. Each generic has its own trait
bounds, so functions with multiple generic type parameters can contain lots of
trait bound information between the function’s name and its parameter list,
making the function signature hard to read. For this reason, Rust has alternate
syntax for specifying trait bounds inside a where clause after the function
signature. So instead of writing this:
fn some_function<T: Display + Clone, U: Clone + Debug>(t: &T, u: &U) -> i32 {we can use a where clause, like this:
fn some_function<T, U>(t: &T, u: &U) -> i32
where
T: Display + Clone,
U: Clone + Debug,
{
unimplemented!()
}This function’s signature is less cluttered: the function name, parameter list, and return type are close together, similar to a function without lots of trait bounds.
Returning Types that Implement Traits
We can also use the impl Trait syntax in the return position to return a
value of some type that implements a trait, as shown here:
pub trait Summary {
fn summarize(&self) -> String;
}
pub struct NewsArticle {
pub headline: String,
pub location: String,
pub author: String,
pub content: String,
}
impl Summary for NewsArticle {
fn summarize(&self) -> String {
format!("{}, by {} ({})", self.headline, self.author, self.location)
}
}
pub struct Tweet {
pub username: String,
pub content: String,
pub reply: bool,
pub retweet: bool,
}
impl Summary for Tweet {
fn summarize(&self) -> String {
format!("{}: {}", self.username, self.content)
}
}
fn returns_summarizable() -> impl Summary {
Tweet {
username: String::from("horse_ebooks"),
content: String::from(
"of course, as you probably already know, people",
),
reply: false,
retweet: false,
}
}By using impl Summary for the return type, we specify that the
returns_summarizable function returns some type that implements the Summary
trait without naming the concrete type. In this case, returns_summarizable
returns a Tweet, but the code calling this function doesn’t need to know that.
The ability to specify a return type only by the trait it implements is
especially useful in the context of closures and iterators, which we cover in
Chapter 13. Closures and iterators create types that only the compiler knows or
types that are very long to specify. The impl Trait syntax lets you concisely
specify that a function returns some type that implements the Iterator trait
without needing to write out a very long type.
However, you can only use impl Trait if you’re returning a single type. For
example, this code that returns either a NewsArticle or a Tweet with the
return type specified as impl Summary wouldn’t work:
pub trait Summary {
fn summarize(&self) -> String;
}
pub struct NewsArticle {
pub headline: String,
pub location: String,
pub author: String,
pub content: String,
}
impl Summary for NewsArticle {
fn summarize(&self) -> String {
format!("{}, by {} ({})", self.headline, self.author, self.location)
}
}
pub struct Tweet {
pub username: String,
pub content: String,
pub reply: bool,
pub retweet: bool,
}
impl Summary for Tweet {
fn summarize(&self) -> String {
format!("{}: {}", self.username, self.content)
}
}
fn returns_summarizable(switch: bool) -> impl Summary {
if switch {
NewsArticle {
headline: String::from(
"Penguins win the Stanley Cup Championship!",
),
location: String::from("Pittsburgh, PA, USA"),
author: String::from("Iceburgh"),
content: String::from(
"The Pittsburgh Penguins once again are the best \
hockey team in the NHL.",
),
}
} else {
Tweet {
username: String::from("horse_ebooks"),
content: String::from(
"of course, as you probably already know, people",
),
reply: false,
retweet: false,
}
}
}Returning either a NewsArticle or a Tweet isn’t allowed due to restrictions
around how the impl Trait syntax is implemented in the compiler. We’ll cover
how to write a function with this behavior in the “Using Trait Objects That
Allow for Values of Different
Types” section of Chapter 17.
Using Trait Bounds to Conditionally Implement Methods
By using a trait bound with an impl block that uses generic type parameters,
we can implement methods conditionally for types that implement the specified
traits. For example, the type Pair<T> in Listing 10-15 always implements the
new function to return a new instance of Pair<T> (recall from the
“Defining Methods” section of Chapter 5 that Self
is a type alias for the type of the impl block, which in this case is
Pair<T>). But in the next impl block, Pair<T> only implements the
cmp_display method if its inner type T implements the PartialOrd trait
that enables comparison and the Display trait that enables printing.
Filename: src/lib.rs
use std::fmt::Display;
struct Pair<T> {
x: T,
y: T,
}
impl<T> Pair<T> {
fn new(x: T, y: T) -> Self {
Self { x, y }
}
}
impl<T: Display + PartialOrd> Pair<T> {
fn cmp_display(&self) {
if self.x >= self.y {
println!("The largest member is x = {}", self.x);
} else {
println!("The largest member is y = {}", self.y);
}
}
}Listing 10-15: Conditionally implementing methods on a generic type depending on trait bounds
We can also conditionally implement a trait for any type that implements
another trait. Implementations of a trait on any type that satisfies the trait
bounds are called blanket implementations and are extensively used in the
Rust standard library. For example, the standard library implements the
ToString trait on any type that implements the Display trait. The impl
block in the standard library looks similar to this code:
impl<T: Display> ToString for T {
// --snip--
}Because the standard library has this blanket implementation, we can call the
to_string method defined by the ToString trait on any type that implements
the Display trait. For example, we can turn integers into their corresponding
String values like this because integers implement Display:
#![allow(unused)] fn main() { let s = 3.to_string(); }
Blanket implementations appear in the documentation for the trait in the “Implementors” section.
Traits and trait bounds let us write code that uses generic type parameters to reduce duplication but also specify to the compiler that we want the generic type to have particular behavior. The compiler can then use the trait bound information to check that all the concrete types used with our code provide the correct behavior. In dynamically typed languages, we would get an error at runtime if we called a method on a type which didn’t define the method. But Rust moves these errors to compile time so we’re forced to fix the problems before our code is even able to run. Additionally, we don’t have to write code that checks for behavior at runtime because we’ve already checked at compile time. Doing so improves performance without having to give up the flexibility of generics.
Validating References with Lifetimes
Lifetimes are another kind of generic that we’ve already been using. Rather than ensuring that a type has the behavior we want, lifetimes ensure that references are valid as long as we need them to be.
One detail we didn’t discuss in the “References and Borrowing” section in Chapter 4 is that every reference in Rust has a lifetime, which is the scope for which that reference is valid. Most of the time, lifetimes are implicit and inferred, just like most of the time, types are inferred. We only must annotate types when multiple types are possible. In a similar way, we must annotate lifetimes when the lifetimes of references could be related in a few different ways. Rust requires us to annotate the relationships using generic lifetime parameters to ensure the actual references used at runtime will definitely be valid.
Annotating lifetimes is not even a concept most other programming languages have, so this is going to feel unfamiliar. Although we won’t cover lifetimes in their entirety in this chapter, we’ll discuss common ways you might encounter lifetime syntax so you can get comfortable with the concept.
Preventing Dangling References with Lifetimes
The main aim of lifetimes is to prevent dangling references, which cause a program to reference data other than the data it’s intended to reference. Consider the program in Listing 10-16, which has an outer scope and an inner scope.
fn main() {
let r;
{
let x = 5;
r = &x;
}
println!("r: {}", r);
}Listing 10-16: An attempt to use a reference whose value has gone out of scope
Note: The examples in Listings 10-16, 10-17, and 10-23 declare variables without giving them an initial value, so the variable name exists in the outer scope. At first glance, this might appear to be in conflict with Rust’s having no null values. However, if we try to use a variable before giving it a value, we’ll get a compile-time error, which shows that Rust indeed does not allow null values.
The outer scope declares a variable named r with no initial value, and the
inner scope declares a variable named x with the initial value of 5. Inside
the inner scope, we attempt to set the value of r as a reference to x. Then
the inner scope ends, and we attempt to print the value in r. This code won’t
compile because the value r is referring to has gone out of scope before we
try to use it. Here is the error message:
$ cargo run
Compiling chapter10 v0.1.0 (file:///projects/chapter10)
error[E0597]: `x` does not live long enough
--> src/main.rs:6:13
|
6 | r = &x;
| ^^ borrowed value does not live long enough
7 | }
| - `x` dropped here while still borrowed
8 |
9 | println!("r: {}", r);
| - borrow later used here
For more information about this error, try `rustc --explain E0597`.
error: could not compile `chapter10` due to previous error
The variable x doesn’t “live long enough.” The reason is that x will be out
of scope when the inner scope ends on line 7. But r is still valid for the
outer scope; because its scope is larger, we say that it “lives longer.” If
Rust allowed this code to work, r would be referencing memory that was
deallocated when x went out of scope, and anything we tried to do with r
wouldn’t work correctly. So how does Rust determine that this code is invalid?
It uses a borrow checker.
The Borrow Checker
The Rust compiler has a borrow checker that compares scopes to determine whether all borrows are valid. Listing 10-17 shows the same code as Listing 10-16 but with annotations showing the lifetimes of the variables.
fn main() {
let r; // ---------+-- 'a
// |
{ // |
let x = 5; // -+-- 'b |
r = &x; // | |
} // -+ |
// |
println!("r: {}", r); // |
} // ---------+Listing 10-17: Annotations of the lifetimes of r and
x, named 'a and 'b, respectively
Here, we’ve annotated the lifetime of r with 'a and the lifetime of x
with 'b. As you can see, the inner 'b block is much smaller than the outer
'a lifetime block. At compile time, Rust compares the size of the two
lifetimes and sees that r has a lifetime of 'a but that it refers to memory
with a lifetime of 'b. The program is rejected because 'b is shorter than
'a: the subject of the reference doesn’t live as long as the reference.
Listing 10-18 fixes the code so it doesn’t have a dangling reference and compiles without any errors.
fn main() { let x = 5; // ----------+-- 'b // | let r = &x; // --+-- 'a | // | | println!("r: {}", r); // | | // --+ | } // ----------+
Listing 10-18: A valid reference because the data has a longer lifetime than the reference
Here, x has the lifetime 'b, which in this case is larger than 'a. This
means r can reference x because Rust knows that the reference in r will
always be valid while x is valid.
Now that you know where the lifetimes of references are and how Rust analyzes lifetimes to ensure references will always be valid, let’s explore generic lifetimes of parameters and return values in the context of functions.
Generic Lifetimes in Functions
We’ll write a function that returns the longer of two string slices. This
function will take two string slices and return a single string slice. After
we’ve implemented the longest function, the code in Listing 10-19 should
print The longest string is abcd.
Filename: src/main.rs
fn main() {
let string1 = String::from("abcd");
let string2 = "xyz";
let result = longest(string1.as_str(), string2);
println!("The longest string is {}", result);
}Listing 10-19: A main function that calls the longest
function to find the longer of two string slices
Note that we want the function to take string slices, which are references,
rather than strings, because we don’t want the longest function to take
ownership of its parameters. Refer to the “String Slices as
Parameters” section in Chapter 4
for more discussion about why the parameters we use in Listing 10-19 are the
ones we want.
If we try to implement the longest function as shown in Listing 10-20, it
won’t compile.
Filename: src/main.rs
fn main() {
let string1 = String::from("abcd");
let string2 = "xyz";
let result = longest(string1.as_str(), string2);
println!("The longest string is {}", result);
}
fn longest(x: &str, y: &str) -> &str {
if x.len() > y.len() {
x
} else {
y
}
}Listing 10-20: An implementation of the longest
function that returns the longer of two string slices but does not yet
compile
Instead, we get the following error that talks about lifetimes:
$ cargo run
Compiling chapter10 v0.1.0 (file:///projects/chapter10)
error[E0106]: missing lifetime specifier
--> src/main.rs:9:33
|
9 | fn longest(x: &str, y: &str) -> &str {
| ---- ---- ^ expected named lifetime parameter
|
= help: this function's return type contains a borrowed value, but the signature does not say whether it is borrowed from `x` or `y`
help: consider introducing a named lifetime parameter
|
9 | fn longest<'a>(x: &'a str, y: &'a str) -> &'a str {
| ++++ ++ ++ ++
For more information about this error, try `rustc --explain E0106`.
error: could not compile `chapter10` due to previous error
The help text reveals that the return type needs a generic lifetime parameter
on it because Rust can’t tell whether the reference being returned refers to
x or y. Actually, we don’t know either, because the if block in the body
of this function returns a reference to x and the else block returns a
reference to y!
When we’re defining this function, we don’t know the concrete values that will
be passed into this function, so we don’t know whether the if case or the
else case will execute. We also don’t know the concrete lifetimes of the
references that will be passed in, so we can’t look at the scopes as we did in
Listings 10-17 and 10-18 to determine whether the reference we return will
always be valid. The borrow checker can’t determine this either, because it
doesn’t know how the lifetimes of x and y relate to the lifetime of the
return value. To fix this error, we’ll add generic lifetime parameters that
define the relationship between the references so the borrow checker can
perform its analysis.
Lifetime Annotation Syntax
Lifetime annotations don’t change how long any of the references live. Rather, they describe the relationships of the lifetimes of multiple references to each other without affecting the lifetimes. Just as functions can accept any type when the signature specifies a generic type parameter, functions can accept references with any lifetime by specifying a generic lifetime parameter.
Lifetime annotations have a slightly unusual syntax: the names of lifetime
parameters must start with an apostrophe (') and are usually all lowercase
and very short, like generic types. Most people use the name 'a for the first
lifetime annotation. We place lifetime parameter annotations after the & of a
reference, using a space to separate the annotation from the reference’s type.
Here are some examples: a reference to an i32 without a lifetime parameter, a
reference to an i32 that has a lifetime parameter named 'a, and a mutable
reference to an i32 that also has the lifetime 'a.
&i32 // a reference
&'a i32 // a reference with an explicit lifetime
&'a mut i32 // a mutable reference with an explicit lifetimeOne lifetime annotation by itself doesn’t have much meaning, because the
annotations are meant to tell Rust how generic lifetime parameters of multiple
references relate to each other. Let’s examine how the lifetime annotations
relate to each other in the context of the longest function.
Lifetime Annotations in Function Signatures
To use lifetime annotations in function signatures, we need to declare the generic lifetime parameters inside angle brackets between the function name and the parameter list, just as we did with generic type parameters.
We want the signature to express the following constraint: the returned
reference will be valid as long as both the parameters are valid. This is the
relationship between lifetimes of the parameters and the return value. We’ll
name the lifetime 'a and then add it to each reference, as shown in Listing
10-21.
Filename: src/main.rs
fn main() { let string1 = String::from("abcd"); let string2 = "xyz"; let result = longest(string1.as_str(), string2); println!("The longest string is {}", result); } fn longest<'a>(x: &'a str, y: &'a str) -> &'a str { if x.len() > y.len() { x } else { y } }
Listing 10-21: The longest function definition
specifying that all the references in the signature must have the same lifetime
'a
This code should compile and produce the result we want when we use it with the
main function in Listing 10-19.
The function signature now tells Rust that for some lifetime 'a, the function
takes two parameters, both of which are string slices that live at least as
long as lifetime 'a. The function signature also tells Rust that the string
slice returned from the function will live at least as long as lifetime 'a.
In practice, it means that the lifetime of the reference returned by the
longest function is the same as the smaller of the lifetimes of the values
referred to by the function arguments. These relationships are what we want
Rust to use when analyzing this code.
Remember, when we specify the lifetime parameters in this function signature,
we’re not changing the lifetimes of any values passed in or returned. Rather,
we’re specifying that the borrow checker should reject any values that don’t
adhere to these constraints. Note that the longest function doesn’t need to
know exactly how long x and y will live, only that some scope can be
substituted for 'a that will satisfy this signature.
When annotating lifetimes in functions, the annotations go in the function signature, not in the function body. The lifetime annotations become part of the contract of the function, much like the types in the signature. Having function signatures contain the lifetime contract means the analysis the Rust compiler does can be simpler. If there’s a problem with the way a function is annotated or the way it is called, the compiler errors can point to the part of our code and the constraints more precisely. If, instead, the Rust compiler made more inferences about what we intended the relationships of the lifetimes to be, the compiler might only be able to point to a use of our code many steps away from the cause of the problem.
When we pass concrete references to longest, the concrete lifetime that is
substituted for 'a is the part of the scope of x that overlaps with the
scope of y. In other words, the generic lifetime 'a will get the concrete
lifetime that is equal to the smaller of the lifetimes of x and y. Because
we’ve annotated the returned reference with the same lifetime parameter 'a,
the returned reference will also be valid for the length of the smaller of the
lifetimes of x and y.
Let’s look at how the lifetime annotations restrict the longest function by
passing in references that have different concrete lifetimes. Listing 10-22 is
a straightforward example.
Filename: src/main.rs
fn main() { let string1 = String::from("long string is long"); { let string2 = String::from("xyz"); let result = longest(string1.as_str(), string2.as_str()); println!("The longest string is {}", result); } } fn longest<'a>(x: &'a str, y: &'a str) -> &'a str { if x.len() > y.len() { x } else { y } }
Listing 10-22: Using the longest function with
references to String values that have different concrete lifetimes
In this example, string1 is valid until the end of the outer scope, string2
is valid until the end of the inner scope, and result references something
that is valid until the end of the inner scope. Run this code, and you’ll see
that the borrow checker approves; it will compile and print The longest string is long string is long.
Next, let’s try an example that shows that the lifetime of the reference in
result must be the smaller lifetime of the two arguments. We’ll move the
declaration of the result variable outside the inner scope but leave the
assignment of the value to the result variable inside the scope with
string2. Then we’ll move the println! that uses result to outside the
inner scope, after the inner scope has ended. The code in Listing 10-23 will
not compile.
Filename: src/main.rs
fn main() {
let string1 = String::from("long string is long");
let result;
{
let string2 = String::from("xyz");
result = longest(string1.as_str(), string2.as_str());
}
println!("The longest string is {}", result);
}
fn longest<'a>(x: &'a str, y: &'a str) -> &'a str {
if x.len() > y.len() {
x
} else {
y
}
}Listing 10-23: Attempting to use result after string2
has gone out of scope
When we try to compile this code, we get this error:
$ cargo run
Compiling chapter10 v0.1.0 (file:///projects/chapter10)
error[E0597]: `string2` does not live long enough
--> src/main.rs:6:44
|
6 | result = longest(string1.as_str(), string2.as_str());
| ^^^^^^^^^^^^^^^^ borrowed value does not live long enough
7 | }
| - `string2` dropped here while still borrowed
8 | println!("The longest string is {}", result);
| ------ borrow later used here
For more information about this error, try `rustc --explain E0597`.
error: could not compile `chapter10` due to previous error
The error shows that for result to be valid for the println! statement,
string2 would need to be valid until the end of the outer scope. Rust knows
this because we annotated the lifetimes of the function parameters and return
values using the same lifetime parameter 'a.
As humans, we can look at this code and see that string1 is longer than
string2 and therefore result will contain a reference to string1.
Because string1 has not gone out of scope yet, a reference to string1 will
still be valid for the println! statement. However, the compiler can’t see
that the reference is valid in this case. We’ve told Rust that the lifetime of
the reference returned by the longest function is the same as the smaller of
the lifetimes of the references passed in. Therefore, the borrow checker
disallows the code in Listing 10-23 as possibly having an invalid reference.
Try designing more experiments that vary the values and lifetimes of the
references passed in to the longest function and how the returned reference
is used. Make hypotheses about whether or not your experiments will pass the
borrow checker before you compile; then check to see if you’re right!
Thinking in Terms of Lifetimes
The way in which you need to specify lifetime parameters depends on what your
function is doing. For example, if we changed the implementation of the
longest function to always return the first parameter rather than the longest
string slice, we wouldn’t need to specify a lifetime on the y parameter. The
following code will compile:
Filename: src/main.rs
fn main() { let string1 = String::from("abcd"); let string2 = "efghijklmnopqrstuvwxyz"; let result = longest(string1.as_str(), string2); println!("The longest string is {}", result); } fn longest<'a>(x: &'a str, y: &str) -> &'a str { x }
We’ve specified a lifetime parameter 'a for the parameter x and the return
type, but not for the parameter y, because the lifetime of y does not have
any relationship with the lifetime of x or the return value.
When returning a reference from a function, the lifetime parameter for the
return type needs to match the lifetime parameter for one of the parameters. If
the reference returned does not refer to one of the parameters, it must refer
to a value created within this function. However, this would be a dangling
reference because the value will go out of scope at the end of the function.
Consider this attempted implementation of the longest function that won’t
compile:
Filename: src/main.rs
fn main() {
let string1 = String::from("abcd");
let string2 = "xyz";
let result = longest(string1.as_str(), string2);
println!("The longest string is {}", result);
}
fn longest<'a>(x: &str, y: &str) -> &'a str {
let result = String::from("really long string");
result.as_str()
}Here, even though we’ve specified a lifetime parameter 'a for the return
type, this implementation will fail to compile because the return value
lifetime is not related to the lifetime of the parameters at all. Here is the
error message we get:
$ cargo run
Compiling chapter10 v0.1.0 (file:///projects/chapter10)
error[E0515]: cannot return reference to local variable `result`
--> src/main.rs:11:5
|
11 | result.as_str()
| ^^^^^^^^^^^^^^^ returns a reference to data owned by the current function
For more information about this error, try `rustc --explain E0515`.
error: could not compile `chapter10` due to previous error
The problem is that result goes out of scope and gets cleaned up at the end
of the longest function. We’re also trying to return a reference to result
from the function. There is no way we can specify lifetime parameters that
would change the dangling reference, and Rust won’t let us create a dangling
reference. In this case, the best fix would be to return an owned data type
rather than a reference so the calling function is then responsible for
cleaning up the value.
Ultimately, lifetime syntax is about connecting the lifetimes of various parameters and return values of functions. Once they’re connected, Rust has enough information to allow memory-safe operations and disallow operations that would create dangling pointers or otherwise violate memory safety.
Lifetime Annotations in Struct Definitions
So far, the structs we’ve defined all hold owned types. We can define structs to
hold references, but in that case we would need to add a lifetime annotation on
every reference in the struct’s definition. Listing 10-24 has a struct named
ImportantExcerpt that holds a string slice.
Filename: src/main.rs
struct ImportantExcerpt<'a> { part: &'a str, } fn main() { let novel = String::from("Call me Ishmael. Some years ago..."); let first_sentence = novel.split('.').next().expect("Could not find a '.'"); let i = ImportantExcerpt { part: first_sentence, }; }
Listing 10-24: A struct that holds a reference, requiring a lifetime annotation
This struct has the single field part that holds a string slice, which is a
reference. As with generic data types, we declare the name of the generic
lifetime parameter inside angle brackets after the name of the struct so we can
use the lifetime parameter in the body of the struct definition. This
annotation means an instance of ImportantExcerpt can’t outlive the reference
it holds in its part field.
The main function here creates an instance of the ImportantExcerpt struct
that holds a reference to the first sentence of the String owned by the
variable novel. The data in novel exists before the ImportantExcerpt
instance is created. In addition, novel doesn’t go out of scope until after
the ImportantExcerpt goes out of scope, so the reference in the
ImportantExcerpt instance is valid.
Lifetime Elision
You’ve learned that every reference has a lifetime and that you need to specify lifetime parameters for functions or structs that use references. However, in Chapter 4 we had a function in Listing 4-9, shown again in Listing 10-25, that compiled without lifetime annotations.
Filename: src/lib.rs
fn first_word(s: &str) -> &str { let bytes = s.as_bytes(); for (i, &item) in bytes.iter().enumerate() { if item == b' ' { return &s[0..i]; } } &s[..] } fn main() { let my_string = String::from("hello world"); // first_word works on slices of `String`s let word = first_word(&my_string[..]); let my_string_literal = "hello world"; // first_word works on slices of string literals let word = first_word(&my_string_literal[..]); // Because string literals *are* string slices already, // this works too, without the slice syntax! let word = first_word(my_string_literal); }
Listing 10-25: A function we defined in Listing 4-9 that compiled without lifetime annotations, even though the parameter and return type are references
The reason this function compiles without lifetime annotations is historical: in early versions (pre-1.0) of Rust, this code wouldn’t have compiled because every reference needed an explicit lifetime. At that time, the function signature would have been written like this:
fn first_word<'a>(s: &'a str) -> &'a str {After writing a lot of Rust code, the Rust team found that Rust programmers were entering the same lifetime annotations over and over in particular situations. These situations were predictable and followed a few deterministic patterns. The developers programmed these patterns into the compiler’s code so the borrow checker could infer the lifetimes in these situations and wouldn’t need explicit annotations.
This piece of Rust history is relevant because it’s possible that more deterministic patterns will emerge and be added to the compiler. In the future, even fewer lifetime annotations might be required.
The patterns programmed into Rust’s analysis of references are called the lifetime elision rules. These aren’t rules for programmers to follow; they’re a set of particular cases that the compiler will consider, and if your code fits these cases, you don’t need to write the lifetimes explicitly.
The elision rules don’t provide full inference. If Rust deterministically applies the rules but there is still ambiguity as to what lifetimes the references have, the compiler won’t guess what the lifetime of the remaining references should be. Instead of guessing, the compiler will give you an error that you can resolve by adding the lifetime annotations.
Lifetimes on function or method parameters are called input lifetimes, and lifetimes on return values are called output lifetimes.
The compiler uses three rules to figure out the lifetimes of the references
when there aren’t explicit annotations. The first rule applies to input
lifetimes, and the second and third rules apply to output lifetimes. If the
compiler gets to the end of the three rules and there are still references for
which it can’t figure out lifetimes, the compiler will stop with an error.
These rules apply to fn definitions as well as impl blocks.
The first rule is that the compiler assigns a lifetime parameter to each
parameter that’s a reference. In other words, a function with one parameter gets
one lifetime parameter: fn foo<'a>(x: &'a i32); a function with two
parameters gets two separate lifetime parameters: fn foo<'a, 'b>(x: &'a i32, y: &'b i32); and so on.
The second rule is that, if there is exactly one input lifetime parameter, that
lifetime is assigned to all output lifetime parameters: fn foo<'a>(x: &'a i32) -> &'a i32.
The third rule is that, if there are multiple input lifetime parameters, but
one of them is &self or &mut self because this is a method, the lifetime of
self is assigned to all output lifetime parameters. This third rule makes
methods much nicer to read and write because fewer symbols are necessary.
Let’s pretend we’re the compiler. We’ll apply these rules to figure out the
lifetimes of the references in the signature of the first_word function in
Listing 10-25. The signature starts without any lifetimes associated with the
references:
fn first_word(s: &str) -> &str {Then the compiler applies the first rule, which specifies that each parameter
gets its own lifetime. We’ll call it 'a as usual, so now the signature is
this:
fn first_word<'a>(s: &'a str) -> &str {The second rule applies because there is exactly one input lifetime. The second rule specifies that the lifetime of the one input parameter gets assigned to the output lifetime, so the signature is now this:
fn first_word<'a>(s: &'a str) -> &'a str {Now all the references in this function signature have lifetimes, and the compiler can continue its analysis without needing the programmer to annotate the lifetimes in this function signature.
Let’s look at another example, this time using the longest function that had
no lifetime parameters when we started working with it in Listing 10-20:
fn longest(x: &str, y: &str) -> &str {Let’s apply the first rule: each parameter gets its own lifetime. This time we have two parameters instead of one, so we have two lifetimes:
fn longest<'a, 'b>(x: &'a str, y: &'b str) -> &str {You can see that the second rule doesn’t apply because there is more than one
input lifetime. The third rule doesn’t apply either, because longest is a
function rather than a method, so none of the parameters are self. After
working through all three rules, we still haven’t figured out what the return
type’s lifetime is. This is why we got an error trying to compile the code in
Listing 10-20: the compiler worked through the lifetime elision rules but still
couldn’t figure out all the lifetimes of the references in the signature.
Because the third rule really only applies in method signatures, we’ll look at lifetimes in that context next to see why the third rule means we don’t have to annotate lifetimes in method signatures very often.
Lifetime Annotations in Method Definitions
When we implement methods on a struct with lifetimes, we use the same syntax as that of generic type parameters shown in Listing 10-11. Where we declare and use the lifetime parameters depends on whether they’re related to the struct fields or the method parameters and return values.
Lifetime names for struct fields always need to be declared after the impl
keyword and then used after the struct’s name, because those lifetimes are part
of the struct’s type.
In method signatures inside the impl block, references might be tied to the
lifetime of references in the struct’s fields, or they might be independent. In
addition, the lifetime elision rules often make it so that lifetime annotations
aren’t necessary in method signatures. Let’s look at some examples using the
struct named ImportantExcerpt that we defined in Listing 10-24.
First, we’ll use a method named level whose only parameter is a reference to
self and whose return value is an i32, which is not a reference to anything:
struct ImportantExcerpt<'a> { part: &'a str, } impl<'a> ImportantExcerpt<'a> { fn level(&self) -> i32 { 3 } } impl<'a> ImportantExcerpt<'a> { fn announce_and_return_part(&self, announcement: &str) -> &str { println!("Attention please: {}", announcement); self.part } } fn main() { let novel = String::from("Call me Ishmael. Some years ago..."); let first_sentence = novel.split('.').next().expect("Could not find a '.'"); let i = ImportantExcerpt { part: first_sentence, }; }
The lifetime parameter declaration after impl and its use after the type name
are required, but we’re not required to annotate the lifetime of the reference
to self because of the first elision rule.
Here is an example where the third lifetime elision rule applies:
struct ImportantExcerpt<'a> { part: &'a str, } impl<'a> ImportantExcerpt<'a> { fn level(&self) -> i32 { 3 } } impl<'a> ImportantExcerpt<'a> { fn announce_and_return_part(&self, announcement: &str) -> &str { println!("Attention please: {}", announcement); self.part } } fn main() { let novel = String::from("Call me Ishmael. Some years ago..."); let first_sentence = novel.split('.').next().expect("Could not find a '.'"); let i = ImportantExcerpt { part: first_sentence, }; }
There are two input lifetimes, so Rust applies the first lifetime elision rule
and gives both &self and announcement their own lifetimes. Then, because
one of the parameters is &self, the return type gets the lifetime of &self,
and all lifetimes have been accounted for.
The Static Lifetime
One special lifetime we need to discuss is 'static, which denotes that the
affected reference can live for the entire duration of the program. All
string literals have the 'static lifetime, which we can annotate as follows:
#![allow(unused)] fn main() { let s: &'static str = "I have a static lifetime."; }
The text of this string is stored directly in the program’s binary, which
is always available. Therefore, the lifetime of all string literals is
'static.
You might see suggestions to use the 'static lifetime in error messages. But
before specifying 'static as the lifetime for a reference, think about
whether the reference you have actually lives the entire lifetime of your
program or not, and whether you want it to. Most of the time, an error message
suggesting the 'static lifetime results from attempting to create a dangling
reference or a mismatch of the available lifetimes. In such cases, the solution
is fixing those problems, not specifying the 'static lifetime.
Generic Type Parameters, Trait Bounds, and Lifetimes Together
Let’s briefly look at the syntax of specifying generic type parameters, trait bounds, and lifetimes all in one function!
fn main() { let string1 = String::from("abcd"); let string2 = "xyz"; let result = longest_with_an_announcement( string1.as_str(), string2, "Today is someone's birthday!", ); println!("The longest string is {}", result); } use std::fmt::Display; fn longest_with_an_announcement<'a, T>( x: &'a str, y: &'a str, ann: T, ) -> &'a str where T: Display, { println!("Announcement! {}", ann); if x.len() > y.len() { x } else { y } }
This is the longest function from Listing 10-21 that returns the longer of
two string slices. But now it has an extra parameter named ann of the generic
type T, which can be filled in by any type that implements the Display
trait as specified by the where clause. This extra parameter will be printed
using {}, which is why the Display trait bound is necessary. Because
lifetimes are a type of generic, the declarations of the lifetime parameter
'a and the generic type parameter T go in the same list inside the angle
brackets after the function name.
Summary
We covered a lot in this chapter! Now that you know about generic type parameters, traits and trait bounds, and generic lifetime parameters, you’re ready to write code without repetition that works in many different situations. Generic type parameters let you apply the code to different types. Traits and trait bounds ensure that even though the types are generic, they’ll have the behavior the code needs. You learned how to use lifetime annotations to ensure that this flexible code won’t have any dangling references. And all of this analysis happens at compile time, which doesn’t affect runtime performance!
Believe it or not, there is much more to learn on the topics we discussed in this chapter: Chapter 17 discusses trait objects, which are another way to use traits. There are also more complex scenarios involving lifetime annotations that you will only need in very advanced scenarios; for those, you should read the Rust Reference. But next, you’ll learn how to write tests in Rust so you can make sure your code is working the way it should.
Writing Automated Tests
In his 1972 essay “The Humble Programmer,” Edsger W. Dijkstra said that “Program testing can be a very effective way to show the presence of bugs, but it is hopelessly inadequate for showing their absence.” That doesn’t mean we shouldn’t try to test as much as we can!
Correctness in our programs is the extent to which our code does what we intend it to do. Rust is designed with a high degree of concern about the correctness of programs, but correctness is complex and not easy to prove. Rust’s type system shoulders a huge part of this burden, but the type system cannot catch everything. As such, Rust includes support for writing automated software tests.
Say we write a function add_two that adds 2 to whatever number is passed to
it. This function’s signature accepts an integer as a parameter and returns an
integer as a result. When we implement and compile that function, Rust does all
the type checking and borrow checking that you’ve learned so far to ensure
that, for instance, we aren’t passing a String value or an invalid reference
to this function. But Rust can’t check that this function will do precisely
what we intend, which is return the parameter plus 2 rather than, say, the
parameter plus 10 or the parameter minus 50! That’s where tests come in.
We can write tests that assert, for example, that when we pass 3 to the
add_two function, the returned value is 5. We can run these tests whenever
we make changes to our code to make sure any existing correct behavior has not
changed.
Testing is a complex skill: although we can’t cover every detail about how to write good tests in one chapter, we’ll discuss the mechanics of Rust’s testing facilities. We’ll talk about the annotations and macros available to you when writing your tests, the default behavior and options provided for running your tests, and how to organize tests into unit tests and integration tests.
How to Write Tests
Tests are Rust functions that verify that the non-test code is functioning in the expected manner. The bodies of test functions typically perform these three actions:
- Set up any needed data or state.
- Run the code you want to test.
- Assert the results are what you expect.
Let’s look at the features Rust provides specifically for writing tests that
take these actions, which include the test attribute, a few macros, and the
should_panic attribute.
The Anatomy of a Test Function
At its simplest, a test in Rust is a function that’s annotated with the test
attribute. Attributes are metadata about pieces of Rust code; one example is
the derive attribute we used with structs in Chapter 5. To change a function
into a test function, add #[test] on the line before fn. When you run your
tests with the cargo test command, Rust builds a test runner binary that runs
the annotated functions and reports on whether each
test function passes or fails.
Whenever we make a new library project with Cargo, a test module with a test function in it is automatically generated for us. This module gives you a template for writing your tests so you don’t have to look up the exact structure and syntax every time you start a new project. You can add as many additional test functions and as many test modules as you want!
We’ll explore some aspects of how tests work by experimenting with the template test before we actually test any code. Then we’ll write some real-world tests that call some code that we’ve written and assert that its behavior is correct.
Let’s create a new library project called adder that will add two numbers:
$ cargo new adder --lib
Created library `adder` project
$ cd adder
The contents of the src/lib.rs file in your adder library should look like
Listing 11-1.
Filename: src/lib.rs
#[cfg(test)]
mod tests {
#[test]
fn it_works() {
let result = 2 + 2;
assert_eq!(result, 4);
}
}Listing 11-1: The test module and function generated
automatically by cargo new
For now, let’s ignore the top two lines and focus on the function. Note the
#[test] annotation: this attribute indicates this is a test function, so the
test runner knows to treat this function as a test. We might also have non-test
functions in the tests module to help set up common scenarios or perform
common operations, so we always need to indicate which functions are tests.
The example function body uses the assert_eq! macro to assert that result,
which contains the result of adding 2 and 2, equals 4. This assertion serves as
an example of the format for a typical test. Let’s run it to see that this test
passes.
The cargo test command runs all tests in our project, as shown in Listing
11-2.
$ cargo test
Compiling adder v0.1.0 (file:///projects/adder)
Finished test [unoptimized + debuginfo] target(s) in 0.57s
Running unittests src/lib.rs (target/debug/deps/adder-92948b65e88960b4)
running 1 test
test tests::it_works ... ok
test result: ok. 1 passed; 0 failed; 0 ignored; 0 measured; 0 filtered out; finished in 0.00s
Doc-tests adder
running 0 tests
test result: ok. 0 passed; 0 failed; 0 ignored; 0 measured; 0 filtered out; finished in 0.00s
Listing 11-2: The output from running the automatically generated test
Cargo compiled and ran the test. We see the line running 1 test. The next
line shows the name of the generated test function, called it_works, and that
the result of running that test is ok. The overall summary test result: ok.
means that all the tests passed, and the portion that reads 1 passed; 0 failed totals the number of tests that passed or failed.
It’s possible to mark a test as ignored so it doesn’t run in a particular
instance; we’ll cover that in the “Ignoring Some Tests Unless Specifically
Requested” section later in this chapter. Because we
haven’t done that here, the summary shows 0 ignored. We can also pass an
argument to the cargo test command to run only tests whose name matches a
string; this is called filtering and we’ll cover that in the “Running a
Subset of Tests by Name” section. We also haven’t
filtered the tests being run, so the end of the summary shows 0 filtered out.
The 0 measured statistic is for benchmark tests that measure performance.
Benchmark tests are, as of this writing, only available in nightly Rust. See
the documentation about benchmark tests to learn more.
The next part of the test output starting at Doc-tests adder is for the
results of any documentation tests. We don’t have any documentation tests yet,
but Rust can compile any code examples that appear in our API documentation.
This feature helps keep your docs and your code in sync! We’ll discuss how to
write documentation tests in the “Documentation Comments as
Tests” section of Chapter 14. For now, we’ll
ignore the Doc-tests output.
Let’s start to customize the test to our own needs. First change the name of
the it_works function to a different name, such as exploration, like so:
Filename: src/lib.rs
#[cfg(test)]
mod tests {
#[test]
fn exploration() {
assert_eq!(2 + 2, 4);
}
}Then run cargo test again. The output now shows exploration instead of
it_works:
$ cargo test
Compiling adder v0.1.0 (file:///projects/adder)
Finished test [unoptimized + debuginfo] target(s) in 0.59s
Running unittests src/lib.rs (target/debug/deps/adder-92948b65e88960b4)
running 1 test
test tests::exploration ... ok
test result: ok. 1 passed; 0 failed; 0 ignored; 0 measured; 0 filtered out; finished in 0.00s
Doc-tests adder
running 0 tests
test result: ok. 0 passed; 0 failed; 0 ignored; 0 measured; 0 filtered out; finished in 0.00s
Now we’ll add another test, but this time we’ll make a test that fails! Tests
fail when something in the test function panics. Each test is run in a new
thread, and when the main thread sees that a test thread has died, the test is
marked as failed. In Chapter 9, we talked about how the simplest way to panic
is to call the panic! macro. Enter the new test as a function named
another, so your src/lib.rs file looks like Listing 11-3.
Filename: src/lib.rs
#[cfg(test)]
mod tests {
#[test]
fn exploration() {
assert_eq!(2 + 2, 4);
}
#[test]
fn another() {
panic!("Make this test fail");
}
}Listing 11-3: Adding a second test that will fail because
we call the panic! macro
Run the tests again using cargo test. The output should look like Listing
11-4, which shows that our exploration test passed and another failed.
$ cargo test
Compiling adder v0.1.0 (file:///projects/adder)
Finished test [unoptimized + debuginfo] target(s) in 0.72s
Running unittests src/lib.rs (target/debug/deps/adder-92948b65e88960b4)
running 2 tests
test tests::another ... FAILED
test tests::exploration ... ok
failures:
---- tests::another stdout ----
thread 'tests::another' panicked at 'Make this test fail', src/lib.rs:10:9
note: run with `RUST_BACKTRACE=1` environment variable to display a backtrace
failures:
tests::another
test result: FAILED. 1 passed; 1 failed; 0 ignored; 0 measured; 0 filtered out; finished in 0.00s
error: test failed, to rerun pass `--lib`
Listing 11-4: Test results when one test passes and one test fails
Instead of ok, the line test tests::another shows FAILED. Two new
sections appear between the individual results and the summary: the first
displays the detailed reason for each test failure. In this case, we get the
details that another failed because it panicked at 'Make this test fail' on
line 10 in the src/lib.rs file. The next section lists just the names of all
the failing tests, which is useful when there are lots of tests and lots of
detailed failing test output. We can use the name of a failing test to run just
that test to more easily debug it; we’ll talk more about ways to run tests in
the “Controlling How Tests Are Run” section.
The summary line displays at the end: overall, our test result is FAILED. We
had one test pass and one test fail.
Now that you’ve seen what the test results look like in different scenarios,
let’s look at some macros other than panic! that are useful in tests.
Checking Results with the assert! Macro
The assert! macro, provided by the standard library, is useful when you want
to ensure that some condition in a test evaluates to true. We give the
assert! macro an argument that evaluates to a Boolean. If the value is
true, nothing happens and the test passes. If the value is false, the
assert! macro calls panic! to cause the test to fail. Using the assert!
macro helps us check that our code is functioning in the way we intend.
In Chapter 5, Listing 5-15, we used a Rectangle struct and a can_hold
method, which are repeated here in Listing 11-5. Let’s put this code in the
src/lib.rs file, then write some tests for it using the assert! macro.
Filename: src/lib.rs
#[derive(Debug)]
struct Rectangle {
width: u32,
height: u32,
}
impl Rectangle {
fn can_hold(&self, other: &Rectangle) -> bool {
self.width > other.width && self.height > other.height
}
}Listing 11-5: Using the Rectangle struct and its
can_hold method from Chapter 5
The can_hold method returns a Boolean, which means it’s a perfect use case
for the assert! macro. In Listing 11-6, we write a test that exercises the
can_hold method by creating a Rectangle instance that has a width of 8 and
a height of 7 and asserting that it can hold another Rectangle instance that
has a width of 5 and a height of 1.
Filename: src/lib.rs
#[derive(Debug)]
struct Rectangle {
width: u32,
height: u32,
}
impl Rectangle {
fn can_hold(&self, other: &Rectangle) -> bool {
self.width > other.width && self.height > other.height
}
}
#[cfg(test)]
mod tests {
use super::*;
#[test]
fn larger_can_hold_smaller() {
let larger = Rectangle {
width: 8,
height: 7,
};
let smaller = Rectangle {
width: 5,
height: 1,
};
assert!(larger.can_hold(&smaller));
}
}Listing 11-6: A test for can_hold that checks whether a
larger rectangle can indeed hold a smaller rectangle
Note that we’ve added a new line inside the tests module: use super::*;.
The tests module is a regular module that follows the usual visibility rules
we covered in Chapter 7 in the “Paths for Referring to an Item in the Module
Tree”
section. Because the tests module is an inner module, we need to bring the
code under test in the outer module into the scope of the inner module. We use
a glob here so anything we define in the outer module is available to this
tests module.
We’ve named our test larger_can_hold_smaller, and we’ve created the two
Rectangle instances that we need. Then we called the assert! macro and
passed it the result of calling larger.can_hold(&smaller). This expression is
supposed to return true, so our test should pass. Let’s find out!
$ cargo test
Compiling rectangle v0.1.0 (file:///projects/rectangle)
Finished test [unoptimized + debuginfo] target(s) in 0.66s
Running unittests src/lib.rs (target/debug/deps/rectangle-6584c4561e48942e)
running 1 test
test tests::larger_can_hold_smaller ... ok
test result: ok. 1 passed; 0 failed; 0 ignored; 0 measured; 0 filtered out; finished in 0.00s
Doc-tests rectangle
running 0 tests
test result: ok. 0 passed; 0 failed; 0 ignored; 0 measured; 0 filtered out; finished in 0.00s
It does pass! Let’s add another test, this time asserting that a smaller rectangle cannot hold a larger rectangle:
Filename: src/lib.rs
#[derive(Debug)]
struct Rectangle {
width: u32,
height: u32,
}
impl Rectangle {
fn can_hold(&self, other: &Rectangle) -> bool {
self.width > other.width && self.height > other.height
}
}
#[cfg(test)]
mod tests {
use super::*;
#[test]
fn larger_can_hold_smaller() {
// --snip--
let larger = Rectangle {
width: 8,
height: 7,
};
let smaller = Rectangle {
width: 5,
height: 1,
};
assert!(larger.can_hold(&smaller));
}
#[test]
fn smaller_cannot_hold_larger() {
let larger = Rectangle {
width: 8,
height: 7,
};
let smaller = Rectangle {
width: 5,
height: 1,
};
assert!(!smaller.can_hold(&larger));
}
}Because the correct result of the can_hold function in this case is false,
we need to negate that result before we pass it to the assert! macro. As a
result, our test will pass if can_hold returns false:
$ cargo test
Compiling rectangle v0.1.0 (file:///projects/rectangle)
Finished test [unoptimized + debuginfo] target(s) in 0.66s
Running unittests src/lib.rs (target/debug/deps/rectangle-6584c4561e48942e)
running 2 tests
test tests::larger_can_hold_smaller ... ok
test tests::smaller_cannot_hold_larger ... ok
test result: ok. 2 passed; 0 failed; 0 ignored; 0 measured; 0 filtered out; finished in 0.00s
Doc-tests rectangle
running 0 tests
test result: ok. 0 passed; 0 failed; 0 ignored; 0 measured; 0 filtered out; finished in 0.00s
Two tests that pass! Now let’s see what happens to our test results when we
introduce a bug in our code. We’ll change the implementation of the can_hold
method by replacing the greater-than sign with a less-than sign when it
compares the widths:
#[derive(Debug)]
struct Rectangle {
width: u32,
height: u32,
}
// --snip--
impl Rectangle {
fn can_hold(&self, other: &Rectangle) -> bool {
self.width < other.width && self.height > other.height
}
}
#[cfg(test)]
mod tests {
use super::*;
#[test]
fn larger_can_hold_smaller() {
let larger = Rectangle {
width: 8,
height: 7,
};
let smaller = Rectangle {
width: 5,
height: 1,
};
assert!(larger.can_hold(&smaller));
}
#[test]
fn smaller_cannot_hold_larger() {
let larger = Rectangle {
width: 8,
height: 7,
};
let smaller = Rectangle {
width: 5,
height: 1,
};
assert!(!smaller.can_hold(&larger));
}
}Running the tests now produces the following:
$ cargo test
Compiling rectangle v0.1.0 (file:///projects/rectangle)
Finished test [unoptimized + debuginfo] target(s) in 0.66s
Running unittests src/lib.rs (target/debug/deps/rectangle-6584c4561e48942e)
running 2 tests
test tests::larger_can_hold_smaller ... FAILED
test tests::smaller_cannot_hold_larger ... ok
failures:
---- tests::larger_can_hold_smaller stdout ----
thread 'tests::larger_can_hold_smaller' panicked at 'assertion failed: larger.can_hold(&smaller)', src/lib.rs:28:9
note: run with `RUST_BACKTRACE=1` environment variable to display a backtrace
failures:
tests::larger_can_hold_smaller
test result: FAILED. 1 passed; 1 failed; 0 ignored; 0 measured; 0 filtered out; finished in 0.00s
error: test failed, to rerun pass `--lib`
Our tests caught the bug! Because larger.width is 8 and smaller.width is
5, the comparison of the widths in can_hold now returns false: 8 is not
less than 5.
Testing Equality with the assert_eq! and assert_ne! Macros
A common way to verify functionality is to test for equality between the result
of the code under test and the value you expect the code to return. You could
do this using the assert! macro and passing it an expression using the ==
operator. However, this is such a common test that the standard library
provides a pair of macros—assert_eq! and assert_ne!—to perform this test
more conveniently. These macros compare two arguments for equality or
inequality, respectively. They’ll also print the two values if the assertion
fails, which makes it easier to see why the test failed; conversely, the
assert! macro only indicates that it got a false value for the ==
expression, without printing the values that led to the false value.
In Listing 11-7, we write a function named add_two that adds 2 to its
parameter, then we test this function using the assert_eq! macro.
Filename: src/lib.rs
pub fn add_two(a: i32) -> i32 {
a + 2
}
#[cfg(test)]
mod tests {
use super::*;
#[test]
fn it_adds_two() {
assert_eq!(4, add_two(2));
}
}Listing 11-7: Testing the function add_two using the
assert_eq! macro
Let’s check that it passes!
$ cargo test
Compiling adder v0.1.0 (file:///projects/adder)
Finished test [unoptimized + debuginfo] target(s) in 0.58s
Running unittests src/lib.rs (target/debug/deps/adder-92948b65e88960b4)
running 1 test
test tests::it_adds_two ... ok
test result: ok. 1 passed; 0 failed; 0 ignored; 0 measured; 0 filtered out; finished in 0.00s
Doc-tests adder
running 0 tests
test result: ok. 0 passed; 0 failed; 0 ignored; 0 measured; 0 filtered out; finished in 0.00s
We pass 4 as the argument to assert_eq!, which is equal to the result of
calling add_two(2). The line for this test is test tests::it_adds_two ... ok, and the ok text indicates that our test passed!
Let’s introduce a bug into our code to see what assert_eq! looks like when it
fails. Change the implementation of the add_two function to instead add 3:
pub fn add_two(a: i32) -> i32 {
a + 3
}
#[cfg(test)]
mod tests {
use super::*;
#[test]
fn it_adds_two() {
assert_eq!(4, add_two(2));
}
}Run the tests again:
$ cargo test
Compiling adder v0.1.0 (file:///projects/adder)
Finished test [unoptimized + debuginfo] target(s) in 0.61s
Running unittests src/lib.rs (target/debug/deps/adder-92948b65e88960b4)
running 1 test
test tests::it_adds_two ... FAILED
failures:
---- tests::it_adds_two stdout ----
thread 'tests::it_adds_two' panicked at 'assertion failed: `(left == right)`
left: `4`,
right: `5`', src/lib.rs:11:9
note: run with `RUST_BACKTRACE=1` environment variable to display a backtrace
failures:
tests::it_adds_two
test result: FAILED. 0 passed; 1 failed; 0 ignored; 0 measured; 0 filtered out; finished in 0.00s
error: test failed, to rerun pass `--lib`
Our test caught the bug! The it_adds_two test failed, and the message tells
us that the assertion that fails was assertion failed: `(left == right)`
and what the left and right values are. This message helps us start
debugging: the left argument was 4 but the right argument, where we had
add_two(2), was 5. You can imagine that this would be especially helpful
when we have a lot of tests going on.
Note that in some languages and test frameworks, the parameters to equality
assertion functions are called expected and actual, and the order in which
we specify the arguments matters. However, in Rust, they’re called left and
right, and the order in which we specify the value we expect and the value
the code produces doesn’t matter. We could write the assertion in this test as
assert_eq!(add_two(2), 4), which would result in the same failure message
that displays assertion failed: `(left == right)`.
The assert_ne! macro will pass if the two values we give it are not equal and
fail if they’re equal. This macro is most useful for cases when we’re not sure
what a value will be, but we know what the value definitely shouldn’t be.
For example, if we’re testing a function that is guaranteed to change its input
in some way, but the way in which the input is changed depends on the day of
the week that we run our tests, the best thing to assert might be that the
output of the function is not equal to the input.
Under the surface, the assert_eq! and assert_ne! macros use the operators
== and !=, respectively. When the assertions fail, these macros print their
arguments using debug formatting, which means the values being compared must
implement the PartialEq and Debug traits. All primitive types and most of
the standard library types implement these traits. For structs and enums that
you define yourself, you’ll need to implement PartialEq to assert equality of
those types. You’ll also need to implement Debug to print the values when the
assertion fails. Because both traits are derivable traits, as mentioned in
Listing 5-12 in Chapter 5, this is usually as straightforward as adding the
#[derive(PartialEq, Debug)] annotation to your struct or enum definition. See
Appendix C, “Derivable Traits,” for more
details about these and other derivable traits.
Adding Custom Failure Messages
You can also add a custom message to be printed with the failure message as
optional arguments to the assert!, assert_eq!, and assert_ne! macros. Any
arguments specified after the required arguments are passed along to the
format! macro (discussed in Chapter 8 in the “Concatenation with the +
Operator or the format!
Macro”
section), so you can pass a format string that contains {} placeholders and
values to go in those placeholders. Custom messages are useful for documenting
what an assertion means; when a test fails, you’ll have a better idea of what
the problem is with the code.
For example, let’s say we have a function that greets people by name and we want to test that the name we pass into the function appears in the output:
Filename: src/lib.rs
pub fn greeting(name: &str) -> String {
format!("Hello {}!", name)
}
#[cfg(test)]
mod tests {
use super::*;
#[test]
fn greeting_contains_name() {
let result = greeting("Carol");
assert!(result.contains("Carol"));
}
}The requirements for this program haven’t been agreed upon yet, and we’re
pretty sure the Hello text at the beginning of the greeting will change. We
decided we don’t want to have to update the test when the requirements change,
so instead of checking for exact equality to the value returned from the
greeting function, we’ll just assert that the output contains the text of the
input parameter.
Now let’s introduce a bug into this code by changing greeting to exclude
name to see what the default test failure looks like:
pub fn greeting(name: &str) -> String {
String::from("Hello!")
}
#[cfg(test)]
mod tests {
use super::*;
#[test]
fn greeting_contains_name() {
let result = greeting("Carol");
assert!(result.contains("Carol"));
}
}Running this test produces the following:
$ cargo test
Compiling greeter v0.1.0 (file:///projects/greeter)
Finished test [unoptimized + debuginfo] target(s) in 0.91s
Running unittests src/lib.rs (target/debug/deps/greeter-170b942eb5bf5e3a)
running 1 test
test tests::greeting_contains_name ... FAILED
failures:
---- tests::greeting_contains_name stdout ----
thread 'tests::greeting_contains_name' panicked at 'assertion failed: result.contains(\"Carol\")', src/lib.rs:12:9
note: run with `RUST_BACKTRACE=1` environment variable to display a backtrace
failures:
tests::greeting_contains_name
test result: FAILED. 0 passed; 1 failed; 0 ignored; 0 measured; 0 filtered out; finished in 0.00s
error: test failed, to rerun pass `--lib`
This result just indicates that the assertion failed and which line the
assertion is on. A more useful failure message would print the value from the
greeting function. Let’s add a custom failure message composed of a format
string with a placeholder filled in with the actual value we got from the
greeting function:
pub fn greeting(name: &str) -> String {
String::from("Hello!")
}
#[cfg(test)]
mod tests {
use super::*;
#[test]
fn greeting_contains_name() {
let result = greeting("Carol");
assert!(
result.contains("Carol"),
"Greeting did not contain name, value was `{}`",
result
);
}
}Now when we run the test, we’ll get a more informative error message:
$ cargo test
Compiling greeter v0.1.0 (file:///projects/greeter)
Finished test [unoptimized + debuginfo] target(s) in 0.93s
Running unittests src/lib.rs (target/debug/deps/greeter-170b942eb5bf5e3a)
running 1 test
test tests::greeting_contains_name ... FAILED
failures:
---- tests::greeting_contains_name stdout ----
thread 'tests::greeting_contains_name' panicked at 'Greeting did not contain name, value was `Hello!`', src/lib.rs:12:9
note: run with `RUST_BACKTRACE=1` environment variable to display a backtrace
failures:
tests::greeting_contains_name
test result: FAILED. 0 passed; 1 failed; 0 ignored; 0 measured; 0 filtered out; finished in 0.00s
error: test failed, to rerun pass `--lib`
We can see the value we actually got in the test output, which would help us debug what happened instead of what we were expecting to happen.
Checking for Panics with should_panic
In addition to checking return values, it’s important to check that our code
handles error conditions as we expect. For example, consider the Guess type
that we created in Chapter 9, Listing 9-13. Other code that uses Guess
depends on the guarantee that Guess instances will contain only values
between 1 and 100. We can write a test that ensures that attempting to create a
Guess instance with a value outside that range panics.
We do this by adding the attribute should_panic to our test function. The
test passes if the code inside the function panics; the test fails if the code
inside the function doesn’t panic.
Listing 11-8 shows a test that checks that the error conditions of Guess::new
happen when we expect them to.
Filename: src/lib.rs
pub struct Guess {
value: i32,
}
impl Guess {
pub fn new(value: i32) -> Guess {
if value < 1 || value > 100 {
panic!("Guess value must be between 1 and 100, got {}.", value);
}
Guess { value }
}
}
#[cfg(test)]
mod tests {
use super::*;
#[test]
#[should_panic]
fn greater_than_100() {
Guess::new(200);
}
}Listing 11-8: Testing that a condition will cause a
panic!
We place the #[should_panic] attribute after the #[test] attribute and
before the test function it applies to. Let’s look at the result when this test
passes:
$ cargo test
Compiling guessing_game v0.1.0 (file:///projects/guessing_game)
Finished test [unoptimized + debuginfo] target(s) in 0.58s
Running unittests src/lib.rs (target/debug/deps/guessing_game-57d70c3acb738f4d)
running 1 test
test tests::greater_than_100 - should panic ... ok
test result: ok. 1 passed; 0 failed; 0 ignored; 0 measured; 0 filtered out; finished in 0.00s
Doc-tests guessing_game
running 0 tests
test result: ok. 0 passed; 0 failed; 0 ignored; 0 measured; 0 filtered out; finished in 0.00s
Looks good! Now let’s introduce a bug in our code by removing the condition
that the new function will panic if the value is greater than 100:
pub struct Guess {
value: i32,
}
// --snip--
impl Guess {
pub fn new(value: i32) -> Guess {
if value < 1 {
panic!("Guess value must be between 1 and 100, got {}.", value);
}
Guess { value }
}
}
#[cfg(test)]
mod tests {
use super::*;
#[test]
#[should_panic]
fn greater_than_100() {
Guess::new(200);
}
}When we run the test in Listing 11-8, it will fail:
$ cargo test
Compiling guessing_game v0.1.0 (file:///projects/guessing_game)
Finished test [unoptimized + debuginfo] target(s) in 0.62s
Running unittests src/lib.rs (target/debug/deps/guessing_game-57d70c3acb738f4d)
running 1 test
test tests::greater_than_100 - should panic ... FAILED
failures:
---- tests::greater_than_100 stdout ----
note: test did not panic as expected
failures:
tests::greater_than_100
test result: FAILED. 0 passed; 1 failed; 0 ignored; 0 measured; 0 filtered out; finished in 0.00s
error: test failed, to rerun pass `--lib`
We don’t get a very helpful message in this case, but when we look at the test
function, we see that it’s annotated with #[should_panic]. The failure we got
means that the code in the test function did not cause a panic.
Tests that use should_panic can be imprecise. A should_panic test would
pass even if the test panics for a different reason from the one we were
expecting. To make should_panic tests more precise, we can add an optional
expected parameter to the should_panic attribute. The test harness will
make sure that the failure message contains the provided text. For example,
consider the modified code for Guess in Listing 11-9 where the new function
panics with different messages depending on whether the value is too small or
too large.
Filename: src/lib.rs
pub struct Guess {
value: i32,
}
// --snip--
impl Guess {
pub fn new(value: i32) -> Guess {
if value < 1 {
panic!(
"Guess value must be greater than or equal to 1, got {}.",
value
);
} else if value > 100 {
panic!(
"Guess value must be less than or equal to 100, got {}.",
value
);
}
Guess { value }
}
}
#[cfg(test)]
mod tests {
use super::*;
#[test]
#[should_panic(expected = "less than or equal to 100")]
fn greater_than_100() {
Guess::new(200);
}
}Listing 11-9: Testing for a panic! with a panic message
containing a specified substring
This test will pass because the value we put in the should_panic attribute’s
expected parameter is a substring of the message that the Guess::new
function panics with. We could have specified the entire panic message that we
expect, which in this case would be Guess value must be less than or equal to 100, got 200. What you choose to specify depends on how much of the panic
message is unique or dynamic and how precise you want your test to be. In this
case, a substring of the panic message is enough to ensure that the code in the
test function executes the else if value > 100 case.
To see what happens when a should_panic test with an expected message
fails, let’s again introduce a bug into our code by swapping the bodies of the
if value < 1 and the else if value > 100 blocks:
pub struct Guess {
value: i32,
}
impl Guess {
pub fn new(value: i32) -> Guess {
if value < 1 {
panic!(
"Guess value must be less than or equal to 100, got {}.",
value
);
} else if value > 100 {
panic!(
"Guess value must be greater than or equal to 1, got {}.",
value
);
}
Guess { value }
}
}
#[cfg(test)]
mod tests {
use super::*;
#[test]
#[should_panic(expected = "less than or equal to 100")]
fn greater_than_100() {
Guess::new(200);
}
}This time when we run the should_panic test, it will fail:
$ cargo test
Compiling guessing_game v0.1.0 (file:///projects/guessing_game)
Finished test [unoptimized + debuginfo] target(s) in 0.66s
Running unittests src/lib.rs (target/debug/deps/guessing_game-57d70c3acb738f4d)
running 1 test
test tests::greater_than_100 - should panic ... FAILED
failures:
---- tests::greater_than_100 stdout ----
thread 'tests::greater_than_100' panicked at 'Guess value must be greater than or equal to 1, got 200.', src/lib.rs:13:13
note: run with `RUST_BACKTRACE=1` environment variable to display a backtrace
note: panic did not contain expected string
panic message: `"Guess value must be greater than or equal to 1, got 200."`,
expected substring: `"less than or equal to 100"`
failures:
tests::greater_than_100
test result: FAILED. 0 passed; 1 failed; 0 ignored; 0 measured; 0 filtered out; finished in 0.00s
error: test failed, to rerun pass `--lib`
The failure message indicates that this test did indeed panic as we expected,
but the panic message did not include the expected string 'Guess value must be less than or equal to 100'. The panic message that we did get in this case was
Guess value must be greater than or equal to 1, got 200. Now we can start
figuring out where our bug is!
Using Result<T, E> in Tests
Our tests so far all panic when they fail. We can also write tests that use
Result<T, E>! Here’s the test from Listing 11-1, rewritten to use Result<T, E> and return an Err instead of panicking:
#[cfg(test)]
mod tests {
#[test]
fn it_works() -> Result<(), String> {
if 2 + 2 == 4 {
Ok(())
} else {
Err(String::from("two plus two does not equal four"))
}
}
}The it_works function now has the Result<(), String> return type. In the
body of the function, rather than calling the assert_eq! macro, we return
Ok(()) when the test passes and an Err with a String inside when the test
fails.
Writing tests so they return a Result<T, E> enables you to use the question
mark operator in the body of tests, which can be a convenient way to write
tests that should fail if any operation within them returns an Err variant.
You can’t use the #[should_panic] annotation on tests that use Result<T, E>. To assert that an operation returns an Err variant, don’t use the
question mark operator on the Result<T, E> value. Instead, use
assert!(value.is_err()).
Now that you know several ways to write tests, let’s look at what is happening
when we run our tests and explore the different options we can use with cargo test.
Controlling How Tests Are Run
Just as cargo run compiles your code and then runs the resulting binary,
cargo test compiles your code in test mode and runs the resulting test
binary. The default behavior of the binary produced by cargo test is to run
all the tests in parallel and capture output generated during test runs,
preventing the output from being displayed and making it easier to read the
output related to the test results. You can, however, specify command line
options to change this default behavior.
Some command line options go to cargo test, and some go to the resulting test
binary. To separate these two types of arguments, you list the arguments that
go to cargo test followed by the separator -- and then the ones that go to
the test binary. Running cargo test --help displays the options you can use
with cargo test, and running cargo test -- --help displays the options you
can use after the separator.
Running Tests in Parallel or Consecutively
When you run multiple tests, by default they run in parallel using threads, meaning they finish running faster and you get feedback quicker. Because the tests are running at the same time, you must make sure your tests don’t depend on each other or on any shared state, including a shared environment, such as the current working directory or environment variables.
For example, say each of your tests runs some code that creates a file on disk named test-output.txt and writes some data to that file. Then each test reads the data in that file and asserts that the file contains a particular value, which is different in each test. Because the tests run at the same time, one test might overwrite the file in the time between another test writing and reading the file. The second test will then fail, not because the code is incorrect but because the tests have interfered with each other while running in parallel. One solution is to make sure each test writes to a different file; another solution is to run the tests one at a time.
If you don’t want to run the tests in parallel or if you want more fine-grained
control over the number of threads used, you can send the --test-threads flag
and the number of threads you want to use to the test binary. Take a look at
the following example:
$ cargo test -- --test-threads=1
We set the number of test threads to 1, telling the program not to use any
parallelism. Running the tests using one thread will take longer than running
them in parallel, but the tests won’t interfere with each other if they share
state.
Showing Function Output
By default, if a test passes, Rust’s test library captures anything printed to
standard output. For example, if we call println! in a test and the test
passes, we won’t see the println! output in the terminal; we’ll see only the
line that indicates the test passed. If a test fails, we’ll see whatever was
printed to standard output with the rest of the failure message.
As an example, Listing 11-10 has a silly function that prints the value of its parameter and returns 10, as well as a test that passes and a test that fails.
Filename: src/lib.rs
fn prints_and_returns_10(a: i32) -> i32 {
println!("I got the value {}", a);
10
}
#[cfg(test)]
mod tests {
use super::*;
#[test]
fn this_test_will_pass() {
let value = prints_and_returns_10(4);
assert_eq!(10, value);
}
#[test]
fn this_test_will_fail() {
let value = prints_and_returns_10(8);
assert_eq!(5, value);
}
}Listing 11-10: Tests for a function that calls
println!
When we run these tests with cargo test, we’ll see the following output:
$ cargo test
Compiling silly-function v0.1.0 (file:///projects/silly-function)
Finished test [unoptimized + debuginfo] target(s) in 0.58s
Running unittests src/lib.rs (target/debug/deps/silly_function-160869f38cff9166)
running 2 tests
test tests::this_test_will_fail ... FAILED
test tests::this_test_will_pass ... ok
failures:
---- tests::this_test_will_fail stdout ----
I got the value 8
thread 'tests::this_test_will_fail' panicked at 'assertion failed: `(left == right)`
left: `5`,
right: `10`', src/lib.rs:19:9
note: run with `RUST_BACKTRACE=1` environment variable to display a backtrace
failures:
tests::this_test_will_fail
test result: FAILED. 1 passed; 1 failed; 0 ignored; 0 measured; 0 filtered out; finished in 0.00s
error: test failed, to rerun pass `--lib`
Note that nowhere in this output do we see I got the value 4, which is what
is printed when the test that passes runs. That output has been captured. The
output from the test that failed, I got the value 8, appears in the section
of the test summary output, which also shows the cause of the test failure.
If we want to see printed values for passing tests as well, we can tell Rust
to also show the output of successful tests with --show-output.
$ cargo test -- --show-output
When we run the tests in Listing 11-10 again with the --show-output flag, we
see the following output:
$ cargo test -- --show-output
Compiling silly-function v0.1.0 (file:///projects/silly-function)
Finished test [unoptimized + debuginfo] target(s) in 0.60s
Running unittests src/lib.rs (target/debug/deps/silly_function-160869f38cff9166)
running 2 tests
test tests::this_test_will_fail ... FAILED
test tests::this_test_will_pass ... ok
successes:
---- tests::this_test_will_pass stdout ----
I got the value 4
successes:
tests::this_test_will_pass
failures:
---- tests::this_test_will_fail stdout ----
I got the value 8
thread 'tests::this_test_will_fail' panicked at 'assertion failed: `(left == right)`
left: `5`,
right: `10`', src/lib.rs:19:9
note: run with `RUST_BACKTRACE=1` environment variable to display a backtrace
failures:
tests::this_test_will_fail
test result: FAILED. 1 passed; 1 failed; 0 ignored; 0 measured; 0 filtered out; finished in 0.00s
error: test failed, to rerun pass `--lib`
Running a Subset of Tests by Name
Sometimes, running a full test suite can take a long time. If you’re working on
code in a particular area, you might want to run only the tests pertaining to
that code. You can choose which tests to run by passing cargo test the name
or names of the test(s) you want to run as an argument.
To demonstrate how to run a subset of tests, we’ll first create three tests for
our add_two function, as shown in Listing 11-11, and choose which ones to run.
Filename: src/lib.rs
pub fn add_two(a: i32) -> i32 {
a + 2
}
#[cfg(test)]
mod tests {
use super::*;
#[test]
fn add_two_and_two() {
assert_eq!(4, add_two(2));
}
#[test]
fn add_three_and_two() {
assert_eq!(5, add_two(3));
}
#[test]
fn one_hundred() {
assert_eq!(102, add_two(100));
}
}Listing 11-11: Three tests with three different names
If we run the tests without passing any arguments, as we saw earlier, all the tests will run in parallel:
$ cargo test
Compiling adder v0.1.0 (file:///projects/adder)
Finished test [unoptimized + debuginfo] target(s) in 0.62s
Running unittests src/lib.rs (target/debug/deps/adder-92948b65e88960b4)
running 3 tests
test tests::add_three_and_two ... ok
test tests::add_two_and_two ... ok
test tests::one_hundred ... ok
test result: ok. 3 passed; 0 failed; 0 ignored; 0 measured; 0 filtered out; finished in 0.00s
Doc-tests adder
running 0 tests
test result: ok. 0 passed; 0 failed; 0 ignored; 0 measured; 0 filtered out; finished in 0.00s
Running Single Tests
We can pass the name of any test function to cargo test to run only that test:
$ cargo test one_hundred
Compiling adder v0.1.0 (file:///projects/adder)
Finished test [unoptimized + debuginfo] target(s) in 0.69s
Running unittests src/lib.rs (target/debug/deps/adder-92948b65e88960b4)
running 1 test
test tests::one_hundred ... ok
test result: ok. 1 passed; 0 failed; 0 ignored; 0 measured; 2 filtered out; finished in 0.00s
Only the test with the name one_hundred ran; the other two tests didn’t match
that name. The test output lets us know we had more tests that didn’t run by
displaying 2 filtered out at the end.
We can’t specify the names of multiple tests in this way; only the first value
given to cargo test will be used. But there is a way to run multiple tests.
Filtering to Run Multiple Tests
We can specify part of a test name, and any test whose name matches that value
will be run. For example, because two of our tests’ names contain add, we can
run those two by running cargo test add:
$ cargo test add
Compiling adder v0.1.0 (file:///projects/adder)
Finished test [unoptimized + debuginfo] target(s) in 0.61s
Running unittests src/lib.rs (target/debug/deps/adder-92948b65e88960b4)
running 2 tests
test tests::add_three_and_two ... ok
test tests::add_two_and_two ... ok
test result: ok. 2 passed; 0 failed; 0 ignored; 0 measured; 1 filtered out; finished in 0.00s
This command ran all tests with add in the name and filtered out the test
named one_hundred. Also note that the module in which a test appears becomes
part of the test’s name, so we can run all the tests in a module by filtering
on the module’s name.
Ignoring Some Tests Unless Specifically Requested
Sometimes a few specific tests can be very time-consuming to execute, so you
might want to exclude them during most runs of cargo test. Rather than
listing as arguments all tests you do want to run, you can instead annotate the
time-consuming tests using the ignore attribute to exclude them, as shown
here:
Filename: src/lib.rs
#[test]
fn it_works() {
assert_eq!(2 + 2, 4);
}
#[test]
#[ignore]
fn expensive_test() {
// code that takes an hour to run
}After #[test] we add the #[ignore] line to the test we want to exclude. Now
when we run our tests, it_works runs, but expensive_test doesn’t:
$ cargo test
Compiling adder v0.1.0 (file:///projects/adder)
Finished test [unoptimized + debuginfo] target(s) in 0.60s
Running unittests src/lib.rs (target/debug/deps/adder-92948b65e88960b4)
running 2 tests
test expensive_test ... ignored
test it_works ... ok
test result: ok. 1 passed; 0 failed; 1 ignored; 0 measured; 0 filtered out; finished in 0.00s
Doc-tests adder
running 0 tests
test result: ok. 0 passed; 0 failed; 0 ignored; 0 measured; 0 filtered out; finished in 0.00s
The expensive_test function is listed as ignored. If we want to run only
the ignored tests, we can use cargo test -- --ignored:
$ cargo test -- --ignored
Compiling adder v0.1.0 (file:///projects/adder)
Finished test [unoptimized + debuginfo] target(s) in 0.61s
Running unittests src/lib.rs (target/debug/deps/adder-92948b65e88960b4)
running 1 test
test expensive_test ... ok
test result: ok. 1 passed; 0 failed; 0 ignored; 0 measured; 1 filtered out; finished in 0.00s
Doc-tests adder
running 0 tests
test result: ok. 0 passed; 0 failed; 0 ignored; 0 measured; 0 filtered out; finished in 0.00s
By controlling which tests run, you can make sure your cargo test results
will be fast. When you’re at a point where it makes sense to check the results
of the ignored tests and you have time to wait for the results, you can run
cargo test -- --ignored instead. If you want to run all tests whether they’re
ignored or not, you can run cargo test -- --include-ignored.
Test Organization
As mentioned at the start of the chapter, testing is a complex discipline, and different people use different terminology and organization. The Rust community thinks about tests in terms of two main categories: unit tests and integration tests. Unit tests are small and more focused, testing one module in isolation at a time, and can test private interfaces. Integration tests are entirely external to your library and use your code in the same way any other external code would, using only the public interface and potentially exercising multiple modules per test.
Writing both kinds of tests is important to ensure that the pieces of your library are doing what you expect them to, separately and together.
Unit Tests
The purpose of unit tests is to test each unit of code in isolation from the
rest of the code to quickly pinpoint where code is and isn’t working as
expected. You’ll put unit tests in the src directory in each file with the
code that they’re testing. The convention is to create a module named tests
in each file to contain the test functions and to annotate the module with
cfg(test).
The Tests Module and #[cfg(test)]
The #[cfg(test)] annotation on the tests module tells Rust to compile and run
the test code only when you run cargo test, not when you run cargo build.
This saves compile time when you only want to build the library and saves space
in the resulting compiled artifact because the tests are not included. You’ll
see that because integration tests go in a different directory, they don’t need
the #[cfg(test)] annotation. However, because unit tests go in the same files
as the code, you’ll use #[cfg(test)] to specify that they shouldn’t be
included in the compiled result.
Recall that when we generated the new adder project in the first section of
this chapter, Cargo generated this code for us:
Filename: src/lib.rs
#[cfg(test)]
mod tests {
#[test]
fn it_works() {
let result = 2 + 2;
assert_eq!(result, 4);
}
}This code is the automatically generated test module. The attribute cfg
stands for configuration and tells Rust that the following item should only
be included given a certain configuration option. In this case, the
configuration option is test, which is provided by Rust for compiling and
running tests. By using the cfg attribute, Cargo compiles our test code only
if we actively run the tests with cargo test. This includes any helper
functions that might be within this module, in addition to the functions
annotated with #[test].
Testing Private Functions
There’s debate within the testing community about whether or not private
functions should be tested directly, and other languages make it difficult or
impossible to test private functions. Regardless of which testing ideology you
adhere to, Rust’s privacy rules do allow you to test private functions.
Consider the code in Listing 11-12 with the private function internal_adder.
Filename: src/lib.rs
pub fn add_two(a: i32) -> i32 {
internal_adder(a, 2)
}
fn internal_adder(a: i32, b: i32) -> i32 {
a + b
}
#[cfg(test)]
mod tests {
use super::*;
#[test]
fn internal() {
assert_eq!(4, internal_adder(2, 2));
}
}Listing 11-12: Testing a private function
Note that the internal_adder function is not marked as pub. Tests are just
Rust code, and the tests module is just another module. As we discussed in
the “Paths for Referring to an Item in the Module Tree”
section, items in child modules can use the items in their ancestor modules. In
this test, we bring all of the test module’s parent’s items into scope with
use super::*, and then the test can call internal_adder. If you don’t think
private functions should be tested, there’s nothing in Rust that will compel
you to do so.
Integration Tests
In Rust, integration tests are entirely external to your library. They use your library in the same way any other code would, which means they can only call functions that are part of your library’s public API. Their purpose is to test whether many parts of your library work together correctly. Units of code that work correctly on their own could have problems when integrated, so test coverage of the integrated code is important as well. To create integration tests, you first need a tests directory.
The tests Directory
We create a tests directory at the top level of our project directory, next to src. Cargo knows to look for integration test files in this directory. We can then make as many test files as we want, and Cargo will compile each of the files as an individual crate.
Let’s create an integration test. With the code in Listing 11-12 still in the src/lib.rs file, make a tests directory, and create a new file named tests/integration_test.rs. Your directory structure should look like this:
adder
├── Cargo.lock
├── Cargo.toml
├── src
│ └── lib.rs
└── tests
└── integration_test.rs
Enter the code in Listing 11-13 into the tests/integration_test.rs file:
Filename: tests/integration_test.rs
use adder;
#[test]
fn it_adds_two() {
assert_eq!(4, adder::add_two(2));
}Listing 11-13: An integration test of a function in the
adder crate
Each file in the tests directory is a separate crate, so we need to bring our
library into each test crate’s scope. For that reason we add use adder at the
top of the code, which we didn’t need in the unit tests.
We don’t need to annotate any code in tests/integration_test.rs with
#[cfg(test)]. Cargo treats the tests directory specially and compiles files
in this directory only when we run cargo test. Run cargo test now:
$ cargo test
Compiling adder v0.1.0 (file:///projects/adder)
Finished test [unoptimized + debuginfo] target(s) in 1.31s
Running unittests src/lib.rs (target/debug/deps/adder-1082c4b063a8fbe6)
running 1 test
test tests::internal ... ok
test result: ok. 1 passed; 0 failed; 0 ignored; 0 measured; 0 filtered out; finished in 0.00s
Running tests/integration_test.rs (target/debug/deps/integration_test-1082c4b063a8fbe6)
running 1 test
test it_adds_two ... ok
test result: ok. 1 passed; 0 failed; 0 ignored; 0 measured; 0 filtered out; finished in 0.00s
Doc-tests adder
running 0 tests
test result: ok. 0 passed; 0 failed; 0 ignored; 0 measured; 0 filtered out; finished in 0.00s
The three sections of output include the unit tests, the integration test, and the doc tests. Note that if any test in a section fails, the following sections will not be run. For example, if a unit test fails, there won’t be any output for integration and doc tests because those tests will only be run if all unit tests are passing.
The first section for the unit tests is the same as we’ve been seeing: one line
for each unit test (one named internal that we added in Listing 11-12) and
then a summary line for the unit tests.
The integration tests section starts with the line Running tests/integration_test.rs. Next, there is a line for each test function in
that integration test and a summary line for the results of the integration
test just before the Doc-tests adder section starts.
Each integration test file has its own section, so if we add more files in the tests directory, there will be more integration test sections.
We can still run a particular integration test function by specifying the test
function’s name as an argument to cargo test. To run all the tests in a
particular integration test file, use the --test argument of cargo test
followed by the name of the file:
$ cargo test --test integration_test
Compiling adder v0.1.0 (file:///projects/adder)
Finished test [unoptimized + debuginfo] target(s) in 0.64s
Running tests/integration_test.rs (target/debug/deps/integration_test-82e7799c1bc62298)
running 1 test
test it_adds_two ... ok
test result: ok. 1 passed; 0 failed; 0 ignored; 0 measured; 0 filtered out; finished in 0.00s
This command runs only the tests in the tests/integration_test.rs file.
Submodules in Integration Tests
As you add more integration tests, you might want to make more files in the tests directory to help organize them; for example, you can group the test functions by the functionality they’re testing. As mentioned earlier, each file in the tests directory is compiled as its own separate crate, which is useful for creating separate scopes to more closely imitate the way end users will be using your crate. However, this means files in the tests directory don’t share the same behavior as files in src do, as you learned in Chapter 7 regarding how to separate code into modules and files.
The different behavior of tests directory files is most noticeable when you
have a set of helper functions to use in multiple integration test files and
you try to follow the steps in the “Separating Modules into Different
Files” section of Chapter 7 to
extract them into a common module. For example, if we create tests/common.rs
and place a function named setup in it, we can add some code to setup that
we want to call from multiple test functions in multiple test files:
Filename: tests/common.rs
pub fn setup() {
// setup code specific to your library's tests would go here
}When we run the tests again, we’ll see a new section in the test output for the
common.rs file, even though this file doesn’t contain any test functions nor
did we call the setup function from anywhere:
$ cargo test
Compiling adder v0.1.0 (file:///projects/adder)
Finished test [unoptimized + debuginfo] target(s) in 0.89s
Running unittests src/lib.rs (target/debug/deps/adder-92948b65e88960b4)
running 1 test
test tests::internal ... ok
test result: ok. 1 passed; 0 failed; 0 ignored; 0 measured; 0 filtered out; finished in 0.00s
Running tests/common.rs (target/debug/deps/common-92948b65e88960b4)
running 0 tests
test result: ok. 0 passed; 0 failed; 0 ignored; 0 measured; 0 filtered out; finished in 0.00s
Running tests/integration_test.rs (target/debug/deps/integration_test-92948b65e88960b4)
running 1 test
test it_adds_two ... ok
test result: ok. 1 passed; 0 failed; 0 ignored; 0 measured; 0 filtered out; finished in 0.00s
Doc-tests adder
running 0 tests
test result: ok. 0 passed; 0 failed; 0 ignored; 0 measured; 0 filtered out; finished in 0.00s
Having common appear in the test results with running 0 tests displayed for
it is not what we wanted. We just wanted to share some code with the other
integration test files.
To avoid having common appear in the test output, instead of creating
tests/common.rs, we’ll create tests/common/mod.rs. The project directory
now looks like this:
├── Cargo.lock
├── Cargo.toml
├── src
│ └── lib.rs
└── tests
├── common
│ └── mod.rs
└── integration_test.rs
This is the older naming convention that Rust also understands that we
mentioned in the “Alternate File Paths” section of
Chapter 7. Naming the file this way tells Rust not to treat the common module
as an integration test file. When we move the setup function code into
tests/common/mod.rs and delete the tests/common.rs file, the section in the
test output will no longer appear. Files in subdirectories of the tests
directory don’t get compiled as separate crates or have sections in the test
output.
After we’ve created tests/common/mod.rs, we can use it from any of the
integration test files as a module. Here’s an example of calling the setup
function from the it_adds_two test in tests/integration_test.rs:
Filename: tests/integration_test.rs
use adder;
mod common;
#[test]
fn it_adds_two() {
common::setup();
assert_eq!(4, adder::add_two(2));
}Note that the mod common; declaration is the same as the module declaration
we demonstrated in Listing 7-21. Then in the test function, we can call the
common::setup() function.
Integration Tests for Binary Crates
If our project is a binary crate that only contains a src/main.rs file and
doesn’t have a src/lib.rs file, we can’t create integration tests in the
tests directory and bring functions defined in the src/main.rs file into
scope with a use statement. Only library crates expose functions that other
crates can use; binary crates are meant to be run on their own.
This is one of the reasons Rust projects that provide a binary have a
straightforward src/main.rs file that calls logic that lives in the
src/lib.rs file. Using that structure, integration tests can test the
library crate with use to make the important functionality available.
If the important functionality works, the small amount of code in the
src/main.rs file will work as well, and that small amount of code doesn’t
need to be tested.
Summary
Rust’s testing features provide a way to specify how code should function to ensure it continues to work as you expect, even as you make changes. Unit tests exercise different parts of a library separately and can test private implementation details. Integration tests check that many parts of the library work together correctly, and they use the library’s public API to test the code in the same way external code will use it. Even though Rust’s type system and ownership rules help prevent some kinds of bugs, tests are still important to reduce logic bugs having to do with how your code is expected to behave.
Let’s combine the knowledge you learned in this chapter and in previous chapters to work on a project!
An I/O Project: Building a Command Line Program
This chapter is a recap of the many skills you’ve learned so far and an exploration of a few more standard library features. We’ll build a command line tool that interacts with file and command line input/output to practice some of the Rust concepts you now have under your belt.
Rust’s speed, safety, single binary output, and cross-platform support make it
an ideal language for creating command line tools, so for our project, we’ll
make our own version of the classic command line search tool grep
(globally search a regular expression and print). In the
simplest use case, grep searches a specified file for a specified string. To
do so, grep takes as its arguments a file path and a string. Then it reads
the file, finds lines in that file that contain the string argument, and prints
those lines.
Along the way, we’ll show how to make our command line tool use the terminal
features that many other command line tools use. We’ll read the value of an
environment variable to allow the user to configure the behavior of our tool.
We’ll also print error messages to the standard error console stream (stderr)
instead of standard output (stdout), so, for example, the user can redirect
successful output to a file while still seeing error messages onscreen.
One Rust community member, Andrew Gallant, has already created a fully
featured, very fast version of grep, called ripgrep. By comparison, our
version will be fairly simple, but this chapter will give you some of the
background knowledge you need to understand a real-world project such as
ripgrep.
Our grep project will combine a number of concepts you’ve learned so far:
- Organizing code (using what you learned about modules in Chapter 7)
- Using vectors and strings (collections, Chapter 8)
- Handling errors (Chapter 9)
- Using traits and lifetimes where appropriate (Chapter 10)
- Writing tests (Chapter 11)
We’ll also briefly introduce closures, iterators, and trait objects, which Chapters 13 and 17 will cover in detail.
Accepting Command Line Arguments
Let’s create a new project with, as always, cargo new. We’ll call our project
minigrep to distinguish it from the grep tool that you might already have
on your system.
$ cargo new minigrep
Created binary (application) `minigrep` project
$ cd minigrep
The first task is to make minigrep accept its two command line arguments: the
file path and a string to search for. That is, we want to be able to run our
program with cargo run, two hyphens to indicate the following arguments are
for our program rather than for cargo, a string to search for, and a path to
a file to search in, like so:
$ cargo run -- searchstring example-filename.txt
Right now, the program generated by cargo new cannot process arguments we
give it. Some existing libraries on crates.io can help
with writing a program that accepts command line arguments, but because you’re
just learning this concept, let’s implement this capability ourselves.
Reading the Argument Values
To enable minigrep to read the values of command line arguments we pass to
it, we’ll need the std::env::args function provided in Rust’s standard
library. This function returns an iterator of the command line arguments passed
to minigrep. We’ll cover iterators fully in Chapter 13. For now, you only need to know two details about iterators: iterators
produce a series of values, and we can call the collect method on an iterator
to turn it into a collection, such as a vector, that contains all the elements
the iterator produces.
The code in Listing 12-1 allows your minigrep program to read any command
line arguments passed to it and then collect the values into a vector.
Filename: src/main.rs
use std::env; fn main() { let args: Vec<String> = env::args().collect(); dbg!(args); }
Listing 12-1: Collecting the command line arguments into a vector and printing them
First, we bring the std::env module into scope with a use statement so we
can use its args function. Notice that the std::env::args function is
nested in two levels of modules. As we discussed in Chapter
7, in cases where the desired function is
nested in more than one module, we’ve chosen to bring the parent module into
scope rather than the function. By doing so, we can easily use other functions
from std::env. It’s also less ambiguous than adding use std::env::args and
then calling the function with just args, because args might easily be
mistaken for a function that’s defined in the current module.
The
argsFunction and Invalid UnicodeNote that
std::env::argswill panic if any argument contains invalid Unicode. If your program needs to accept arguments containing invalid Unicode, usestd::env::args_osinstead. That function returns an iterator that producesOsStringvalues instead ofStringvalues. We’ve chosen to usestd::env::argshere for simplicity, becauseOsStringvalues differ per platform and are more complex to work with thanStringvalues.
On the first line of main, we call env::args, and we immediately use
collect to turn the iterator into a vector containing all the values produced
by the iterator. We can use the collect function to create many kinds of
collections, so we explicitly annotate the type of args to specify that we
want a vector of strings. Although we very rarely need to annotate types in
Rust, collect is one function you do often need to annotate because Rust
isn’t able to infer the kind of collection you want.
Finally, we print the vector using the debug macro. Let’s try running the code first with no arguments and then with two arguments:
$ cargo run
Compiling minigrep v0.1.0 (file:///projects/minigrep)
Finished dev [unoptimized + debuginfo] target(s) in 0.61s
Running `target/debug/minigrep`
[src/main.rs:5] args = [
"target/debug/minigrep",
]
$ cargo run -- needle haystack
Compiling minigrep v0.1.0 (file:///projects/minigrep)
Finished dev [unoptimized + debuginfo] target(s) in 1.57s
Running `target/debug/minigrep needle haystack`
[src/main.rs:5] args = [
"target/debug/minigrep",
"needle",
"haystack",
]
Notice that the first value in the vector is "target/debug/minigrep", which
is the name of our binary. This matches the behavior of the arguments list in
C, letting programs use the name by which they were invoked in their execution.
It’s often convenient to have access to the program name in case you want to
print it in messages or change behavior of the program based on what command
line alias was used to invoke the program. But for the purposes of this
chapter, we’ll ignore it and save only the two arguments we need.
Saving the Argument Values in Variables
The program is currently able to access the values specified as command line arguments. Now we need to save the values of the two arguments in variables so we can use the values throughout the rest of the program. We do that in Listing 12-2.
Filename: src/main.rs
use std::env;
fn main() {
let args: Vec<String> = env::args().collect();
let query = &args[1];
let file_path = &args[2];
println!("Searching for {}", query);
println!("In file {}", file_path);
}Listing 12-2: Creating variables to hold the query argument and file path argument
As we saw when we printed the vector, the program’s name takes up the first
value in the vector at args[0], so we’re starting arguments at index 1. The
first argument minigrep takes is the string we’re searching for, so we put a
reference to the first argument in the variable query. The second argument
will be the file path, so we put a reference to the second argument in the
variable file_path.
We temporarily print the values of these variables to prove that the code is
working as we intend. Let’s run this program again with the arguments test
and sample.txt:
$ cargo run -- test sample.txt
Compiling minigrep v0.1.0 (file:///projects/minigrep)
Finished dev [unoptimized + debuginfo] target(s) in 0.0s
Running `target/debug/minigrep test sample.txt`
Searching for test
In file sample.txt
Great, the program is working! The values of the arguments we need are being saved into the right variables. Later we’ll add some error handling to deal with certain potential erroneous situations, such as when the user provides no arguments; for now, we’ll ignore that situation and work on adding file-reading capabilities instead.
Reading a File
Now we’ll add functionality to read the file specified in the file_path
argument. First, we need a sample file to test it with: we’ll use a file with a
small amount of text over multiple lines with some repeated words. Listing 12-3
has an Emily Dickinson poem that will work well! Create a file called
poem.txt at the root level of your project, and enter the poem “I’m Nobody!
Who are you?”
Filename: poem.txt
I'm nobody! Who are you?
Are you nobody, too?
Then there's a pair of us - don't tell!
They'd banish us, you know.
How dreary to be somebody!
How public, like a frog
To tell your name the livelong day
To an admiring bog!
Listing 12-3: A poem by Emily Dickinson makes a good test case
With the text in place, edit src/main.rs and add code to read the file, as shown in Listing 12-4.
Filename: src/main.rs
use std::env;
use std::fs;
fn main() {
// --snip--
let args: Vec<String> = env::args().collect();
let query = &args[1];
let file_path = &args[2];
println!("Searching for {}", query);
println!("In file {}", file_path);
let contents = fs::read_to_string(file_path)
.expect("Should have been able to read the file");
println!("With text:\n{contents}");
}Listing 12-4: Reading the contents of the file specified by the second argument
First, we bring in a relevant part of the standard library with a use
statement: we need std::fs to handle files.
In main, the new statement fs::read_to_string takes the file_path, opens
that file, and returns a std::io::Result<String> of the file’s contents.
After that, we again add a temporary println! statement that prints the value
of contents after the file is read, so we can check that the program is
working so far.
Let’s run this code with any string as the first command line argument (because we haven’t implemented the searching part yet) and the poem.txt file as the second argument:
$ cargo run -- the poem.txt
Compiling minigrep v0.1.0 (file:///projects/minigrep)
Finished dev [unoptimized + debuginfo] target(s) in 0.0s
Running `target/debug/minigrep the poem.txt`
Searching for the
In file poem.txt
With text:
I'm nobody! Who are you?
Are you nobody, too?
Then there's a pair of us - don't tell!
They'd banish us, you know.
How dreary to be somebody!
How public, like a frog
To tell your name the livelong day
To an admiring bog!
Great! The code read and then printed the contents of the file. But the code
has a few flaws. At the moment, the main function has multiple
responsibilities: generally, functions are clearer and easier to maintain if
each function is responsible for only one idea. The other problem is that we’re
not handling errors as well as we could. The program is still small, so these
flaws aren’t a big problem, but as the program grows, it will be harder to fix
them cleanly. It’s good practice to begin refactoring early on when developing
a program, because it’s much easier to refactor smaller amounts of code. We’ll
do that next.
Refactoring to Improve Modularity and Error Handling
To improve our program, we’ll fix four problems that have to do with the
program’s structure and how it’s handling potential errors. First, our main
function now performs two tasks: it parses arguments and reads files. As our
program grows, the number of separate tasks the main function handles will
increase. As a function gains responsibilities, it becomes more difficult to
reason about, harder to test, and harder to change without breaking one of its
parts. It’s best to separate functionality so each function is responsible for
one task.
This issue also ties into the second problem: although query and file_path
are configuration variables to our program, variables like contents are used
to perform the program’s logic. The longer main becomes, the more variables
we’ll need to bring into scope; the more variables we have in scope, the harder
it will be to keep track of the purpose of each. It’s best to group the
configuration variables into one structure to make their purpose clear.
The third problem is that we’ve used expect to print an error message when
reading the file fails, but the error message just prints Should have been able to read the file. Reading a file can fail in a number of ways: for
example, the file could be missing, or we might not have permission to open it.
Right now, regardless of the situation, we’d print the same error message for
everything, which wouldn’t give the user any information!
Fourth, we use expect repeatedly to handle different errors, and if the user
runs our program without specifying enough arguments, they’ll get an index out of bounds error from Rust that doesn’t clearly explain the problem. It would
be best if all the error-handling code were in one place so future maintainers
had only one place to consult the code if the error-handling logic needed to
change. Having all the error-handling code in one place will also ensure that
we’re printing messages that will be meaningful to our end users.
Let’s address these four problems by refactoring our project.
Separation of Concerns for Binary Projects
The organizational problem of allocating responsibility for multiple tasks to
the main function is common to many binary projects. As a result, the Rust
community has developed guidelines for splitting the separate concerns of a
binary program when main starts getting large. This process has the following
steps:
- Split your program into a main.rs and a lib.rs and move your program’s logic to lib.rs.
- As long as your command line parsing logic is small, it can remain in main.rs.
- When the command line parsing logic starts getting complicated, extract it from main.rs and move it to lib.rs.
The responsibilities that remain in the main function after this process
should be limited to the following:
- Calling the command line parsing logic with the argument values
- Setting up any other configuration
- Calling a
runfunction in lib.rs - Handling the error if
runreturns an error
This pattern is about separating concerns: main.rs handles running the
program, and lib.rs handles all the logic of the task at hand. Because you
can’t test the main function directly, this structure lets you test all of
your program’s logic by moving it into functions in lib.rs. The code that
remains in main.rs will be small enough to verify its correctness by reading
it. Let’s rework our program by following this process.
Extracting the Argument Parser
We’ll extract the functionality for parsing arguments into a function that
main will call to prepare for moving the command line parsing logic to
src/lib.rs. Listing 12-5 shows the new start of main that calls a new
function parse_config, which we’ll define in src/main.rs for the moment.
Filename: src/main.rs
use std::env;
use std::fs;
fn main() {
let args: Vec<String> = env::args().collect();
let (query, file_path) = parse_config(&args);
// --snip--
println!("Searching for {}", query);
println!("In file {}", file_path);
let contents = fs::read_to_string(file_path)
.expect("Should have been able to read the file");
println!("With text:\n{contents}");
}
fn parse_config(args: &[String]) -> (&str, &str) {
let query = &args[1];
let file_path = &args[2];
(query, file_path)
}Listing 12-5: Extracting a parse_config function from
main
We’re still collecting the command line arguments into a vector, but instead of
assigning the argument value at index 1 to the variable query and the
argument value at index 2 to the variable file_path within the main
function, we pass the whole vector to the parse_config function. The
parse_config function then holds the logic that determines which argument
goes in which variable and passes the values back to main. We still create
the query and file_path variables in main, but main no longer has the
responsibility of determining how the command line arguments and variables
correspond.
This rework may seem like overkill for our small program, but we’re refactoring in small, incremental steps. After making this change, run the program again to verify that the argument parsing still works. It’s good to check your progress often, to help identify the cause of problems when they occur.
Grouping Configuration Values
We can take another small step to improve the parse_config function further.
At the moment, we’re returning a tuple, but then we immediately break that
tuple into individual parts again. This is a sign that perhaps we don’t have
the right abstraction yet.
Another indicator that shows there’s room for improvement is the config part
of parse_config, which implies that the two values we return are related and
are both part of one configuration value. We’re not currently conveying this
meaning in the structure of the data other than by grouping the two values into
a tuple; we’ll instead put the two values into one struct and give each of the
struct fields a meaningful name. Doing so will make it easier for future
maintainers of this code to understand how the different values relate to each
other and what their purpose is.
Listing 12-6 shows the improvements to the parse_config function.
Filename: src/main.rs
use std::env;
use std::fs;
fn main() {
let args: Vec<String> = env::args().collect();
let config = parse_config(&args);
println!("Searching for {}", config.query);
println!("In file {}", config.file_path);
let contents = fs::read_to_string(config.file_path)
.expect("Should have been able to read the file");
// --snip--
println!("With text:\n{contents}");
}
struct Config {
query: String,
file_path: String,
}
fn parse_config(args: &[String]) -> Config {
let query = args[1].clone();
let file_path = args[2].clone();
Config { query, file_path }
}Listing 12-6: Refactoring parse_config to return an
instance of a Config struct
We’ve added a struct named Config defined to have fields named query and
file_path. The signature of parse_config now indicates that it returns a
Config value. In the body of parse_config, where we used to return
string slices that reference String values in args, we now define Config
to contain owned String values. The args variable in main is the owner of
the argument values and is only letting the parse_config function borrow
them, which means we’d violate Rust’s borrowing rules if Config tried to take
ownership of the values in args.
There are a number of ways we could manage the String data; the easiest,
though somewhat inefficient, route is to call the clone method on the values.
This will make a full copy of the data for the Config instance to own, which
takes more time and memory than storing a reference to the string data.
However, cloning the data also makes our code very straightforward because we
don’t have to manage the lifetimes of the references; in this circumstance,
giving up a little performance to gain simplicity is a worthwhile trade-off.
The Trade-Offs of Using
cloneThere’s a tendency among many Rustaceans to avoid using
cloneto fix ownership problems because of its runtime cost. In Chapter 13, you’ll learn how to use more efficient methods in this type of situation. But for now, it’s okay to copy a few strings to continue making progress because you’ll make these copies only once and your file path and query string are very small. It’s better to have a working program that’s a bit inefficient than to try to hyperoptimize code on your first pass. As you become more experienced with Rust, it’ll be easier to start with the most efficient solution, but for now, it’s perfectly acceptable to callclone.
We’ve updated main so it places the instance of Config returned by
parse_config into a variable named config, and we updated the code that
previously used the separate query and file_path variables so it now uses
the fields on the Config struct instead.
Now our code more clearly conveys that query and file_path are related and
that their purpose is to configure how the program will work. Any code that
uses these values knows to find them in the config instance in the fields
named for their purpose.
Creating a Constructor for Config
So far, we’ve extracted the logic responsible for parsing the command line
arguments from main and placed it in the parse_config function. Doing so
helped us to see that the query and file_path values were related and that
relationship should be conveyed in our code. We then added a Config struct to
name the related purpose of query and file_path and to be able to return the
values’ names as struct field names from the parse_config function.
So now that the purpose of the parse_config function is to create a Config
instance, we can change parse_config from a plain function to a function
named new that is associated with the Config struct. Making this change
will make the code more idiomatic. We can create instances of types in the
standard library, such as String, by calling String::new. Similarly, by
changing parse_config into a new function associated with Config, we’ll
be able to create instances of Config by calling Config::new. Listing 12-7
shows the changes we need to make.
Filename: src/main.rs
use std::env;
use std::fs;
fn main() {
let args: Vec<String> = env::args().collect();
let config = Config::new(&args);
println!("Searching for {}", config.query);
println!("In file {}", config.file_path);
let contents = fs::read_to_string(config.file_path)
.expect("Should have been able to read the file");
println!("With text:\n{contents}");
// --snip--
}
// --snip--
struct Config {
query: String,
file_path: String,
}
impl Config {
fn new(args: &[String]) -> Config {
let query = args[1].clone();
let file_path = args[2].clone();
Config { query, file_path }
}
}Listing 12-7: Changing parse_config into
Config::new
We’ve updated main where we were calling parse_config to instead call
Config::new. We’ve changed the name of parse_config to new and moved it
within an impl block, which associates the new function with Config. Try
compiling this code again to make sure it works.
Fixing the Error Handling
Now we’ll work on fixing our error handling. Recall that attempting to access
the values in the args vector at index 1 or index 2 will cause the program to
panic if the vector contains fewer than three items. Try running the program
without any arguments; it will look like this:
$ cargo run
Compiling minigrep v0.1.0 (file:///projects/minigrep)
Finished dev [unoptimized + debuginfo] target(s) in 0.0s
Running `target/debug/minigrep`
thread 'main' panicked at 'index out of bounds: the len is 1 but the index is 1', src/main.rs:27:21
note: run with `RUST_BACKTRACE=1` environment variable to display a backtrace
The line index out of bounds: the len is 1 but the index is 1 is an error
message intended for programmers. It won’t help our end users understand what
they should do instead. Let’s fix that now.
Improving the Error Message
In Listing 12-8, we add a check in the new function that will verify that the
slice is long enough before accessing index 1 and 2. If the slice isn’t long
enough, the program panics and displays a better error message.
Filename: src/main.rs
use std::env;
use std::fs;
fn main() {
let args: Vec<String> = env::args().collect();
let config = Config::new(&args);
println!("Searching for {}", config.query);
println!("In file {}", config.file_path);
let contents = fs::read_to_string(config.file_path)
.expect("Should have been able to read the file");
println!("With text:\n{contents}");
}
struct Config {
query: String,
file_path: String,
}
impl Config {
// --snip--
fn new(args: &[String]) -> Config {
if args.len() < 3 {
panic!("not enough arguments");
}
// --snip--
let query = args[1].clone();
let file_path = args[2].clone();
Config { query, file_path }
}
}Listing 12-8: Adding a check for the number of arguments
This code is similar to the Guess::new function we wrote in Listing
9-13, where we called panic! when the
value argument was out of the range of valid values. Instead of checking for
a range of values here, we’re checking that the length of args is at least 3
and the rest of the function can operate under the assumption that this
condition has been met. If args has fewer than three items, this condition
will be true, and we call the panic! macro to end the program immediately.
With these extra few lines of code in new, let’s run the program without any
arguments again to see what the error looks like now:
$ cargo run
Compiling minigrep v0.1.0 (file:///projects/minigrep)
Finished dev [unoptimized + debuginfo] target(s) in 0.0s
Running `target/debug/minigrep`
thread 'main' panicked at 'not enough arguments', src/main.rs:26:13
note: run with `RUST_BACKTRACE=1` environment variable to display a backtrace
This output is better: we now have a reasonable error message. However, we also
have extraneous information we don’t want to give to our users. Perhaps using
the technique we used in Listing 9-13 isn’t the best to use here: a call to
panic! is more appropriate for a programming problem than a usage problem,
as discussed in Chapter 9. Instead,
we’ll use the other technique you learned about in Chapter 9—returning a
Result that indicates either success or an error.
Returning a Result Instead of Calling panic!
We can instead return a Result value that will contain a Config instance in
the successful case and will describe the problem in the error case. We’re also
going to change the function name from new to build because many
programmers expect new functions to never fail. When Config::build is
communicating to main, we can use the Result type to signal there was a
problem. Then we can change main to convert an Err variant into a more
practical error for our users without the surrounding text about thread 'main' and RUST_BACKTRACE that a call to panic! causes.
Listing 12-9 shows the changes we need to make to the return value of the
function we’re now calling Config::build and the body of the function needed
to return a Result. Note that this won’t compile until we update main as
well, which we’ll do in the next listing.
Filename: src/main.rs
use std::env;
use std::fs;
fn main() {
let args: Vec<String> = env::args().collect();
let config = Config::new(&args);
println!("Searching for {}", config.query);
println!("In file {}", config.file_path);
let contents = fs::read_to_string(config.file_path)
.expect("Should have been able to read the file");
println!("With text:\n{contents}");
}
struct Config {
query: String,
file_path: String,
}
impl Config {
fn build(args: &[String]) -> Result<Config, &'static str> {
if args.len() < 3 {
return Err("not enough arguments");
}
let query = args[1].clone();
let file_path = args[2].clone();
Ok(Config { query, file_path })
}
}Listing 12-9: Returning a Result from
Config::build
Our build function returns a Result with a Config instance in the success
case and a &'static str in the error case. Our error values will always be
string literals that have the 'static lifetime.
We’ve made two changes in the body of the function: instead of calling panic!
when the user doesn’t pass enough arguments, we now return an Err value, and
we’ve wrapped the Config return value in an Ok. These changes make the
function conform to its new type signature.
Returning an Err value from Config::build allows the main function to
handle the Result value returned from the build function and exit the
process more cleanly in the error case.
Calling Config::build and Handling Errors
To handle the error case and print a user-friendly message, we need to update
main to handle the Result being returned by Config::build, as shown in
Listing 12-10. We’ll also take the responsibility of exiting the command line
tool with a nonzero error code away from panic! and instead implement it by
hand. A nonzero exit status is a convention to signal to the process that
called our program that the program exited with an error state.
Filename: src/main.rs
use std::env;
use std::fs;
use std::process;
fn main() {
let args: Vec<String> = env::args().collect();
let config = Config::build(&args).unwrap_or_else(|err| {
println!("Problem parsing arguments: {err}");
process::exit(1);
});
// --snip--
println!("Searching for {}", config.query);
println!("In file {}", config.file_path);
let contents = fs::read_to_string(config.file_path)
.expect("Should have been able to read the file");
println!("With text:\n{contents}");
}
struct Config {
query: String,
file_path: String,
}
impl Config {
fn build(args: &[String]) -> Result<Config, &'static str> {
if args.len() < 3 {
return Err("not enough arguments");
}
let query = args[1].clone();
let file_path = args[2].clone();
Ok(Config { query, file_path })
}
}Listing 12-10: Exiting with an error code if building a
Config fails
In this listing, we’ve used a method we haven’t covered in detail yet:
unwrap_or_else, which is defined on Result<T, E> by the standard library.
Using unwrap_or_else allows us to define some custom, non-panic! error
handling. If the Result is an Ok value, this method’s behavior is similar
to unwrap: it returns the inner value Ok is wrapping. However, if the value
is an Err value, this method calls the code in the closure, which is an
anonymous function we define and pass as an argument to unwrap_or_else. We’ll
cover closures in more detail in Chapter 13. For now,
you just need to know that unwrap_or_else will pass the inner value of the
Err, which in this case is the static string "not enough arguments" that we
added in Listing 12-9, to our closure in the argument err that appears
between the vertical pipes. The code in the closure can then use the err
value when it runs.
We’ve added a new use line to bring process from the standard library into
scope. The code in the closure that will be run in the error case is only two
lines: we print the err value and then call process::exit. The
process::exit function will stop the program immediately and return the
number that was passed as the exit status code. This is similar to the
panic!-based handling we used in Listing 12-8, but we no longer get all the
extra output. Let’s try it:
$ cargo run
Compiling minigrep v0.1.0 (file:///projects/minigrep)
Finished dev [unoptimized + debuginfo] target(s) in 0.48s
Running `target/debug/minigrep`
Problem parsing arguments: not enough arguments
Great! This output is much friendlier for our users.
Extracting Logic from main
Now that we’ve finished refactoring the configuration parsing, let’s turn to
the program’s logic. As we stated in “Separation of Concerns for Binary
Projects”, we’ll
extract a function named run that will hold all the logic currently in the
main function that isn’t involved with setting up configuration or handling
errors. When we’re done, main will be concise and easy to verify by
inspection, and we’ll be able to write tests for all the other logic.
Listing 12-11 shows the extracted run function. For now, we’re just making
the small, incremental improvement of extracting the function. We’re still
defining the function in src/main.rs.
Filename: src/main.rs
use std::env;
use std::fs;
use std::process;
fn main() {
// --snip--
let args: Vec<String> = env::args().collect();
let config = Config::build(&args).unwrap_or_else(|err| {
println!("Problem parsing arguments: {err}");
process::exit(1);
});
println!("Searching for {}", config.query);
println!("In file {}", config.file_path);
run(config);
}
fn run(config: Config) {
let contents = fs::read_to_string(config.file_path)
.expect("Should have been able to read the file");
println!("With text:\n{contents}");
}
// --snip--
struct Config {
query: String,
file_path: String,
}
impl Config {
fn build(args: &[String]) -> Result<Config, &'static str> {
if args.len() < 3 {
return Err("not enough arguments");
}
let query = args[1].clone();
let file_path = args[2].clone();
Ok(Config { query, file_path })
}
}Listing 12-11: Extracting a run function containing the
rest of the program logic
The run function now contains all the remaining logic from main, starting
from reading the file. The run function takes the Config instance as an
argument.
Returning Errors from the run Function
With the remaining program logic separated into the run function, we can
improve the error handling, as we did with Config::build in Listing 12-9.
Instead of allowing the program to panic by calling expect, the run
function will return a Result<T, E> when something goes wrong. This will let
us further consolidate the logic around handling errors into main in a
user-friendly way. Listing 12-12 shows the changes we need to make to the
signature and body of run.
Filename: src/main.rs
use std::env;
use std::fs;
use std::process;
use std::error::Error;
// --snip--
fn main() {
let args: Vec<String> = env::args().collect();
let config = Config::build(&args).unwrap_or_else(|err| {
println!("Problem parsing arguments: {err}");
process::exit(1);
});
println!("Searching for {}", config.query);
println!("In file {}", config.file_path);
run(config);
}
fn run(config: Config) -> Result<(), Box<dyn Error>> {
let contents = fs::read_to_string(config.file_path)?;
println!("With text:\n{contents}");
Ok(())
}
struct Config {
query: String,
file_path: String,
}
impl Config {
fn build(args: &[String]) -> Result<Config, &'static str> {
if args.len() < 3 {
return Err("not enough arguments");
}
let query = args[1].clone();
let file_path = args[2].clone();
Ok(Config { query, file_path })
}
}Listing 12-12: Changing the run function to return
Result
We’ve made three significant changes here. First, we changed the return type of
the run function to Result<(), Box<dyn Error>>. This function previously
returned the unit type, (), and we keep that as the value returned in the
Ok case.
For the error type, we used the trait object Box<dyn Error> (and we’ve
brought std::error::Error into scope with a use statement at the top).
We’ll cover trait objects in Chapter 17. For now, just
know that Box<dyn Error> means the function will return a type that
implements the Error trait, but we don’t have to specify what particular type
the return value will be. This gives us flexibility to return error values that
may be of different types in different error cases. The dyn keyword is short
for “dynamic.”
Second, we’ve removed the call to expect in favor of the ? operator, as we
talked about in Chapter 9. Rather than
panic! on an error, ? will return the error value from the current function
for the caller to handle.
Third, the run function now returns an Ok value in the success case.
We’ve declared the run function’s success type as () in the signature,
which means we need to wrap the unit type value in the Ok value. This
Ok(()) syntax might look a bit strange at first, but using () like this is
the idiomatic way to indicate that we’re calling run for its side effects
only; it doesn’t return a value we need.
When you run this code, it will compile but will display a warning:
$ cargo run the poem.txt
Compiling minigrep v0.1.0 (file:///projects/minigrep)
warning: unused `Result` that must be used
--> src/main.rs:19:5
|
19 | run(config);
| ^^^^^^^^^^^
|
= note: this `Result` may be an `Err` variant, which should be handled
= note: `#[warn(unused_must_use)]` on by default
warning: `minigrep` (bin "minigrep") generated 1 warning
Finished dev [unoptimized + debuginfo] target(s) in 0.71s
Running `target/debug/minigrep the poem.txt`
Searching for the
In file poem.txt
With text:
I'm nobody! Who are you?
Are you nobody, too?
Then there's a pair of us - don't tell!
They'd banish us, you know.
How dreary to be somebody!
How public, like a frog
To tell your name the livelong day
To an admiring bog!
Rust tells us that our code ignored the Result value and the Result value
might indicate that an error occurred. But we’re not checking to see whether or
not there was an error, and the compiler reminds us that we probably meant to
have some error-handling code here! Let’s rectify that problem now.
Handling Errors Returned from run in main
We’ll check for errors and handle them using a technique similar to one we used
with Config::build in Listing 12-10, but with a slight difference:
Filename: src/main.rs
use std::env;
use std::error::Error;
use std::fs;
use std::process;
fn main() {
// --snip--
let args: Vec<String> = env::args().collect();
let config = Config::build(&args).unwrap_or_else(|err| {
println!("Problem parsing arguments: {err}");
process::exit(1);
});
println!("Searching for {}", config.query);
println!("In file {}", config.file_path);
if let Err(e) = run(config) {
println!("Application error: {e}");
process::exit(1);
}
}
fn run(config: Config) -> Result<(), Box<dyn Error>> {
let contents = fs::read_to_string(config.file_path)?;
println!("With text:\n{contents}");
Ok(())
}
struct Config {
query: String,
file_path: String,
}
impl Config {
fn build(args: &[String]) -> Result<Config, &'static str> {
if args.len() < 3 {
return Err("not enough arguments");
}
let query = args[1].clone();
let file_path = args[2].clone();
Ok(Config { query, file_path })
}
}We use if let rather than unwrap_or_else to check whether run returns an
Err value and call process::exit(1) if it does. The run function doesn’t
return a value that we want to unwrap in the same way that Config::build
returns the Config instance. Because run returns () in the success case,
we only care about detecting an error, so we don’t need unwrap_or_else to
return the unwrapped value, which would only be ().
The bodies of the if let and the unwrap_or_else functions are the same in
both cases: we print the error and exit.
Splitting Code into a Library Crate
Our minigrep project is looking good so far! Now we’ll split the
src/main.rs file and put some code into the src/lib.rs file. That way we
can test the code and have a src/main.rs file with fewer responsibilities.
Let’s move all the code that isn’t the main function from src/main.rs to
src/lib.rs:
- The
runfunction definition - The relevant
usestatements - The definition of
Config - The
Config::buildfunction definition
The contents of src/lib.rs should have the signatures shown in Listing 12-13 (we’ve omitted the bodies of the functions for brevity). Note that this won’t compile until we modify src/main.rs in Listing 12-14.
Filename: src/lib.rs
use std::error::Error;
use std::fs;
pub struct Config {
pub query: String,
pub file_path: String,
}
impl Config {
pub fn build(args: &[String]) -> Result<Config, &'static str> {
// --snip--
if args.len() < 3 {
return Err("not enough arguments");
}
let query = args[1].clone();
let file_path = args[2].clone();
Ok(Config { query, file_path })
}
}
pub fn run(config: Config) -> Result<(), Box<dyn Error>> {
// --snip--
let contents = fs::read_to_string(config.file_path)?;
println!("With text:\n{contents}");
Ok(())
}Listing 12-13: Moving Config and run into
src/lib.rs
We’ve made liberal use of the pub keyword: on Config, on its fields and its
build method, and on the run function. We now have a library crate that has
a public API we can test!
Now we need to bring the code we moved to src/lib.rs into the scope of the binary crate in src/main.rs, as shown in Listing 12-14.
Filename: src/main.rs
use std::env;
use std::process;
use minigrep::Config;
fn main() {
// --snip--
let args: Vec<String> = env::args().collect();
let config = Config::build(&args).unwrap_or_else(|err| {
println!("Problem parsing arguments: {err}");
process::exit(1);
});
println!("Searching for {}", config.query);
println!("In file {}", config.file_path);
if let Err(e) = minigrep::run(config) {
// --snip--
println!("Application error: {e}");
process::exit(1);
}
}Listing 12-14: Using the minigrep library crate in
src/main.rs
We add a use minigrep::Config line to bring the Config type from the
library crate into the binary crate’s scope, and we prefix the run function
with our crate name. Now all the functionality should be connected and should
work. Run the program with cargo run and make sure everything works
correctly.
Whew! That was a lot of work, but we’ve set ourselves up for success in the future. Now it’s much easier to handle errors, and we’ve made the code more modular. Almost all of our work will be done in src/lib.rs from here on out.
Let’s take advantage of this newfound modularity by doing something that would have been difficult with the old code but is easy with the new code: we’ll write some tests!
Developing the Library’s Functionality with Test-Driven Development
Now that we’ve extracted the logic into src/lib.rs and left the argument collecting and error handling in src/main.rs, it’s much easier to write tests for the core functionality of our code. We can call functions directly with various arguments and check return values without having to call our binary from the command line.
In this section, we’ll add the searching logic to the minigrep program
using the test-driven development (TDD) process with the following steps:
- Write a test that fails and run it to make sure it fails for the reason you expect.
- Write or modify just enough code to make the new test pass.
- Refactor the code you just added or changed and make sure the tests continue to pass.
- Repeat from step 1!
Though it’s just one of many ways to write software, TDD can help drive code design. Writing the test before you write the code that makes the test pass helps to maintain high test coverage throughout the process.
We’ll test drive the implementation of the functionality that will actually do
the searching for the query string in the file contents and produce a list of
lines that match the query. We’ll add this functionality in a function called
search.
Writing a Failing Test
Because we don’t need them anymore, let’s remove the println! statements from
src/lib.rs and src/main.rs that we used to check the program’s behavior.
Then, in src/lib.rs, add a tests module with a test function, as we did in
Chapter 11. The test function specifies the
behavior we want the search function to have: it will take a query and the
text to search, and it will return only the lines from the text that contain
the query. Listing 12-15 shows this test, which won’t compile yet.
Filename: src/lib.rs
use std::error::Error;
use std::fs;
pub struct Config {
pub query: String,
pub file_path: String,
}
impl Config {
pub fn build(args: &[String]) -> Result<Config, &'static str> {
if args.len() < 3 {
return Err("not enough arguments");
}
let query = args[1].clone();
let file_path = args[2].clone();
Ok(Config { query, file_path })
}
}
pub fn run(config: Config) -> Result<(), Box<dyn Error>> {
let contents = fs::read_to_string(config.file_path)?;
Ok(())
}
#[cfg(test)]
mod tests {
use super::*;
#[test]
fn one_result() {
let query = "duct";
let contents = "\
Rust:
safe, fast, productive.
Pick three.";
assert_eq!(vec!["safe, fast, productive."], search(query, contents));
}
}Listing 12-15: Creating a failing test for the search
function we wish we had
This test searches for the string "duct". The text we’re searching is three
lines, only one of which contains "duct" (Note that the backslash after the
opening double quote tells Rust not to put a newline character at the beginning
of the contents of this string literal). We assert that the value returned from
the search function contains only the line we expect.
We aren’t yet able to run this test and watch it fail because the test doesn’t
even compile: the search function doesn’t exist yet! In accordance with TDD
principles, we’ll add just enough code to get the test to compile and run by
adding a definition of the search function that always returns an empty
vector, as shown in Listing 12-16. Then the test should compile and fail
because an empty vector doesn’t match a vector containing the line "safe, fast, productive."
Filename: src/lib.rs
use std::error::Error;
use std::fs;
pub struct Config {
pub query: String,
pub file_path: String,
}
impl Config {
pub fn build(args: &[String]) -> Result<Config, &'static str> {
if args.len() < 3 {
return Err("not enough arguments");
}
let query = args[1].clone();
let file_path = args[2].clone();
Ok(Config { query, file_path })
}
}
pub fn run(config: Config) -> Result<(), Box<dyn Error>> {
let contents = fs::read_to_string(config.file_path)?;
Ok(())
}
pub fn search<'a>(query: &str, contents: &'a str) -> Vec<&'a str> {
vec![]
}
#[cfg(test)]
mod tests {
use super::*;
#[test]
fn one_result() {
let query = "duct";
let contents = "\
Rust:
safe, fast, productive.
Pick three.";
assert_eq!(vec!["safe, fast, productive."], search(query, contents));
}
}Listing 12-16: Defining just enough of the search
function so our test will compile
Notice that we need to define an explicit lifetime 'a in the signature of
search and use that lifetime with the contents argument and the return
value. Recall in Chapter 10 that the lifetime
parameters specify which argument lifetime is connected to the lifetime of the
return value. In this case, we indicate that the returned vector should contain
string slices that reference slices of the argument contents (rather than the
argument query).
In other words, we tell Rust that the data returned by the search function
will live as long as the data passed into the search function in the
contents argument. This is important! The data referenced by a slice needs
to be valid for the reference to be valid; if the compiler assumes we’re making
string slices of query rather than contents, it will do its safety checking
incorrectly.
If we forget the lifetime annotations and try to compile this function, we’ll get this error:
$ cargo build
Compiling minigrep v0.1.0 (file:///projects/minigrep)
error[E0106]: missing lifetime specifier
--> src/lib.rs:28:51
|
28 | pub fn search(query: &str, contents: &str) -> Vec<&str> {
| ---- ---- ^ expected named lifetime parameter
|
= help: this function's return type contains a borrowed value, but the signature does not say whether it is borrowed from `query` or `contents`
help: consider introducing a named lifetime parameter
|
28 | pub fn search<'a>(query: &'a str, contents: &'a str) -> Vec<&'a str> {
| ++++ ++ ++ ++
For more information about this error, try `rustc --explain E0106`.
error: could not compile `minigrep` due to previous error
Rust can’t possibly know which of the two arguments we need, so we need to tell
it explicitly. Because contents is the argument that contains all of our text
and we want to return the parts of that text that match, we know contents is
the argument that should be connected to the return value using the lifetime
syntax.
Other programming languages don’t require you to connect arguments to return values in the signature, but this practice will get easier over time. You might want to compare this example with the “Validating References with Lifetimes” section in Chapter 10.
Now let’s run the test:
$ cargo test
Compiling minigrep v0.1.0 (file:///projects/minigrep)
Finished test [unoptimized + debuginfo] target(s) in 0.97s
Running unittests src/lib.rs (target/debug/deps/minigrep-9cd200e5fac0fc94)
running 1 test
test tests::one_result ... FAILED
failures:
---- tests::one_result stdout ----
thread 'tests::one_result' panicked at 'assertion failed: `(left == right)`
left: `["safe, fast, productive."]`,
right: `[]`', src/lib.rs:44:9
note: run with `RUST_BACKTRACE=1` environment variable to display a backtrace
failures:
tests::one_result
test result: FAILED. 0 passed; 1 failed; 0 ignored; 0 measured; 0 filtered out; finished in 0.00s
error: test failed, to rerun pass `--lib`
Great, the test fails, exactly as we expected. Let’s get the test to pass!
Writing Code to Pass the Test
Currently, our test is failing because we always return an empty vector. To fix
that and implement search, our program needs to follow these steps:
- Iterate through each line of the contents.
- Check whether the line contains our query string.
- If it does, add it to the list of values we’re returning.
- If it doesn’t, do nothing.
- Return the list of results that match.
Let’s work through each step, starting with iterating through lines.
Iterating Through Lines with the lines Method
Rust has a helpful method to handle line-by-line iteration of strings,
conveniently named lines, that works as shown in Listing 12-17. Note this
won’t compile yet.
Filename: src/lib.rs
use std::error::Error;
use std::fs;
pub struct Config {
pub query: String,
pub file_path: String,
}
impl Config {
pub fn build(args: &[String]) -> Result<Config, &'static str> {
if args.len() < 3 {
return Err("not enough arguments");
}
let query = args[1].clone();
let file_path = args[2].clone();
Ok(Config { query, file_path })
}
}
pub fn run(config: Config) -> Result<(), Box<dyn Error>> {
let contents = fs::read_to_string(config.file_path)?;
Ok(())
}
pub fn search<'a>(query: &str, contents: &'a str) -> Vec<&'a str> {
for line in contents.lines() {
// do something with line
}
}
#[cfg(test)]
mod tests {
use super::*;
#[test]
fn one_result() {
let query = "duct";
let contents = "\
Rust:
safe, fast, productive.
Pick three.";
assert_eq!(vec!["safe, fast, productive."], search(query, contents));
}
}Listing 12-17: Iterating through each line in contents
The lines method returns an iterator. We’ll talk about iterators in depth in
Chapter 13, but recall that you saw this way
of using an iterator in Listing 3-5, where we used a
for loop with an iterator to run some code on each item in a collection.
Searching Each Line for the Query
Next, we’ll check whether the current line contains our query string.
Fortunately, strings have a helpful method named contains that does this for
us! Add a call to the contains method in the search function, as shown in
Listing 12-18. Note this still won’t compile yet.
Filename: src/lib.rs
use std::error::Error;
use std::fs;
pub struct Config {
pub query: String,
pub file_path: String,
}
impl Config {
pub fn build(args: &[String]) -> Result<Config, &'static str> {
if args.len() < 3 {
return Err("not enough arguments");
}
let query = args[1].clone();
let file_path = args[2].clone();
Ok(Config { query, file_path })
}
}
pub fn run(config: Config) -> Result<(), Box<dyn Error>> {
let contents = fs::read_to_string(config.file_path)?;
Ok(())
}
pub fn search<'a>(query: &str, contents: &'a str) -> Vec<&'a str> {
for line in contents.lines() {
if line.contains(query) {
// do something with line
}
}
}
#[cfg(test)]
mod tests {
use super::*;
#[test]
fn one_result() {
let query = "duct";
let contents = "\
Rust:
safe, fast, productive.
Pick three.";
assert_eq!(vec!["safe, fast, productive."], search(query, contents));
}
}Listing 12-18: Adding functionality to see whether the
line contains the string in query
At the moment, we’re building up functionality. To get it to compile, we need to return a value from the body as we indicated we would in the function signature.
Storing Matching Lines
To finish this function, we need a way to store the matching lines that we want
to return. For that, we can make a mutable vector before the for loop and
call the push method to store a line in the vector. After the for loop,
we return the vector, as shown in Listing 12-19.
Filename: src/lib.rs
use std::error::Error;
use std::fs;
pub struct Config {
pub query: String,
pub file_path: String,
}
impl Config {
pub fn build(args: &[String]) -> Result<Config, &'static str> {
if args.len() < 3 {
return Err("not enough arguments");
}
let query = args[1].clone();
let file_path = args[2].clone();
Ok(Config { query, file_path })
}
}
pub fn run(config: Config) -> Result<(), Box<dyn Error>> {
let contents = fs::read_to_string(config.file_path)?;
Ok(())
}
pub fn search<'a>(query: &str, contents: &'a str) -> Vec<&'a str> {
let mut results = Vec::new();
for line in contents.lines() {
if line.contains(query) {
results.push(line);
}
}
results
}
#[cfg(test)]
mod tests {
use super::*;
#[test]
fn one_result() {
let query = "duct";
let contents = "\
Rust:
safe, fast, productive.
Pick three.";
assert_eq!(vec!["safe, fast, productive."], search(query, contents));
}
}Listing 12-19: Storing the lines that match so we can return them
Now the search function should return only the lines that contain query,
and our test should pass. Let’s run the test:
$ cargo test
Compiling minigrep v0.1.0 (file:///projects/minigrep)
Finished test [unoptimized + debuginfo] target(s) in 1.22s
Running unittests src/lib.rs (target/debug/deps/minigrep-9cd200e5fac0fc94)
running 1 test
test tests::one_result ... ok
test result: ok. 1 passed; 0 failed; 0 ignored; 0 measured; 0 filtered out; finished in 0.00s
Running unittests src/main.rs (target/debug/deps/minigrep-9cd200e5fac0fc94)
running 0 tests
test result: ok. 0 passed; 0 failed; 0 ignored; 0 measured; 0 filtered out; finished in 0.00s
Doc-tests minigrep
running 0 tests
test result: ok. 0 passed; 0 failed; 0 ignored; 0 measured; 0 filtered out; finished in 0.00s
Our test passed, so we know it works!
At this point, we could consider opportunities for refactoring the implementation of the search function while keeping the tests passing to maintain the same functionality. The code in the search function isn’t too bad, but it doesn’t take advantage of some useful features of iterators. We’ll return to this example in Chapter 13, where we’ll explore iterators in detail, and look at how to improve it.
Using the search Function in the run Function
Now that the search function is working and tested, we need to call search
from our run function. We need to pass the config.query value and the
contents that run reads from the file to the search function. Then run
will print each line returned from search:
Filename: src/lib.rs
use std::error::Error;
use std::fs;
pub struct Config {
pub query: String,
pub file_path: String,
}
impl Config {
pub fn build(args: &[String]) -> Result<Config, &'static str> {
if args.len() < 3 {
return Err("not enough arguments");
}
let query = args[1].clone();
let file_path = args[2].clone();
Ok(Config { query, file_path })
}
}
pub fn run(config: Config) -> Result<(), Box<dyn Error>> {
let contents = fs::read_to_string(config.file_path)?;
for line in search(&config.query, &contents) {
println!("{line}");
}
Ok(())
}
pub fn search<'a>(query: &str, contents: &'a str) -> Vec<&'a str> {
let mut results = Vec::new();
for line in contents.lines() {
if line.contains(query) {
results.push(line);
}
}
results
}
#[cfg(test)]
mod tests {
use super::*;
#[test]
fn one_result() {
let query = "duct";
let contents = "\
Rust:
safe, fast, productive.
Pick three.";
assert_eq!(vec!["safe, fast, productive."], search(query, contents));
}
}We’re still using a for loop to return each line from search and print it.
Now the entire program should work! Let’s try it out, first with a word that should return exactly one line from the Emily Dickinson poem, “frog”:
$ cargo run -- frog poem.txt
Compiling minigrep v0.1.0 (file:///projects/minigrep)
Finished dev [unoptimized + debuginfo] target(s) in 0.38s
Running `target/debug/minigrep frog poem.txt`
How public, like a frog
Cool! Now let’s try a word that will match multiple lines, like “body”:
$ cargo run -- body poem.txt
Compiling minigrep v0.1.0 (file:///projects/minigrep)
Finished dev [unoptimized + debuginfo] target(s) in 0.0s
Running `target/debug/minigrep body poem.txt`
I'm nobody! Who are you?
Are you nobody, too?
How dreary to be somebody!
And finally, let’s make sure that we don’t get any lines when we search for a word that isn’t anywhere in the poem, such as “monomorphization”:
$ cargo run -- monomorphization poem.txt
Compiling minigrep v0.1.0 (file:///projects/minigrep)
Finished dev [unoptimized + debuginfo] target(s) in 0.0s
Running `target/debug/minigrep monomorphization poem.txt`
Excellent! We’ve built our own mini version of a classic tool and learned a lot about how to structure applications. We’ve also learned a bit about file input and output, lifetimes, testing, and command line parsing.
To round out this project, we’ll briefly demonstrate how to work with environment variables and how to print to standard error, both of which are useful when you’re writing command line programs.
Working with Environment Variables
We’ll improve minigrep by adding an extra feature: an option for
case-insensitive searching that the user can turn on via an environment
variable. We could make this feature a command line option and require that
users enter it each time they want it to apply, but by instead making it an
environment variable, we allow our users to set the environment variable once
and have all their searches be case insensitive in that terminal session.
Writing a Failing Test for the Case-Insensitive search Function
We first add a new search_case_insensitive function that will be called when
the environment variable has a value. We’ll continue to follow the TDD process,
so the first step is again to write a failing test. We’ll add a new test for
the new search_case_insensitive function and rename our old test from
one_result to case_sensitive to clarify the differences between the two
tests, as shown in Listing 12-20.
Filename: src/lib.rs
use std::error::Error;
use std::fs;
pub struct Config {
pub query: String,
pub file_path: String,
}
impl Config {
pub fn build(args: &[String]) -> Result<Config, &'static str> {
if args.len() < 3 {
return Err("not enough arguments");
}
let query = args[1].clone();
let file_path = args[2].clone();
Ok(Config { query, file_path })
}
}
pub fn run(config: Config) -> Result<(), Box<dyn Error>> {
let contents = fs::read_to_string(config.file_path)?;
for line in search(&config.query, &contents) {
println!("{line}");
}
Ok(())
}
pub fn search<'a>(query: &str, contents: &'a str) -> Vec<&'a str> {
let mut results = Vec::new();
for line in contents.lines() {
if line.contains(query) {
results.push(line);
}
}
results
}
#[cfg(test)]
mod tests {
use super::*;
#[test]
fn case_sensitive() {
let query = "duct";
let contents = "\
Rust:
safe, fast, productive.
Pick three.
Duct tape.";
assert_eq!(vec!["safe, fast, productive."], search(query, contents));
}
#[test]
fn case_insensitive() {
let query = "rUsT";
let contents = "\
Rust:
safe, fast, productive.
Pick three.
Trust me.";
assert_eq!(
vec!["Rust:", "Trust me."],
search_case_insensitive(query, contents)
);
}
}Listing 12-20: Adding a new failing test for the case-insensitive function we’re about to add
Note that we’ve edited the old test’s contents too. We’ve added a new line
with the text "Duct tape." using a capital D that shouldn’t match the query
"duct" when we’re searching in a case-sensitive manner. Changing the old test
in this way helps ensure that we don’t accidentally break the case-sensitive
search functionality that we’ve already implemented. This test should pass now
and should continue to pass as we work on the case-insensitive search.
The new test for the case-insensitive search uses "rUsT" as its query. In
the search_case_insensitive function we’re about to add, the query "rUsT"
should match the line containing "Rust:" with a capital R and match the line
"Trust me." even though both have different casing from the query. This is
our failing test, and it will fail to compile because we haven’t yet defined
the search_case_insensitive function. Feel free to add a skeleton
implementation that always returns an empty vector, similar to the way we did
for the search function in Listing 12-16 to see the test compile and fail.
Implementing the search_case_insensitive Function
The search_case_insensitive function, shown in Listing 12-21, will be almost
the same as the search function. The only difference is that we’ll lowercase
the query and each line so whatever the case of the input arguments,
they’ll be the same case when we check whether the line contains the query.
Filename: src/lib.rs
use std::error::Error;
use std::fs;
pub struct Config {
pub query: String,
pub file_path: String,
}
impl Config {
pub fn build(args: &[String]) -> Result<Config, &'static str> {
if args.len() < 3 {
return Err("not enough arguments");
}
let query = args[1].clone();
let file_path = args[2].clone();
Ok(Config { query, file_path })
}
}
pub fn run(config: Config) -> Result<(), Box<dyn Error>> {
let contents = fs::read_to_string(config.file_path)?;
for line in search(&config.query, &contents) {
println!("{line}");
}
Ok(())
}
pub fn search<'a>(query: &str, contents: &'a str) -> Vec<&'a str> {
let mut results = Vec::new();
for line in contents.lines() {
if line.contains(query) {
results.push(line);
}
}
results
}
pub fn search_case_insensitive<'a>(
query: &str,
contents: &'a str,
) -> Vec<&'a str> {
let query = query.to_lowercase();
let mut results = Vec::new();
for line in contents.lines() {
if line.to_lowercase().contains(&query) {
results.push(line);
}
}
results
}
#[cfg(test)]
mod tests {
use super::*;
#[test]
fn case_sensitive() {
let query = "duct";
let contents = "\
Rust:
safe, fast, productive.
Pick three.
Duct tape.";
assert_eq!(vec!["safe, fast, productive."], search(query, contents));
}
#[test]
fn case_insensitive() {
let query = "rUsT";
let contents = "\
Rust:
safe, fast, productive.
Pick three.
Trust me.";
assert_eq!(
vec!["Rust:", "Trust me."],
search_case_insensitive(query, contents)
);
}
}Listing 12-21: Defining the search_case_insensitive
function to lowercase the query and the line before comparing them
First, we lowercase the query string and store it in a shadowed variable with
the same name. Calling to_lowercase on the query is necessary so no
matter whether the user’s query is "rust", "RUST", "Rust", or "rUsT",
we’ll treat the query as if it were "rust" and be insensitive to the case.
While to_lowercase will handle basic Unicode, it won’t be 100% accurate. If
we were writing a real application, we’d want to do a bit more work here, but
this section is about environment variables, not Unicode, so we’ll leave it at
that here.
Note that query is now a String rather than a string slice, because calling
to_lowercase creates new data rather than referencing existing data. Say the
query is "rUsT", as an example: that string slice doesn’t contain a lowercase
u or t for us to use, so we have to allocate a new String containing
"rust". When we pass query as an argument to the contains method now, we
need to add an ampersand because the signature of contains is defined to take
a string slice.
Next, we add a call to to_lowercase on each line to lowercase all
characters. Now that we’ve converted line and query to lowercase, we’ll
find matches no matter what the case of the query is.
Let’s see if this implementation passes the tests:
$ cargo test
Compiling minigrep v0.1.0 (file:///projects/minigrep)
Finished test [unoptimized + debuginfo] target(s) in 1.33s
Running unittests src/lib.rs (target/debug/deps/minigrep-9cd200e5fac0fc94)
running 2 tests
test tests::case_insensitive ... ok
test tests::case_sensitive ... ok
test result: ok. 2 passed; 0 failed; 0 ignored; 0 measured; 0 filtered out; finished in 0.00s
Running unittests src/main.rs (target/debug/deps/minigrep-9cd200e5fac0fc94)
running 0 tests
test result: ok. 0 passed; 0 failed; 0 ignored; 0 measured; 0 filtered out; finished in 0.00s
Doc-tests minigrep
running 0 tests
test result: ok. 0 passed; 0 failed; 0 ignored; 0 measured; 0 filtered out; finished in 0.00s
Great! They passed. Now, let’s call the new search_case_insensitive function
from the run function. First, we’ll add a configuration option to the
Config struct to switch between case-sensitive and case-insensitive search.
Adding this field will cause compiler errors because we aren’t initializing
this field anywhere yet:
Filename: src/lib.rs
use std::error::Error;
use std::fs;
pub struct Config {
pub query: String,
pub file_path: String,
pub ignore_case: bool,
}
impl Config {
pub fn build(args: &[String]) -> Result<Config, &'static str> {
if args.len() < 3 {
return Err("not enough arguments");
}
let query = args[1].clone();
let file_path = args[2].clone();
Ok(Config { query, file_path })
}
}
pub fn run(config: Config) -> Result<(), Box<dyn Error>> {
let contents = fs::read_to_string(config.file_path)?;
let results = if config.ignore_case {
search_case_insensitive(&config.query, &contents)
} else {
search(&config.query, &contents)
};
for line in results {
println!("{line}");
}
Ok(())
}
pub fn search<'a>(query: &str, contents: &'a str) -> Vec<&'a str> {
let mut results = Vec::new();
for line in contents.lines() {
if line.contains(query) {
results.push(line);
}
}
results
}
pub fn search_case_insensitive<'a>(
query: &str,
contents: &'a str,
) -> Vec<&'a str> {
let query = query.to_lowercase();
let mut results = Vec::new();
for line in contents.lines() {
if line.to_lowercase().contains(&query) {
results.push(line);
}
}
results
}
#[cfg(test)]
mod tests {
use super::*;
#[test]
fn case_sensitive() {
let query = "duct";
let contents = "\
Rust:
safe, fast, productive.
Pick three.
Duct tape.";
assert_eq!(vec!["safe, fast, productive."], search(query, contents));
}
#[test]
fn case_insensitive() {
let query = "rUsT";
let contents = "\
Rust:
safe, fast, productive.
Pick three.
Trust me.";
assert_eq!(
vec!["Rust:", "Trust me."],
search_case_insensitive(query, contents)
);
}
}We added the ignore_case field that holds a Boolean. Next, we need the run
function to check the ignore_case field’s value and use that to decide
whether to call the search function or the search_case_insensitive
function, as shown in Listing 12-22. This still won’t compile yet.
Filename: src/lib.rs
use std::error::Error;
use std::fs;
pub struct Config {
pub query: String,
pub file_path: String,
pub ignore_case: bool,
}
impl Config {
pub fn build(args: &[String]) -> Result<Config, &'static str> {
if args.len() < 3 {
return Err("not enough arguments");
}
let query = args[1].clone();
let file_path = args[2].clone();
Ok(Config { query, file_path })
}
}
pub fn run(config: Config) -> Result<(), Box<dyn Error>> {
let contents = fs::read_to_string(config.file_path)?;
let results = if config.ignore_case {
search_case_insensitive(&config.query, &contents)
} else {
search(&config.query, &contents)
};
for line in results {
println!("{line}");
}
Ok(())
}
pub fn search<'a>(query: &str, contents: &'a str) -> Vec<&'a str> {
let mut results = Vec::new();
for line in contents.lines() {
if line.contains(query) {
results.push(line);
}
}
results
}
pub fn search_case_insensitive<'a>(
query: &str,
contents: &'a str,
) -> Vec<&'a str> {
let query = query.to_lowercase();
let mut results = Vec::new();
for line in contents.lines() {
if line.to_lowercase().contains(&query) {
results.push(line);
}
}
results
}
#[cfg(test)]
mod tests {
use super::*;
#[test]
fn case_sensitive() {
let query = "duct";
let contents = "\
Rust:
safe, fast, productive.
Pick three.
Duct tape.";
assert_eq!(vec!["safe, fast, productive."], search(query, contents));
}
#[test]
fn case_insensitive() {
let query = "rUsT";
let contents = "\
Rust:
safe, fast, productive.
Pick three.
Trust me.";
assert_eq!(
vec!["Rust:", "Trust me."],
search_case_insensitive(query, contents)
);
}
}Listing 12-22: Calling either search or
search_case_insensitive based on the value in config.ignore_case
Finally, we need to check for the environment variable. The functions for
working with environment variables are in the env module in the standard
library, so we bring that module into scope at the top of src/lib.rs. Then
we’ll use the var function from the env module to check to see if any value
has been set for an environment variable named IGNORE_CASE, as shown in
Listing 12-23.
Filename: src/lib.rs
use std::env;
// --snip--
use std::error::Error;
use std::fs;
pub struct Config {
pub query: String,
pub file_path: String,
pub ignore_case: bool,
}
impl Config {
pub fn build(args: &[String]) -> Result<Config, &'static str> {
if args.len() < 3 {
return Err("not enough arguments");
}
let query = args[1].clone();
let file_path = args[2].clone();
let ignore_case = env::var("IGNORE_CASE").is_ok();
Ok(Config {
query,
file_path,
ignore_case,
})
}
}
pub fn run(config: Config) -> Result<(), Box<dyn Error>> {
let contents = fs::read_to_string(config.file_path)?;
let results = if config.ignore_case {
search_case_insensitive(&config.query, &contents)
} else {
search(&config.query, &contents)
};
for line in results {
println!("{line}");
}
Ok(())
}
pub fn search<'a>(query: &str, contents: &'a str) -> Vec<&'a str> {
let mut results = Vec::new();
for line in contents.lines() {
if line.contains(query) {
results.push(line);
}
}
results
}
pub fn search_case_insensitive<'a>(
query: &str,
contents: &'a str,
) -> Vec<&'a str> {
let query = query.to_lowercase();
let mut results = Vec::new();
for line in contents.lines() {
if line.to_lowercase().contains(&query) {
results.push(line);
}
}
results
}
#[cfg(test)]
mod tests {
use super::*;
#[test]
fn case_sensitive() {
let query = "duct";
let contents = "\
Rust:
safe, fast, productive.
Pick three.
Duct tape.";
assert_eq!(vec!["safe, fast, productive."], search(query, contents));
}
#[test]
fn case_insensitive() {
let query = "rUsT";
let contents = "\
Rust:
safe, fast, productive.
Pick three.
Trust me.";
assert_eq!(
vec!["Rust:", "Trust me."],
search_case_insensitive(query, contents)
);
}
}Listing 12-23: Checking for any value in an environment
variable named IGNORE_CASE
Here, we create a new variable ignore_case. To set its value, we call the
env::var function and pass it the name of the IGNORE_CASE environment
variable. The env::var function returns a Result that will be the
successful Ok variant that contains the value of the environment variable if
the environment variable is set to any value. It will return the Err variant
if the environment variable is not set.
We’re using the is_ok method on the Result to check whether the environment
variable is set, which means the program should do a case-insensitive search.
If the IGNORE_CASE environment variable isn’t set to anything, is_ok will
return false and the program will perform a case-sensitive search. We don’t
care about the value of the environment variable, just whether it’s set or
unset, so we’re checking is_ok rather than using unwrap, expect, or any
of the other methods we’ve seen on Result.
We pass the value in the ignore_case variable to the Config instance so the
run function can read that value and decide whether to call
search_case_insensitive or search, as we implemented in Listing 12-22.
Let’s give it a try! First, we’ll run our program without the environment
variable set and with the query to, which should match any line that contains
the word “to” in all lowercase:
$ cargo run -- to poem.txt
Compiling minigrep v0.1.0 (file:///projects/minigrep)
Finished dev [unoptimized + debuginfo] target(s) in 0.0s
Running `target/debug/minigrep to poem.txt`
Are you nobody, too?
How dreary to be somebody!
Looks like that still works! Now, let’s run the program with IGNORE_CASE
set to 1 but with the same query to.
$ IGNORE_CASE=1 cargo run -- to poem.txt
If you’re using PowerShell, you will need to set the environment variable and run the program as separate commands:
PS> $Env:IGNORE_CASE=1; cargo run -- to poem.txt
This will make IGNORE_CASE persist for the remainder of your shell
session. It can be unset with the Remove-Item cmdlet:
PS> Remove-Item Env:IGNORE_CASE
We should get lines that contain “to” that might have uppercase letters:
Are you nobody, too?
How dreary to be somebody!
To tell your name the livelong day
To an admiring bog!
Excellent, we also got lines containing “To”! Our minigrep program can now do
case-insensitive searching controlled by an environment variable. Now you know
how to manage options set using either command line arguments or environment
variables.
Some programs allow arguments and environment variables for the same configuration. In those cases, the programs decide that one or the other takes precedence. For another exercise on your own, try controlling case sensitivity through either a command line argument or an environment variable. Decide whether the command line argument or the environment variable should take precedence if the program is run with one set to case sensitive and one set to ignore case.
The std::env module contains many more useful features for dealing with
environment variables: check out its documentation to see what is available.
Writing Error Messages to Standard Error Instead of Standard Output
At the moment, we’re writing all of our output to the terminal using the
println! macro. In most terminals, there are two kinds of output: standard
output (stdout) for general information and standard error (stderr) for
error messages. This distinction enables users to choose to direct the
successful output of a program to a file but still print error messages to the
screen.
The println! macro is only capable of printing to standard output, so we
have to use something else to print to standard error.
Checking Where Errors Are Written
First, let’s observe how the content printed by minigrep is currently being
written to standard output, including any error messages we want to write to
standard error instead. We’ll do that by redirecting the standard output stream
to a file while intentionally causing an error. We won’t redirect the standard
error stream, so any content sent to standard error will continue to display on
the screen.
Command line programs are expected to send error messages to the standard error stream so we can still see error messages on the screen even if we redirect the standard output stream to a file. Our program is not currently well-behaved: we’re about to see that it saves the error message output to a file instead!
To demonstrate this behavior, we’ll run the program with > and the file path,
output.txt, that we want to redirect the standard output stream to. We won’t
pass any arguments, which should cause an error:
$ cargo run > output.txt
The > syntax tells the shell to write the contents of standard output to
output.txt instead of the screen. We didn’t see the error message we were
expecting printed to the screen, so that means it must have ended up in the
file. This is what output.txt contains:
Problem parsing arguments: not enough arguments
Yup, our error message is being printed to standard output. It’s much more useful for error messages like this to be printed to standard error so only data from a successful run ends up in the file. We’ll change that.
Printing Errors to Standard Error
We’ll use the code in Listing 12-24 to change how error messages are printed.
Because of the refactoring we did earlier in this chapter, all the code that
prints error messages is in one function, main. The standard library provides
the eprintln! macro that prints to the standard error stream, so let’s change
the two places we were calling println! to print errors to use eprintln!
instead.
Filename: src/main.rs
use std::env;
use std::process;
use minigrep::Config;
fn main() {
let args: Vec<String> = env::args().collect();
let config = Config::build(&args).unwrap_or_else(|err| {
eprintln!("Problem parsing arguments: {err}");
process::exit(1);
});
if let Err(e) = minigrep::run(config) {
eprintln!("Application error: {e}");
process::exit(1);
}
}Listing 12-24: Writing error messages to standard error
instead of standard output using eprintln!
Let’s now run the program again in the same way, without any arguments and
redirecting standard output with >:
$ cargo run > output.txt
Problem parsing arguments: not enough arguments
Now we see the error onscreen and output.txt contains nothing, which is the behavior we expect of command line programs.
Let’s run the program again with arguments that don’t cause an error but still redirect standard output to a file, like so:
$ cargo run -- to poem.txt > output.txt
We won’t see any output to the terminal, and output.txt will contain our results:
Filename: output.txt
Are you nobody, too?
How dreary to be somebody!
This demonstrates that we’re now using standard output for successful output and standard error for error output as appropriate.
Summary
This chapter recapped some of the major concepts you’ve learned so far and
covered how to perform common I/O operations in Rust. By using command line
arguments, files, environment variables, and the eprintln! macro for printing
errors, you’re now prepared to write command line applications. Combined with
the concepts in previous chapters, your code will be well organized, store data
effectively in the appropriate data structures, handle errors nicely, and be
well tested.
Next, we’ll explore some Rust features that were influenced by functional languages: closures and iterators.
Functional Language Features: Iterators and Closures
Rust’s design has taken inspiration from many existing languages and techniques, and one significant influence is functional programming. Programming in a functional style often includes using functions as values by passing them in arguments, returning them from other functions, assigning them to variables for later execution, and so forth.
In this chapter, we won’t debate the issue of what functional programming is or isn’t but will instead discuss some features of Rust that are similar to features in many languages often referred to as functional.
More specifically, we’ll cover:
- Closures, a function-like construct you can store in a variable
- Iterators, a way of processing a series of elements
- How to use closures and iterators to improve the I/O project in Chapter 12
- The performance of closures and iterators (Spoiler alert: they’re faster than you might think!)
We’ve already covered some other Rust features, such as pattern matching and enums, that are also influenced by the functional style. Because mastering closures and iterators is an important part of writing idiomatic, fast Rust code, we’ll devote this entire chapter to them.
Closures: Anonymous Functions that Capture Their Environment
Rust’s closures are anonymous functions you can save in a variable or pass as arguments to other functions. You can create the closure in one place and then call the closure elsewhere to evaluate it in a different context. Unlike functions, closures can capture values from the scope in which they’re defined. We’ll demonstrate how these closure features allow for code reuse and behavior customization.
Capturing the Environment with Closures
We’ll first examine how we can use closures to capture values from the environment they’re defined in for later use. Here’s the scenario: Every so often, our t-shirt company gives away an exclusive, limited-edition shirt to someone on our mailing list as a promotion. People on the mailing list can optionally add their favorite color to their profile. If the person chosen for a free shirt has their favorite color set, they get that color shirt. If the person hasn’t specified a favorite color, they get whatever color the company currently has the most of.
There are many ways to implement this. For this example, we’re going to use an
enum called ShirtColor that has the variants Red and Blue (limiting the
number of colors available for simplicity). We represent the company’s
inventory with an Inventory struct that has a field named shirts that
contains a Vec<ShirtColor> representing the shirt colors currently in stock.
The method giveaway defined on Inventory gets the optional shirt
color preference of the free shirt winner, and returns the shirt color the
person will get. This setup is shown in Listing 13-1:
Filename: src/main.rs
#[derive(Debug, PartialEq, Copy, Clone)]
enum ShirtColor {
Red,
Blue,
}
struct Inventory {
shirts: Vec<ShirtColor>,
}
impl Inventory {
fn giveaway(&self, user_preference: Option<ShirtColor>) -> ShirtColor {
user_preference.unwrap_or_else(|| self.most_stocked())
}
fn most_stocked(&self) -> ShirtColor {
let mut num_red = 0;
let mut num_blue = 0;
for color in &self.shirts {
match color {
ShirtColor::Red => num_red += 1,
ShirtColor::Blue => num_blue += 1,
}
}
if num_red > num_blue {
ShirtColor::Red
} else {
ShirtColor::Blue
}
}
}
fn main() {
let store = Inventory {
shirts: vec![ShirtColor::Blue, ShirtColor::Red, ShirtColor::Blue],
};
let user_pref1 = Some(ShirtColor::Red);
let giveaway1 = store.giveaway(user_pref1);
println!(
"The user with preference {:?} gets {:?}",
user_pref1, giveaway1
);
let user_pref2 = None;
let giveaway2 = store.giveaway(user_pref2);
println!(
"The user with preference {:?} gets {:?}",
user_pref2, giveaway2
);
}Listing 13-1: Shirt company giveaway situation
The store defined in main has two blue shirts and one red shirt remaining
to distribute for this limited-edition promotion. We call the giveaway method
for a user with a preference for a red shirt and a user without any preference.
Again, this code could be implemented in many ways, and here, to focus on
closures, we’ve stuck to concepts you’ve already learned except for the body of
the giveaway method that uses a closure. In the giveaway method, we get the
user preference as a parameter of type Option<ShirtColor> and call the
unwrap_or_else method on user_preference. The unwrap_or_else method on
Option<T> is defined by the standard library.
It takes one argument: a closure without any arguments that returns a value T
(the same type stored in the Some variant of the Option<T>, in this case
ShirtColor). If the Option<T> is the Some variant, unwrap_or_else
returns the value from within the Some. If the Option<T> is the None
variant, unwrap_or_else calls the closure and returns the value returned by
the closure.
We specify the closure expression || self.most_stocked() as the argument to
unwrap_or_else. This is a closure that takes no parameters itself (if the
closure had parameters, they would appear between the two vertical bars). The
body of the closure calls self.most_stocked(). We’re defining the closure
here, and the implementation of unwrap_or_else will evaluate the closure
later if the result is needed.
Running this code prints:
$ cargo run
Compiling shirt-company v0.1.0 (file:///projects/shirt-company)
Finished dev [unoptimized + debuginfo] target(s) in 0.27s
Running `target/debug/shirt-company`
The user with preference Some(Red) gets Red
The user with preference None gets Blue
One interesting aspect here is that we’ve passed a closure that calls
self.most_stocked() on the current Inventory instance. The standard library
didn’t need to know anything about the Inventory or ShirtColor types we
defined, or the logic we want to use in this scenario. The closure captures an
immutable reference to the self Inventory instance and passes it with the
code we specify to the unwrap_or_else method. Functions, on the other hand,
are not able to capture their environment in this way.
Closure Type Inference and Annotation
There are more differences between functions and closures. Closures don’t
usually require you to annotate the types of the parameters or the return value
like fn functions do. Type annotations are required on functions because the
types are part of an explicit interface exposed to your users. Defining this
interface rigidly is important for ensuring that everyone agrees on what types
of values a function uses and returns. Closures, on the other hand, aren’t used
in an exposed interface like this: they’re stored in variables and used without
naming them and exposing them to users of our library.
Closures are typically short and relevant only within a narrow context rather than in any arbitrary scenario. Within these limited contexts, the compiler can infer the types of the parameters and the return type, similar to how it’s able to infer the types of most variables (there are rare cases where the compiler needs closure type annotations too).
As with variables, we can add type annotations if we want to increase explicitness and clarity at the cost of being more verbose than is strictly necessary. Annotating the types for a closure would look like the definition shown in Listing 13-2. In this example, we’re defining a closure and storing it in a variable rather than defining the closure in the spot we pass it as an argument as we did in Listing 13-1.
Filename: src/main.rs
use std::thread; use std::time::Duration; fn generate_workout(intensity: u32, random_number: u32) { let expensive_closure = |num: u32| -> u32 { println!("calculating slowly..."); thread::sleep(Duration::from_secs(2)); num }; if intensity < 25 { println!("Today, do {} pushups!", expensive_closure(intensity)); println!("Next, do {} situps!", expensive_closure(intensity)); } else { if random_number == 3 { println!("Take a break today! Remember to stay hydrated!"); } else { println!( "Today, run for {} minutes!", expensive_closure(intensity) ); } } } fn main() { let simulated_user_specified_value = 10; let simulated_random_number = 7; generate_workout(simulated_user_specified_value, simulated_random_number); }
Listing 13-2: Adding optional type annotations of the parameter and return value types in the closure
With type annotations added, the syntax of closures looks more similar to the syntax of functions. Here we define a function that adds 1 to its parameter and a closure that has the same behavior, for comparison. We’ve added some spaces to line up the relevant parts. This illustrates how closure syntax is similar to function syntax except for the use of pipes and the amount of syntax that is optional:
fn add_one_v1 (x: u32) -> u32 { x + 1 }
let add_one_v2 = |x: u32| -> u32 { x + 1 };
let add_one_v3 = |x| { x + 1 };
let add_one_v4 = |x| x + 1 ;The first line shows a function definition, and the second line shows a fully
annotated closure definition. In the third line, we remove the type annotations
from the closure definition. In the fourth line, we remove the brackets, which
are optional because the closure body has only one expression. These are all
valid definitions that will produce the same behavior when they’re called. The
add_one_v3 and add_one_v4 lines require the closures to be evaluated to be
able to compile because the types will be inferred from their usage. This is
similar to let v = Vec::new(); needing either type annotations or values of
some type to be inserted into the Vec for Rust to be able to infer the type.
For closure definitions, the compiler will infer one concrete type for each of
their parameters and for their return value. For instance, Listing 13-3 shows
the definition of a short closure that just returns the value it receives as a
parameter. This closure isn’t very useful except for the purposes of this
example. Note that we haven’t added any type annotations to the definition.
Because there are no type annotations, we can call the closure with any type,
which we’ve done here with String the first time. If we then try to call
example_closure with an integer, we’ll get an error.
Filename: src/main.rs
fn main() {
let example_closure = |x| x;
let s = example_closure(String::from("hello"));
let n = example_closure(5);
}Listing 13-3: Attempting to call a closure whose types are inferred with two different types
The compiler gives us this error:
$ cargo run
Compiling closure-example v0.1.0 (file:///projects/closure-example)
error[E0308]: mismatched types
--> src/main.rs:5:29
|
5 | let n = example_closure(5);
| --------------- ^- help: try using a conversion method: `.to_string()`
| | |
| | expected struct `String`, found integer
| arguments to this function are incorrect
|
note: closure parameter defined here
--> src/main.rs:2:28
|
2 | let example_closure = |x| x;
| ^
For more information about this error, try `rustc --explain E0308`.
error: could not compile `closure-example` due to previous error
The first time we call example_closure with the String value, the compiler
infers the type of x and the return type of the closure to be String. Those
types are then locked into the closure in example_closure, and we get a type
error when we next try to use a different type with the same closure.
Capturing References or Moving Ownership
Closures can capture values from their environment in three ways, which directly map to the three ways a function can take a parameter: borrowing immutably, borrowing mutably, and taking ownership. The closure will decide which of these to use based on what the body of the function does with the captured values.
In Listing 13-4, we define a closure that captures an immutable reference to
the vector named list because it only needs an immutable reference to print
the value:
Filename: src/main.rs
fn main() { let list = vec![1, 2, 3]; println!("Before defining closure: {:?}", list); let only_borrows = || println!("From closure: {:?}", list); println!("Before calling closure: {:?}", list); only_borrows(); println!("After calling closure: {:?}", list); }
Listing 13-4: Defining and calling a closure that captures an immutable reference
This example also illustrates that a variable can bind to a closure definition, and we can later call the closure by using the variable name and parentheses as if the variable name were a function name.
Because we can have multiple immutable references to list at the same time,
list is still accessible from the code before the closure definition, after
the closure definition but before the closure is called, and after the closure
is called. This code compiles, runs, and prints:
$ cargo run
Compiling closure-example v0.1.0 (file:///projects/closure-example)
Finished dev [unoptimized + debuginfo] target(s) in 0.43s
Running `target/debug/closure-example`
Before defining closure: [1, 2, 3]
Before calling closure: [1, 2, 3]
From closure: [1, 2, 3]
After calling closure: [1, 2, 3]
Next, in Listing 13-5, we change the closure body so that it adds an element to
the list vector. The closure now captures a mutable reference:
Filename: src/main.rs
fn main() { let mut list = vec![1, 2, 3]; println!("Before defining closure: {:?}", list); let mut borrows_mutably = || list.push(7); borrows_mutably(); println!("After calling closure: {:?}", list); }
Listing 13-5: Defining and calling a closure that captures a mutable reference
This code compiles, runs, and prints:
$ cargo run
Compiling closure-example v0.1.0 (file:///projects/closure-example)
Finished dev [unoptimized + debuginfo] target(s) in 0.43s
Running `target/debug/closure-example`
Before defining closure: [1, 2, 3]
After calling closure: [1, 2, 3, 7]
Note that there’s no longer a println! between the definition and the call of
the borrows_mutably closure: when borrows_mutably is defined, it captures a
mutable reference to list. We don’t use the closure again after the closure
is called, so the mutable borrow ends. Between the closure definition and the
closure call, an immutable borrow to print isn’t allowed because no other
borrows are allowed when there’s a mutable borrow. Try adding a println!
there to see what error message you get!
If you want to force the closure to take ownership of the values it uses in the
environment even though the body of the closure doesn’t strictly need
ownership, you can use the move keyword before the parameter list.
This technique is mostly useful when passing a closure to a new thread to move
the data so that it’s owned by the new thread. We’ll discuss threads and why
you would want to use them in detail in Chapter 16 when we talk about
concurrency, but for now, let’s briefly explore spawning a new thread using a
closure that needs the move keyword. Listing 13-6 shows Listing 13-4 modified
to print the vector in a new thread rather than in the main thread:
Filename: src/main.rs
use std::thread; fn main() { let list = vec![1, 2, 3]; println!("Before defining closure: {:?}", list); thread::spawn(move || println!("From thread: {:?}", list)) .join() .unwrap(); }
Listing 13-6: Using move to force the closure for the
thread to take ownership of list
We spawn a new thread, giving the thread a closure to run as an argument. The
closure body prints out the list. In Listing 13-4, the closure only captured
list using an immutable reference because that's the least amount of access
to list needed to print it. In this example, even though the closure body
still only needs an immutable reference, we need to specify that list should
be moved into the closure by putting the move keyword at the beginning of the
closure definition. The new thread might finish before the rest of the main
thread finishes, or the main thread might finish first. If the main thread
maintained ownership of list but ended before the new thread did and dropped
list, the immutable reference in the thread would be invalid. Therefore, the
compiler requires that list be moved into the closure given to the new thread
so the reference will be valid. Try removing the move keyword or using list
in the main thread after the closure is defined to see what compiler errors you
get!
Moving Captured Values Out of Closures and the Fn Traits
Once a closure has captured a reference or captured ownership of a value from the environment where the closure is defined (thus affecting what, if anything, is moved into the closure), the code in the body of the closure defines what happens to the references or values when the closure is evaluated later (thus affecting what, if anything, is moved out of the closure). A closure body can do any of the following: move a captured value out of the closure, mutate the captured value, neither move nor mutate the value, or capture nothing from the environment to begin with.
The way a closure captures and handles values from the environment affects
which traits the closure implements, and traits are how functions and structs
can specify what kinds of closures they can use. Closures will automatically
implement one, two, or all three of these Fn traits, in an additive fashion,
depending on how the closure’s body handles the values:
FnOnceapplies to closures that can be called once. All closures implement at least this trait, because all closures can be called. A closure that moves captured values out of its body will only implementFnOnceand none of the otherFntraits, because it can only be called once.FnMutapplies to closures that don’t move captured values out of their body, but that might mutate the captured values. These closures can be called more than once.Fnapplies to closures that don’t move captured values out of their body and that don’t mutate captured values, as well as closures that capture nothing from their environment. These closures can be called more than once without mutating their environment, which is important in cases such as calling a closure multiple times concurrently.
Let’s look at the definition of the unwrap_or_else method on Option<T> that
we used in Listing 13-1:
impl<T> Option<T> {
pub fn unwrap_or_else<F>(self, f: F) -> T
where
F: FnOnce() -> T
{
match self {
Some(x) => x,
None => f(),
}
}
}Recall that T is the generic type representing the type of the value in the
Some variant of an Option. That type T is also the return type of the
unwrap_or_else function: code that calls unwrap_or_else on an
Option<String>, for example, will get a String.
Next, notice that the unwrap_or_else function has the additional generic type
parameter F. The F type is the type of the parameter named f, which is
the closure we provide when calling unwrap_or_else.
The trait bound specified on the generic type F is FnOnce() -> T, which
means F must be able to be called once, take no arguments, and return a T.
Using FnOnce in the trait bound expresses the constraint that
unwrap_or_else is only going to call f at most one time. In the body of
unwrap_or_else, we can see that if the Option is Some, f won’t be
called. If the Option is None, f will be called once. Because all
closures implement FnOnce, unwrap_or_else accepts the most different kinds
of closures and is as flexible as it can be.
Note: Functions can implement all three of the
Fntraits too. If what we want to do doesn’t require capturing a value from the environment, we can use the name of a function rather than a closure where we need something that implements one of theFntraits. For example, on anOption<Vec<T>>value, we could callunwrap_or_else(Vec::new)to get a new, empty vector if the value isNone.
Now let’s look at the standard library method sort_by_key defined on slices,
to see how that differs from unwrap_or_else and why sort_by_key uses
FnMut instead of FnOnce for the trait bound. The closure gets one argument
in the form of a reference to the current item in the slice being considered,
and returns a value of type K that can be ordered. This function is useful
when you want to sort a slice by a particular attribute of each item. In
Listing 13-7, we have a list of Rectangle instances and we use sort_by_key
to order them by their width attribute from low to high:
Filename: src/main.rs
#[derive(Debug)] struct Rectangle { width: u32, height: u32, } fn main() { let mut list = [ Rectangle { width: 10, height: 1 }, Rectangle { width: 3, height: 5 }, Rectangle { width: 7, height: 12 }, ]; list.sort_by_key(|r| r.width); println!("{:#?}", list); }
Listing 13-7: Using sort_by_key to order rectangles by
width
This code prints:
$ cargo run
Compiling rectangles v0.1.0 (file:///projects/rectangles)
Finished dev [unoptimized + debuginfo] target(s) in 0.41s
Running `target/debug/rectangles`
[
Rectangle {
width: 3,
height: 5,
},
Rectangle {
width: 7,
height: 12,
},
Rectangle {
width: 10,
height: 1,
},
]
The reason sort_by_key is defined to take an FnMut closure is that it calls
the closure multiple times: once for each item in the slice. The closure |r| r.width doesn’t capture, mutate, or move out anything from its environment, so
it meets the trait bound requirements.
In contrast, Listing 13-8 shows an example of a closure that implements just
the FnOnce trait, because it moves a value out of the environment. The
compiler won’t let us use this closure with sort_by_key:
Filename: src/main.rs
#[derive(Debug)]
struct Rectangle {
width: u32,
height: u32,
}
fn main() {
let mut list = [
Rectangle { width: 10, height: 1 },
Rectangle { width: 3, height: 5 },
Rectangle { width: 7, height: 12 },
];
let mut sort_operations = vec![];
let value = String::from("by key called");
list.sort_by_key(|r| {
sort_operations.push(value);
r.width
});
println!("{:#?}", list);
}Listing 13-8: Attempting to use an FnOnce closure with
sort_by_key
This is a contrived, convoluted way (that doesn’t work) to try and count the
number of times sort_by_key gets called when sorting list. This code
attempts to do this counting by pushing value—a String from the closure’s
environment—into the sort_operations vector. The closure captures value
then moves value out of the closure by transferring ownership of value to
the sort_operations vector. This closure can be called once; trying to call
it a second time wouldn’t work because value would no longer be in the
environment to be pushed into sort_operations again! Therefore, this closure
only implements FnOnce. When we try to compile this code, we get this error
that value can’t be moved out of the closure because the closure must
implement FnMut:
$ cargo run
Compiling rectangles v0.1.0 (file:///projects/rectangles)
error[E0507]: cannot move out of `value`, a captured variable in an `FnMut` closure
--> src/main.rs:18:30
|
15 | let value = String::from("by key called");
| ----- captured outer variable
16 |
17 | list.sort_by_key(|r| {
| --- captured by this `FnMut` closure
18 | sort_operations.push(value);
| ^^^^^ move occurs because `value` has type `String`, which does not implement the `Copy` trait
For more information about this error, try `rustc --explain E0507`.
error: could not compile `rectangles` due to previous error
The error points to the line in the closure body that moves value out of the
environment. To fix this, we need to change the closure body so that it doesn’t
move values out of the environment. To count the number of times sort_by_key
is called, keeping a counter in the environment and incrementing its value in
the closure body is a more straightforward way to calculate that. The closure
in Listing 13-9 works with sort_by_key because it is only capturing a mutable
reference to the num_sort_operations counter and can therefore be called more
than once:
Filename: src/main.rs
#[derive(Debug)] struct Rectangle { width: u32, height: u32, } fn main() { let mut list = [ Rectangle { width: 10, height: 1 }, Rectangle { width: 3, height: 5 }, Rectangle { width: 7, height: 12 }, ]; let mut num_sort_operations = 0; list.sort_by_key(|r| { num_sort_operations += 1; r.width }); println!("{:#?}, sorted in {num_sort_operations} operations", list); }
Listing 13-9: Using an FnMut closure with sort_by_key
is allowed
The Fn traits are important when defining or using functions or types that
make use of closures. In the next section, we’ll discuss iterators. Many
iterator methods take closure arguments, so keep these closure details in mind
as we continue!
Processing a Series of Items with Iterators
The iterator pattern allows you to perform some task on a sequence of items in turn. An iterator is responsible for the logic of iterating over each item and determining when the sequence has finished. When you use iterators, you don’t have to reimplement that logic yourself.
In Rust, iterators are lazy, meaning they have no effect until you call
methods that consume the iterator to use it up. For example, the code in
Listing 13-10 creates an iterator over the items in the vector v1 by calling
the iter method defined on Vec<T>. This code by itself doesn’t do anything
useful.
fn main() { let v1 = vec![1, 2, 3]; let v1_iter = v1.iter(); }
Listing 13-10: Creating an iterator
The iterator is stored in the v1_iter variable. Once we’ve created an
iterator, we can use it in a variety of ways. In Listing 3-5 in Chapter 3, we
iterated over an array using a for loop to execute some code on each of its
items. Under the hood this implicitly created and then consumed an iterator,
but we glossed over how exactly that works until now.
In the example in Listing 13-11, we separate the creation of the iterator from
the use of the iterator in the for loop. When the for loop is called using
the iterator in v1_iter, each element in the iterator is used in one
iteration of the loop, which prints out each value.
fn main() { let v1 = vec![1, 2, 3]; let v1_iter = v1.iter(); for val in v1_iter { println!("Got: {}", val); } }
Listing 13-11: Using an iterator in a for loop
In languages that don’t have iterators provided by their standard libraries, you would likely write this same functionality by starting a variable at index 0, using that variable to index into the vector to get a value, and incrementing the variable value in a loop until it reached the total number of items in the vector.
Iterators handle all that logic for you, cutting down on repetitive code you could potentially mess up. Iterators give you more flexibility to use the same logic with many different kinds of sequences, not just data structures you can index into, like vectors. Let’s examine how iterators do that.
The Iterator Trait and the next Method
All iterators implement a trait named Iterator that is defined in the
standard library. The definition of the trait looks like this:
#![allow(unused)] fn main() { pub trait Iterator { type Item; fn next(&mut self) -> Option<Self::Item>; // methods with default implementations elided } }
Notice this definition uses some new syntax: type Item and Self::Item,
which are defining an associated type with this trait. We’ll talk about
associated types in depth in Chapter 19. For now, all you need to know is that
this code says implementing the Iterator trait requires that you also define
an Item type, and this Item type is used in the return type of the next
method. In other words, the Item type will be the type returned from the
iterator.
The Iterator trait only requires implementors to define one method: the
next method, which returns one item of the iterator at a time wrapped in
Some and, when iteration is over, returns None.
We can call the next method on iterators directly; Listing 13-12 demonstrates
what values are returned from repeated calls to next on the iterator created
from the vector.
Filename: src/lib.rs
#[cfg(test)]
mod tests {
#[test]
fn iterator_demonstration() {
let v1 = vec![1, 2, 3];
let mut v1_iter = v1.iter();
assert_eq!(v1_iter.next(), Some(&1));
assert_eq!(v1_iter.next(), Some(&2));
assert_eq!(v1_iter.next(), Some(&3));
assert_eq!(v1_iter.next(), None);
}
}Listing 13-12: Calling the next method on an
iterator
Note that we needed to make v1_iter mutable: calling the next method on an
iterator changes internal state that the iterator uses to keep track of where
it is in the sequence. In other words, this code consumes, or uses up, the
iterator. Each call to next eats up an item from the iterator. We didn’t need
to make v1_iter mutable when we used a for loop because the loop took
ownership of v1_iter and made it mutable behind the scenes.
Also note that the values we get from the calls to next are immutable
references to the values in the vector. The iter method produces an iterator
over immutable references. If we want to create an iterator that takes
ownership of v1 and returns owned values, we can call into_iter instead of
iter. Similarly, if we want to iterate over mutable references, we can call
iter_mut instead of iter.
Methods that Consume the Iterator
The Iterator trait has a number of different methods with default
implementations provided by the standard library; you can find out about these
methods by looking in the standard library API documentation for the Iterator
trait. Some of these methods call the next method in their definition, which
is why you’re required to implement the next method when implementing the
Iterator trait.
Methods that call next are called consuming adaptors, because calling them
uses up the iterator. One example is the sum method, which takes ownership of
the iterator and iterates through the items by repeatedly calling next, thus
consuming the iterator. As it iterates through, it adds each item to a running
total and returns the total when iteration is complete. Listing 13-13 has a
test illustrating a use of the sum method:
Filename: src/lib.rs
#[cfg(test)]
mod tests {
#[test]
fn iterator_sum() {
let v1 = vec![1, 2, 3];
let v1_iter = v1.iter();
let total: i32 = v1_iter.sum();
assert_eq!(total, 6);
}
}Listing 13-13: Calling the sum method to get the total
of all items in the iterator
We aren’t allowed to use v1_iter after the call to sum because sum takes
ownership of the iterator we call it on.
Methods that Produce Other Iterators
Iterator adaptors are methods defined on the Iterator trait that don’t
consume the iterator. Instead, they produce different iterators by changing
some aspect of the original iterator.
Listing 13-14 shows an example of calling the iterator adaptor method map,
which takes a closure to call on each item as the items are iterated through.
The map method returns a new iterator that produces the modified items. The
closure here creates a new iterator in which each item from the vector will be
incremented by 1:
Filename: src/main.rs
fn main() { let v1: Vec<i32> = vec![1, 2, 3]; v1.iter().map(|x| x + 1); }
Listing 13-14: Calling the iterator adaptor map to
create a new iterator
However, this code produces a warning:
$ cargo run
Compiling iterators v0.1.0 (file:///projects/iterators)
warning: unused `Map` that must be used
--> src/main.rs:4:5
|
4 | v1.iter().map(|x| x + 1);
| ^^^^^^^^^^^^^^^^^^^^^^^^
|
= note: iterators are lazy and do nothing unless consumed
= note: `#[warn(unused_must_use)]` on by default
warning: `iterators` (bin "iterators") generated 1 warning
Finished dev [unoptimized + debuginfo] target(s) in 0.47s
Running `target/debug/iterators`
The code in Listing 13-14 doesn’t do anything; the closure we’ve specified never gets called. The warning reminds us why: iterator adaptors are lazy, and we need to consume the iterator here.
To fix this warning and consume the iterator, we’ll use the collect method,
which we used in Chapter 12 with env::args in Listing 12-1. This method
consumes the iterator and collects the resulting values into a collection data
type.
In Listing 13-15, we collect the results of iterating over the iterator that’s
returned from the call to map into a vector. This vector will end up
containing each item from the original vector incremented by 1.
Filename: src/main.rs
fn main() { let v1: Vec<i32> = vec![1, 2, 3]; let v2: Vec<_> = v1.iter().map(|x| x + 1).collect(); assert_eq!(v2, vec![2, 3, 4]); }
Listing 13-15: Calling the map method to create a new
iterator and then calling the collect method to consume the new iterator and
create a vector
Because map takes a closure, we can specify any operation we want to perform
on each item. This is a great example of how closures let you customize some
behavior while reusing the iteration behavior that the Iterator trait
provides.
You can chain multiple calls to iterator adaptors to perform complex actions in a readable way. But because all iterators are lazy, you have to call one of the consuming adaptor methods to get results from calls to iterator adaptors.
Using Closures that Capture Their Environment
Many iterator adapters take closures as arguments, and commonly the closures we’ll specify as arguments to iterator adapters will be closures that capture their environment.
For this example, we’ll use the filter method that takes a closure. The
closure gets an item from the iterator and returns a bool. If the closure
returns true, the value will be included in the iteration produced by
filter. If the closure returns false, the value won’t be included.
In Listing 13-16, we use filter with a closure that captures the shoe_size
variable from its environment to iterate over a collection of Shoe struct
instances. It will return only shoes that are the specified size.
Filename: src/lib.rs
#[derive(PartialEq, Debug)]
struct Shoe {
size: u32,
style: String,
}
fn shoes_in_size(shoes: Vec<Shoe>, shoe_size: u32) -> Vec<Shoe> {
shoes.into_iter().filter(|s| s.size == shoe_size).collect()
}
#[cfg(test)]
mod tests {
use super::*;
#[test]
fn filters_by_size() {
let shoes = vec![
Shoe {
size: 10,
style: String::from("sneaker"),
},
Shoe {
size: 13,
style: String::from("sandal"),
},
Shoe {
size: 10,
style: String::from("boot"),
},
];
let in_my_size = shoes_in_size(shoes, 10);
assert_eq!(
in_my_size,
vec![
Shoe {
size: 10,
style: String::from("sneaker")
},
Shoe {
size: 10,
style: String::from("boot")
},
]
);
}
}Listing 13-16: Using the filter method with a closure
that captures shoe_size
The shoes_in_size function takes ownership of a vector of shoes and a shoe
size as parameters. It returns a vector containing only shoes of the specified
size.
In the body of shoes_in_size, we call into_iter to create an iterator
that takes ownership of the vector. Then we call filter to adapt that
iterator into a new iterator that only contains elements for which the closure
returns true.
The closure captures the shoe_size parameter from the environment and
compares the value with each shoe’s size, keeping only shoes of the size
specified. Finally, calling collect gathers the values returned by the
adapted iterator into a vector that’s returned by the function.
The test shows that when we call shoes_in_size, we get back only shoes
that have the same size as the value we specified.
Improving Our I/O Project
With this new knowledge about iterators, we can improve the I/O project in
Chapter 12 by using iterators to make places in the code clearer and more
concise. Let’s look at how iterators can improve our implementation of the
Config::build function and the search function.
Removing a clone Using an Iterator
In Listing 12-6, we added code that took a slice of String values and created
an instance of the Config struct by indexing into the slice and cloning the
values, allowing the Config struct to own those values. In Listing 13-17,
we’ve reproduced the implementation of the Config::build function as it was
in Listing 12-23:
Filename: src/lib.rs
use std::env;
use std::error::Error;
use std::fs;
pub struct Config {
pub query: String,
pub file_path: String,
pub ignore_case: bool,
}
impl Config {
pub fn build(args: &[String]) -> Result<Config, &'static str> {
if args.len() < 3 {
return Err("not enough arguments");
}
let query = args[1].clone();
let file_path = args[2].clone();
let ignore_case = env::var("IGNORE_CASE").is_ok();
Ok(Config {
query,
file_path,
ignore_case,
})
}
}
pub fn run(config: Config) -> Result<(), Box<dyn Error>> {
let contents = fs::read_to_string(config.file_path)?;
let results = if config.ignore_case {
search_case_insensitive(&config.query, &contents)
} else {
search(&config.query, &contents)
};
for line in results {
println!("{line}");
}
Ok(())
}
pub fn search<'a>(query: &str, contents: &'a str) -> Vec<&'a str> {
let mut results = Vec::new();
for line in contents.lines() {
if line.contains(query) {
results.push(line);
}
}
results
}
pub fn search_case_insensitive<'a>(
query: &str,
contents: &'a str,
) -> Vec<&'a str> {
let query = query.to_lowercase();
let mut results = Vec::new();
for line in contents.lines() {
if line.to_lowercase().contains(&query) {
results.push(line);
}
}
results
}
#[cfg(test)]
mod tests {
use super::*;
#[test]
fn case_sensitive() {
let query = "duct";
let contents = "\
Rust:
safe, fast, productive.
Pick three.
Duct tape.";
assert_eq!(vec!["safe, fast, productive."], search(query, contents));
}
#[test]
fn case_insensitive() {
let query = "rUsT";
let contents = "\
Rust:
safe, fast, productive.
Pick three.
Trust me.";
assert_eq!(
vec!["Rust:", "Trust me."],
search_case_insensitive(query, contents)
);
}
}Listing 13-17: Reproduction of the Config::build
function from Listing 12-23
At the time, we said not to worry about the inefficient clone calls because
we would remove them in the future. Well, that time is now!
We needed clone here because we have a slice with String elements in the
parameter args, but the build function doesn’t own args. To return
ownership of a Config instance, we had to clone the values from the query
and file_path fields of Config so the Config instance can own its values.
With our new knowledge about iterators, we can change the build function to
take ownership of an iterator as its argument instead of borrowing a slice.
We’ll use the iterator functionality instead of the code that checks the length
of the slice and indexes into specific locations. This will clarify what the
Config::build function is doing because the iterator will access the values.
Once Config::build takes ownership of the iterator and stops using indexing
operations that borrow, we can move the String values from the iterator into
Config rather than calling clone and making a new allocation.
Using the Returned Iterator Directly
Open your I/O project’s src/main.rs file, which should look like this:
Filename: src/main.rs
use std::env;
use std::process;
use minigrep::Config;
fn main() {
let args: Vec<String> = env::args().collect();
let config = Config::build(&args).unwrap_or_else(|err| {
eprintln!("Problem parsing arguments: {err}");
process::exit(1);
});
// --snip--
if let Err(e) = minigrep::run(config) {
eprintln!("Application error: {e}");
process::exit(1);
}
}We’ll first change the start of the main function that we had in Listing
12-24 to the code in Listing 13-18, which this time uses an iterator. This
won’t compile until we update Config::build as well.
Filename: src/main.rs
use std::env;
use std::process;
use minigrep::Config;
fn main() {
let config = Config::build(env::args()).unwrap_or_else(|err| {
eprintln!("Problem parsing arguments: {err}");
process::exit(1);
});
// --snip--
if let Err(e) = minigrep::run(config) {
eprintln!("Application error: {e}");
process::exit(1);
}
}Listing 13-18: Passing the return value of env::args to
Config::build
The env::args function returns an iterator! Rather than collecting the
iterator values into a vector and then passing a slice to Config::build, now
we’re passing ownership of the iterator returned from env::args to
Config::build directly.
Next, we need to update the definition of Config::build. In your I/O
project’s src/lib.rs file, let’s change the signature of Config::build to
look like Listing 13-19. This still won’t compile because we need to update the
function body.
Filename: src/lib.rs
use std::env;
use std::error::Error;
use std::fs;
pub struct Config {
pub query: String,
pub file_path: String,
pub ignore_case: bool,
}
impl Config {
pub fn build(
mut args: impl Iterator<Item = String>,
) -> Result<Config, &'static str> {
// --snip--
if args.len() < 3 {
return Err("not enough arguments");
}
let query = args[1].clone();
let file_path = args[2].clone();
let ignore_case = env::var("IGNORE_CASE").is_ok();
Ok(Config {
query,
file_path,
ignore_case,
})
}
}
pub fn run(config: Config) -> Result<(), Box<dyn Error>> {
let contents = fs::read_to_string(config.file_path)?;
let results = if config.ignore_case {
search_case_insensitive(&config.query, &contents)
} else {
search(&config.query, &contents)
};
for line in results {
println!("{line}");
}
Ok(())
}
pub fn search<'a>(query: &str, contents: &'a str) -> Vec<&'a str> {
let mut results = Vec::new();
for line in contents.lines() {
if line.contains(query) {
results.push(line);
}
}
results
}
pub fn search_case_insensitive<'a>(
query: &str,
contents: &'a str,
) -> Vec<&'a str> {
let query = query.to_lowercase();
let mut results = Vec::new();
for line in contents.lines() {
if line.to_lowercase().contains(&query) {
results.push(line);
}
}
results
}
#[cfg(test)]
mod tests {
use super::*;
#[test]
fn case_sensitive() {
let query = "duct";
let contents = "\
Rust:
safe, fast, productive.
Pick three.
Duct tape.";
assert_eq!(vec!["safe, fast, productive."], search(query, contents));
}
#[test]
fn case_insensitive() {
let query = "rUsT";
let contents = "\
Rust:
safe, fast, productive.
Pick three.
Trust me.";
assert_eq!(
vec!["Rust:", "Trust me."],
search_case_insensitive(query, contents)
);
}
}Listing 13-19: Updating the signature of Config::build
to expect an iterator
The standard library documentation for the env::args function shows that the
type of the iterator it returns is std::env::Args, and that type implements
the Iterator trait and returns String values.
We’ve updated the signature of the Config::build function so the parameter
args has a generic type with the trait bounds impl Iterator<Item = String>
instead of &[String]. This usage of the impl Trait syntax we discussed in
the “Traits as Parameters” section of Chapter 10
means that args can be any type that implements the Iterator type and
returns String items.
Because we’re taking ownership of args and we’ll be mutating args by
iterating over it, we can add the mut keyword into the specification of the
args parameter to make it mutable.
Using Iterator Trait Methods Instead of Indexing
Next, we’ll fix the body of Config::build. Because args implements the
Iterator trait, we know we can call the next method on it! Listing 13-20
updates the code from Listing 12-23 to use the next method:
Filename: src/lib.rs
use std::env;
use std::error::Error;
use std::fs;
pub struct Config {
pub query: String,
pub file_path: String,
pub ignore_case: bool,
}
impl Config {
pub fn build(
mut args: impl Iterator<Item = String>,
) -> Result<Config, &'static str> {
args.next();
let query = match args.next() {
Some(arg) => arg,
None => return Err("Didn't get a query string"),
};
let file_path = match args.next() {
Some(arg) => arg,
None => return Err("Didn't get a file path"),
};
let ignore_case = env::var("IGNORE_CASE").is_ok();
Ok(Config {
query,
file_path,
ignore_case,
})
}
}
pub fn run(config: Config) -> Result<(), Box<dyn Error>> {
let contents = fs::read_to_string(config.file_path)?;
let results = if config.ignore_case {
search_case_insensitive(&config.query, &contents)
} else {
search(&config.query, &contents)
};
for line in results {
println!("{line}");
}
Ok(())
}
pub fn search<'a>(query: &str, contents: &'a str) -> Vec<&'a str> {
let mut results = Vec::new();
for line in contents.lines() {
if line.contains(query) {
results.push(line);
}
}
results
}
pub fn search_case_insensitive<'a>(
query: &str,
contents: &'a str,
) -> Vec<&'a str> {
let query = query.to_lowercase();
let mut results = Vec::new();
for line in contents.lines() {
if line.to_lowercase().contains(&query) {
results.push(line);
}
}
results
}
#[cfg(test)]
mod tests {
use super::*;
#[test]
fn case_sensitive() {
let query = "duct";
let contents = "\
Rust:
safe, fast, productive.
Pick three.
Duct tape.";
assert_eq!(vec!["safe, fast, productive."], search(query, contents));
}
#[test]
fn case_insensitive() {
let query = "rUsT";
let contents = "\
Rust:
safe, fast, productive.
Pick three.
Trust me.";
assert_eq!(
vec!["Rust:", "Trust me."],
search_case_insensitive(query, contents)
);
}
}Listing 13-20: Changing the body of Config::build to use
iterator methods
Remember that the first value in the return value of env::args is the name of
the program. We want to ignore that and get to the next value, so first we call
next and do nothing with the return value. Second, we call next to get the
value we want to put in the query field of Config. If next returns a
Some, we use a match to extract the value. If it returns None, it means
not enough arguments were given and we return early with an Err value. We do
the same thing for the file_path value.
Making Code Clearer with Iterator Adaptors
We can also take advantage of iterators in the search function in our I/O
project, which is reproduced here in Listing 13-21 as it was in Listing 12-19:
Filename: src/lib.rs
use std::error::Error;
use std::fs;
pub struct Config {
pub query: String,
pub file_path: String,
}
impl Config {
pub fn build(args: &[String]) -> Result<Config, &'static str> {
if args.len() < 3 {
return Err("not enough arguments");
}
let query = args[1].clone();
let file_path = args[2].clone();
Ok(Config { query, file_path })
}
}
pub fn run(config: Config) -> Result<(), Box<dyn Error>> {
let contents = fs::read_to_string(config.file_path)?;
Ok(())
}
pub fn search<'a>(query: &str, contents: &'a str) -> Vec<&'a str> {
let mut results = Vec::new();
for line in contents.lines() {
if line.contains(query) {
results.push(line);
}
}
results
}
#[cfg(test)]
mod tests {
use super::*;
#[test]
fn one_result() {
let query = "duct";
let contents = "\
Rust:
safe, fast, productive.
Pick three.";
assert_eq!(vec!["safe, fast, productive."], search(query, contents));
}
}Listing 13-21: The implementation of the search
function from Listing 12-19
We can write this code in a more concise way using iterator adaptor methods.
Doing so also lets us avoid having a mutable intermediate results vector. The
functional programming style prefers to minimize the amount of mutable state to
make code clearer. Removing the mutable state might enable a future enhancement
to make searching happen in parallel, because we wouldn’t have to manage
concurrent access to the results vector. Listing 13-22 shows this change:
Filename: src/lib.rs
use std::env;
use std::error::Error;
use std::fs;
pub struct Config {
pub query: String,
pub file_path: String,
pub ignore_case: bool,
}
impl Config {
pub fn build(
mut args: impl Iterator<Item = String>,
) -> Result<Config, &'static str> {
args.next();
let query = match args.next() {
Some(arg) => arg,
None => return Err("Didn't get a query string"),
};
let file_path = match args.next() {
Some(arg) => arg,
None => return Err("Didn't get a file path"),
};
let ignore_case = env::var("IGNORE_CASE").is_ok();
Ok(Config {
query,
file_path,
ignore_case,
})
}
}
pub fn run(config: Config) -> Result<(), Box<dyn Error>> {
let contents = fs::read_to_string(config.file_path)?;
let results = if config.ignore_case {
search_case_insensitive(&config.query, &contents)
} else {
search(&config.query, &contents)
};
for line in results {
println!("{line}");
}
Ok(())
}
pub fn search<'a>(query: &str, contents: &'a str) -> Vec<&'a str> {
contents
.lines()
.filter(|line| line.contains(query))
.collect()
}
pub fn search_case_insensitive<'a>(
query: &str,
contents: &'a str,
) -> Vec<&'a str> {
let query = query.to_lowercase();
let mut results = Vec::new();
for line in contents.lines() {
if line.to_lowercase().contains(&query) {
results.push(line);
}
}
results
}
#[cfg(test)]
mod tests {
use super::*;
#[test]
fn case_sensitive() {
let query = "duct";
let contents = "\
Rust:
safe, fast, productive.
Pick three.
Duct tape.";
assert_eq!(vec!["safe, fast, productive."], search(query, contents));
}
#[test]
fn case_insensitive() {
let query = "rUsT";
let contents = "\
Rust:
safe, fast, productive.
Pick three.
Trust me.";
assert_eq!(
vec!["Rust:", "Trust me."],
search_case_insensitive(query, contents)
);
}
}Listing 13-22: Using iterator adaptor methods in the
implementation of the search function
Recall that the purpose of the search function is to return all lines in
contents that contain the query. Similar to the filter example in Listing
13-16, this code uses the filter adaptor to keep only the lines that
line.contains(query) returns true for. We then collect the matching lines
into another vector with collect. Much simpler! Feel free to make the same
change to use iterator methods in the search_case_insensitive function as
well.
Choosing Between Loops or Iterators
The next logical question is which style you should choose in your own code and why: the original implementation in Listing 13-21 or the version using iterators in Listing 13-22. Most Rust programmers prefer to use the iterator style. It’s a bit tougher to get the hang of at first, but once you get a feel for the various iterator adaptors and what they do, iterators can be easier to understand. Instead of fiddling with the various bits of looping and building new vectors, the code focuses on the high-level objective of the loop. This abstracts away some of the commonplace code so it’s easier to see the concepts that are unique to this code, such as the filtering condition each element in the iterator must pass.
But are the two implementations truly equivalent? The intuitive assumption might be that the more low-level loop will be faster. Let’s talk about performance.
Comparing Performance: Loops vs. Iterators
To determine whether to use loops or iterators, you need to know which
implementation is faster: the version of the search function with an explicit
for loop or the version with iterators.
We ran a benchmark by loading the entire contents of The Adventures of
Sherlock Holmes by Sir Arthur Conan Doyle into a String and looking for the
word the in the contents. Here are the results of the benchmark on the
version of search using the for loop and the version using iterators:
test bench_search_for ... bench: 19,620,300 ns/iter (+/- 915,700)
test bench_search_iter ... bench: 19,234,900 ns/iter (+/- 657,200)
The iterator version was slightly faster! We won’t explain the benchmark code here, because the point is not to prove that the two versions are equivalent but to get a general sense of how these two implementations compare performance-wise.
For a more comprehensive benchmark, you should check using various texts of
various sizes as the contents, different words and words of different lengths
as the query, and all kinds of other variations. The point is this:
iterators, although a high-level abstraction, get compiled down to roughly the
same code as if you’d written the lower-level code yourself. Iterators are one
of Rust’s zero-cost abstractions, by which we mean using the abstraction
imposes no additional runtime overhead. This is analogous to how Bjarne
Stroustrup, the original designer and implementor of C++, defines
zero-overhead in “Foundations of C++” (2012):
In general, C++ implementations obey the zero-overhead principle: What you don’t use, you don’t pay for. And further: What you do use, you couldn’t hand code any better.
As another example, the following code is taken from an audio decoder. The
decoding algorithm uses the linear prediction mathematical operation to
estimate future values based on a linear function of the previous samples. This
code uses an iterator chain to do some math on three variables in scope: a
buffer slice of data, an array of 12 coefficients, and an amount by which
to shift data in qlp_shift. We’ve declared the variables within this example
but not given them any values; although this code doesn’t have much meaning
outside of its context, it’s still a concise, real-world example of how Rust
translates high-level ideas to low-level code.
let buffer: &mut [i32];
let coefficients: [i64; 12];
let qlp_shift: i16;
for i in 12..buffer.len() {
let prediction = coefficients.iter()
.zip(&buffer[i - 12..i])
.map(|(&c, &s)| c * s as i64)
.sum::<i64>() >> qlp_shift;
let delta = buffer[i];
buffer[i] = prediction as i32 + delta;
}To calculate the value of prediction, this code iterates through each of the
12 values in coefficients and uses the zip method to pair the coefficient
values with the previous 12 values in buffer. Then, for each pair, we
multiply the values together, sum all the results, and shift the bits in the
sum qlp_shift bits to the right.
Calculations in applications like audio decoders often prioritize performance
most highly. Here, we’re creating an iterator, using two adaptors, and then
consuming the value. What assembly code would this Rust code compile to? Well,
as of this writing, it compiles down to the same assembly you’d write by hand.
There’s no loop at all corresponding to the iteration over the values in
coefficients: Rust knows that there are 12 iterations, so it “unrolls” the
loop. Unrolling is an optimization that removes the overhead of the loop
controlling code and instead generates repetitive code for each iteration of
the loop.
All of the coefficients get stored in registers, which means accessing the values is very fast. There are no bounds checks on the array access at runtime. All these optimizations that Rust is able to apply make the resulting code extremely efficient. Now that you know this, you can use iterators and closures without fear! They make code seem like it’s higher level but don’t impose a runtime performance penalty for doing so.
Summary
Closures and iterators are Rust features inspired by functional programming language ideas. They contribute to Rust’s capability to clearly express high-level ideas at low-level performance. The implementations of closures and iterators are such that runtime performance is not affected. This is part of Rust’s goal to strive to provide zero-cost abstractions.
Now that we’ve improved the expressiveness of our I/O project, let’s look at
some more features of cargo that will help us share the project with the
world.
More About Cargo and Crates.io
So far we’ve used only the most basic features of Cargo to build, run, and test our code, but it can do a lot more. In this chapter, we’ll discuss some of its other, more advanced features to show you how to do the following:
- Customize your build through release profiles
- Publish libraries on crates.io
- Organize large projects with workspaces
- Install binaries from crates.io
- Extend Cargo using custom commands
Cargo can do even more than the functionality we cover in this chapter, so for a full explanation of all its features, see its documentation.
Customizing Builds with Release Profiles
In Rust, release profiles are predefined and customizable profiles with different configurations that allow a programmer to have more control over various options for compiling code. Each profile is configured independently of the others.
Cargo has two main profiles: the dev profile Cargo uses when you run cargo build and the release profile Cargo uses when you run cargo build --release. The dev profile is defined with good defaults for development,
and the release profile has good defaults for release builds.
These profile names might be familiar from the output of your builds:
$ cargo build
Finished dev [unoptimized + debuginfo] target(s) in 0.0s
$ cargo build --release
Finished release [optimized] target(s) in 0.0s
The dev and release are these different profiles used by the compiler.
Cargo has default settings for each of the profiles that apply when you haven't
explicitly added any [profile.*] sections in the project’s Cargo.toml file.
By adding [profile.*] sections for any profile you want to customize, you
override any subset of the default settings. For example, here are the default
values for the opt-level setting for the dev and release profiles:
Filename: Cargo.toml
[profile.dev]
opt-level = 0
[profile.release]
opt-level = 3
The opt-level setting controls the number of optimizations Rust will apply to
your code, with a range of 0 to 3. Applying more optimizations extends
compiling time, so if you’re in development and compiling your code often,
you’ll want fewer optimizations to compile faster even if the resulting code
runs slower. The default opt-level for dev is therefore 0. When you’re
ready to release your code, it’s best to spend more time compiling. You’ll only
compile in release mode once, but you’ll run the compiled program many times,
so release mode trades longer compile time for code that runs faster. That is
why the default opt-level for the release profile is 3.
You can override a default setting by adding a different value for it in Cargo.toml. For example, if we want to use optimization level 1 in the development profile, we can add these two lines to our project’s Cargo.toml file:
Filename: Cargo.toml
[profile.dev]
opt-level = 1
This code overrides the default setting of 0. Now when we run cargo build,
Cargo will use the defaults for the dev profile plus our customization to
opt-level. Because we set opt-level to 1, Cargo will apply more
optimizations than the default, but not as many as in a release build.
For the full list of configuration options and defaults for each profile, see Cargo’s documentation.
Publishing a Crate to Crates.io
We’ve used packages from crates.io as dependencies of our project, but you can also share your code with other people by publishing your own packages. The crate registry at crates.io distributes the source code of your packages, so it primarily hosts code that is open source.
Rust and Cargo have features that make your published package easier for people to find and use. We’ll talk about some of these features next and then explain how to publish a package.
Making Useful Documentation Comments
Accurately documenting your packages will help other users know how and when to
use them, so it’s worth investing the time to write documentation. In Chapter
3, we discussed how to comment Rust code using two slashes, //. Rust also has
a particular kind of comment for documentation, known conveniently as a
documentation comment, that will generate HTML documentation. The HTML
displays the contents of documentation comments for public API items intended
for programmers interested in knowing how to use your crate as opposed to how
your crate is implemented.
Documentation comments use three slashes, ///, instead of two and support
Markdown notation for formatting the text. Place documentation comments just
before the item they’re documenting. Listing 14-1 shows documentation comments
for an add_one function in a crate named my_crate.
Filename: src/lib.rs
/// Adds one to the number given.
///
/// # Examples
///
/// ```
/// let arg = 5;
/// let answer = my_crate::add_one(arg);
///
/// assert_eq!(6, answer);
/// ```
pub fn add_one(x: i32) -> i32 {
x + 1
}Listing 14-1: A documentation comment for a function
Here, we give a description of what the add_one function does, start a
section with the heading Examples, and then provide code that demonstrates
how to use the add_one function. We can generate the HTML documentation from
this documentation comment by running cargo doc. This command runs the
rustdoc tool distributed with Rust and puts the generated HTML documentation
in the target/doc directory.
For convenience, running cargo doc --open will build the HTML for your
current crate’s documentation (as well as the documentation for all of your
crate’s dependencies) and open the result in a web browser. Navigate to the
add_one function and you’ll see how the text in the documentation comments is
rendered, as shown in Figure 14-1:
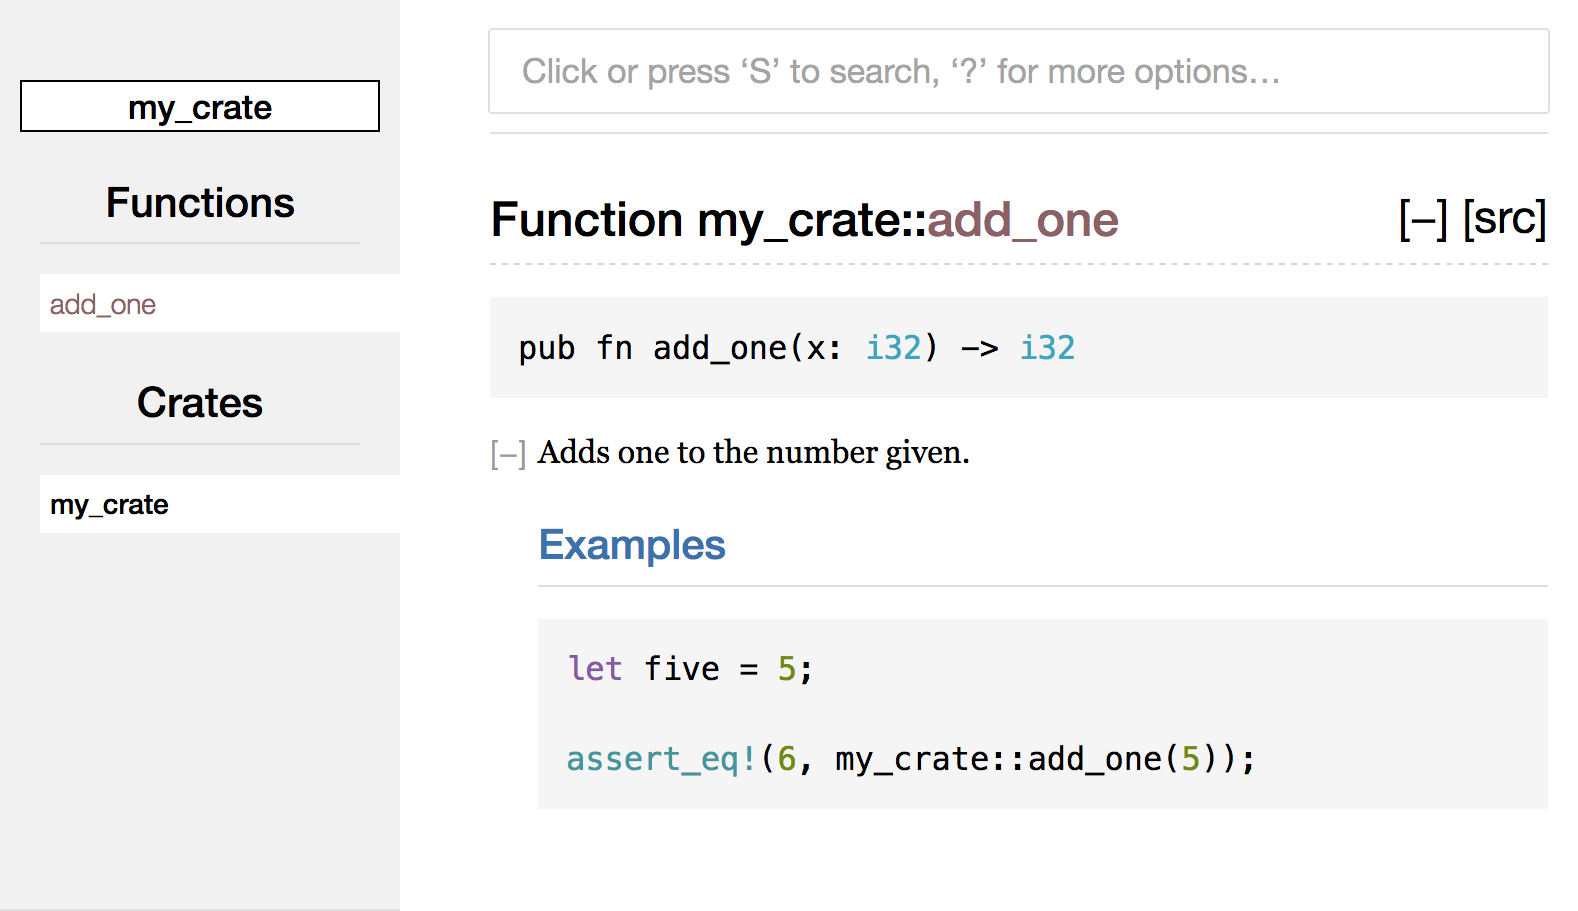
Figure 14-1: HTML documentation for the add_one
function
Commonly Used Sections
We used the # Examples Markdown heading in Listing 14-1 to create a section
in the HTML with the title “Examples.” Here are some other sections that crate
authors commonly use in their documentation:
- Panics: The scenarios in which the function being documented could panic. Callers of the function who don’t want their programs to panic should make sure they don’t call the function in these situations.
- Errors: If the function returns a
Result, describing the kinds of errors that might occur and what conditions might cause those errors to be returned can be helpful to callers so they can write code to handle the different kinds of errors in different ways. - Safety: If the function is
unsafeto call (we discuss unsafety in Chapter 19), there should be a section explaining why the function is unsafe and covering the invariants that the function expects callers to uphold.
Most documentation comments don’t need all of these sections, but this is a good checklist to remind you of the aspects of your code users will be interested in knowing about.
Documentation Comments as Tests
Adding example code blocks in your documentation comments can help demonstrate
how to use your library, and doing so has an additional bonus: running cargo test will run the code examples in your documentation as tests! Nothing is
better than documentation with examples. But nothing is worse than examples
that don’t work because the code has changed since the documentation was
written. If we run cargo test with the documentation for the add_one
function from Listing 14-1, we will see a section in the test results like this:
Doc-tests my_crate
running 1 test
test src/lib.rs - add_one (line 5) ... ok
test result: ok. 1 passed; 0 failed; 0 ignored; 0 measured; 0 filtered out; finished in 0.27s
Now if we change either the function or the example so the assert_eq! in the
example panics and run cargo test again, we’ll see that the doc tests catch
that the example and the code are out of sync with each other!
Commenting Contained Items
The style of doc comment //! adds documentation to the item that contains the
comments rather than to the items following the comments. We typically use
these doc comments inside the crate root file (src/lib.rs by convention) or
inside a module to document the crate or the module as a whole.
For example, to add documentation that describes the purpose of the my_crate
crate that contains the add_one function, we add documentation comments that
start with //! to the beginning of the src/lib.rs file, as shown in Listing
14-2:
Filename: src/lib.rs
//! # My Crate
//!
//! `my_crate` is a collection of utilities to make performing certain
//! calculations more convenient.
/// Adds one to the number given.
// --snip--
///
/// # Examples
///
/// ```
/// let arg = 5;
/// let answer = my_crate::add_one(arg);
///
/// assert_eq!(6, answer);
/// ```
pub fn add_one(x: i32) -> i32 {
x + 1
}Listing 14-2: Documentation for the my_crate crate as a
whole
Notice there isn’t any code after the last line that begins with //!. Because
we started the comments with //! instead of ///, we’re documenting the item
that contains this comment rather than an item that follows this comment. In
this case, that item is the src/lib.rs file, which is the crate root. These
comments describe the entire crate.
When we run cargo doc --open, these comments will display on the front
page of the documentation for my_crate above the list of public items in the
crate, as shown in Figure 14-2:
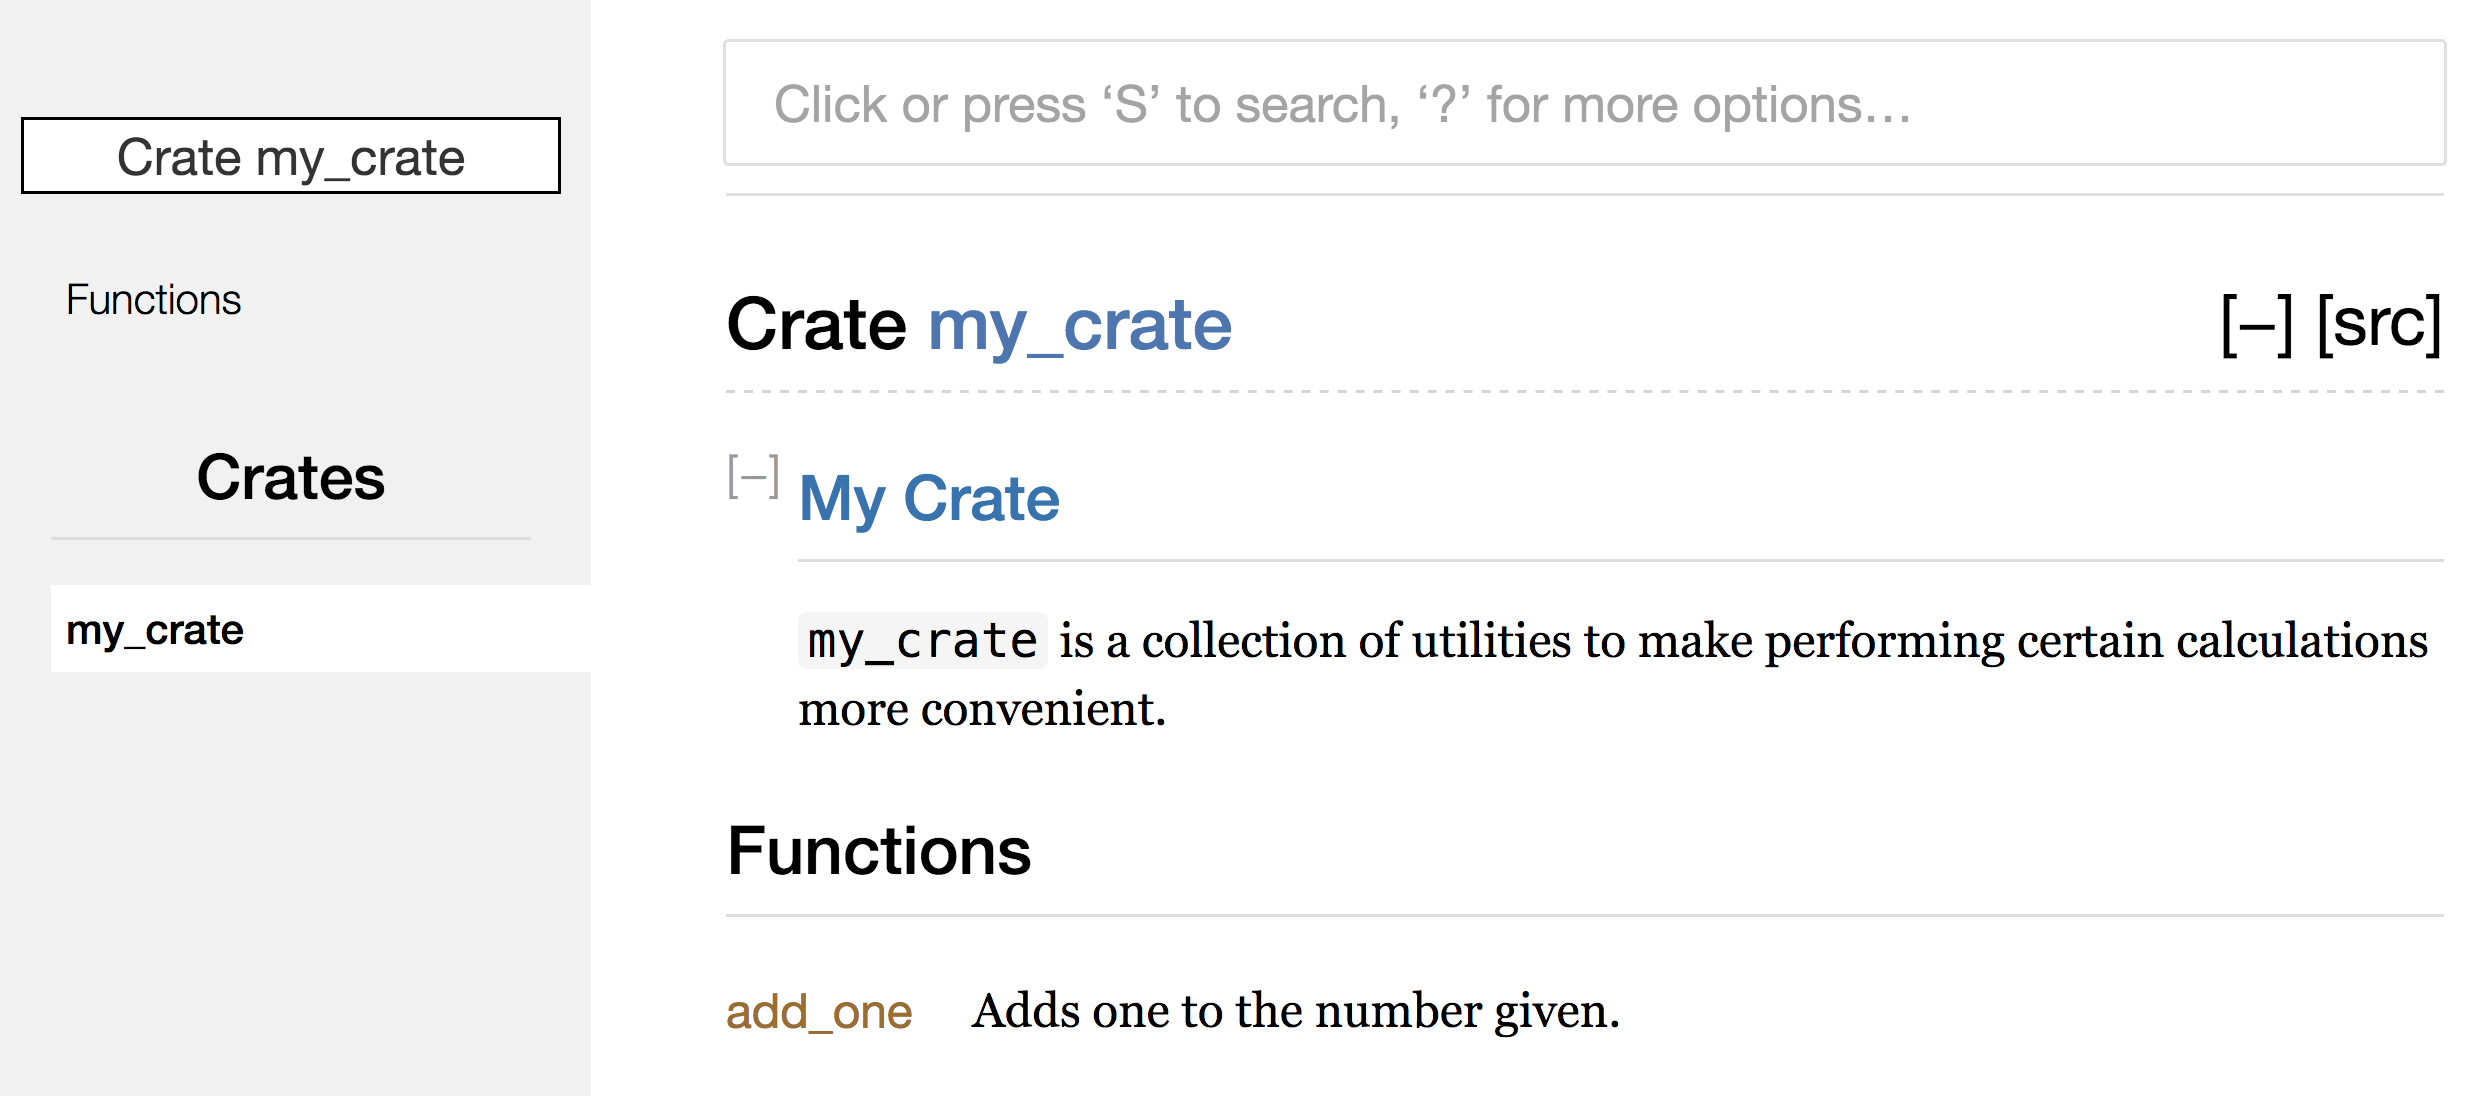
Figure 14-2: Rendered documentation for my_crate,
including the comment describing the crate as a whole
Documentation comments within items are useful for describing crates and modules especially. Use them to explain the overall purpose of the container to help your users understand the crate’s organization.
Exporting a Convenient Public API with pub use
The structure of your public API is a major consideration when publishing a crate. People who use your crate are less familiar with the structure than you are and might have difficulty finding the pieces they want to use if your crate has a large module hierarchy.
In Chapter 7, we covered how to make items public using the pub keyword, and
bring items into a scope with the use keyword. However, the structure that
makes sense to you while you’re developing a crate might not be very convenient
for your users. You might want to organize your structs in a hierarchy
containing multiple levels, but then people who want to use a type you’ve
defined deep in the hierarchy might have trouble finding out that type exists.
They might also be annoyed at having to enter use
my_crate::some_module::another_module::UsefulType; rather than use
my_crate::UsefulType;.
The good news is that if the structure isn’t convenient for others to use
from another library, you don’t have to rearrange your internal organization:
instead, you can re-export items to make a public structure that’s different
from your private structure by using pub use. Re-exporting takes a public
item in one location and makes it public in another location, as if it were
defined in the other location instead.
For example, say we made a library named art for modeling artistic concepts.
Within this library are two modules: a kinds module containing two enums
named PrimaryColor and SecondaryColor and a utils module containing a
function named mix, as shown in Listing 14-3:
Filename: src/lib.rs
//! # Art
//!
//! A library for modeling artistic concepts.
pub mod kinds {
/// The primary colors according to the RYB color model.
pub enum PrimaryColor {
Red,
Yellow,
Blue,
}
/// The secondary colors according to the RYB color model.
pub enum SecondaryColor {
Orange,
Green,
Purple,
}
}
pub mod utils {
use crate::kinds::*;
/// Combines two primary colors in equal amounts to create
/// a secondary color.
pub fn mix(c1: PrimaryColor, c2: PrimaryColor) -> SecondaryColor {
// --snip--
unimplemented!();
}
}Listing 14-3: An art library with items organized into
kinds and utils modules
Figure 14-3 shows what the front page of the documentation for this crate
generated by cargo doc would look like:
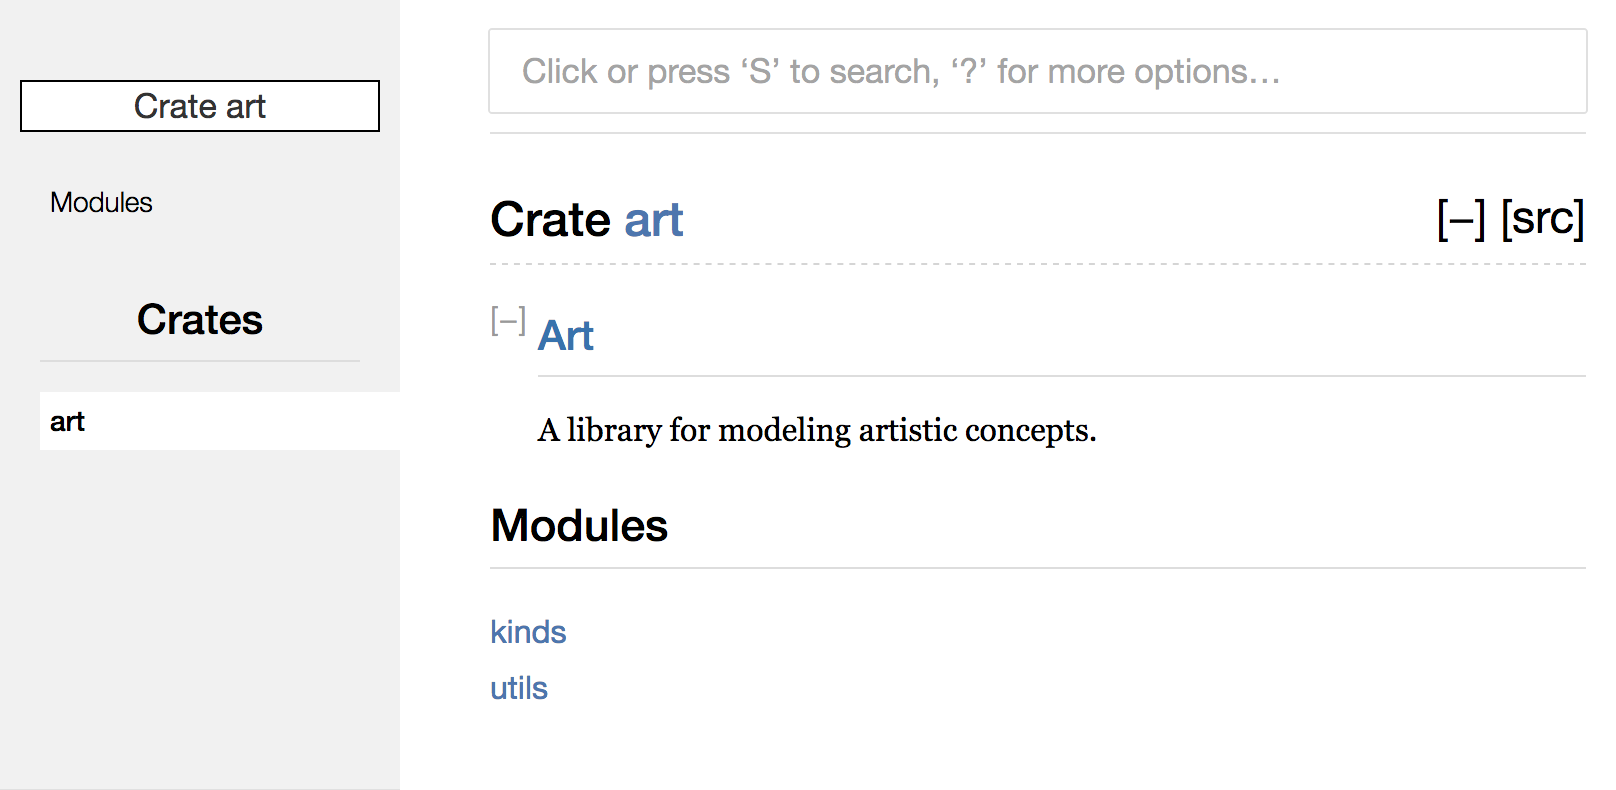
Figure 14-3: Front page of the documentation for art
that lists the kinds and utils modules
Note that the PrimaryColor and SecondaryColor types aren’t listed on the
front page, nor is the mix function. We have to click kinds and utils to
see them.
Another crate that depends on this library would need use statements that
bring the items from art into scope, specifying the module structure that’s
currently defined. Listing 14-4 shows an example of a crate that uses the
PrimaryColor and mix items from the art crate:
Filename: src/main.rs
use art::kinds::PrimaryColor;
use art::utils::mix;
fn main() {
let red = PrimaryColor::Red;
let yellow = PrimaryColor::Yellow;
mix(red, yellow);
}Listing 14-4: A crate using the art crate’s items with
its internal structure exported
The author of the code in Listing 14-4, which uses the art crate, had to
figure out that PrimaryColor is in the kinds module and mix is in the
utils module. The module structure of the art crate is more relevant to
developers working on the art crate than to those using it. The internal
structure doesn’t contain any useful information for someone trying to
understand how to use the art crate, but rather causes confusion because
developers who use it have to figure out where to look, and must specify the
module names in the use statements.
To remove the internal organization from the public API, we can modify the
art crate code in Listing 14-3 to add pub use statements to re-export the
items at the top level, as shown in Listing 14-5:
Filename: src/lib.rs
//! # Art
//!
//! A library for modeling artistic concepts.
pub use self::kinds::PrimaryColor;
pub use self::kinds::SecondaryColor;
pub use self::utils::mix;
pub mod kinds {
// --snip--
/// The primary colors according to the RYB color model.
pub enum PrimaryColor {
Red,
Yellow,
Blue,
}
/// The secondary colors according to the RYB color model.
pub enum SecondaryColor {
Orange,
Green,
Purple,
}
}
pub mod utils {
// --snip--
use crate::kinds::*;
/// Combines two primary colors in equal amounts to create
/// a secondary color.
pub fn mix(c1: PrimaryColor, c2: PrimaryColor) -> SecondaryColor {
SecondaryColor::Orange
}
}Listing 14-5: Adding pub use statements to re-export
items
The API documentation that cargo doc generates for this crate will now list
and link re-exports on the front page, as shown in Figure 14-4, making the
PrimaryColor and SecondaryColor types and the mix function easier to find.
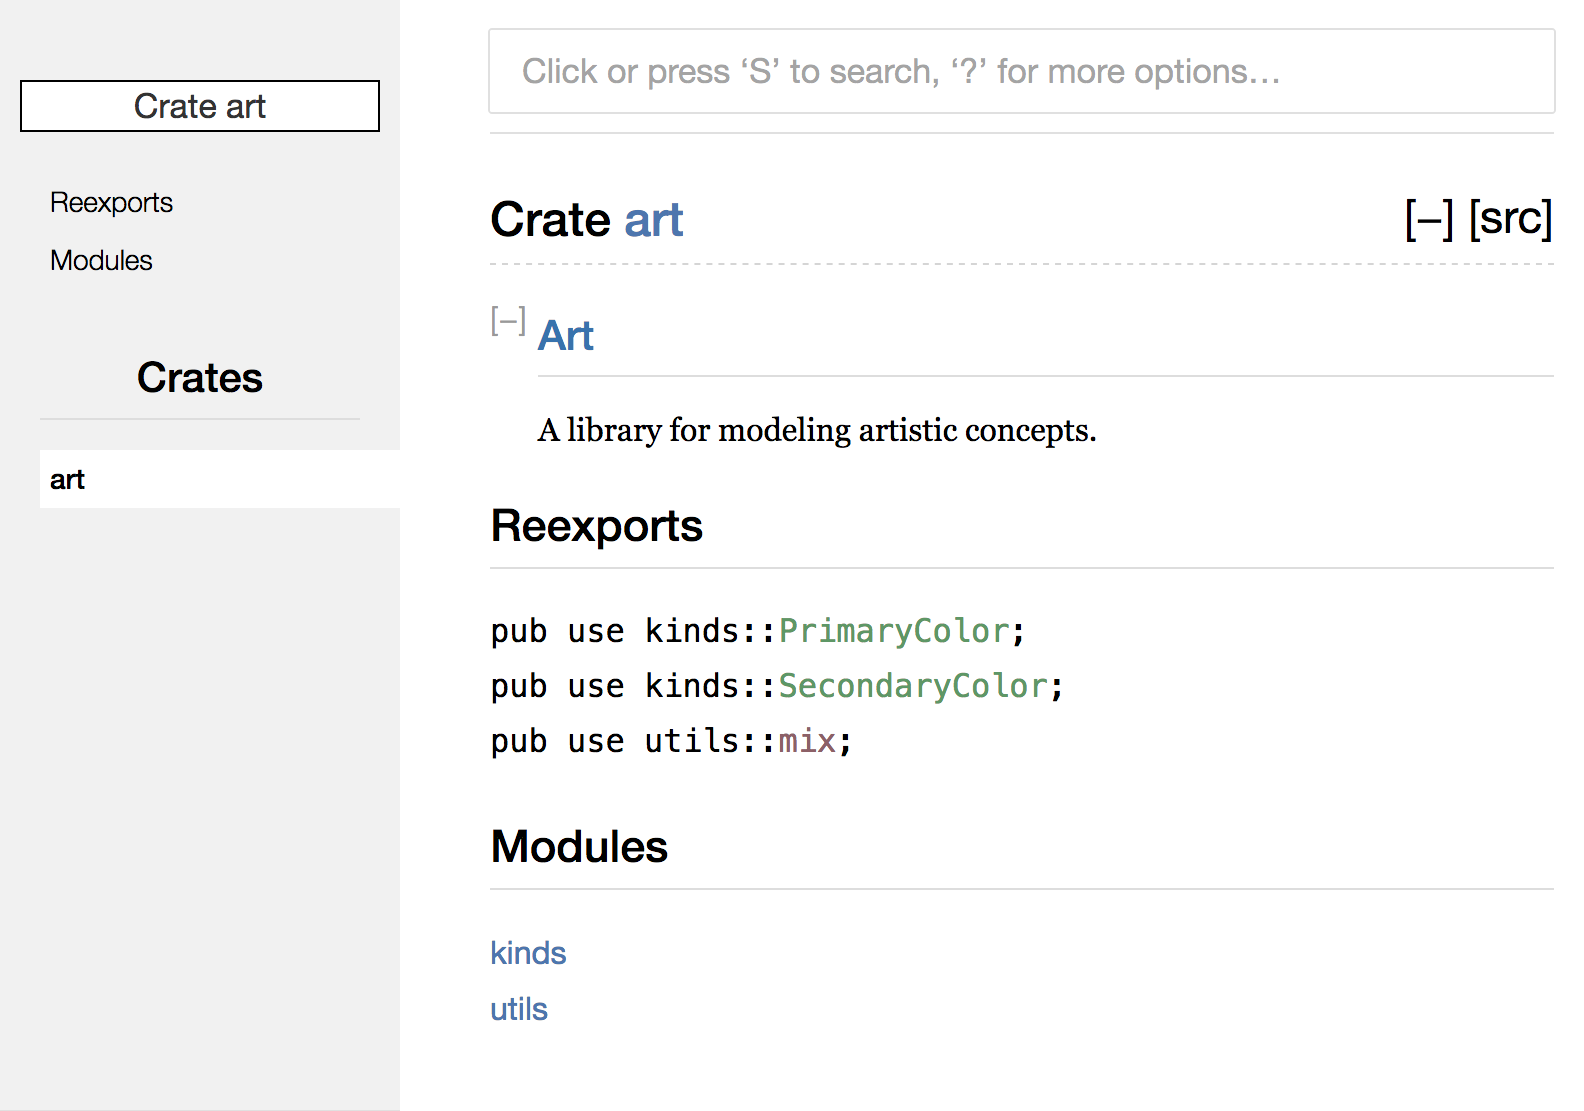
Figure 14-4: The front page of the documentation for art
that lists the re-exports
The art crate users can still see and use the internal structure from Listing
14-3 as demonstrated in Listing 14-4, or they can use the more convenient
structure in Listing 14-5, as shown in Listing 14-6:
Filename: src/main.rs
use art::mix;
use art::PrimaryColor;
fn main() {
// --snip--
let red = PrimaryColor::Red;
let yellow = PrimaryColor::Yellow;
mix(red, yellow);
}Listing 14-6: A program using the re-exported items from
the art crate
In cases where there are many nested modules, re-exporting the types at the top
level with pub use can make a significant difference in the experience of
people who use the crate. Another common use of pub use is to re-export
definitions of a dependency in the current crate to make that crate's
definitions part of your crate’s public API.
Creating a useful public API structure is more of an art than a science, and
you can iterate to find the API that works best for your users. Choosing pub use gives you flexibility in how you structure your crate internally and
decouples that internal structure from what you present to your users. Look at
some of the code of crates you’ve installed to see if their internal structure
differs from their public API.
Setting Up a Crates.io Account
Before you can publish any crates, you need to create an account on
crates.io and get an API token. To do so,
visit the home page at crates.io and log
in via a GitHub account. (The GitHub account is currently a requirement, but
the site might support other ways of creating an account in the future.) Once
you’re logged in, visit your account settings at
https://crates.io/me/ and retrieve your
API key. Then run the cargo login command with your API key, like this:
$ cargo login abcdefghijklmnopqrstuvwxyz012345
This command will inform Cargo of your API token and store it locally in ~/.cargo/credentials. Note that this token is a secret: do not share it with anyone else. If you do share it with anyone for any reason, you should revoke it and generate a new token on crates.io.
Adding Metadata to a New Crate
Let’s say you have a crate you want to publish. Before publishing, you’ll need
to add some metadata in the [package] section of the crate’s Cargo.toml
file.
Your crate will need a unique name. While you’re working on a crate locally,
you can name a crate whatever you’d like. However, crate names on
crates.io are allocated on a first-come,
first-served basis. Once a crate name is taken, no one else can publish a crate
with that name. Before attempting to publish a crate, search for the name you
want to use. If the name has been used, you will need to find another name and
edit the name field in the Cargo.toml file under the [package] section to
use the new name for publishing, like so:
Filename: Cargo.toml
[package]
name = "guessing_game"
Even if you’ve chosen a unique name, when you run cargo publish to publish
the crate at this point, you’ll get a warning and then an error:
$ cargo publish
Updating crates.io index
warning: manifest has no description, license, license-file, documentation, homepage or repository.
See https://doc.rust-lang.org/cargo/reference/manifest.html#package-metadata for more info.
--snip--
error: failed to publish to registry at https://crates.io
Caused by:
the remote server responded with an error: missing or empty metadata fields: description, license. Please see https://doc.rust-lang.org/cargo/reference/manifest.html for how to upload metadata
This errors because you’re missing some crucial information: a description and
license are required so people will know what your crate does and under what
terms they can use it. In Cargo.toml, add a description that's just a
sentence or two, because it will appear with your crate in search results. For
the license field, you need to give a license identifier value. The Linux
Foundation’s Software Package Data Exchange (SPDX) lists the identifiers
you can use for this value. For example, to specify that you’ve licensed your
crate using the MIT License, add the MIT identifier:
Filename: Cargo.toml
[package]
name = "guessing_game"
license = "MIT"
If you want to use a license that doesn’t appear in the SPDX, you need to place
the text of that license in a file, include the file in your project, and then
use license-file to specify the name of that file instead of using the
license key.
Guidance on which license is appropriate for your project is beyond the scope
of this book. Many people in the Rust community license their projects in the
same way as Rust by using a dual license of MIT OR Apache-2.0. This practice
demonstrates that you can also specify multiple license identifiers separated
by OR to have multiple licenses for your project.
With a unique name, the version, your description, and a license added, the Cargo.toml file for a project that is ready to publish might look like this:
Filename: Cargo.toml
[package]
name = "guessing_game"
version = "0.1.0"
edition = "2021"
description = "A fun game where you guess what number the computer has chosen."
license = "MIT OR Apache-2.0"
[dependencies]
Cargo’s documentation describes other metadata you can specify to ensure others can discover and use your crate more easily.
Publishing to Crates.io
Now that you’ve created an account, saved your API token, chosen a name for your crate, and specified the required metadata, you’re ready to publish! Publishing a crate uploads a specific version to crates.io for others to use.
Be careful, because a publish is permanent. The version can never be overwritten, and the code cannot be deleted. One major goal of crates.io is to act as a permanent archive of code so that builds of all projects that depend on crates from crates.io will continue to work. Allowing version deletions would make fulfilling that goal impossible. However, there is no limit to the number of crate versions you can publish.
Run the cargo publish command again. It should succeed now:
$ cargo publish
Updating crates.io index
Packaging guessing_game v0.1.0 (file:///projects/guessing_game)
Verifying guessing_game v0.1.0 (file:///projects/guessing_game)
Compiling guessing_game v0.1.0
(file:///projects/guessing_game/target/package/guessing_game-0.1.0)
Finished dev [unoptimized + debuginfo] target(s) in 0.19s
Uploading guessing_game v0.1.0 (file:///projects/guessing_game)
Congratulations! You’ve now shared your code with the Rust community, and anyone can easily add your crate as a dependency of their project.
Publishing a New Version of an Existing Crate
When you’ve made changes to your crate and are ready to release a new version,
you change the version value specified in your Cargo.toml file and
republish. Use the Semantic Versioning rules to decide what an
appropriate next version number is based on the kinds of changes you’ve made.
Then run cargo publish to upload the new version.
Deprecating Versions from Crates.io with cargo yank
Although you can’t remove previous versions of a crate, you can prevent any future projects from adding them as a new dependency. This is useful when a crate version is broken for one reason or another. In such situations, Cargo supports yanking a crate version.
Yanking a version prevents new projects from depending on that version while allowing all existing projects that depend on it to continue. Essentially, a yank means that all projects with a Cargo.lock will not break, and any future Cargo.lock files generated will not use the yanked version.
To yank a version of a crate, in the directory of the crate that you’ve
previously published, run cargo yank and specify which version you want to
yank. For example, if we've published a crate named guessing_game version
1.0.1 and we want to yank it, in the project directory for guessing_game we'd
run:
$ cargo yank --vers 1.0.1
Updating crates.io index
Yank guessing_game@1.0.1
By adding --undo to the command, you can also undo a yank and allow projects
to start depending on a version again:
$ cargo yank --vers 1.0.1 --undo
Updating crates.io index
Unyank guessing_game@1.0.1
A yank does not delete any code. It cannot, for example, delete accidentally uploaded secrets. If that happens, you must reset those secrets immediately.
Cargo Workspaces
In Chapter 12, we built a package that included a binary crate and a library crate. As your project develops, you might find that the library crate continues to get bigger and you want to split your package further into multiple library crates. Cargo offers a feature called workspaces that can help manage multiple related packages that are developed in tandem.
Creating a Workspace
A workspace is a set of packages that share the same Cargo.lock and output
directory. Let’s make a project using a workspace—we’ll use trivial code so we
can concentrate on the structure of the workspace. There are multiple ways to
structure a workspace, so we'll just show one common way. We’ll have a
workspace containing a binary and two libraries. The binary, which will provide
the main functionality, will depend on the two libraries. One library will
provide an add_one function, and a second library an add_two function.
These three crates will be part of the same workspace. We’ll start by creating
a new directory for the workspace:
$ mkdir add
$ cd add
Next, in the add directory, we create the Cargo.toml file that will
configure the entire workspace. This file won’t have a [package] section.
Instead, it will start with a [workspace] section that will allow us to add
members to the workspace by specifying the path to the package with our binary
crate; in this case, that path is adder:
Filename: Cargo.toml
[workspace]
members = [
"adder",
]
Next, we’ll create the adder binary crate by running cargo new within the
add directory:
$ cargo new adder
Created binary (application) `adder` package
At this point, we can build the workspace by running cargo build. The files
in your add directory should look like this:
├── Cargo.lock
├── Cargo.toml
├── adder
│ ├── Cargo.toml
│ └── src
│ └── main.rs
└── target
The workspace has one target directory at the top level that the compiled
artifacts will be placed into; the adder package doesn’t have its own
target directory. Even if we were to run cargo build from inside the
adder directory, the compiled artifacts would still end up in add/target
rather than add/adder/target. Cargo structures the target directory in a
workspace like this because the crates in a workspace are meant to depend on
each other. If each crate had its own target directory, each crate would have
to recompile each of the other crates in the workspace to place the artifacts
in its own target directory. By sharing one target directory, the crates
can avoid unnecessary rebuilding.
Creating the Second Package in the Workspace
Next, let’s create another member package in the workspace and call it
add_one. Change the top-level Cargo.toml to specify the add_one path in
the members list:
Filename: Cargo.toml
[workspace]
members = [
"adder",
"add_one",
]
Then generate a new library crate named add_one:
$ cargo new add_one --lib
Created library `add_one` package
Your add directory should now have these directories and files:
├── Cargo.lock
├── Cargo.toml
├── add_one
│ ├── Cargo.toml
│ └── src
│ └── lib.rs
├── adder
│ ├── Cargo.toml
│ └── src
│ └── main.rs
└── target
In the add_one/src/lib.rs file, let’s add an add_one function:
Filename: add_one/src/lib.rs
pub fn add_one(x: i32) -> i32 {
x + 1
}Now we can have the adder package with our binary depend on the add_one
package that has our library. First, we’ll need to add a path dependency on
add_one to adder/Cargo.toml.
Filename: adder/Cargo.toml
[dependencies]
add_one = { path = "../add_one" }
Cargo doesn’t assume that crates in a workspace will depend on each other, so we need to be explicit about the dependency relationships.
Next, let’s use the add_one function (from the add_one crate) in the
adder crate. Open the adder/src/main.rs file and add a use line at the
top to bring the new add_one library crate into scope. Then change the main
function to call the add_one function, as in Listing 14-7.
Filename: adder/src/main.rs
use add_one;
fn main() {
let num = 10;
println!("Hello, world! {num} plus one is {}!", add_one::add_one(num));
}Listing 14-7: Using the add_one library crate from the
adder crate
Let’s build the workspace by running cargo build in the top-level add
directory!
$ cargo build
Compiling add_one v0.1.0 (file:///projects/add/add_one)
Compiling adder v0.1.0 (file:///projects/add/adder)
Finished dev [unoptimized + debuginfo] target(s) in 0.68s
To run the binary crate from the add directory, we can specify which
package in the workspace we want to run by using the -p argument and the
package name with cargo run:
$ cargo run -p adder
Finished dev [unoptimized + debuginfo] target(s) in 0.0s
Running `target/debug/adder`
Hello, world! 10 plus one is 11!
This runs the code in adder/src/main.rs, which depends on the add_one crate.
Depending on an External Package in a Workspace
Notice that the workspace has only one Cargo.lock file at the top level,
rather than having a Cargo.lock in each crate’s directory. This ensures that
all crates are using the same version of all dependencies. If we add the rand
package to the adder/Cargo.toml and add_one/Cargo.toml files, Cargo will
resolve both of those to one version of rand and record that in the one
Cargo.lock. Making all crates in the workspace use the same dependencies
means the crates will always be compatible with each other. Let’s add the
rand crate to the [dependencies] section in the add_one/Cargo.toml file
so we can use the rand crate in the add_one crate:
Filename: add_one/Cargo.toml
[dependencies]
rand = "0.8.5"
We can now add use rand; to the add_one/src/lib.rs file, and building the
whole workspace by running cargo build in the add directory will bring in
and compile the rand crate. We will get one warning because we aren’t
referring to the rand we brought into scope:
$ cargo build
Updating crates.io index
Downloaded rand v0.8.5
--snip--
Compiling rand v0.8.5
Compiling add_one v0.1.0 (file:///projects/add/add_one)
warning: unused import: `rand`
--> add_one/src/lib.rs:1:5
|
1 | use rand;
| ^^^^
|
= note: `#[warn(unused_imports)]` on by default
warning: `add_one` (lib) generated 1 warning
Compiling adder v0.1.0 (file:///projects/add/adder)
Finished dev [unoptimized + debuginfo] target(s) in 10.18s
The top-level Cargo.lock now contains information about the dependency of
add_one on rand. However, even though rand is used somewhere in the
workspace, we can’t use it in other crates in the workspace unless we add
rand to their Cargo.toml files as well. For example, if we add use rand;
to the adder/src/main.rs file for the adder package, we’ll get an error:
$ cargo build
--snip--
Compiling adder v0.1.0 (file:///projects/add/adder)
error[E0432]: unresolved import `rand`
--> adder/src/main.rs:2:5
|
2 | use rand;
| ^^^^ no external crate `rand`
To fix this, edit the Cargo.toml file for the adder package and indicate
that rand is a dependency for it as well. Building the adder package will
add rand to the list of dependencies for adder in Cargo.lock, but no
additional copies of rand will be downloaded. Cargo has ensured that every
crate in every package in the workspace using the rand package will be using
the same version, saving us space and ensuring that the crates in the workspace
will be compatible with each other.
Adding a Test to a Workspace
For another enhancement, let’s add a test of the add_one::add_one function
within the add_one crate:
Filename: add_one/src/lib.rs
pub fn add_one(x: i32) -> i32 {
x + 1
}
#[cfg(test)]
mod tests {
use super::*;
#[test]
fn it_works() {
assert_eq!(3, add_one(2));
}
}Now run cargo test in the top-level add directory. Running cargo test in
a workspace structured like this one will run the tests for all the crates in
the workspace:
$ cargo test
Compiling add_one v0.1.0 (file:///projects/add/add_one)
Compiling adder v0.1.0 (file:///projects/add/adder)
Finished test [unoptimized + debuginfo] target(s) in 0.27s
Running unittests src/lib.rs (target/debug/deps/add_one-f0253159197f7841)
running 1 test
test tests::it_works ... ok
test result: ok. 1 passed; 0 failed; 0 ignored; 0 measured; 0 filtered out; finished in 0.00s
Running unittests src/main.rs (target/debug/deps/adder-49979ff40686fa8e)
running 0 tests
test result: ok. 0 passed; 0 failed; 0 ignored; 0 measured; 0 filtered out; finished in 0.00s
Doc-tests add_one
running 0 tests
test result: ok. 0 passed; 0 failed; 0 ignored; 0 measured; 0 filtered out; finished in 0.00s
The first section of the output shows that the it_works test in the add_one
crate passed. The next section shows that zero tests were found in the adder
crate, and then the last section shows zero documentation tests were found in
the add_one crate.
We can also run tests for one particular crate in a workspace from the
top-level directory by using the -p flag and specifying the name of the crate
we want to test:
$ cargo test -p add_one
Finished test [unoptimized + debuginfo] target(s) in 0.00s
Running unittests src/lib.rs (target/debug/deps/add_one-b3235fea9a156f74)
running 1 test
test tests::it_works ... ok
test result: ok. 1 passed; 0 failed; 0 ignored; 0 measured; 0 filtered out; finished in 0.00s
Doc-tests add_one
running 0 tests
test result: ok. 0 passed; 0 failed; 0 ignored; 0 measured; 0 filtered out; finished in 0.00s
This output shows cargo test only ran the tests for the add_one crate and
didn’t run the adder crate tests.
If you publish the crates in the workspace to crates.io,
each crate in the workspace will need to be published separately. Like cargo test, we can publish a particular crate in our workspace by using the -p
flag and specifying the name of the crate we want to publish.
For additional practice, add an add_two crate to this workspace in a similar
way as the add_one crate!
As your project grows, consider using a workspace: it’s easier to understand smaller, individual components than one big blob of code. Furthermore, keeping the crates in a workspace can make coordination between crates easier if they are often changed at the same time.
Installing Binaries with cargo install
The cargo install command allows you to install and use binary crates
locally. This isn’t intended to replace system packages; it’s meant to be a
convenient way for Rust developers to install tools that others have shared on
crates.io. Note that you can only install
packages that have binary targets. A binary target is the runnable program
that is created if the crate has a src/main.rs file or another file specified
as a binary, as opposed to a library target that isn’t runnable on its own but
is suitable for including within other programs. Usually, crates have
information in the README file about whether a crate is a library, has a
binary target, or both.
All binaries installed with cargo install are stored in the installation
root’s bin folder. If you installed Rust using rustup.rs and don’t have any
custom configurations, this directory will be $HOME/.cargo/bin. Ensure that
directory is in your $PATH to be able to run programs you’ve installed with
cargo install.
For example, in Chapter 12 we mentioned that there’s a Rust implementation of
the grep tool called ripgrep for searching files. To install ripgrep, we
can run the following:
$ cargo install ripgrep
Updating crates.io index
Downloaded ripgrep v13.0.0
Downloaded 1 crate (243.3 KB) in 0.88s
Installing ripgrep v13.0.0
--snip--
Compiling ripgrep v13.0.0
Finished release [optimized + debuginfo] target(s) in 3m 10s
Installing ~/.cargo/bin/rg
Installed package `ripgrep v13.0.0` (executable `rg`)
The second-to-last line of the output shows the location and the name of the
installed binary, which in the case of ripgrep is rg. As long as the
installation directory is in your $PATH, as mentioned previously, you can
then run rg --help and start using a faster, rustier tool for searching files!
Extending Cargo with Custom Commands
Cargo is designed so you can extend it with new subcommands without having to
modify Cargo. If a binary in your $PATH is named cargo-something, you can
run it as if it was a Cargo subcommand by running cargo something. Custom
commands like this are also listed when you run cargo --list. Being able to
use cargo install to install extensions and then run them just like the
built-in Cargo tools is a super convenient benefit of Cargo’s design!
Summary
Sharing code with Cargo and crates.io is part of what makes the Rust ecosystem useful for many different tasks. Rust’s standard library is small and stable, but crates are easy to share, use, and improve on a timeline different from that of the language. Don’t be shy about sharing code that’s useful to you on crates.io; it’s likely that it will be useful to someone else as well!
Smart Pointers
A pointer is a general concept for a variable that contains an address in
memory. This address refers to, or “points at,” some other data. The most
common kind of pointer in Rust is a reference, which you learned about in
Chapter 4. References are indicated by the & symbol and borrow the value they
point to. They don’t have any special capabilities other than referring to
data, and have no overhead.
Smart pointers, on the other hand, are data structures that act like a pointer but also have additional metadata and capabilities. The concept of smart pointers isn’t unique to Rust: smart pointers originated in C++ and exist in other languages as well. Rust has a variety of smart pointers defined in the standard library that provide functionality beyond that provided by references. To explore the general concept, we’ll look at a couple of different examples of smart pointers, including a reference counting smart pointer type. This pointer enables you to allow data to have multiple owners by keeping track of the number of owners and, when no owners remain, cleaning up the data.
Rust, with its concept of ownership and borrowing, has an additional difference between references and smart pointers: while references only borrow data, in many cases, smart pointers own the data they point to.
Though we didn’t call them as such at the time, we’ve already encountered a few
smart pointers in this book, including String and Vec<T> in Chapter 8. Both
these types count as smart pointers because they own some memory and allow you
to manipulate it. They also have metadata and extra capabilities or guarantees.
String, for example, stores its capacity as metadata and has the extra
ability to ensure its data will always be valid UTF-8.
Smart pointers are usually implemented using structs. Unlike an ordinary
struct, smart pointers implement the Deref and Drop traits. The Deref
trait allows an instance of the smart pointer struct to behave like a reference
so you can write your code to work with either references or smart pointers.
The Drop trait allows you to customize the code that’s run when an instance
of the smart pointer goes out of scope. In this chapter, we’ll discuss both
traits and demonstrate why they’re important to smart pointers.
Given that the smart pointer pattern is a general design pattern used frequently in Rust, this chapter won’t cover every existing smart pointer. Many libraries have their own smart pointers, and you can even write your own. We’ll cover the most common smart pointers in the standard library:
Box<T>for allocating values on the heapRc<T>, a reference counting type that enables multiple ownershipRef<T>andRefMut<T>, accessed throughRefCell<T>, a type that enforces the borrowing rules at runtime instead of compile time
In addition, we’ll cover the interior mutability pattern where an immutable type exposes an API for mutating an interior value. We’ll also discuss reference cycles: how they can leak memory and how to prevent them.
Let’s dive in!
Using Box<T> to Point to Data on the Heap
The most straightforward smart pointer is a box, whose type is written
Box<T>. Boxes allow you to store data on the heap rather than the stack. What
remains on the stack is the pointer to the heap data. Refer to Chapter 4 to
review the difference between the stack and the heap.
Boxes don’t have performance overhead, other than storing their data on the heap instead of on the stack. But they don’t have many extra capabilities either. You’ll use them most often in these situations:
- When you have a type whose size can’t be known at compile time and you want to use a value of that type in a context that requires an exact size
- When you have a large amount of data and you want to transfer ownership but ensure the data won’t be copied when you do so
- When you want to own a value and you care only that it’s a type that implements a particular trait rather than being of a specific type
We’ll demonstrate the first situation in the “Enabling Recursive Types with Boxes” section. In the second case, transferring ownership of a large amount of data can take a long time because the data is copied around on the stack. To improve performance in this situation, we can store the large amount of data on the heap in a box. Then, only the small amount of pointer data is copied around on the stack, while the data it references stays in one place on the heap. The third case is known as a trait object, and Chapter 17 devotes an entire section, “Using Trait Objects That Allow for Values of Different Types,” just to that topic. So what you learn here you’ll apply again in Chapter 17!
Using a Box<T> to Store Data on the Heap
Before we discuss the heap storage use case for Box<T>, we’ll cover the
syntax and how to interact with values stored within a Box<T>.
Listing 15-1 shows how to use a box to store an i32 value on the heap:
Filename: src/main.rs
fn main() { let b = Box::new(5); println!("b = {}", b); }
Listing 15-1: Storing an i32 value on the heap using a
box
We define the variable b to have the value of a Box that points to the
value 5, which is allocated on the heap. This program will print b = 5; in
this case, we can access the data in the box similar to how we would if this
data were on the stack. Just like any owned value, when a box goes out of
scope, as b does at the end of main, it will be deallocated. The
deallocation happens both for the box (stored on the stack) and the data it
points to (stored on the heap).
Putting a single value on the heap isn’t very useful, so you won’t use boxes by
themselves in this way very often. Having values like a single i32 on the
stack, where they’re stored by default, is more appropriate in the majority of
situations. Let’s look at a case where boxes allow us to define types that we
wouldn’t be allowed to if we didn’t have boxes.
Enabling Recursive Types with Boxes
A value of recursive type can have another value of the same type as part of itself. Recursive types pose an issue because at compile time Rust needs to know how much space a type takes up. However, the nesting of values of recursive types could theoretically continue infinitely, so Rust can’t know how much space the value needs. Because boxes have a known size, we can enable recursive types by inserting a box in the recursive type definition.
As an example of a recursive type, let’s explore the cons list. This is a data type commonly found in functional programming languages. The cons list type we’ll define is straightforward except for the recursion; therefore, the concepts in the example we’ll work with will be useful any time you get into more complex situations involving recursive types.
More Information About the Cons List
A cons list is a data structure that comes from the Lisp programming language
and its dialects and is made up of nested pairs, and is the Lisp version of a
linked list. Its name comes from the cons function (short for “construct
function”) in Lisp that constructs a new pair from its two arguments. By
calling cons on a pair consisting of a value and another pair, we can
construct cons lists made up of recursive pairs.
For example, here’s a pseudocode representation of a cons list containing the list 1, 2, 3 with each pair in parentheses:
(1, (2, (3, Nil)))
Each item in a cons list contains two elements: the value of the current item
and the next item. The last item in the list contains only a value called Nil
without a next item. A cons list is produced by recursively calling the cons
function. The canonical name to denote the base case of the recursion is Nil.
Note that this is not the same as the “null” or “nil” concept in Chapter 6,
which is an invalid or absent value.
The cons list isn’t a commonly used data structure in Rust. Most of the time
when you have a list of items in Rust, Vec<T> is a better choice to use.
Other, more complex recursive data types are useful in various situations,
but by starting with the cons list in this chapter, we can explore how boxes
let us define a recursive data type without much distraction.
Listing 15-2 contains an enum definition for a cons list. Note that this code
won’t compile yet because the List type doesn’t have a known size, which
we’ll demonstrate.
Filename: src/main.rs
enum List {
Cons(i32, List),
Nil,
}
fn main() {}Listing 15-2: The first attempt at defining an enum to
represent a cons list data structure of i32 values
Note: We’re implementing a cons list that holds only
i32values for the purposes of this example. We could have implemented it using generics, as we discussed in Chapter 10, to define a cons list type that could store values of any type.
Using the List type to store the list 1, 2, 3 would look like the code in
Listing 15-3:
Filename: src/main.rs
enum List {
Cons(i32, List),
Nil,
}
use crate::List::{Cons, Nil};
fn main() {
let list = Cons(1, Cons(2, Cons(3, Nil)));
}Listing 15-3: Using the List enum to store the list 1, 2, 3
The first Cons value holds 1 and another List value. This List value is
another Cons value that holds 2 and another List value. This List value
is one more Cons value that holds 3 and a List value, which is finally
Nil, the non-recursive variant that signals the end of the list.
If we try to compile the code in Listing 15-3, we get the error shown in Listing 15-4:
$ cargo run
Compiling cons-list v0.1.0 (file:///projects/cons-list)
error[E0072]: recursive type `List` has infinite size
--> src/main.rs:1:1
|
1 | enum List {
| ^^^^^^^^^
2 | Cons(i32, List),
| ---- recursive without indirection
|
help: insert some indirection (e.g., a `Box`, `Rc`, or `&`) to break the cycle
|
2 | Cons(i32, Box<List>),
| ++++ +
For more information about this error, try `rustc --explain E0072`.
error: could not compile `cons-list` due to previous error
Listing 15-4: The error we get when attempting to define a recursive enum
The error shows this type “has infinite size.” The reason is that we’ve defined
List with a variant that is recursive: it holds another value of itself
directly. As a result, Rust can’t figure out how much space it needs to store a
List value. Let’s break down why we get this error. First, we’ll look at how
Rust decides how much space it needs to store a value of a non-recursive type.
Computing the Size of a Non-Recursive Type
Recall the Message enum we defined in Listing 6-2 when we discussed enum
definitions in Chapter 6:
enum Message { Quit, Move { x: i32, y: i32 }, Write(String), ChangeColor(i32, i32, i32), } fn main() {}
To determine how much space to allocate for a Message value, Rust goes
through each of the variants to see which variant needs the most space. Rust
sees that Message::Quit doesn’t need any space, Message::Move needs enough
space to store two i32 values, and so forth. Because only one variant will be
used, the most space a Message value will need is the space it would take to
store the largest of its variants.
Contrast this with what happens when Rust tries to determine how much space a
recursive type like the List enum in Listing 15-2 needs. The compiler starts
by looking at the Cons variant, which holds a value of type i32 and a value
of type List. Therefore, Cons needs an amount of space equal to the size of
an i32 plus the size of a List. To figure out how much memory the List
type needs, the compiler looks at the variants, starting with the Cons
variant. The Cons variant holds a value of type i32 and a value of type
List, and this process continues infinitely, as shown in Figure 15-1.

Figure 15-1: An infinite List consisting of infinite
Cons variants
Using Box<T> to Get a Recursive Type with a Known Size
Because Rust can’t figure out how much space to allocate for recursively defined types, the compiler gives an error with this helpful suggestion:
help: insert some indirection (e.g., a `Box`, `Rc`, or `&`) to make `List` representable
|
2 | Cons(i32, Box<List>),
| ++++ +
In this suggestion, “indirection” means that instead of storing a value directly, we should change the data structure to store the value indirectly by storing a pointer to the value instead.
Because a Box<T> is a pointer, Rust always knows how much space a Box<T>
needs: a pointer’s size doesn’t change based on the amount of data it’s
pointing to. This means we can put a Box<T> inside the Cons variant instead
of another List value directly. The Box<T> will point to the next List
value that will be on the heap rather than inside the Cons variant.
Conceptually, we still have a list, created with lists holding other lists, but
this implementation is now more like placing the items next to one another
rather than inside one another.
We can change the definition of the List enum in Listing 15-2 and the usage
of the List in Listing 15-3 to the code in Listing 15-5, which will compile:
Filename: src/main.rs
enum List { Cons(i32, Box<List>), Nil, } use crate::List::{Cons, Nil}; fn main() { let list = Cons(1, Box::new(Cons(2, Box::new(Cons(3, Box::new(Nil)))))); }
Listing 15-5: Definition of List that uses Box<T> in
order to have a known size
The Cons variant needs the size of an i32 plus the space to store the
box’s pointer data. The Nil variant stores no values, so it needs less space
than the Cons variant. We now know that any List value will take up the
size of an i32 plus the size of a box’s pointer data. By using a box, we’ve
broken the infinite, recursive chain, so the compiler can figure out the size
it needs to store a List value. Figure 15-2 shows what the Cons variant
looks like now.

Figure 15-2: A List that is not infinitely sized
because Cons holds a Box
Boxes provide only the indirection and heap allocation; they don’t have any other special capabilities, like those we’ll see with the other smart pointer types. They also don’t have the performance overhead that these special capabilities incur, so they can be useful in cases like the cons list where the indirection is the only feature we need. We’ll look at more use cases for boxes in Chapter 17, too.
The Box<T> type is a smart pointer because it implements the Deref trait,
which allows Box<T> values to be treated like references. When a Box<T>
value goes out of scope, the heap data that the box is pointing to is cleaned
up as well because of the Drop trait implementation. These two traits will be
even more important to the functionality provided by the other smart pointer
types we’ll discuss in the rest of this chapter. Let’s explore these two traits
in more detail.
Treating Smart Pointers Like Regular References with the Deref Trait
Implementing the Deref trait allows you to customize the behavior of the
dereference operator * (not to be confused with the multiplication or glob
operator). By implementing Deref in such a way that a smart pointer can be
treated like a regular reference, you can write code that operates on
references and use that code with smart pointers too.
Let’s first look at how the dereference operator works with regular references.
Then we’ll try to define a custom type that behaves like Box<T>, and see why
the dereference operator doesn’t work like a reference on our newly defined
type. We’ll explore how implementing the Deref trait makes it possible for
smart pointers to work in ways similar to references. Then we’ll look at
Rust’s deref coercion feature and how it lets us work with either references
or smart pointers.
Note: there’s one big difference between the
MyBox<T>type we’re about to build and the realBox<T>: our version will not store its data on the heap. We are focusing this example onDeref, so where the data is actually stored is less important than the pointer-like behavior.
Following the Pointer to the Value
A regular reference is a type of pointer, and one way to think of a pointer is
as an arrow to a value stored somewhere else. In Listing 15-6, we create a
reference to an i32 value and then use the dereference operator to follow the
reference to the value:
Filename: src/main.rs
fn main() { let x = 5; let y = &x; assert_eq!(5, x); assert_eq!(5, *y); }
Listing 15-6: Using the dereference operator to follow a
reference to an i32 value
The variable x holds an i32 value 5. We set y equal to a reference to
x. We can assert that x is equal to 5. However, if we want to make an
assertion about the value in y, we have to use *y to follow the reference
to the value it’s pointing to (hence dereference) so the compiler can compare
the actual value. Once we dereference y, we have access to the integer value
y is pointing to that we can compare with 5.
If we tried to write assert_eq!(5, y); instead, we would get this compilation
error:
$ cargo run
Compiling deref-example v0.1.0 (file:///projects/deref-example)
error[E0277]: can't compare `{integer}` with `&{integer}`
--> src/main.rs:6:5
|
6 | assert_eq!(5, y);
| ^^^^^^^^^^^^^^^^ no implementation for `{integer} == &{integer}`
|
= help: the trait `PartialEq<&{integer}>` is not implemented for `{integer}`
= help: the following other types implement trait `PartialEq<Rhs>`:
f32
f64
i128
i16
i32
i64
i8
isize
and 6 others
= note: this error originates in the macro `assert_eq` (in Nightly builds, run with -Z macro-backtrace for more info)
For more information about this error, try `rustc --explain E0277`.
error: could not compile `deref-example` due to previous error
Comparing a number and a reference to a number isn’t allowed because they’re different types. We must use the dereference operator to follow the reference to the value it’s pointing to.
Using Box<T> Like a Reference
We can rewrite the code in Listing 15-6 to use a Box<T> instead of a
reference; the dereference operator used on the Box<T> in Listing 15-7
functions in the same way as the dereference operator used on the reference in
Listing 15-6:
Filename: src/main.rs
fn main() { let x = 5; let y = Box::new(x); assert_eq!(5, x); assert_eq!(5, *y); }
Listing 15-7: Using the dereference operator on a
Box<i32>
The main difference between Listing 15-7 and Listing 15-6 is that here we set
y to be an instance of a Box<T> pointing to a copied value of x rather
than a reference pointing to the value of x. In the last assertion, we can
use the dereference operator to follow the pointer of the Box<T> in the same
way that we did when y was a reference. Next, we’ll explore what is special
about Box<T> that enables us to use the dereference operator by defining our
own type.
Defining Our Own Smart Pointer
Let’s build a smart pointer similar to the Box<T> type provided by the
standard library to experience how smart pointers behave differently from
references by default. Then we’ll look at how to add the ability to use the
dereference operator.
The Box<T> type is ultimately defined as a tuple struct with one element, so
Listing 15-8 defines a MyBox<T> type in the same way. We’ll also define a
new function to match the new function defined on Box<T>.
Filename: src/main.rs
struct MyBox<T>(T); impl<T> MyBox<T> { fn new(x: T) -> MyBox<T> { MyBox(x) } } fn main() {}
Listing 15-8: Defining a MyBox<T> type
We define a struct named MyBox and declare a generic parameter T, because
we want our type to hold values of any type. The MyBox type is a tuple struct
with one element of type T. The MyBox::new function takes one parameter of
type T and returns a MyBox instance that holds the value passed in.
Let’s try adding the main function in Listing 15-7 to Listing 15-8 and
changing it to use the MyBox<T> type we’ve defined instead of Box<T>. The
code in Listing 15-9 won’t compile because Rust doesn’t know how to dereference
MyBox.
Filename: src/main.rs
struct MyBox<T>(T);
impl<T> MyBox<T> {
fn new(x: T) -> MyBox<T> {
MyBox(x)
}
}
fn main() {
let x = 5;
let y = MyBox::new(x);
assert_eq!(5, x);
assert_eq!(5, *y);
}Listing 15-9: Attempting to use MyBox<T> in the same
way we used references and Box<T>
Here’s the resulting compilation error:
$ cargo run
Compiling deref-example v0.1.0 (file:///projects/deref-example)
error[E0614]: type `MyBox<{integer}>` cannot be dereferenced
--> src/main.rs:14:19
|
14 | assert_eq!(5, *y);
| ^^
For more information about this error, try `rustc --explain E0614`.
error: could not compile `deref-example` due to previous error
Our MyBox<T> type can’t be dereferenced because we haven’t implemented that
ability on our type. To enable dereferencing with the * operator, we
implement the Deref trait.
Treating a Type Like a Reference by Implementing the Deref Trait
As discussed in the “Implementing a Trait on a Type” section of Chapter 10, to implement a trait, we need to provide
implementations for the trait’s required methods. The Deref trait, provided
by the standard library, requires us to implement one method named deref that
borrows self and returns a reference to the inner data. Listing 15-10
contains an implementation of Deref to add to the definition of MyBox:
Filename: src/main.rs
use std::ops::Deref; impl<T> Deref for MyBox<T> { type Target = T; fn deref(&self) -> &Self::Target { &self.0 } } struct MyBox<T>(T); impl<T> MyBox<T> { fn new(x: T) -> MyBox<T> { MyBox(x) } } fn main() { let x = 5; let y = MyBox::new(x); assert_eq!(5, x); assert_eq!(5, *y); }
Listing 15-10: Implementing Deref on MyBox<T>
The type Target = T; syntax defines an associated type for the Deref
trait to use. Associated types are a slightly different way of declaring a
generic parameter, but you don’t need to worry about them for now; we’ll cover
them in more detail in Chapter 19.
We fill in the body of the deref method with &self.0 so deref returns a
reference to the value we want to access with the * operator; recall from the
“Using Tuple Structs without Named Fields to Create Different
Types” section of Chapter 5 that .0 accesses
the first value in a tuple struct. The main function in Listing 15-9 that
calls * on the MyBox<T> value now compiles, and the assertions pass!
Without the Deref trait, the compiler can only dereference & references.
The deref method gives the compiler the ability to take a value of any type
that implements Deref and call the deref method to get a & reference that
it knows how to dereference.
When we entered *y in Listing 15-9, behind the scenes Rust actually ran this
code:
*(y.deref())Rust substitutes the * operator with a call to the deref method and then a
plain dereference so we don’t have to think about whether or not we need to
call the deref method. This Rust feature lets us write code that functions
identically whether we have a regular reference or a type that implements
Deref.
The reason the deref method returns a reference to a value, and that the
plain dereference outside the parentheses in *(y.deref()) is still necessary,
is to do with the ownership system. If the deref method returned the value
directly instead of a reference to the value, the value would be moved out of
self. We don’t want to take ownership of the inner value inside MyBox<T> in
this case or in most cases where we use the dereference operator.
Note that the * operator is replaced with a call to the deref method and
then a call to the * operator just once, each time we use a * in our code.
Because the substitution of the * operator does not recurse infinitely, we
end up with data of type i32, which matches the 5 in assert_eq! in
Listing 15-9.
Implicit Deref Coercions with Functions and Methods
Deref coercion converts a reference to a type that implements the Deref
trait into a reference to another type. For example, deref coercion can convert
&String to &str because String implements the Deref trait such that it
returns &str. Deref coercion is a convenience Rust performs on arguments to
functions and methods, and works only on types that implement the Deref
trait. It happens automatically when we pass a reference to a particular type’s
value as an argument to a function or method that doesn’t match the parameter
type in the function or method definition. A sequence of calls to the deref
method converts the type we provided into the type the parameter needs.
Deref coercion was added to Rust so that programmers writing function and
method calls don’t need to add as many explicit references and dereferences
with & and *. The deref coercion feature also lets us write more code that
can work for either references or smart pointers.
To see deref coercion in action, let’s use the MyBox<T> type we defined in
Listing 15-8 as well as the implementation of Deref that we added in Listing
15-10. Listing 15-11 shows the definition of a function that has a string slice
parameter:
Filename: src/main.rs
fn hello(name: &str) { println!("Hello, {name}!"); } fn main() {}
Listing 15-11: A hello function that has the parameter
name of type &str
We can call the hello function with a string slice as an argument, such as
hello("Rust"); for example. Deref coercion makes it possible to call hello
with a reference to a value of type MyBox<String>, as shown in Listing 15-12:
Filename: src/main.rs
use std::ops::Deref; impl<T> Deref for MyBox<T> { type Target = T; fn deref(&self) -> &T { &self.0 } } struct MyBox<T>(T); impl<T> MyBox<T> { fn new(x: T) -> MyBox<T> { MyBox(x) } } fn hello(name: &str) { println!("Hello, {name}!"); } fn main() { let m = MyBox::new(String::from("Rust")); hello(&m); }
Listing 15-12: Calling hello with a reference to a
MyBox<String> value, which works because of deref coercion
Here we’re calling the hello function with the argument &m, which is a
reference to a MyBox<String> value. Because we implemented the Deref trait
on MyBox<T> in Listing 15-10, Rust can turn &MyBox<String> into &String
by calling deref. The standard library provides an implementation of Deref
on String that returns a string slice, and this is in the API documentation
for Deref. Rust calls deref again to turn the &String into &str, which
matches the hello function’s definition.
If Rust didn’t implement deref coercion, we would have to write the code in
Listing 15-13 instead of the code in Listing 15-12 to call hello with a value
of type &MyBox<String>.
Filename: src/main.rs
use std::ops::Deref; impl<T> Deref for MyBox<T> { type Target = T; fn deref(&self) -> &T { &self.0 } } struct MyBox<T>(T); impl<T> MyBox<T> { fn new(x: T) -> MyBox<T> { MyBox(x) } } fn hello(name: &str) { println!("Hello, {name}!"); } fn main() { let m = MyBox::new(String::from("Rust")); hello(&(*m)[..]); }
Listing 15-13: The code we would have to write if Rust didn’t have deref coercion
The (*m) dereferences the MyBox<String> into a String. Then the & and
[..] take a string slice of the String that is equal to the whole string to
match the signature of hello. This code without deref coercions is harder to
read, write, and understand with all of these symbols involved. Deref coercion
allows Rust to handle these conversions for us automatically.
When the Deref trait is defined for the types involved, Rust will analyze the
types and use Deref::deref as many times as necessary to get a reference to
match the parameter’s type. The number of times that Deref::deref needs to be
inserted is resolved at compile time, so there is no runtime penalty for taking
advantage of deref coercion!
How Deref Coercion Interacts with Mutability
Similar to how you use the Deref trait to override the * operator on
immutable references, you can use the DerefMut trait to override the *
operator on mutable references.
Rust does deref coercion when it finds types and trait implementations in three cases:
- From
&Tto&UwhenT: Deref<Target=U> - From
&mut Tto&mut UwhenT: DerefMut<Target=U> - From
&mut Tto&UwhenT: Deref<Target=U>
The first two cases are the same as each other except that the second
implements mutability. The first case states that if you have a &T, and T
implements Deref to some type U, you can get a &U transparently. The
second case states that the same deref coercion happens for mutable references.
The third case is trickier: Rust will also coerce a mutable reference to an immutable one. But the reverse is not possible: immutable references will never coerce to mutable references. Because of the borrowing rules, if you have a mutable reference, that mutable reference must be the only reference to that data (otherwise, the program wouldn’t compile). Converting one mutable reference to one immutable reference will never break the borrowing rules. Converting an immutable reference to a mutable reference would require that the initial immutable reference is the only immutable reference to that data, but the borrowing rules don’t guarantee that. Therefore, Rust can’t make the assumption that converting an immutable reference to a mutable reference is possible.
Running Code on Cleanup with the Drop Trait
The second trait important to the smart pointer pattern is Drop, which lets
you customize what happens when a value is about to go out of scope. You can
provide an implementation for the Drop trait on any type, and that code can
be used to release resources like files or network connections.
We’re introducing Drop in the context of smart pointers because the
functionality of the Drop trait is almost always used when implementing a
smart pointer. For example, when a Box<T> is dropped it will deallocate the
space on the heap that the box points to.
In some languages, for some types, the programmer must call code to free memory or resources every time they finish using an instance of those types. Examples include file handles, sockets, or locks. If they forget, the system might become overloaded and crash. In Rust, you can specify that a particular bit of code be run whenever a value goes out of scope, and the compiler will insert this code automatically. As a result, you don’t need to be careful about placing cleanup code everywhere in a program that an instance of a particular type is finished with—you still won’t leak resources!
You specify the code to run when a value goes out of scope by implementing the
Drop trait. The Drop trait requires you to implement one method named
drop that takes a mutable reference to self. To see when Rust calls drop,
let’s implement drop with println! statements for now.
Listing 15-14 shows a CustomSmartPointer struct whose only custom
functionality is that it will print Dropping CustomSmartPointer! when the
instance goes out of scope, to show when Rust runs the drop function.
Filename: src/main.rs
struct CustomSmartPointer { data: String, } impl Drop for CustomSmartPointer { fn drop(&mut self) { println!("Dropping CustomSmartPointer with data `{}`!", self.data); } } fn main() { let c = CustomSmartPointer { data: String::from("my stuff"), }; let d = CustomSmartPointer { data: String::from("other stuff"), }; println!("CustomSmartPointers created."); }
Listing 15-14: A CustomSmartPointer struct that
implements the Drop trait where we would put our cleanup code
The Drop trait is included in the prelude, so we don’t need to bring it into
scope. We implement the Drop trait on CustomSmartPointer and provide an
implementation for the drop method that calls println!. The body of the
drop function is where you would place any logic that you wanted to run when
an instance of your type goes out of scope. We’re printing some text here to
demonstrate visually when Rust will call drop.
In main, we create two instances of CustomSmartPointer and then print
CustomSmartPointers created. At the end of main, our instances of
CustomSmartPointer will go out of scope, and Rust will call the code we put
in the drop method, printing our final message. Note that we didn’t need to
call the drop method explicitly.
When we run this program, we’ll see the following output:
$ cargo run
Compiling drop-example v0.1.0 (file:///projects/drop-example)
Finished dev [unoptimized + debuginfo] target(s) in 0.60s
Running `target/debug/drop-example`
CustomSmartPointers created.
Dropping CustomSmartPointer with data `other stuff`!
Dropping CustomSmartPointer with data `my stuff`!
Rust automatically called drop for us when our instances went out of scope,
calling the code we specified. Variables are dropped in the reverse order of
their creation, so d was dropped before c. This example’s purpose is to
give you a visual guide to how the drop method works; usually you would
specify the cleanup code that your type needs to run rather than a print
message.
Dropping a Value Early with std::mem::drop
Unfortunately, it’s not straightforward to disable the automatic drop
functionality. Disabling drop isn’t usually necessary; the whole point of the
Drop trait is that it’s taken care of automatically. Occasionally, however,
you might want to clean up a value early. One example is when using smart
pointers that manage locks: you might want to force the drop method that
releases the lock so that other code in the same scope can acquire the lock.
Rust doesn’t let you call the Drop trait’s drop method manually; instead
you have to call the std::mem::drop function provided by the standard library
if you want to force a value to be dropped before the end of its scope.
If we try to call the Drop trait’s drop method manually by modifying the
main function from Listing 15-14, as shown in Listing 15-15, we’ll get a
compiler error:
Filename: src/main.rs
struct CustomSmartPointer {
data: String,
}
impl Drop for CustomSmartPointer {
fn drop(&mut self) {
println!("Dropping CustomSmartPointer with data `{}`!", self.data);
}
}
fn main() {
let c = CustomSmartPointer {
data: String::from("some data"),
};
println!("CustomSmartPointer created.");
c.drop();
println!("CustomSmartPointer dropped before the end of main.");
}Listing 15-15: Attempting to call the drop method from
the Drop trait manually to clean up early
When we try to compile this code, we’ll get this error:
$ cargo run
Compiling drop-example v0.1.0 (file:///projects/drop-example)
error[E0040]: explicit use of destructor method
--> src/main.rs:16:7
|
16 | c.drop();
| --^^^^--
| | |
| | explicit destructor calls not allowed
| help: consider using `drop` function: `drop(c)`
For more information about this error, try `rustc --explain E0040`.
error: could not compile `drop-example` due to previous error
This error message states that we’re not allowed to explicitly call drop. The
error message uses the term destructor, which is the general programming term
for a function that cleans up an instance. A destructor is analogous to a
constructor, which creates an instance. The drop function in Rust is one
particular destructor.
Rust doesn’t let us call drop explicitly because Rust would still
automatically call drop on the value at the end of main. This would cause a
double free error because Rust would be trying to clean up the same value
twice.
We can’t disable the automatic insertion of drop when a value goes out of
scope, and we can’t call the drop method explicitly. So, if we need to force
a value to be cleaned up early, we use the std::mem::drop function.
The std::mem::drop function is different from the drop method in the Drop
trait. We call it by passing as an argument the value we want to force drop.
The function is in the prelude, so we can modify main in Listing 15-15 to
call the drop function, as shown in Listing 15-16:
Filename: src/main.rs
struct CustomSmartPointer { data: String, } impl Drop for CustomSmartPointer { fn drop(&mut self) { println!("Dropping CustomSmartPointer with data `{}`!", self.data); } } fn main() { let c = CustomSmartPointer { data: String::from("some data"), }; println!("CustomSmartPointer created."); drop(c); println!("CustomSmartPointer dropped before the end of main."); }
Listing 15-16: Calling std::mem::drop to explicitly
drop a value before it goes out of scope
Running this code will print the following:
$ cargo run
Compiling drop-example v0.1.0 (file:///projects/drop-example)
Finished dev [unoptimized + debuginfo] target(s) in 0.73s
Running `target/debug/drop-example`
CustomSmartPointer created.
Dropping CustomSmartPointer with data `some data`!
CustomSmartPointer dropped before the end of main.
The text Dropping CustomSmartPointer with data `some data`! is printed
between the CustomSmartPointer created. and CustomSmartPointer dropped before the end of main. text, showing that the drop method code is called to
drop c at that point.
You can use code specified in a Drop trait implementation in many ways to
make cleanup convenient and safe: for instance, you could use it to create your
own memory allocator! With the Drop trait and Rust’s ownership system, you
don’t have to remember to clean up because Rust does it automatically.
You also don’t have to worry about problems resulting from accidentally
cleaning up values still in use: the ownership system that makes sure
references are always valid also ensures that drop gets called only once when
the value is no longer being used.
Now that we’ve examined Box<T> and some of the characteristics of smart
pointers, let’s look at a few other smart pointers defined in the standard
library.
Rc<T>, the Reference Counted Smart Pointer
In the majority of cases, ownership is clear: you know exactly which variable owns a given value. However, there are cases when a single value might have multiple owners. For example, in graph data structures, multiple edges might point to the same node, and that node is conceptually owned by all of the edges that point to it. A node shouldn’t be cleaned up unless it doesn’t have any edges pointing to it and so has no owners.
You have to enable multiple ownership explicitly by using the Rust type
Rc<T>, which is an abbreviation for reference counting. The Rc<T> type
keeps track of the number of references to a value to determine whether or not
the value is still in use. If there are zero references to a value, the value
can be cleaned up without any references becoming invalid.
Imagine Rc<T> as a TV in a family room. When one person enters to watch TV,
they turn it on. Others can come into the room and watch the TV. When the last
person leaves the room, they turn off the TV because it’s no longer being used.
If someone turns off the TV while others are still watching it, there would be
uproar from the remaining TV watchers!
We use the Rc<T> type when we want to allocate some data on the heap for
multiple parts of our program to read and we can’t determine at compile time
which part will finish using the data last. If we knew which part would finish
last, we could just make that part the data’s owner, and the normal ownership
rules enforced at compile time would take effect.
Note that Rc<T> is only for use in single-threaded scenarios. When we discuss
concurrency in Chapter 16, we’ll cover how to do reference counting in
multithreaded programs.
Using Rc<T> to Share Data
Let’s return to our cons list example in Listing 15-5. Recall that we defined
it using Box<T>. This time, we’ll create two lists that both share ownership
of a third list. Conceptually, this looks similar to Figure 15-3:

Figure 15-3: Two lists, b and c, sharing ownership of
a third list, a
We’ll create list a that contains 5 and then 10. Then we’ll make two more
lists: b that starts with 3 and c that starts with 4. Both b and c
lists will then continue on to the first a list containing 5 and 10. In other
words, both lists will share the first list containing 5 and 10.
Trying to implement this scenario using our definition of List with Box<T>
won’t work, as shown in Listing 15-17:
Filename: src/main.rs
enum List {
Cons(i32, Box<List>),
Nil,
}
use crate::List::{Cons, Nil};
fn main() {
let a = Cons(5, Box::new(Cons(10, Box::new(Nil))));
let b = Cons(3, Box::new(a));
let c = Cons(4, Box::new(a));
}Listing 15-17: Demonstrating we’re not allowed to have
two lists using Box<T> that try to share ownership of a third list
When we compile this code, we get this error:
$ cargo run
Compiling cons-list v0.1.0 (file:///projects/cons-list)
error[E0382]: use of moved value: `a`
--> src/main.rs:11:30
|
9 | let a = Cons(5, Box::new(Cons(10, Box::new(Nil))));
| - move occurs because `a` has type `List`, which does not implement the `Copy` trait
10 | let b = Cons(3, Box::new(a));
| - value moved here
11 | let c = Cons(4, Box::new(a));
| ^ value used here after move
For more information about this error, try `rustc --explain E0382`.
error: could not compile `cons-list` due to previous error
The Cons variants own the data they hold, so when we create the b list, a
is moved into b and b owns a. Then, when we try to use a again when
creating c, we’re not allowed to because a has been moved.
We could change the definition of Cons to hold references instead, but then
we would have to specify lifetime parameters. By specifying lifetime
parameters, we would be specifying that every element in the list will live at
least as long as the entire list. This is the case for the elements and lists
in Listing 15-17, but not in every scenario.
Instead, we’ll change our definition of List to use Rc<T> in place of
Box<T>, as shown in Listing 15-18. Each Cons variant will now hold a value
and an Rc<T> pointing to a List. When we create b, instead of taking
ownership of a, we’ll clone the Rc<List> that a is holding, thereby
increasing the number of references from one to two and letting a and b
share ownership of the data in that Rc<List>. We’ll also clone a when
creating c, increasing the number of references from two to three. Every time
we call Rc::clone, the reference count to the data within the Rc<List> will
increase, and the data won’t be cleaned up unless there are zero references to
it.
Filename: src/main.rs
enum List { Cons(i32, Rc<List>), Nil, } use crate::List::{Cons, Nil}; use std::rc::Rc; fn main() { let a = Rc::new(Cons(5, Rc::new(Cons(10, Rc::new(Nil))))); let b = Cons(3, Rc::clone(&a)); let c = Cons(4, Rc::clone(&a)); }
Listing 15-18: A definition of List that uses
Rc<T>
We need to add a use statement to bring Rc<T> into scope because it’s not
in the prelude. In main, we create the list holding 5 and 10 and store it in
a new Rc<List> in a. Then when we create b and c, we call the
Rc::clone function and pass a reference to the Rc<List> in a as an
argument.
We could have called a.clone() rather than Rc::clone(&a), but Rust’s
convention is to use Rc::clone in this case. The implementation of
Rc::clone doesn’t make a deep copy of all the data like most types’
implementations of clone do. The call to Rc::clone only increments the
reference count, which doesn’t take much time. Deep copies of data can take a
lot of time. By using Rc::clone for reference counting, we can visually
distinguish between the deep-copy kinds of clones and the kinds of clones that
increase the reference count. When looking for performance problems in the
code, we only need to consider the deep-copy clones and can disregard calls to
Rc::clone.
Cloning an Rc<T> Increases the Reference Count
Let’s change our working example in Listing 15-18 so we can see the reference
counts changing as we create and drop references to the Rc<List> in a.
In Listing 15-19, we’ll change main so it has an inner scope around list c;
then we can see how the reference count changes when c goes out of scope.
Filename: src/main.rs
enum List { Cons(i32, Rc<List>), Nil, } use crate::List::{Cons, Nil}; use std::rc::Rc; fn main() { let a = Rc::new(Cons(5, Rc::new(Cons(10, Rc::new(Nil))))); println!("count after creating a = {}", Rc::strong_count(&a)); let b = Cons(3, Rc::clone(&a)); println!("count after creating b = {}", Rc::strong_count(&a)); { let c = Cons(4, Rc::clone(&a)); println!("count after creating c = {}", Rc::strong_count(&a)); } println!("count after c goes out of scope = {}", Rc::strong_count(&a)); }
Listing 15-19: Printing the reference count
At each point in the program where the reference count changes, we print the
reference count, which we get by calling the Rc::strong_count function. This
function is named strong_count rather than count because the Rc<T> type
also has a weak_count; we’ll see what weak_count is used for in the
“Preventing Reference Cycles: Turning an Rc<T> into a
Weak<T>” section.
This code prints the following:
$ cargo run
Compiling cons-list v0.1.0 (file:///projects/cons-list)
Finished dev [unoptimized + debuginfo] target(s) in 0.45s
Running `target/debug/cons-list`
count after creating a = 1
count after creating b = 2
count after creating c = 3
count after c goes out of scope = 2
We can see that the Rc<List> in a has an initial reference count of 1; then
each time we call clone, the count goes up by 1. When c goes out of scope,
the count goes down by 1. We don’t have to call a function to decrease the
reference count like we have to call Rc::clone to increase the reference
count: the implementation of the Drop trait decreases the reference count
automatically when an Rc<T> value goes out of scope.
What we can’t see in this example is that when b and then a go out of scope
at the end of main, the count is then 0, and the Rc<List> is cleaned up
completely. Using Rc<T> allows a single value to have multiple owners, and
the count ensures that the value remains valid as long as any of the owners
still exist.
Via immutable references, Rc<T> allows you to share data between multiple
parts of your program for reading only. If Rc<T> allowed you to have multiple
mutable references too, you might violate one of the borrowing rules discussed
in Chapter 4: multiple mutable borrows to the same place can cause data races
and inconsistencies. But being able to mutate data is very useful! In the next
section, we’ll discuss the interior mutability pattern and the RefCell<T>
type that you can use in conjunction with an Rc<T> to work with this
immutability restriction.
RefCell<T> and the Interior Mutability Pattern
Interior mutability is a design pattern in Rust that allows you to mutate
data even when there are immutable references to that data; normally, this
action is disallowed by the borrowing rules. To mutate data, the pattern uses
unsafe code inside a data structure to bend Rust’s usual rules that govern
mutation and borrowing. Unsafe code indicates to the compiler that we’re
checking the rules manually instead of relying on the compiler to check them
for us; we will discuss unsafe code more in Chapter 19.
We can use types that use the interior mutability pattern only when we can
ensure that the borrowing rules will be followed at runtime, even though the
compiler can’t guarantee that. The unsafe code involved is then wrapped in a
safe API, and the outer type is still immutable.
Let’s explore this concept by looking at the RefCell<T> type that follows the
interior mutability pattern.
Enforcing Borrowing Rules at Runtime with RefCell<T>
Unlike Rc<T>, the RefCell<T> type represents single ownership over the data
it holds. So, what makes RefCell<T> different from a type like Box<T>?
Recall the borrowing rules you learned in Chapter 4:
- At any given time, you can have either (but not both) one mutable reference or any number of immutable references.
- References must always be valid.
With references and Box<T>, the borrowing rules’ invariants are enforced at
compile time. With RefCell<T>, these invariants are enforced at runtime.
With references, if you break these rules, you’ll get a compiler error. With
RefCell<T>, if you break these rules, your program will panic and exit.
The advantages of checking the borrowing rules at compile time are that errors will be caught sooner in the development process, and there is no impact on runtime performance because all the analysis is completed beforehand. For those reasons, checking the borrowing rules at compile time is the best choice in the majority of cases, which is why this is Rust’s default.
The advantage of checking the borrowing rules at runtime instead is that certain memory-safe scenarios are then allowed, where they would’ve been disallowed by the compile-time checks. Static analysis, like the Rust compiler, is inherently conservative. Some properties of code are impossible to detect by analyzing the code: the most famous example is the Halting Problem, which is beyond the scope of this book but is an interesting topic to research.
Because some analysis is impossible, if the Rust compiler can’t be sure the
code complies with the ownership rules, it might reject a correct program; in
this way, it’s conservative. If Rust accepted an incorrect program, users
wouldn’t be able to trust in the guarantees Rust makes. However, if Rust
rejects a correct program, the programmer will be inconvenienced, but nothing
catastrophic can occur. The RefCell<T> type is useful when you’re sure your
code follows the borrowing rules but the compiler is unable to understand and
guarantee that.
Similar to Rc<T>, RefCell<T> is only for use in single-threaded scenarios
and will give you a compile-time error if you try using it in a multithreaded
context. We’ll talk about how to get the functionality of RefCell<T> in a
multithreaded program in Chapter 16.
Here is a recap of the reasons to choose Box<T>, Rc<T>, or RefCell<T>:
Rc<T>enables multiple owners of the same data;Box<T>andRefCell<T>have single owners.Box<T>allows immutable or mutable borrows checked at compile time;Rc<T>allows only immutable borrows checked at compile time;RefCell<T>allows immutable or mutable borrows checked at runtime.- Because
RefCell<T>allows mutable borrows checked at runtime, you can mutate the value inside theRefCell<T>even when theRefCell<T>is immutable.
Mutating the value inside an immutable value is the interior mutability pattern. Let’s look at a situation in which interior mutability is useful and examine how it’s possible.
Interior Mutability: A Mutable Borrow to an Immutable Value
A consequence of the borrowing rules is that when you have an immutable value, you can’t borrow it mutably. For example, this code won’t compile:
fn main() {
let x = 5;
let y = &mut x;
}If you tried to compile this code, you’d get the following error:
$ cargo run
Compiling borrowing v0.1.0 (file:///projects/borrowing)
error[E0596]: cannot borrow `x` as mutable, as it is not declared as mutable
--> src/main.rs:3:13
|
2 | let x = 5;
| - help: consider changing this to be mutable: `mut x`
3 | let y = &mut x;
| ^^^^^^ cannot borrow as mutable
For more information about this error, try `rustc --explain E0596`.
error: could not compile `borrowing` due to previous error
However, there are situations in which it would be useful for a value to mutate
itself in its methods but appear immutable to other code. Code outside the
value’s methods would not be able to mutate the value. Using RefCell<T> is
one way to get the ability to have interior mutability, but RefCell<T>
doesn’t get around the borrowing rules completely: the borrow checker in the
compiler allows this interior mutability, and the borrowing rules are checked
at runtime instead. If you violate the rules, you’ll get a panic! instead of
a compiler error.
Let’s work through a practical example where we can use RefCell<T> to mutate
an immutable value and see why that is useful.
A Use Case for Interior Mutability: Mock Objects
Sometimes during testing a programmer will use a type in place of another type, in order to observe particular behavior and assert it’s implemented correctly. This placeholder type is called a test double. Think of it in the sense of a “stunt double” in filmmaking, where a person steps in and substitutes for an actor to do a particular tricky scene. Test doubles stand in for other types when we’re running tests. Mock objects are specific types of test doubles that record what happens during a test so you can assert that the correct actions took place.
Rust doesn’t have objects in the same sense as other languages have objects, and Rust doesn’t have mock object functionality built into the standard library as some other languages do. However, you can definitely create a struct that will serve the same purposes as a mock object.
Here’s the scenario we’ll test: we’ll create a library that tracks a value against a maximum value and sends messages based on how close to the maximum value the current value is. This library could be used to keep track of a user’s quota for the number of API calls they’re allowed to make, for example.
Our library will only provide the functionality of tracking how close to the
maximum a value is and what the messages should be at what times. Applications
that use our library will be expected to provide the mechanism for sending the
messages: the application could put a message in the application, send an
email, send a text message, or something else. The library doesn’t need to know
that detail. All it needs is something that implements a trait we’ll provide
called Messenger. Listing 15-20 shows the library code:
Filename: src/lib.rs
pub trait Messenger {
fn send(&self, msg: &str);
}
pub struct LimitTracker<'a, T: Messenger> {
messenger: &'a T,
value: usize,
max: usize,
}
impl<'a, T> LimitTracker<'a, T>
where
T: Messenger,
{
pub fn new(messenger: &'a T, max: usize) -> LimitTracker<'a, T> {
LimitTracker {
messenger,
value: 0,
max,
}
}
pub fn set_value(&mut self, value: usize) {
self.value = value;
let percentage_of_max = self.value as f64 / self.max as f64;
if percentage_of_max >= 1.0 {
self.messenger.send("Error: You are over your quota!");
} else if percentage_of_max >= 0.9 {
self.messenger
.send("Urgent warning: You've used up over 90% of your quota!");
} else if percentage_of_max >= 0.75 {
self.messenger
.send("Warning: You've used up over 75% of your quota!");
}
}
}Listing 15-20: A library to keep track of how close a value is to a maximum value and warn when the value is at certain levels
One important part of this code is that the Messenger trait has one method
called send that takes an immutable reference to self and the text of the
message. This trait is the interface our mock object needs to implement so that
the mock can be used in the same way a real object is. The other important part
is that we want to test the behavior of the set_value method on the
LimitTracker. We can change what we pass in for the value parameter, but
set_value doesn’t return anything for us to make assertions on. We want to be
able to say that if we create a LimitTracker with something that implements
the Messenger trait and a particular value for max, when we pass different
numbers for value, the messenger is told to send the appropriate messages.
We need a mock object that, instead of sending an email or text message when we
call send, will only keep track of the messages it’s told to send. We can
create a new instance of the mock object, create a LimitTracker that uses the
mock object, call the set_value method on LimitTracker, and then check that
the mock object has the messages we expect. Listing 15-21 shows an attempt to
implement a mock object to do just that, but the borrow checker won’t allow it:
Filename: src/lib.rs
pub trait Messenger {
fn send(&self, msg: &str);
}
pub struct LimitTracker<'a, T: Messenger> {
messenger: &'a T,
value: usize,
max: usize,
}
impl<'a, T> LimitTracker<'a, T>
where
T: Messenger,
{
pub fn new(messenger: &'a T, max: usize) -> LimitTracker<'a, T> {
LimitTracker {
messenger,
value: 0,
max,
}
}
pub fn set_value(&mut self, value: usize) {
self.value = value;
let percentage_of_max = self.value as f64 / self.max as f64;
if percentage_of_max >= 1.0 {
self.messenger.send("Error: You are over your quota!");
} else if percentage_of_max >= 0.9 {
self.messenger
.send("Urgent warning: You've used up over 90% of your quota!");
} else if percentage_of_max >= 0.75 {
self.messenger
.send("Warning: You've used up over 75% of your quota!");
}
}
}
#[cfg(test)]
mod tests {
use super::*;
struct MockMessenger {
sent_messages: Vec<String>,
}
impl MockMessenger {
fn new() -> MockMessenger {
MockMessenger {
sent_messages: vec![],
}
}
}
impl Messenger for MockMessenger {
fn send(&self, message: &str) {
self.sent_messages.push(String::from(message));
}
}
#[test]
fn it_sends_an_over_75_percent_warning_message() {
let mock_messenger = MockMessenger::new();
let mut limit_tracker = LimitTracker::new(&mock_messenger, 100);
limit_tracker.set_value(80);
assert_eq!(mock_messenger.sent_messages.len(), 1);
}
}Listing 15-21: An attempt to implement a MockMessenger
that isn’t allowed by the borrow checker
This test code defines a MockMessenger struct that has a sent_messages
field with a Vec of String values to keep track of the messages it’s told
to send. We also define an associated function new to make it convenient to
create new MockMessenger values that start with an empty list of messages. We
then implement the Messenger trait for MockMessenger so we can give a
MockMessenger to a LimitTracker. In the definition of the send method, we
take the message passed in as a parameter and store it in the MockMessenger
list of sent_messages.
In the test, we’re testing what happens when the LimitTracker is told to set
value to something that is more than 75 percent of the max value. First, we
create a new MockMessenger, which will start with an empty list of messages.
Then we create a new LimitTracker and give it a reference to the new
MockMessenger and a max value of 100. We call the set_value method on the
LimitTracker with a value of 80, which is more than 75 percent of 100. Then
we assert that the list of messages that the MockMessenger is keeping track
of should now have one message in it.
However, there’s one problem with this test, as shown here:
$ cargo test
Compiling limit-tracker v0.1.0 (file:///projects/limit-tracker)
error[E0596]: cannot borrow `self.sent_messages` as mutable, as it is behind a `&` reference
--> src/lib.rs:58:13
|
2 | fn send(&self, msg: &str);
| ----- help: consider changing that to be a mutable reference: `&mut self`
...
58 | self.sent_messages.push(String::from(message));
| ^^^^^^^^^^^^^^^^^^^^^^^^^^^^^^^^^^^^^^^^^^^^^^ `self` is a `&` reference, so the data it refers to cannot be borrowed as mutable
For more information about this error, try `rustc --explain E0596`.
error: could not compile `limit-tracker` due to previous error
warning: build failed, waiting for other jobs to finish...
We can’t modify the MockMessenger to keep track of the messages, because the
send method takes an immutable reference to self. We also can’t take the
suggestion from the error text to use &mut self instead, because then the
signature of send wouldn’t match the signature in the Messenger trait
definition (feel free to try and see what error message you get).
This is a situation in which interior mutability can help! We’ll store the
sent_messages within a RefCell<T>, and then the send method will be
able to modify sent_messages to store the messages we’ve seen. Listing 15-22
shows what that looks like:
Filename: src/lib.rs
pub trait Messenger {
fn send(&self, msg: &str);
}
pub struct LimitTracker<'a, T: Messenger> {
messenger: &'a T,
value: usize,
max: usize,
}
impl<'a, T> LimitTracker<'a, T>
where
T: Messenger,
{
pub fn new(messenger: &'a T, max: usize) -> LimitTracker<'a, T> {
LimitTracker {
messenger,
value: 0,
max,
}
}
pub fn set_value(&mut self, value: usize) {
self.value = value;
let percentage_of_max = self.value as f64 / self.max as f64;
if percentage_of_max >= 1.0 {
self.messenger.send("Error: You are over your quota!");
} else if percentage_of_max >= 0.9 {
self.messenger
.send("Urgent warning: You've used up over 90% of your quota!");
} else if percentage_of_max >= 0.75 {
self.messenger
.send("Warning: You've used up over 75% of your quota!");
}
}
}
#[cfg(test)]
mod tests {
use super::*;
use std::cell::RefCell;
struct MockMessenger {
sent_messages: RefCell<Vec<String>>,
}
impl MockMessenger {
fn new() -> MockMessenger {
MockMessenger {
sent_messages: RefCell::new(vec![]),
}
}
}
impl Messenger for MockMessenger {
fn send(&self, message: &str) {
self.sent_messages.borrow_mut().push(String::from(message));
}
}
#[test]
fn it_sends_an_over_75_percent_warning_message() {
// --snip--
let mock_messenger = MockMessenger::new();
let mut limit_tracker = LimitTracker::new(&mock_messenger, 100);
limit_tracker.set_value(80);
assert_eq!(mock_messenger.sent_messages.borrow().len(), 1);
}
}Listing 15-22: Using RefCell<T> to mutate an inner
value while the outer value is considered immutable
The sent_messages field is now of type RefCell<Vec<String>> instead of
Vec<String>. In the new function, we create a new RefCell<Vec<String>>
instance around the empty vector.
For the implementation of the send method, the first parameter is still an
immutable borrow of self, which matches the trait definition. We call
borrow_mut on the RefCell<Vec<String>> in self.sent_messages to get a
mutable reference to the value inside the RefCell<Vec<String>>, which is the
vector. Then we can call push on the mutable reference to the vector to keep
track of the messages sent during the test.
The last change we have to make is in the assertion: to see how many items are
in the inner vector, we call borrow on the RefCell<Vec<String>> to get an
immutable reference to the vector.
Now that you’ve seen how to use RefCell<T>, let’s dig into how it works!
Keeping Track of Borrows at Runtime with RefCell<T>
When creating immutable and mutable references, we use the & and &mut
syntax, respectively. With RefCell<T>, we use the borrow and borrow_mut
methods, which are part of the safe API that belongs to RefCell<T>. The
borrow method returns the smart pointer type Ref<T>, and borrow_mut
returns the smart pointer type RefMut<T>. Both types implement Deref, so we
can treat them like regular references.
The RefCell<T> keeps track of how many Ref<T> and RefMut<T> smart
pointers are currently active. Every time we call borrow, the RefCell<T>
increases its count of how many immutable borrows are active. When a Ref<T>
value goes out of scope, the count of immutable borrows goes down by one. Just
like the compile-time borrowing rules, RefCell<T> lets us have many immutable
borrows or one mutable borrow at any point in time.
If we try to violate these rules, rather than getting a compiler error as we
would with references, the implementation of RefCell<T> will panic at
runtime. Listing 15-23 shows a modification of the implementation of send in
Listing 15-22. We’re deliberately trying to create two mutable borrows active
for the same scope to illustrate that RefCell<T> prevents us from doing this
at runtime.
Filename: src/lib.rs
pub trait Messenger {
fn send(&self, msg: &str);
}
pub struct LimitTracker<'a, T: Messenger> {
messenger: &'a T,
value: usize,
max: usize,
}
impl<'a, T> LimitTracker<'a, T>
where
T: Messenger,
{
pub fn new(messenger: &'a T, max: usize) -> LimitTracker<'a, T> {
LimitTracker {
messenger,
value: 0,
max,
}
}
pub fn set_value(&mut self, value: usize) {
self.value = value;
let percentage_of_max = self.value as f64 / self.max as f64;
if percentage_of_max >= 1.0 {
self.messenger.send("Error: You are over your quota!");
} else if percentage_of_max >= 0.9 {
self.messenger
.send("Urgent warning: You've used up over 90% of your quota!");
} else if percentage_of_max >= 0.75 {
self.messenger
.send("Warning: You've used up over 75% of your quota!");
}
}
}
#[cfg(test)]
mod tests {
use super::*;
use std::cell::RefCell;
struct MockMessenger {
sent_messages: RefCell<Vec<String>>,
}
impl MockMessenger {
fn new() -> MockMessenger {
MockMessenger {
sent_messages: RefCell::new(vec![]),
}
}
}
impl Messenger for MockMessenger {
fn send(&self, message: &str) {
let mut one_borrow = self.sent_messages.borrow_mut();
let mut two_borrow = self.sent_messages.borrow_mut();
one_borrow.push(String::from(message));
two_borrow.push(String::from(message));
}
}
#[test]
fn it_sends_an_over_75_percent_warning_message() {
let mock_messenger = MockMessenger::new();
let mut limit_tracker = LimitTracker::new(&mock_messenger, 100);
limit_tracker.set_value(80);
assert_eq!(mock_messenger.sent_messages.borrow().len(), 1);
}
}Listing 15-23: Creating two mutable references in the
same scope to see that RefCell<T> will panic
We create a variable one_borrow for the RefMut<T> smart pointer returned
from borrow_mut. Then we create another mutable borrow in the same way in the
variable two_borrow. This makes two mutable references in the same scope,
which isn’t allowed. When we run the tests for our library, the code in Listing
15-23 will compile without any errors, but the test will fail:
$ cargo test
Compiling limit-tracker v0.1.0 (file:///projects/limit-tracker)
Finished test [unoptimized + debuginfo] target(s) in 0.91s
Running unittests src/lib.rs (target/debug/deps/limit_tracker-e599811fa246dbde)
running 1 test
test tests::it_sends_an_over_75_percent_warning_message ... FAILED
failures:
---- tests::it_sends_an_over_75_percent_warning_message stdout ----
thread 'tests::it_sends_an_over_75_percent_warning_message' panicked at 'already borrowed: BorrowMutError', src/lib.rs:60:53
note: run with `RUST_BACKTRACE=1` environment variable to display a backtrace
failures:
tests::it_sends_an_over_75_percent_warning_message
test result: FAILED. 0 passed; 1 failed; 0 ignored; 0 measured; 0 filtered out; finished in 0.00s
error: test failed, to rerun pass `--lib`
Notice that the code panicked with the message already borrowed: BorrowMutError. This is how RefCell<T> handles violations of the borrowing
rules at runtime.
Choosing to catch borrowing errors at runtime rather than compile time, as
we’ve done here, means you’d potentially be finding mistakes in your code later
in the development process: possibly not until your code was deployed to
production. Also, your code would incur a small runtime performance penalty as
a result of keeping track of the borrows at runtime rather than compile time.
However, using RefCell<T> makes it possible to write a mock object that can
modify itself to keep track of the messages it has seen while you’re using it
in a context where only immutable values are allowed. You can use RefCell<T>
despite its trade-offs to get more functionality than regular references
provide.
Having Multiple Owners of Mutable Data by Combining Rc<T> and RefCell<T>
A common way to use RefCell<T> is in combination with Rc<T>. Recall that
Rc<T> lets you have multiple owners of some data, but it only gives immutable
access to that data. If you have an Rc<T> that holds a RefCell<T>, you can
get a value that can have multiple owners and that you can mutate!
For example, recall the cons list example in Listing 15-18 where we used
Rc<T> to allow multiple lists to share ownership of another list. Because
Rc<T> holds only immutable values, we can’t change any of the values in the
list once we’ve created them. Let’s add in RefCell<T> to gain the ability to
change the values in the lists. Listing 15-24 shows that by using a
RefCell<T> in the Cons definition, we can modify the value stored in all
the lists:
Filename: src/main.rs
#[derive(Debug)] enum List { Cons(Rc<RefCell<i32>>, Rc<List>), Nil, } use crate::List::{Cons, Nil}; use std::cell::RefCell; use std::rc::Rc; fn main() { let value = Rc::new(RefCell::new(5)); let a = Rc::new(Cons(Rc::clone(&value), Rc::new(Nil))); let b = Cons(Rc::new(RefCell::new(3)), Rc::clone(&a)); let c = Cons(Rc::new(RefCell::new(4)), Rc::clone(&a)); *value.borrow_mut() += 10; println!("a after = {:?}", a); println!("b after = {:?}", b); println!("c after = {:?}", c); }
Listing 15-24: Using Rc<RefCell<i32>> to create a
List that we can mutate
We create a value that is an instance of Rc<RefCell<i32>> and store it in a
variable named value so we can access it directly later. Then we create a
List in a with a Cons variant that holds value. We need to clone
value so both a and value have ownership of the inner 5 value rather
than transferring ownership from value to a or having a borrow from
value.
We wrap the list a in an Rc<T> so when we create lists b and c, they
can both refer to a, which is what we did in Listing 15-18.
After we’ve created the lists in a, b, and c, we want to add 10 to the
value in value. We do this by calling borrow_mut on value, which uses the
automatic dereferencing feature we discussed in Chapter 5 (see the section
“Where’s the -> Operator?”) to
dereference the Rc<T> to the inner RefCell<T> value. The borrow_mut
method returns a RefMut<T> smart pointer, and we use the dereference operator
on it and change the inner value.
When we print a, b, and c, we can see that they all have the modified
value of 15 rather than 5:
$ cargo run
Compiling cons-list v0.1.0 (file:///projects/cons-list)
Finished dev [unoptimized + debuginfo] target(s) in 0.63s
Running `target/debug/cons-list`
a after = Cons(RefCell { value: 15 }, Nil)
b after = Cons(RefCell { value: 3 }, Cons(RefCell { value: 15 }, Nil))
c after = Cons(RefCell { value: 4 }, Cons(RefCell { value: 15 }, Nil))
This technique is pretty neat! By using RefCell<T>, we have an outwardly
immutable List value. But we can use the methods on RefCell<T> that provide
access to its interior mutability so we can modify our data when we need to.
The runtime checks of the borrowing rules protect us from data races, and it’s
sometimes worth trading a bit of speed for this flexibility in our data
structures. Note that RefCell<T> does not work for multithreaded code!
Mutex<T> is the thread-safe version of RefCell<T> and we’ll discuss
Mutex<T> in Chapter 16.
Reference Cycles Can Leak Memory
Rust’s memory safety guarantees make it difficult, but not impossible, to
accidentally create memory that is never cleaned up (known as a memory leak).
Preventing memory leaks entirely is not one of Rust’s guarantees, meaning
memory leaks are memory safe in Rust. We can see that Rust allows memory leaks
by using Rc<T> and RefCell<T>: it’s possible to create references where
items refer to each other in a cycle. This creates memory leaks because the
reference count of each item in the cycle will never reach 0, and the values
will never be dropped.
Creating a Reference Cycle
Let’s look at how a reference cycle might happen and how to prevent it,
starting with the definition of the List enum and a tail method in Listing
15-25:
Filename: src/main.rs
use crate::List::{Cons, Nil}; use std::cell::RefCell; use std::rc::Rc; #[derive(Debug)] enum List { Cons(i32, RefCell<Rc<List>>), Nil, } impl List { fn tail(&self) -> Option<&RefCell<Rc<List>>> { match self { Cons(_, item) => Some(item), Nil => None, } } } fn main() {}
Listing 15-25: A cons list definition that holds a
RefCell<T> so we can modify what a Cons variant is referring to
We’re using another variation of the List definition from Listing 15-5. The
second element in the Cons variant is now RefCell<Rc<List>>, meaning that
instead of having the ability to modify the i32 value as we did in Listing
15-24, we want to modify the List value a Cons variant is pointing to.
We’re also adding a tail method to make it convenient for us to access the
second item if we have a Cons variant.
In Listing 15-26, we’re adding a main function that uses the definitions in
Listing 15-25. This code creates a list in a and a list in b that points to
the list in a. Then it modifies the list in a to point to b, creating a
reference cycle. There are println! statements along the way to show what the
reference counts are at various points in this process.
Filename: src/main.rs
use crate::List::{Cons, Nil}; use std::cell::RefCell; use std::rc::Rc; #[derive(Debug)] enum List { Cons(i32, RefCell<Rc<List>>), Nil, } impl List { fn tail(&self) -> Option<&RefCell<Rc<List>>> { match self { Cons(_, item) => Some(item), Nil => None, } } } fn main() { let a = Rc::new(Cons(5, RefCell::new(Rc::new(Nil)))); println!("a initial rc count = {}", Rc::strong_count(&a)); println!("a next item = {:?}", a.tail()); let b = Rc::new(Cons(10, RefCell::new(Rc::clone(&a)))); println!("a rc count after b creation = {}", Rc::strong_count(&a)); println!("b initial rc count = {}", Rc::strong_count(&b)); println!("b next item = {:?}", b.tail()); if let Some(link) = a.tail() { *link.borrow_mut() = Rc::clone(&b); } println!("b rc count after changing a = {}", Rc::strong_count(&b)); println!("a rc count after changing a = {}", Rc::strong_count(&a)); // Uncomment the next line to see that we have a cycle; // it will overflow the stack // println!("a next item = {:?}", a.tail()); }
Listing 15-26: Creating a reference cycle of two List
values pointing to each other
We create an Rc<List> instance holding a List value in the variable a
with an initial list of 5, Nil. We then create an Rc<List> instance holding
another List value in the variable b that contains the value 10 and points
to the list in a.
We modify a so it points to b instead of Nil, creating a cycle. We do
that by using the tail method to get a reference to the RefCell<Rc<List>>
in a, which we put in the variable link. Then we use the borrow_mut
method on the RefCell<Rc<List>> to change the value inside from an Rc<List>
that holds a Nil value to the Rc<List> in b.
When we run this code, keeping the last println! commented out for the
moment, we’ll get this output:
$ cargo run
Compiling cons-list v0.1.0 (file:///projects/cons-list)
Finished dev [unoptimized + debuginfo] target(s) in 0.53s
Running `target/debug/cons-list`
a initial rc count = 1
a next item = Some(RefCell { value: Nil })
a rc count after b creation = 2
b initial rc count = 1
b next item = Some(RefCell { value: Cons(5, RefCell { value: Nil }) })
b rc count after changing a = 2
a rc count after changing a = 2
The reference count of the Rc<List> instances in both a and b are 2 after
we change the list in a to point to b. At the end of main, Rust drops the
variable b, which decreases the reference count of the b Rc<List> instance
from 2 to 1. The memory that Rc<List> has on the heap won’t be dropped at
this point, because its reference count is 1, not 0. Then Rust drops a, which
decreases the reference count of the a Rc<List> instance from 2 to 1 as
well. This instance’s memory can’t be dropped either, because the other
Rc<List> instance still refers to it. The memory allocated to the list will
remain uncollected forever. To visualize this reference cycle, we’ve created a
diagram in Figure 15-4.

Figure 15-4: A reference cycle of lists a and b
pointing to each other
If you uncomment the last println! and run the program, Rust will try to
print this cycle with a pointing to b pointing to a and so forth until it
overflows the stack.
Compared to a real-world program, the consequences creating a reference cycle in this example aren’t very dire: right after we create the reference cycle, the program ends. However, if a more complex program allocated lots of memory in a cycle and held onto it for a long time, the program would use more memory than it needed and might overwhelm the system, causing it to run out of available memory.
Creating reference cycles is not easily done, but it’s not impossible either.
If you have RefCell<T> values that contain Rc<T> values or similar nested
combinations of types with interior mutability and reference counting, you must
ensure that you don’t create cycles; you can’t rely on Rust to catch them.
Creating a reference cycle would be a logic bug in your program that you should
use automated tests, code reviews, and other software development practices to
minimize.
Another solution for avoiding reference cycles is reorganizing your data
structures so that some references express ownership and some references don’t.
As a result, you can have cycles made up of some ownership relationships and
some non-ownership relationships, and only the ownership relationships affect
whether or not a value can be dropped. In Listing 15-25, we always want Cons
variants to own their list, so reorganizing the data structure isn’t possible.
Let’s look at an example using graphs made up of parent nodes and child nodes
to see when non-ownership relationships are an appropriate way to prevent
reference cycles.
Preventing Reference Cycles: Turning an Rc<T> into a Weak<T>
So far, we’ve demonstrated that calling Rc::clone increases the
strong_count of an Rc<T> instance, and an Rc<T> instance is only cleaned
up if its strong_count is 0. You can also create a weak reference to the
value within an Rc<T> instance by calling Rc::downgrade and passing a
reference to the Rc<T>. Strong references are how you can share ownership of
an Rc<T> instance. Weak references don’t express an ownership relationship,
and their count doesn’t affect when an Rc<T> instance is cleaned up. They
won’t cause a reference cycle because any cycle involving some weak references
will be broken once the strong reference count of values involved is 0.
When you call Rc::downgrade, you get a smart pointer of type Weak<T>.
Instead of increasing the strong_count in the Rc<T> instance by 1, calling
Rc::downgrade increases the weak_count by 1. The Rc<T> type uses
weak_count to keep track of how many Weak<T> references exist, similar to
strong_count. The difference is the weak_count doesn’t need to be 0 for the
Rc<T> instance to be cleaned up.
Because the value that Weak<T> references might have been dropped, to do
anything with the value that a Weak<T> is pointing to, you must make sure the
value still exists. Do this by calling the upgrade method on a Weak<T>
instance, which will return an Option<Rc<T>>. You’ll get a result of Some
if the Rc<T> value has not been dropped yet and a result of None if the
Rc<T> value has been dropped. Because upgrade returns an Option<Rc<T>>,
Rust will ensure that the Some case and the None case are handled, and
there won’t be an invalid pointer.
As an example, rather than using a list whose items know only about the next item, we’ll create a tree whose items know about their children items and their parent items.
Creating a Tree Data Structure: a Node with Child Nodes
To start, we’ll build a tree with nodes that know about their child nodes.
We’ll create a struct named Node that holds its own i32 value as well as
references to its children Node values:
Filename: src/main.rs
use std::cell::RefCell; use std::rc::Rc; #[derive(Debug)] struct Node { value: i32, children: RefCell<Vec<Rc<Node>>>, } fn main() { let leaf = Rc::new(Node { value: 3, children: RefCell::new(vec![]), }); let branch = Rc::new(Node { value: 5, children: RefCell::new(vec![Rc::clone(&leaf)]), }); }
We want a Node to own its children, and we want to share that ownership with
variables so we can access each Node in the tree directly. To do this, we
define the Vec<T> items to be values of type Rc<Node>. We also want to
modify which nodes are children of another node, so we have a RefCell<T> in
children around the Vec<Rc<Node>>.
Next, we’ll use our struct definition and create one Node instance named
leaf with the value 3 and no children, and another instance named branch
with the value 5 and leaf as one of its children, as shown in Listing 15-27:
Filename: src/main.rs
use std::cell::RefCell; use std::rc::Rc; #[derive(Debug)] struct Node { value: i32, children: RefCell<Vec<Rc<Node>>>, } fn main() { let leaf = Rc::new(Node { value: 3, children: RefCell::new(vec![]), }); let branch = Rc::new(Node { value: 5, children: RefCell::new(vec![Rc::clone(&leaf)]), }); }
Listing 15-27: Creating a leaf node with no children
and a branch node with leaf as one of its children
We clone the Rc<Node> in leaf and store that in branch, meaning the
Node in leaf now has two owners: leaf and branch. We can get from
branch to leaf through branch.children, but there’s no way to get from
leaf to branch. The reason is that leaf has no reference to branch and
doesn’t know they’re related. We want leaf to know that branch is its
parent. We’ll do that next.
Adding a Reference from a Child to Its Parent
To make the child node aware of its parent, we need to add a parent field to
our Node struct definition. The trouble is in deciding what the type of
parent should be. We know it can’t contain an Rc<T>, because that would
create a reference cycle with leaf.parent pointing to branch and
branch.children pointing to leaf, which would cause their strong_count
values to never be 0.
Thinking about the relationships another way, a parent node should own its children: if a parent node is dropped, its child nodes should be dropped as well. However, a child should not own its parent: if we drop a child node, the parent should still exist. This is a case for weak references!
So instead of Rc<T>, we’ll make the type of parent use Weak<T>,
specifically a RefCell<Weak<Node>>. Now our Node struct definition looks
like this:
Filename: src/main.rs
use std::cell::RefCell; use std::rc::{Rc, Weak}; #[derive(Debug)] struct Node { value: i32, parent: RefCell<Weak<Node>>, children: RefCell<Vec<Rc<Node>>>, } fn main() { let leaf = Rc::new(Node { value: 3, parent: RefCell::new(Weak::new()), children: RefCell::new(vec![]), }); println!("leaf parent = {:?}", leaf.parent.borrow().upgrade()); let branch = Rc::new(Node { value: 5, parent: RefCell::new(Weak::new()), children: RefCell::new(vec![Rc::clone(&leaf)]), }); *leaf.parent.borrow_mut() = Rc::downgrade(&branch); println!("leaf parent = {:?}", leaf.parent.borrow().upgrade()); }
A node will be able to refer to its parent node but doesn’t own its parent.
In Listing 15-28, we update main to use this new definition so the leaf
node will have a way to refer to its parent, branch:
Filename: src/main.rs
use std::cell::RefCell; use std::rc::{Rc, Weak}; #[derive(Debug)] struct Node { value: i32, parent: RefCell<Weak<Node>>, children: RefCell<Vec<Rc<Node>>>, } fn main() { let leaf = Rc::new(Node { value: 3, parent: RefCell::new(Weak::new()), children: RefCell::new(vec![]), }); println!("leaf parent = {:?}", leaf.parent.borrow().upgrade()); let branch = Rc::new(Node { value: 5, parent: RefCell::new(Weak::new()), children: RefCell::new(vec![Rc::clone(&leaf)]), }); *leaf.parent.borrow_mut() = Rc::downgrade(&branch); println!("leaf parent = {:?}", leaf.parent.borrow().upgrade()); }
Listing 15-28: A leaf node with a weak reference to its
parent node branch
Creating the leaf node looks similar to Listing 15-27 with the exception of
the parent field: leaf starts out without a parent, so we create a new,
empty Weak<Node> reference instance.
At this point, when we try to get a reference to the parent of leaf by using
the upgrade method, we get a None value. We see this in the output from the
first println! statement:
leaf parent = None
When we create the branch node, it will also have a new Weak<Node>
reference in the parent field, because branch doesn’t have a parent node.
We still have leaf as one of the children of branch. Once we have the
Node instance in branch, we can modify leaf to give it a Weak<Node>
reference to its parent. We use the borrow_mut method on the
RefCell<Weak<Node>> in the parent field of leaf, and then we use the
Rc::downgrade function to create a Weak<Node> reference to branch from
the Rc<Node> in branch.
When we print the parent of leaf again, this time we’ll get a Some variant
holding branch: now leaf can access its parent! When we print leaf, we
also avoid the cycle that eventually ended in a stack overflow like we had in
Listing 15-26; the Weak<Node> references are printed as (Weak):
leaf parent = Some(Node { value: 5, parent: RefCell { value: (Weak) },
children: RefCell { value: [Node { value: 3, parent: RefCell { value: (Weak) },
children: RefCell { value: [] } }] } })
The lack of infinite output indicates that this code didn’t create a reference
cycle. We can also tell this by looking at the values we get from calling
Rc::strong_count and Rc::weak_count.
Visualizing Changes to strong_count and weak_count
Let’s look at how the strong_count and weak_count values of the Rc<Node>
instances change by creating a new inner scope and moving the creation of
branch into that scope. By doing so, we can see what happens when branch is
created and then dropped when it goes out of scope. The modifications are shown
in Listing 15-29:
Filename: src/main.rs
use std::cell::RefCell; use std::rc::{Rc, Weak}; #[derive(Debug)] struct Node { value: i32, parent: RefCell<Weak<Node>>, children: RefCell<Vec<Rc<Node>>>, } fn main() { let leaf = Rc::new(Node { value: 3, parent: RefCell::new(Weak::new()), children: RefCell::new(vec![]), }); println!( "leaf strong = {}, weak = {}", Rc::strong_count(&leaf), Rc::weak_count(&leaf), ); { let branch = Rc::new(Node { value: 5, parent: RefCell::new(Weak::new()), children: RefCell::new(vec![Rc::clone(&leaf)]), }); *leaf.parent.borrow_mut() = Rc::downgrade(&branch); println!( "branch strong = {}, weak = {}", Rc::strong_count(&branch), Rc::weak_count(&branch), ); println!( "leaf strong = {}, weak = {}", Rc::strong_count(&leaf), Rc::weak_count(&leaf), ); } println!("leaf parent = {:?}", leaf.parent.borrow().upgrade()); println!( "leaf strong = {}, weak = {}", Rc::strong_count(&leaf), Rc::weak_count(&leaf), ); }
Listing 15-29: Creating branch in an inner scope and
examining strong and weak reference counts
After leaf is created, its Rc<Node> has a strong count of 1 and a weak
count of 0. In the inner scope, we create branch and associate it with
leaf, at which point when we print the counts, the Rc<Node> in branch
will have a strong count of 1 and a weak count of 1 (for leaf.parent pointing
to branch with a Weak<Node>). When we print the counts in leaf, we’ll see
it will have a strong count of 2, because branch now has a clone of the
Rc<Node> of leaf stored in branch.children, but will still have a weak
count of 0.
When the inner scope ends, branch goes out of scope and the strong count of
the Rc<Node> decreases to 0, so its Node is dropped. The weak count of 1
from leaf.parent has no bearing on whether or not Node is dropped, so we
don’t get any memory leaks!
If we try to access the parent of leaf after the end of the scope, we’ll get
None again. At the end of the program, the Rc<Node> in leaf has a strong
count of 1 and a weak count of 0, because the variable leaf is now the only
reference to the Rc<Node> again.
All of the logic that manages the counts and value dropping is built into
Rc<T> and Weak<T> and their implementations of the Drop trait. By
specifying that the relationship from a child to its parent should be a
Weak<T> reference in the definition of Node, you’re able to have parent
nodes point to child nodes and vice versa without creating a reference cycle
and memory leaks.
Summary
This chapter covered how to use smart pointers to make different guarantees and
trade-offs from those Rust makes by default with regular references. The
Box<T> type has a known size and points to data allocated on the heap. The
Rc<T> type keeps track of the number of references to data on the heap so
that data can have multiple owners. The RefCell<T> type with its interior
mutability gives us a type that we can use when we need an immutable type but
need to change an inner value of that type; it also enforces the borrowing
rules at runtime instead of at compile time.
Also discussed were the Deref and Drop traits, which enable a lot of the
functionality of smart pointers. We explored reference cycles that can cause
memory leaks and how to prevent them using Weak<T>.
If this chapter has piqued your interest and you want to implement your own smart pointers, check out “The Rustonomicon” for more useful information.
Next, we’ll talk about concurrency in Rust. You’ll even learn about a few new smart pointers.
Fearless Concurrency
Handling concurrent programming safely and efficiently is another of Rust’s major goals. Concurrent programming, where different parts of a program execute independently, and parallel programming, where different parts of a program execute at the same time, are becoming increasingly important as more computers take advantage of their multiple processors. Historically, programming in these contexts has been difficult and error prone: Rust hopes to change that.
Initially, the Rust team thought that ensuring memory safety and preventing concurrency problems were two separate challenges to be solved with different methods. Over time, the team discovered that the ownership and type systems are a powerful set of tools to help manage memory safety and concurrency problems! By leveraging ownership and type checking, many concurrency errors are compile-time errors in Rust rather than runtime errors. Therefore, rather than making you spend lots of time trying to reproduce the exact circumstances under which a runtime concurrency bug occurs, incorrect code will refuse to compile and present an error explaining the problem. As a result, you can fix your code while you’re working on it rather than potentially after it has been shipped to production. We’ve nicknamed this aspect of Rust fearless concurrency. Fearless concurrency allows you to write code that is free of subtle bugs and is easy to refactor without introducing new bugs.
Note: For simplicity’s sake, we’ll refer to many of the problems as concurrent rather than being more precise by saying concurrent and/or parallel. If this book were about concurrency and/or parallelism, we’d be more specific. For this chapter, please mentally substitute concurrent and/or parallel whenever we use concurrent.
Many languages are dogmatic about the solutions they offer for handling concurrent problems. For example, Erlang has elegant functionality for message-passing concurrency but has only obscure ways to share state between threads. Supporting only a subset of possible solutions is a reasonable strategy for higher-level languages, because a higher-level language promises benefits from giving up some control to gain abstractions. However, lower-level languages are expected to provide the solution with the best performance in any given situation and have fewer abstractions over the hardware. Therefore, Rust offers a variety of tools for modeling problems in whatever way is appropriate for your situation and requirements.
Here are the topics we’ll cover in this chapter:
- How to create threads to run multiple pieces of code at the same time
- Message-passing concurrency, where channels send messages between threads
- Shared-state concurrency, where multiple threads have access to some piece of data
- The
SyncandSendtraits, which extend Rust’s concurrency guarantees to user-defined types as well as types provided by the standard library
Using Threads to Run Code Simultaneously
In most current operating systems, an executed program’s code is run in a process, and the operating system will manage multiple processes at once. Within a program, you can also have independent parts that run simultaneously. The features that run these independent parts are called threads. For example, a web server could have multiple threads so that it could respond to more than one request at the same time.
Splitting the computation in your program into multiple threads to run multiple tasks at the same time can improve performance, but it also adds complexity. Because threads can run simultaneously, there’s no inherent guarantee about the order in which parts of your code on different threads will run. This can lead to problems, such as:
- Race conditions, where threads are accessing data or resources in an inconsistent order
- Deadlocks, where two threads are waiting for each other, preventing both threads from continuing
- Bugs that happen only in certain situations and are hard to reproduce and fix reliably
Rust attempts to mitigate the negative effects of using threads, but programming in a multithreaded context still takes careful thought and requires a code structure that is different from that in programs running in a single thread.
Programming languages implement threads in a few different ways, and many operating systems provide an API the language can call for creating new threads. The Rust standard library uses a 1:1 model of thread implementation, whereby a program uses one operating system thread per one language thread. There are crates that implement other models of threading that make different tradeoffs to the 1:1 model.
Creating a New Thread with spawn
To create a new thread, we call the thread::spawn function and pass it a
closure (we talked about closures in Chapter 13) containing the code we want to
run in the new thread. The example in Listing 16-1 prints some text from a main
thread and other text from a new thread:
Filename: src/main.rs
use std::thread; use std::time::Duration; fn main() { thread::spawn(|| { for i in 1..10 { println!("hi number {} from the spawned thread!", i); thread::sleep(Duration::from_millis(1)); } }); for i in 1..5 { println!("hi number {} from the main thread!", i); thread::sleep(Duration::from_millis(1)); } }
Listing 16-1: Creating a new thread to print one thing while the main thread prints something else
Note that when the main thread of a Rust program completes, all spawned threads are shut down, whether or not they have finished running. The output from this program might be a little different every time, but it will look similar to the following:
hi number 1 from the main thread!
hi number 1 from the spawned thread!
hi number 2 from the main thread!
hi number 2 from the spawned thread!
hi number 3 from the main thread!
hi number 3 from the spawned thread!
hi number 4 from the main thread!
hi number 4 from the spawned thread!
hi number 5 from the spawned thread!
The calls to thread::sleep force a thread to stop its execution for a short
duration, allowing a different thread to run. The threads will probably take
turns, but that isn’t guaranteed: it depends on how your operating system
schedules the threads. In this run, the main thread printed first, even though
the print statement from the spawned thread appears first in the code. And even
though we told the spawned thread to print until i is 9, it only got to 5
before the main thread shut down.
If you run this code and only see output from the main thread, or don’t see any overlap, try increasing the numbers in the ranges to create more opportunities for the operating system to switch between the threads.
Waiting for All Threads to Finish Using join Handles
The code in Listing 16-1 not only stops the spawned thread prematurely most of the time due to the main thread ending, but because there is no guarantee on the order in which threads run, we also can’t guarantee that the spawned thread will get to run at all!
We can fix the problem of the spawned thread not running or ending prematurely
by saving the return value of thread::spawn in a variable. The return type of
thread::spawn is JoinHandle. A JoinHandle is an owned value that, when we
call the join method on it, will wait for its thread to finish. Listing 16-2
shows how to use the JoinHandle of the thread we created in Listing 16-1 and
call join to make sure the spawned thread finishes before main exits:
Filename: src/main.rs
use std::thread; use std::time::Duration; fn main() { let handle = thread::spawn(|| { for i in 1..10 { println!("hi number {} from the spawned thread!", i); thread::sleep(Duration::from_millis(1)); } }); for i in 1..5 { println!("hi number {} from the main thread!", i); thread::sleep(Duration::from_millis(1)); } handle.join().unwrap(); }
Listing 16-2: Saving a JoinHandle from thread::spawn
to guarantee the thread is run to completion
Calling join on the handle blocks the thread currently running until the
thread represented by the handle terminates. Blocking a thread means that
thread is prevented from performing work or exiting. Because we’ve put the call
to join after the main thread’s for loop, running Listing 16-2 should
produce output similar to this:
hi number 1 from the main thread!
hi number 2 from the main thread!
hi number 1 from the spawned thread!
hi number 3 from the main thread!
hi number 2 from the spawned thread!
hi number 4 from the main thread!
hi number 3 from the spawned thread!
hi number 4 from the spawned thread!
hi number 5 from the spawned thread!
hi number 6 from the spawned thread!
hi number 7 from the spawned thread!
hi number 8 from the spawned thread!
hi number 9 from the spawned thread!
The two threads continue alternating, but the main thread waits because of the
call to handle.join() and does not end until the spawned thread is finished.
But let’s see what happens when we instead move handle.join() before the
for loop in main, like this:
Filename: src/main.rs
use std::thread; use std::time::Duration; fn main() { let handle = thread::spawn(|| { for i in 1..10 { println!("hi number {} from the spawned thread!", i); thread::sleep(Duration::from_millis(1)); } }); handle.join().unwrap(); for i in 1..5 { println!("hi number {} from the main thread!", i); thread::sleep(Duration::from_millis(1)); } }
The main thread will wait for the spawned thread to finish and then run its
for loop, so the output won’t be interleaved anymore, as shown here:
hi number 1 from the spawned thread!
hi number 2 from the spawned thread!
hi number 3 from the spawned thread!
hi number 4 from the spawned thread!
hi number 5 from the spawned thread!
hi number 6 from the spawned thread!
hi number 7 from the spawned thread!
hi number 8 from the spawned thread!
hi number 9 from the spawned thread!
hi number 1 from the main thread!
hi number 2 from the main thread!
hi number 3 from the main thread!
hi number 4 from the main thread!
Small details, such as where join is called, can affect whether or not your
threads run at the same time.
Using move Closures with Threads
We'll often use the move keyword with closures passed to thread::spawn
because the closure will then take ownership of the values it uses from the
environment, thus transferring ownership of those values from one thread to
another. In the “Capturing References or Moving Ownership” section of Chapter 13, we discussed move in the context of closures. Now,
we’ll concentrate more on the interaction between move and thread::spawn.
Notice in Listing 16-1 that the closure we pass to thread::spawn takes no
arguments: we’re not using any data from the main thread in the spawned
thread’s code. To use data from the main thread in the spawned thread, the
spawned thread’s closure must capture the values it needs. Listing 16-3 shows
an attempt to create a vector in the main thread and use it in the spawned
thread. However, this won’t yet work, as you’ll see in a moment.
Filename: src/main.rs
use std::thread;
fn main() {
let v = vec![1, 2, 3];
let handle = thread::spawn(|| {
println!("Here's a vector: {:?}", v);
});
handle.join().unwrap();
}Listing 16-3: Attempting to use a vector created by the main thread in another thread
The closure uses v, so it will capture v and make it part of the closure’s
environment. Because thread::spawn runs this closure in a new thread, we
should be able to access v inside that new thread. But when we compile this
example, we get the following error:
$ cargo run
Compiling threads v0.1.0 (file:///projects/threads)
error[E0373]: closure may outlive the current function, but it borrows `v`, which is owned by the current function
--> src/main.rs:6:32
|
6 | let handle = thread::spawn(|| {
| ^^ may outlive borrowed value `v`
7 | println!("Here's a vector: {:?}", v);
| - `v` is borrowed here
|
note: function requires argument type to outlive `'static`
--> src/main.rs:6:18
|
6 | let handle = thread::spawn(|| {
| __________________^
7 | | println!("Here's a vector: {:?}", v);
8 | | });
| |______^
help: to force the closure to take ownership of `v` (and any other referenced variables), use the `move` keyword
|
6 | let handle = thread::spawn(move || {
| ++++
For more information about this error, try `rustc --explain E0373`.
error: could not compile `threads` due to previous error
Rust infers how to capture v, and because println! only needs a reference
to v, the closure tries to borrow v. However, there’s a problem: Rust can’t
tell how long the spawned thread will run, so it doesn’t know if the reference
to v will always be valid.
Listing 16-4 provides a scenario that’s more likely to have a reference to v
that won’t be valid:
Filename: src/main.rs
use std::thread;
fn main() {
let v = vec![1, 2, 3];
let handle = thread::spawn(|| {
println!("Here's a vector: {:?}", v);
});
drop(v); // oh no!
handle.join().unwrap();
}Listing 16-4: A thread with a closure that attempts to
capture a reference to v from a main thread that drops v
If Rust allowed us to run this code, there’s a possibility the spawned thread
would be immediately put in the background without running at all. The spawned
thread has a reference to v inside, but the main thread immediately drops
v, using the drop function we discussed in Chapter 15. Then, when the
spawned thread starts to execute, v is no longer valid, so a reference to it
is also invalid. Oh no!
To fix the compiler error in Listing 16-3, we can use the error message’s advice:
help: to force the closure to take ownership of `v` (and any other referenced variables), use the `move` keyword
|
6 | let handle = thread::spawn(move || {
| ++++
By adding the move keyword before the closure, we force the closure to take
ownership of the values it’s using rather than allowing Rust to infer that it
should borrow the values. The modification to Listing 16-3 shown in Listing
16-5 will compile and run as we intend:
Filename: src/main.rs
use std::thread; fn main() { let v = vec![1, 2, 3]; let handle = thread::spawn(move || { println!("Here's a vector: {:?}", v); }); handle.join().unwrap(); }
Listing 16-5: Using the move keyword to force a closure
to take ownership of the values it uses
We might be tempted to try the same thing to fix the code in Listing 16-4 where
the main thread called drop by using a move closure. However, this fix will
not work because what Listing 16-4 is trying to do is disallowed for a
different reason. If we added move to the closure, we would move v into the
closure’s environment, and we could no longer call drop on it in the main
thread. We would get this compiler error instead:
$ cargo run
Compiling threads v0.1.0 (file:///projects/threads)
error[E0382]: use of moved value: `v`
--> src/main.rs:10:10
|
4 | let v = vec![1, 2, 3];
| - move occurs because `v` has type `Vec<i32>`, which does not implement the `Copy` trait
5 |
6 | let handle = thread::spawn(move || {
| ------- value moved into closure here
7 | println!("Here's a vector: {:?}", v);
| - variable moved due to use in closure
...
10 | drop(v); // oh no!
| ^ value used here after move
For more information about this error, try `rustc --explain E0382`.
error: could not compile `threads` due to previous error
Rust’s ownership rules have saved us again! We got an error from the code in
Listing 16-3 because Rust was being conservative and only borrowing v for the
thread, which meant the main thread could theoretically invalidate the spawned
thread’s reference. By telling Rust to move ownership of v to the spawned
thread, we’re guaranteeing Rust that the main thread won’t use v anymore. If
we change Listing 16-4 in the same way, we’re then violating the ownership
rules when we try to use v in the main thread. The move keyword overrides
Rust’s conservative default of borrowing; it doesn’t let us violate the
ownership rules.
With a basic understanding of threads and the thread API, let’s look at what we can do with threads.
Using Message Passing to Transfer Data Between Threads
One increasingly popular approach to ensuring safe concurrency is message passing, where threads or actors communicate by sending each other messages containing data. Here’s the idea in a slogan from the Go language documentation: “Do not communicate by sharing memory; instead, share memory by communicating.”
To accomplish message-sending concurrency, Rust's standard library provides an implementation of channels. A channel is a general programming concept by which data is sent from one thread to another.
You can imagine a channel in programming as being like a directional channel of water, such as a stream or a river. If you put something like a rubber duck into a river, it will travel downstream to the end of the waterway.
A channel has two halves: a transmitter and a receiver. The transmitter half is the upstream location where you put rubber ducks into the river, and the receiver half is where the rubber duck ends up downstream. One part of your code calls methods on the transmitter with the data you want to send, and another part checks the receiving end for arriving messages. A channel is said to be closed if either the transmitter or receiver half is dropped.
Here, we’ll work up to a program that has one thread to generate values and send them down a channel, and another thread that will receive the values and print them out. We’ll be sending simple values between threads using a channel to illustrate the feature. Once you’re familiar with the technique, you could use channels for any threads that need to communicate between each other, such as a chat system or a system where many threads perform parts of a calculation and send the parts to one thread that aggregates the results.
First, in Listing 16-6, we’ll create a channel but not do anything with it. Note that this won’t compile yet because Rust can’t tell what type of values we want to send over the channel.
Filename: src/main.rs
use std::sync::mpsc;
fn main() {
let (tx, rx) = mpsc::channel();
}Listing 16-6: Creating a channel and assigning the two
halves to tx and rx
We create a new channel using the mpsc::channel function; mpsc stands for
multiple producer, single consumer. In short, the way Rust’s standard library
implements channels means a channel can have multiple sending ends that
produce values but only one receiving end that consumes those values. Imagine
multiple streams flowing together into one big river: everything sent down any
of the streams will end up in one river at the end. We’ll start with a single
producer for now, but we’ll add multiple producers when we get this example
working.
The mpsc::channel function returns a tuple, the first element of which is the
sending end--the transmitter--and the second element is the receiving end--the
receiver. The abbreviations tx and rx are traditionally used in many fields
for transmitter and receiver respectively, so we name our variables as such
to indicate each end. We’re using a let statement with a pattern that
destructures the tuples; we’ll discuss the use of patterns in let statements
and destructuring in Chapter 18. For now, know that using a let statement
this way is a convenient approach to extract the pieces of the tuple returned
by mpsc::channel.
Let’s move the transmitting end into a spawned thread and have it send one string so the spawned thread is communicating with the main thread, as shown in Listing 16-7. This is like putting a rubber duck in the river upstream or sending a chat message from one thread to another.
Filename: src/main.rs
use std::sync::mpsc; use std::thread; fn main() { let (tx, rx) = mpsc::channel(); thread::spawn(move || { let val = String::from("hi"); tx.send(val).unwrap(); }); }
Listing 16-7: Moving tx to a spawned thread and sending
“hi”
Again, we’re using thread::spawn to create a new thread and then using move
to move tx into the closure so the spawned thread owns tx. The spawned
thread needs to own the transmitter to be able to send messages through the
channel. The transmitter has a send method that takes the value we want to
send. The send method returns a Result<T, E> type, so if the receiver has
already been dropped and there’s nowhere to send a value, the send operation
will return an error. In this example, we’re calling unwrap to panic in case
of an error. But in a real application, we would handle it properly: return to
Chapter 9 to review strategies for proper error handling.
In Listing 16-8, we’ll get the value from the receiver in the main thread. This is like retrieving the rubber duck from the water at the end of the river or receiving a chat message.
Filename: src/main.rs
use std::sync::mpsc; use std::thread; fn main() { let (tx, rx) = mpsc::channel(); thread::spawn(move || { let val = String::from("hi"); tx.send(val).unwrap(); }); let received = rx.recv().unwrap(); println!("Got: {}", received); }
Listing 16-8: Receiving the value “hi” in the main thread and printing it
The receiver has two useful methods: recv and try_recv. We’re using recv,
short for receive, which will block the main thread’s execution and wait
until a value is sent down the channel. Once a value is sent, recv will
return it in a Result<T, E>. When the transmitter closes, recv will return
an error to signal that no more values will be coming.
The try_recv method doesn’t block, but will instead return a Result<T, E>
immediately: an Ok value holding a message if one is available and an Err
value if there aren’t any messages this time. Using try_recv is useful if
this thread has other work to do while waiting for messages: we could write a
loop that calls try_recv every so often, handles a message if one is
available, and otherwise does other work for a little while until checking
again.
We’ve used recv in this example for simplicity; we don’t have any other work
for the main thread to do other than wait for messages, so blocking the main
thread is appropriate.
When we run the code in Listing 16-8, we’ll see the value printed from the main thread:
Got: hi
Perfect!
Channels and Ownership Transference
The ownership rules play a vital role in message sending because they help you
write safe, concurrent code. Preventing errors in concurrent programming is the
advantage of thinking about ownership throughout your Rust programs. Let’s do
an experiment to show how channels and ownership work together to prevent
problems: we’ll try to use a val value in the spawned thread after we’ve
sent it down the channel. Try compiling the code in Listing 16-9 to see why
this code isn’t allowed:
Filename: src/main.rs
use std::sync::mpsc;
use std::thread;
fn main() {
let (tx, rx) = mpsc::channel();
thread::spawn(move || {
let val = String::from("hi");
tx.send(val).unwrap();
println!("val is {}", val);
});
let received = rx.recv().unwrap();
println!("Got: {}", received);
}Listing 16-9: Attempting to use val after we’ve sent it
down the channel
Here, we try to print val after we’ve sent it down the channel via tx.send.
Allowing this would be a bad idea: once the value has been sent to another
thread, that thread could modify or drop it before we try to use the value
again. Potentially, the other thread’s modifications could cause errors or
unexpected results due to inconsistent or nonexistent data. However, Rust gives
us an error if we try to compile the code in Listing 16-9:
$ cargo run
Compiling message-passing v0.1.0 (file:///projects/message-passing)
error[E0382]: borrow of moved value: `val`
--> src/main.rs:10:31
|
8 | let val = String::from("hi");
| --- move occurs because `val` has type `String`, which does not implement the `Copy` trait
9 | tx.send(val).unwrap();
| --- value moved here
10 | println!("val is {}", val);
| ^^^ value borrowed here after move
|
= note: this error originates in the macro `$crate::format_args_nl` which comes from the expansion of the macro `println` (in Nightly builds, run with -Z macro-backtrace for more info)
For more information about this error, try `rustc --explain E0382`.
error: could not compile `message-passing` due to previous error
Our concurrency mistake has caused a compile time error. The send function
takes ownership of its parameter, and when the value is moved, the receiver
takes ownership of it. This stops us from accidentally using the value again
after sending it; the ownership system checks that everything is okay.
Sending Multiple Values and Seeing the Receiver Waiting
The code in Listing 16-8 compiled and ran, but it didn’t clearly show us that two separate threads were talking to each other over the channel. In Listing 16-10 we’ve made some modifications that will prove the code in Listing 16-8 is running concurrently: the spawned thread will now send multiple messages and pause for a second between each message.
Filename: src/main.rs
use std::sync::mpsc;
use std::thread;
use std::time::Duration;
fn main() {
let (tx, rx) = mpsc::channel();
thread::spawn(move || {
let vals = vec![
String::from("hi"),
String::from("from"),
String::from("the"),
String::from("thread"),
];
for val in vals {
tx.send(val).unwrap();
thread::sleep(Duration::from_secs(1));
}
});
for received in rx {
println!("Got: {}", received);
}
}Listing 16-10: Sending multiple messages and pausing between each
This time, the spawned thread has a vector of strings that we want to send to
the main thread. We iterate over them, sending each individually, and pause
between each by calling the thread::sleep function with a Duration value of
1 second.
In the main thread, we’re not calling the recv function explicitly anymore:
instead, we’re treating rx as an iterator. For each value received, we’re
printing it. When the channel is closed, iteration will end.
When running the code in Listing 16-10, you should see the following output with a 1-second pause in between each line:
Got: hi
Got: from
Got: the
Got: thread
Because we don’t have any code that pauses or delays in the for loop in the
main thread, we can tell that the main thread is waiting to receive values from
the spawned thread.
Creating Multiple Producers by Cloning the Transmitter
Earlier we mentioned that mpsc was an acronym for multiple producer,
single consumer. Let’s put mpsc to use and expand the code in Listing 16-10
to create multiple threads that all send values to the same receiver. We can do
so by cloning the transmitter, as shown in Listing 16-11:
Filename: src/main.rs
use std::sync::mpsc;
use std::thread;
use std::time::Duration;
fn main() {
// --snip--
let (tx, rx) = mpsc::channel();
let tx1 = tx.clone();
thread::spawn(move || {
let vals = vec![
String::from("hi"),
String::from("from"),
String::from("the"),
String::from("thread"),
];
for val in vals {
tx1.send(val).unwrap();
thread::sleep(Duration::from_secs(1));
}
});
thread::spawn(move || {
let vals = vec![
String::from("more"),
String::from("messages"),
String::from("for"),
String::from("you"),
];
for val in vals {
tx.send(val).unwrap();
thread::sleep(Duration::from_secs(1));
}
});
for received in rx {
println!("Got: {}", received);
}
// --snip--
}Listing 16-11: Sending multiple messages from multiple producers
This time, before we create the first spawned thread, we call clone on the
transmitter. This will give us a new transmitter we can pass to the first
spawned thread. We pass the original transmitter to a second spawned thread.
This gives us two threads, each sending different messages to the one receiver.
When you run the code, your output should look something like this:
Got: hi
Got: more
Got: from
Got: messages
Got: for
Got: the
Got: thread
Got: you
You might see the values in another order, depending on your system. This is
what makes concurrency interesting as well as difficult. If you experiment with
thread::sleep, giving it various values in the different threads, each run
will be more nondeterministic and create different output each time.
Now that we’ve looked at how channels work, let’s look at a different method of concurrency.
Shared-State Concurrency
Message passing is a fine way of handling concurrency, but it’s not the only one. Another method would be for multiple threads to access the same shared data. Consider this part of the slogan from the Go language documentation again: “do not communicate by sharing memory.”
What would communicating by sharing memory look like? In addition, why would message-passing enthusiasts caution not to use memory sharing?
In a way, channels in any programming language are similar to single ownership, because once you transfer a value down a channel, you should no longer use that value. Shared memory concurrency is like multiple ownership: multiple threads can access the same memory location at the same time. As you saw in Chapter 15, where smart pointers made multiple ownership possible, multiple ownership can add complexity because these different owners need managing. Rust’s type system and ownership rules greatly assist in getting this management correct. For an example, let’s look at mutexes, one of the more common concurrency primitives for shared memory.
Using Mutexes to Allow Access to Data from One Thread at a Time
Mutex is an abbreviation for mutual exclusion, as in, a mutex allows only one thread to access some data at any given time. To access the data in a mutex, a thread must first signal that it wants access by asking to acquire the mutex’s lock. The lock is a data structure that is part of the mutex that keeps track of who currently has exclusive access to the data. Therefore, the mutex is described as guarding the data it holds via the locking system.
Mutexes have a reputation for being difficult to use because you have to remember two rules:
- You must attempt to acquire the lock before using the data.
- When you’re done with the data that the mutex guards, you must unlock the data so other threads can acquire the lock.
For a real-world metaphor for a mutex, imagine a panel discussion at a conference with only one microphone. Before a panelist can speak, they have to ask or signal that they want to use the microphone. When they get the microphone, they can talk for as long as they want to and then hand the microphone to the next panelist who requests to speak. If a panelist forgets to hand the microphone off when they’re finished with it, no one else is able to speak. If management of the shared microphone goes wrong, the panel won’t work as planned!
Management of mutexes can be incredibly tricky to get right, which is why so many people are enthusiastic about channels. However, thanks to Rust’s type system and ownership rules, you can’t get locking and unlocking wrong.
The API of Mutex<T>
As an example of how to use a mutex, let’s start by using a mutex in a single-threaded context, as shown in Listing 16-12:
Filename: src/main.rs
use std::sync::Mutex; fn main() { let m = Mutex::new(5); { let mut num = m.lock().unwrap(); *num = 6; } println!("m = {:?}", m); }
Listing 16-12: Exploring the API of Mutex<T> in a
single-threaded context for simplicity
As with many types, we create a Mutex<T> using the associated function new.
To access the data inside the mutex, we use the lock method to acquire the
lock. This call will block the current thread so it can’t do any work until
it’s our turn to have the lock.
The call to lock would fail if another thread holding the lock panicked. In
that case, no one would ever be able to get the lock, so we’ve chosen to
unwrap and have this thread panic if we’re in that situation.
After we’ve acquired the lock, we can treat the return value, named num in
this case, as a mutable reference to the data inside. The type system ensures
that we acquire a lock before using the value in m. The type of m is
Mutex<i32>, not i32, so we must call lock to be able to use the i32
value. We can’t forget; the type system won’t let us access the inner i32
otherwise.
As you might suspect, Mutex<T> is a smart pointer. More accurately, the call
to lock returns a smart pointer called MutexGuard, wrapped in a
LockResult that we handled with the call to unwrap. The MutexGuard smart
pointer implements Deref to point at our inner data; the smart pointer also
has a Drop implementation that releases the lock automatically when a
MutexGuard goes out of scope, which happens at the end of the inner scope. As
a result, we don’t risk forgetting to release the lock and blocking the mutex
from being used by other threads, because the lock release happens
automatically.
After dropping the lock, we can print the mutex value and see that we were able
to change the inner i32 to 6.
Sharing a Mutex<T> Between Multiple Threads
Now, let’s try to share a value between multiple threads using Mutex<T>.
We’ll spin up 10 threads and have them each increment a counter value by 1, so
the counter goes from 0 to 10. The next example in Listing 16-13 will have
a compiler error, and we’ll use that error to learn more about using
Mutex<T> and how Rust helps us use it correctly.
Filename: src/main.rs
use std::sync::Mutex;
use std::thread;
fn main() {
let counter = Mutex::new(0);
let mut handles = vec![];
for _ in 0..10 {
let handle = thread::spawn(move || {
let mut num = counter.lock().unwrap();
*num += 1;
});
handles.push(handle);
}
for handle in handles {
handle.join().unwrap();
}
println!("Result: {}", *counter.lock().unwrap());
}Listing 16-13: Ten threads each increment a counter
guarded by a Mutex<T>
We create a counter variable to hold an i32 inside a Mutex<T>, as we did
in Listing 16-12. Next, we create 10 threads by iterating over a range of
numbers. We use thread::spawn and give all the threads the same closure: one
that moves the counter into the thread, acquires a lock on the Mutex<T> by
calling the lock method, and then adds 1 to the value in the mutex. When a
thread finishes running its closure, num will go out of scope and release the
lock so another thread can acquire it.
In the main thread, we collect all the join handles. Then, as we did in Listing
16-2, we call join on each handle to make sure all the threads finish. At
that point, the main thread will acquire the lock and print the result of this
program.
We hinted that this example wouldn’t compile. Now let’s find out why!
$ cargo run
Compiling shared-state v0.1.0 (file:///projects/shared-state)
error[E0382]: use of moved value: `counter`
--> src/main.rs:9:36
|
5 | let counter = Mutex::new(0);
| ------- move occurs because `counter` has type `Mutex<i32>`, which does not implement the `Copy` trait
...
9 | let handle = thread::spawn(move || {
| ^^^^^^^ value moved into closure here, in previous iteration of loop
10 | let mut num = counter.lock().unwrap();
| ------- use occurs due to use in closure
For more information about this error, try `rustc --explain E0382`.
error: could not compile `shared-state` due to previous error
The error message states that the counter value was moved in the previous
iteration of the loop. Rust is telling us that we can’t move the ownership
of lock counter into multiple threads. Let’s fix the compiler error with a
multiple-ownership method we discussed in Chapter 15.
Multiple Ownership with Multiple Threads
In Chapter 15, we gave a value multiple owners by using the smart pointer
Rc<T> to create a reference counted value. Let’s do the same here and see
what happens. We’ll wrap the Mutex<T> in Rc<T> in Listing 16-14 and clone
the Rc<T> before moving ownership to the thread.
Filename: src/main.rs
use std::rc::Rc;
use std::sync::Mutex;
use std::thread;
fn main() {
let counter = Rc::new(Mutex::new(0));
let mut handles = vec![];
for _ in 0..10 {
let counter = Rc::clone(&counter);
let handle = thread::spawn(move || {
let mut num = counter.lock().unwrap();
*num += 1;
});
handles.push(handle);
}
for handle in handles {
handle.join().unwrap();
}
println!("Result: {}", *counter.lock().unwrap());
}Listing 16-14: Attempting to use Rc<T> to allow
multiple threads to own the Mutex<T>
Once again, we compile and get... different errors! The compiler is teaching us a lot.
$ cargo run
Compiling shared-state v0.1.0 (file:///projects/shared-state)
error[E0277]: `Rc<Mutex<i32>>` cannot be sent between threads safely
--> src/main.rs:11:36
|
11 | let handle = thread::spawn(move || {
| ------------- ^------
| | |
| ______________________|_____________within this `[closure@src/main.rs:11:36: 11:43]`
| | |
| | required by a bound introduced by this call
12 | | let mut num = counter.lock().unwrap();
13 | |
14 | | *num += 1;
15 | | });
| |_________^ `Rc<Mutex<i32>>` cannot be sent between threads safely
|
= help: within `[closure@src/main.rs:11:36: 11:43]`, the trait `Send` is not implemented for `Rc<Mutex<i32>>`
note: required because it's used within this closure
--> src/main.rs:11:36
|
11 | let handle = thread::spawn(move || {
| ^^^^^^^
note: required by a bound in `spawn`
--> /rustc/d5a82bbd26e1ad8b7401f6a718a9c57c96905483/library/std/src/thread/mod.rs:704:8
|
= note: required by this bound in `spawn`
For more information about this error, try `rustc --explain E0277`.
error: could not compile `shared-state` due to previous error
Wow, that error message is very wordy! Here’s the important part to focus on:
`Rc<Mutex<i32>>` cannot be sent between threads safely. The compiler is
also telling us the reason why: the trait `Send` is not implemented for `Rc<Mutex<i32>>` . We’ll talk about Send in the next section: it’s one of
the traits that ensures the types we use with threads are meant for use in
concurrent situations.
Unfortunately, Rc<T> is not safe to share across threads. When Rc<T>
manages the reference count, it adds to the count for each call to clone and
subtracts from the count when each clone is dropped. But it doesn’t use any
concurrency primitives to make sure that changes to the count can’t be
interrupted by another thread. This could lead to wrong counts—subtle bugs that
could in turn lead to memory leaks or a value being dropped before we’re done
with it. What we need is a type exactly like Rc<T> but one that makes changes
to the reference count in a thread-safe way.
Atomic Reference Counting with Arc<T>
Fortunately, Arc<T> is a type like Rc<T> that is safe to use in
concurrent situations. The a stands for atomic, meaning it’s an atomically
reference counted type. Atomics are an additional kind of concurrency
primitive that we won’t cover in detail here: see the standard library
documentation for std::sync::atomic for more
details. At this point, you just need to know that atomics work like primitive
types but are safe to share across threads.
You might then wonder why all primitive types aren’t atomic and why standard
library types aren’t implemented to use Arc<T> by default. The reason is that
thread safety comes with a performance penalty that you only want to pay when
you really need to. If you’re just performing operations on values within a
single thread, your code can run faster if it doesn’t have to enforce the
guarantees atomics provide.
Let’s return to our example: Arc<T> and Rc<T> have the same API, so we fix
our program by changing the use line, the call to new, and the call to
clone. The code in Listing 16-15 will finally compile and run:
Filename: src/main.rs
use std::sync::{Arc, Mutex}; use std::thread; fn main() { let counter = Arc::new(Mutex::new(0)); let mut handles = vec![]; for _ in 0..10 { let counter = Arc::clone(&counter); let handle = thread::spawn(move || { let mut num = counter.lock().unwrap(); *num += 1; }); handles.push(handle); } for handle in handles { handle.join().unwrap(); } println!("Result: {}", *counter.lock().unwrap()); }
Listing 16-15: Using an Arc<T> to wrap the Mutex<T>
to be able to share ownership across multiple threads
This code will print the following:
Result: 10
We did it! We counted from 0 to 10, which may not seem very impressive, but it
did teach us a lot about Mutex<T> and thread safety. You could also use this
program’s structure to do more complicated operations than just incrementing a
counter. Using this strategy, you can divide a calculation into independent
parts, split those parts across threads, and then use a Mutex<T> to have each
thread update the final result with its part.
Note that if you are doing simple numerical operations, there are types simpler
than Mutex<T> types provided by the std::sync::atomic module of the
standard library. These types provide safe, concurrent,
atomic access to primitive types. We chose to use Mutex<T> with a primitive
type for this example so we could concentrate on how Mutex<T> works.
Similarities Between RefCell<T>/Rc<T> and Mutex<T>/Arc<T>
You might have noticed that counter is immutable but we could get a mutable
reference to the value inside it; this means Mutex<T> provides interior
mutability, as the Cell family does. In the same way we used RefCell<T> in
Chapter 15 to allow us to mutate contents inside an Rc<T>, we use Mutex<T>
to mutate contents inside an Arc<T>.
Another detail to note is that Rust can’t protect you from all kinds of logic
errors when you use Mutex<T>. Recall in Chapter 15 that using Rc<T> came
with the risk of creating reference cycles, where two Rc<T> values refer to
each other, causing memory leaks. Similarly, Mutex<T> comes with the risk of
creating deadlocks. These occur when an operation needs to lock two resources
and two threads have each acquired one of the locks, causing them to wait for
each other forever. If you’re interested in deadlocks, try creating a Rust
program that has a deadlock; then research deadlock mitigation strategies for
mutexes in any language and have a go at implementing them in Rust. The
standard library API documentation for Mutex<T> and MutexGuard offers
useful information.
We’ll round out this chapter by talking about the Send and Sync traits and
how we can use them with custom types.
Extensible Concurrency with the Sync and Send Traits
Interestingly, the Rust language has very few concurrency features. Almost every concurrency feature we’ve talked about so far in this chapter has been part of the standard library, not the language. Your options for handling concurrency are not limited to the language or the standard library; you can write your own concurrency features or use those written by others.
However, two concurrency concepts are embedded in the language: the
std::marker traits Sync and Send.
Allowing Transference of Ownership Between Threads with Send
The Send marker trait indicates that ownership of values of the type
implementing Send can be transferred between threads. Almost every Rust type
is Send, but there are some exceptions, including Rc<T>: this cannot be
Send because if you cloned an Rc<T> value and tried to transfer ownership
of the clone to another thread, both threads might update the reference count
at the same time. For this reason, Rc<T> is implemented for use in
single-threaded situations where you don’t want to pay the thread-safe
performance penalty.
Therefore, Rust’s type system and trait bounds ensure that you can never
accidentally send an Rc<T> value across threads unsafely. When we tried to do
this in Listing 16-14, we got the error the trait Send is not implemented for Rc<Mutex<i32>>. When we switched to Arc<T>, which is Send, the code
compiled.
Any type composed entirely of Send types is automatically marked as Send as
well. Almost all primitive types are Send, aside from raw pointers, which
we’ll discuss in Chapter 19.
Allowing Access from Multiple Threads with Sync
The Sync marker trait indicates that it is safe for the type implementing
Sync to be referenced from multiple threads. In other words, any type T is
Sync if &T (an immutable reference to T) is Send, meaning the reference
can be sent safely to another thread. Similar to Send, primitive types are
Sync, and types composed entirely of types that are Sync are also Sync.
The smart pointer Rc<T> is also not Sync for the same reasons that it’s not
Send. The RefCell<T> type (which we talked about in Chapter 15) and the
family of related Cell<T> types are not Sync. The implementation of borrow
checking that RefCell<T> does at runtime is not thread-safe. The smart
pointer Mutex<T> is Sync and can be used to share access with multiple
threads as you saw in the “Sharing a Mutex<T> Between Multiple
Threads” section.
Implementing Send and Sync Manually Is Unsafe
Because types that are made up of Send and Sync traits are automatically
also Send and Sync, we don’t have to implement those traits manually. As
marker traits, they don’t even have any methods to implement. They’re just
useful for enforcing invariants related to concurrency.
Manually implementing these traits involves implementing unsafe Rust code.
We’ll talk about using unsafe Rust code in Chapter 19; for now, the important
information is that building new concurrent types not made up of Send and
Sync parts requires careful thought to uphold the safety guarantees. “The
Rustonomicon” has more information about these guarantees and how to
uphold them.
Summary
This isn’t the last you’ll see of concurrency in this book: the project in Chapter 20 will use the concepts in this chapter in a more realistic situation than the smaller examples discussed here.
As mentioned earlier, because very little of how Rust handles concurrency is part of the language, many concurrency solutions are implemented as crates. These evolve more quickly than the standard library, so be sure to search online for the current, state-of-the-art crates to use in multithreaded situations.
The Rust standard library provides channels for message passing and smart
pointer types, such as Mutex<T> and Arc<T>, that are safe to use in
concurrent contexts. The type system and the borrow checker ensure that the
code using these solutions won’t end up with data races or invalid references.
Once you get your code to compile, you can rest assured that it will happily
run on multiple threads without the kinds of hard-to-track-down bugs common in
other languages. Concurrent programming is no longer a concept to be afraid of:
go forth and make your programs concurrent, fearlessly!
Next, we’ll talk about idiomatic ways to model problems and structure solutions as your Rust programs get bigger. In addition, we’ll discuss how Rust’s idioms relate to those you might be familiar with from object-oriented programming.
Object-Oriented Programming Features of Rust
Object-oriented programming (OOP) is a way of modeling programs. Objects as a programmatic concept were introduced in the programming language Simula in the 1960s. Those objects influenced Alan Kay’s programming architecture in which objects pass messages to each other. To describe this architecture, he coined the term object-oriented programming in 1967. Many competing definitions describe what OOP is, and by some of these definitions Rust is object-oriented, but by others it is not. In this chapter, we’ll explore certain characteristics that are commonly considered object-oriented and how those characteristics translate to idiomatic Rust. We’ll then show you how to implement an object-oriented design pattern in Rust and discuss the trade-offs of doing so versus implementing a solution using some of Rust’s strengths instead.
Characteristics of Object-Oriented Languages
There is no consensus in the programming community about what features a language must have to be considered object-oriented. Rust is influenced by many programming paradigms, including OOP; for example, we explored the features that came from functional programming in Chapter 13. Arguably, OOP languages share certain common characteristics, namely objects, encapsulation, and inheritance. Let’s look at what each of those characteristics means and whether Rust supports it.
Objects Contain Data and Behavior
The book Design Patterns: Elements of Reusable Object-Oriented Software by Erich Gamma, Richard Helm, Ralph Johnson, and John Vlissides (Addison-Wesley Professional, 1994), colloquially referred to as The Gang of Four book, is a catalog of object-oriented design patterns. It defines OOP this way:
Object-oriented programs are made up of objects. An object packages both data and the procedures that operate on that data. The procedures are typically called methods or operations.
Using this definition, Rust is object-oriented: structs and enums have data,
and impl blocks provide methods on structs and enums. Even though structs and
enums with methods aren’t called objects, they provide the same
functionality, according to the Gang of Four’s definition of objects.
Encapsulation that Hides Implementation Details
Another aspect commonly associated with OOP is the idea of encapsulation, which means that the implementation details of an object aren’t accessible to code using that object. Therefore, the only way to interact with an object is through its public API; code using the object shouldn’t be able to reach into the object’s internals and change data or behavior directly. This enables the programmer to change and refactor an object’s internals without needing to change the code that uses the object.
We discussed how to control encapsulation in Chapter 7: we can use the pub
keyword to decide which modules, types, functions, and methods in our code
should be public, and by default everything else is private. For example, we
can define a struct AveragedCollection that has a field containing a vector
of i32 values. The struct can also have a field that contains the average of
the values in the vector, meaning the average doesn’t have to be computed
on demand whenever anyone needs it. In other words, AveragedCollection will
cache the calculated average for us. Listing 17-1 has the definition of the
AveragedCollection struct:
Filename: src/lib.rs
pub struct AveragedCollection {
list: Vec<i32>,
average: f64,
}Listing 17-1: An AveragedCollection struct that
maintains a list of integers and the average of the items in the
collection
The struct is marked pub so that other code can use it, but the fields within
the struct remain private. This is important in this case because we want to
ensure that whenever a value is added or removed from the list, the average is
also updated. We do this by implementing add, remove, and average methods
on the struct, as shown in Listing 17-2:
Filename: src/lib.rs
pub struct AveragedCollection {
list: Vec<i32>,
average: f64,
}
impl AveragedCollection {
pub fn add(&mut self, value: i32) {
self.list.push(value);
self.update_average();
}
pub fn remove(&mut self) -> Option<i32> {
let result = self.list.pop();
match result {
Some(value) => {
self.update_average();
Some(value)
}
None => None,
}
}
pub fn average(&self) -> f64 {
self.average
}
fn update_average(&mut self) {
let total: i32 = self.list.iter().sum();
self.average = total as f64 / self.list.len() as f64;
}
}Listing 17-2: Implementations of the public methods
add, remove, and average on AveragedCollection
The public methods add, remove, and average are the only ways to access
or modify data in an instance of AveragedCollection. When an item is added
to list using the add method or removed using the remove method, the
implementations of each call the private update_average method that handles
updating the average field as well.
We leave the list and average fields private so there is no way for
external code to add or remove items to or from the list field directly;
otherwise, the average field might become out of sync when the list
changes. The average method returns the value in the average field,
allowing external code to read the average but not modify it.
Because we’ve encapsulated the implementation details of the struct
AveragedCollection, we can easily change aspects, such as the data structure,
in the future. For instance, we could use a HashSet<i32> instead of a
Vec<i32> for the list field. As long as the signatures of the add,
remove, and average public methods stay the same, code using
AveragedCollection wouldn’t need to change. If we made list public instead,
this wouldn’t necessarily be the case: HashSet<i32> and Vec<i32> have
different methods for adding and removing items, so the external code would
likely have to change if it were modifying list directly.
If encapsulation is a required aspect for a language to be considered
object-oriented, then Rust meets that requirement. The option to use pub or
not for different parts of code enables encapsulation of implementation details.
Inheritance as a Type System and as Code Sharing
Inheritance is a mechanism whereby an object can inherit elements from another object’s definition, thus gaining the parent object’s data and behavior without you having to define them again.
If a language must have inheritance to be an object-oriented language, then Rust is not one. There is no way to define a struct that inherits the parent struct’s fields and method implementations without using a macro.
However, if you’re used to having inheritance in your programming toolbox, you can use other solutions in Rust, depending on your reason for reaching for inheritance in the first place.
You would choose inheritance for two main reasons. One is for reuse of code:
you can implement particular behavior for one type, and inheritance enables you
to reuse that implementation for a different type. You can do this in a limited
way in Rust code using default trait method implementations, which you saw in
Listing 10-14 when we added a default implementation of the summarize method
on the Summary trait. Any type implementing the Summary trait would have
the summarize method available on it without any further code. This is
similar to a parent class having an implementation of a method and an
inheriting child class also having the implementation of the method. We can
also override the default implementation of the summarize method when we
implement the Summary trait, which is similar to a child class overriding the
implementation of a method inherited from a parent class.
The other reason to use inheritance relates to the type system: to enable a child type to be used in the same places as the parent type. This is also called polymorphism, which means that you can substitute multiple objects for each other at runtime if they share certain characteristics.
Polymorphism
To many people, polymorphism is synonymous with inheritance. But it’s actually a more general concept that refers to code that can work with data of multiple types. For inheritance, those types are generally subclasses.
Rust instead uses generics to abstract over different possible types and trait bounds to impose constraints on what those types must provide. This is sometimes called bounded parametric polymorphism.
Inheritance has recently fallen out of favor as a programming design solution in many programming languages because it’s often at risk of sharing more code than necessary. Subclasses shouldn’t always share all characteristics of their parent class but will do so with inheritance. This can make a program’s design less flexible. It also introduces the possibility of calling methods on subclasses that don’t make sense or that cause errors because the methods don’t apply to the subclass. In addition, some languages will only allow single inheritance (meaning a subclass can only inherit from one class), further restricting the flexibility of a program’s design.
For these reasons, Rust takes the different approach of using trait objects instead of inheritance. Let’s look at how trait objects enable polymorphism in Rust.
Using Trait Objects That Allow for Values of Different Types
In Chapter 8, we mentioned that one limitation of vectors is that they can
store elements of only one type. We created a workaround in Listing 8-9 where
we defined a SpreadsheetCell enum that had variants to hold integers, floats,
and text. This meant we could store different types of data in each cell and
still have a vector that represented a row of cells. This is a perfectly good
solution when our interchangeable items are a fixed set of types that we know
when our code is compiled.
However, sometimes we want our library user to be able to extend the set of
types that are valid in a particular situation. To show how we might achieve
this, we’ll create an example graphical user interface (GUI) tool that iterates
through a list of items, calling a draw method on each one to draw it to the
screen—a common technique for GUI tools. We’ll create a library crate called
gui that contains the structure of a GUI library. This crate might include
some types for people to use, such as Button or TextField. In addition,
gui users will want to create their own types that can be drawn: for
instance, one programmer might add an Image and another might add a
SelectBox.
We won’t implement a fully fledged GUI library for this example but will show
how the pieces would fit together. At the time of writing the library, we can’t
know and define all the types other programmers might want to create. But we do
know that gui needs to keep track of many values of different types, and it
needs to call a draw method on each of these differently typed values. It
doesn’t need to know exactly what will happen when we call the draw method,
just that the value will have that method available for us to call.
To do this in a language with inheritance, we might define a class named
Component that has a method named draw on it. The other classes, such as
Button, Image, and SelectBox, would inherit from Component and thus
inherit the draw method. They could each override the draw method to define
their custom behavior, but the framework could treat all of the types as if
they were Component instances and call draw on them. But because Rust
doesn’t have inheritance, we need another way to structure the gui library to
allow users to extend it with new types.
Defining a Trait for Common Behavior
To implement the behavior we want gui to have, we’ll define a trait named
Draw that will have one method named draw. Then we can define a vector that
takes a trait object. A trait object points to both an instance of a type
implementing our specified trait and a table used to look up trait methods on
that type at runtime. We create a trait object by specifying some sort of
pointer, such as a & reference or a Box<T> smart pointer, then the dyn
keyword, and then specifying the relevant trait. (We’ll talk about the reason
trait objects must use a pointer in Chapter 19 in the section “Dynamically
Sized Types and the Sized Trait.”) We can
use trait objects in place of a generic or concrete type. Wherever we use a
trait object, Rust’s type system will ensure at compile time that any value
used in that context will implement the trait object’s trait. Consequently, we
don’t need to know all the possible types at compile time.
We’ve mentioned that, in Rust, we refrain from calling structs and enums
“objects” to distinguish them from other languages’ objects. In a struct or
enum, the data in the struct fields and the behavior in impl blocks are
separated, whereas in other languages, the data and behavior combined into one
concept is often labeled an object. However, trait objects are more like
objects in other languages in the sense that they combine data and behavior.
But trait objects differ from traditional objects in that we can’t add data to
a trait object. Trait objects aren’t as generally useful as objects in other
languages: their specific purpose is to allow abstraction across common
behavior.
Listing 17-3 shows how to define a trait named Draw with one method named
draw:
Filename: src/lib.rs
pub trait Draw {
fn draw(&self);
}Listing 17-3: Definition of the Draw trait
This syntax should look familiar from our discussions on how to define traits
in Chapter 10. Next comes some new syntax: Listing 17-4 defines a struct named
Screen that holds a vector named components. This vector is of type
Box<dyn Draw>, which is a trait object; it’s a stand-in for any type inside
a Box that implements the Draw trait.
Filename: src/lib.rs
pub trait Draw {
fn draw(&self);
}
pub struct Screen {
pub components: Vec<Box<dyn Draw>>,
}Listing 17-4: Definition of the Screen struct with a
components field holding a vector of trait objects that implement the Draw
trait
On the Screen struct, we’ll define a method named run that will call the
draw method on each of its components, as shown in Listing 17-5:
Filename: src/lib.rs
pub trait Draw {
fn draw(&self);
}
pub struct Screen {
pub components: Vec<Box<dyn Draw>>,
}
impl Screen {
pub fn run(&self) {
for component in self.components.iter() {
component.draw();
}
}
}Listing 17-5: A run method on Screen that calls the
draw method on each component
This works differently from defining a struct that uses a generic type
parameter with trait bounds. A generic type parameter can only be substituted
with one concrete type at a time, whereas trait objects allow for multiple
concrete types to fill in for the trait object at runtime. For example, we
could have defined the Screen struct using a generic type and a trait bound
as in Listing 17-6:
Filename: src/lib.rs
pub trait Draw {
fn draw(&self);
}
pub struct Screen<T: Draw> {
pub components: Vec<T>,
}
impl<T> Screen<T>
where
T: Draw,
{
pub fn run(&self) {
for component in self.components.iter() {
component.draw();
}
}
}Listing 17-6: An alternate implementation of the Screen
struct and its run method using generics and trait bounds
This restricts us to a Screen instance that has a list of components all of
type Button or all of type TextField. If you’ll only ever have homogeneous
collections, using generics and trait bounds is preferable because the
definitions will be monomorphized at compile time to use the concrete types.
On the other hand, with the method using trait objects, one Screen instance
can hold a Vec<T> that contains a Box<Button> as well as a
Box<TextField>. Let’s look at how this works, and then we’ll talk about the
runtime performance implications.
Implementing the Trait
Now we’ll add some types that implement the Draw trait. We’ll provide the
Button type. Again, actually implementing a GUI library is beyond the scope
of this book, so the draw method won’t have any useful implementation in its
body. To imagine what the implementation might look like, a Button struct
might have fields for width, height, and label, as shown in Listing 17-7:
Filename: src/lib.rs
pub trait Draw {
fn draw(&self);
}
pub struct Screen {
pub components: Vec<Box<dyn Draw>>,
}
impl Screen {
pub fn run(&self) {
for component in self.components.iter() {
component.draw();
}
}
}
pub struct Button {
pub width: u32,
pub height: u32,
pub label: String,
}
impl Draw for Button {
fn draw(&self) {
// code to actually draw a button
}
}Listing 17-7: A Button struct that implements the
Draw trait
The width, height, and label fields on Button will differ from the
fields on other components; for example, a TextField type might have those
same fields plus a placeholder field. Each of the types we want to draw on
the screen will implement the Draw trait but will use different code in the
draw method to define how to draw that particular type, as Button has here
(without the actual GUI code, as mentioned). The Button type, for instance,
might have an additional impl block containing methods related to what
happens when a user clicks the button. These kinds of methods won’t apply to
types like TextField.
If someone using our library decides to implement a SelectBox struct that has
width, height, and options fields, they implement the Draw trait on the
SelectBox type as well, as shown in Listing 17-8:
Filename: src/main.rs
use gui::Draw;
struct SelectBox {
width: u32,
height: u32,
options: Vec<String>,
}
impl Draw for SelectBox {
fn draw(&self) {
// code to actually draw a select box
}
}
fn main() {}Listing 17-8: Another crate using gui and implementing
the Draw trait on a SelectBox struct
Our library’s user can now write their main function to create a Screen
instance. To the Screen instance, they can add a SelectBox and a Button
by putting each in a Box<T> to become a trait object. They can then call the
run method on the Screen instance, which will call draw on each of the
components. Listing 17-9 shows this implementation:
Filename: src/main.rs
use gui::Draw;
struct SelectBox {
width: u32,
height: u32,
options: Vec<String>,
}
impl Draw for SelectBox {
fn draw(&self) {
// code to actually draw a select box
}
}
use gui::{Button, Screen};
fn main() {
let screen = Screen {
components: vec![
Box::new(SelectBox {
width: 75,
height: 10,
options: vec![
String::from("Yes"),
String::from("Maybe"),
String::from("No"),
],
}),
Box::new(Button {
width: 50,
height: 10,
label: String::from("OK"),
}),
],
};
screen.run();
}Listing 17-9: Using trait objects to store values of different types that implement the same trait
When we wrote the library, we didn’t know that someone might add the
SelectBox type, but our Screen implementation was able to operate on the
new type and draw it because SelectBox implements the Draw trait, which
means it implements the draw method.
This concept—of being concerned only with the messages a value responds to
rather than the value’s concrete type—is similar to the concept of duck
typing in dynamically typed languages: if it walks like a duck and quacks
like a duck, then it must be a duck! In the implementation of run on Screen
in Listing 17-5, run doesn’t need to know what the concrete type of each
component is. It doesn’t check whether a component is an instance of a Button
or a SelectBox, it just calls the draw method on the component. By
specifying Box<dyn Draw> as the type of the values in the components
vector, we’ve defined Screen to need values that we can call the draw
method on.
The advantage of using trait objects and Rust’s type system to write code similar to code using duck typing is that we never have to check whether a value implements a particular method at runtime or worry about getting errors if a value doesn’t implement a method but we call it anyway. Rust won’t compile our code if the values don’t implement the traits that the trait objects need.
For example, Listing 17-10 shows what happens if we try to create a Screen
with a String as a component:
Filename: src/main.rs
use gui::Screen;
fn main() {
let screen = Screen {
components: vec![Box::new(String::from("Hi"))],
};
screen.run();
}Listing 17-10: Attempting to use a type that doesn’t implement the trait object’s trait
We’ll get this error because String doesn’t implement the Draw trait:
$ cargo run
Compiling gui v0.1.0 (file:///projects/gui)
error[E0277]: the trait bound `String: Draw` is not satisfied
--> src/main.rs:5:26
|
5 | components: vec![Box::new(String::from("Hi"))],
| ^^^^^^^^^^^^^^^^^^^^^^^^^^^^ the trait `Draw` is not implemented for `String`
|
= help: the trait `Draw` is implemented for `Button`
= note: required for the cast from `String` to the object type `dyn Draw`
For more information about this error, try `rustc --explain E0277`.
error: could not compile `gui` due to previous error
This error lets us know that either we’re passing something to Screen we
didn’t mean to pass and so should pass a different type or we should implement
Draw on String so that Screen is able to call draw on it.
Trait Objects Perform Dynamic Dispatch
Recall in the “Performance of Code Using Generics” section in Chapter 10 our discussion on the monomorphization process performed by the compiler when we use trait bounds on generics: the compiler generates nongeneric implementations of functions and methods for each concrete type that we use in place of a generic type parameter. The code that results from monomorphization is doing static dispatch, which is when the compiler knows what method you’re calling at compile time. This is opposed to dynamic dispatch, which is when the compiler can’t tell at compile time which method you’re calling. In dynamic dispatch cases, the compiler emits code that at runtime will figure out which method to call.
When we use trait objects, Rust must use dynamic dispatch. The compiler doesn’t know all the types that might be used with the code that’s using trait objects, so it doesn’t know which method implemented on which type to call. Instead, at runtime, Rust uses the pointers inside the trait object to know which method to call. This lookup incurs a runtime cost that doesn’t occur with static dispatch. Dynamic dispatch also prevents the compiler from choosing to inline a method’s code, which in turn prevents some optimizations. However, we did get extra flexibility in the code that we wrote in Listing 17-5 and were able to support in Listing 17-9, so it’s a trade-off to consider.
Implementing an Object-Oriented Design Pattern
The state pattern is an object-oriented design pattern. The crux of the pattern is that we define a set of states a value can have internally. The states are represented by a set of state objects, and the value’s behavior changes based on its state. We’re going to work through an example of a blog post struct that has a field to hold its state, which will be a state object from the set "draft", "review", or "published".
The state objects share functionality: in Rust, of course, we use structs and traits rather than objects and inheritance. Each state object is responsible for its own behavior and for governing when it should change into another state. The value that holds a state object knows nothing about the different behavior of the states or when to transition between states.
The advantage of using the state pattern is that, when the business requirements of the program change, we won’t need to change the code of the value holding the state or the code that uses the value. We’ll only need to update the code inside one of the state objects to change its rules or perhaps add more state objects.
First, we’re going to implement the state pattern in a more traditional object-oriented way, then we’ll use an approach that’s a bit more natural in Rust. Let’s dig in to incrementally implementing a blog post workflow using the state pattern.
The final functionality will look like this:
- A blog post starts as an empty draft.
- When the draft is done, a review of the post is requested.
- When the post is approved, it gets published.
- Only published blog posts return content to print, so unapproved posts can’t accidentally be published.
Any other changes attempted on a post should have no effect. For example, if we try to approve a draft blog post before we’ve requested a review, the post should remain an unpublished draft.
Listing 17-11 shows this workflow in code form: this is an example usage of the
API we’ll implement in a library crate named blog. This won’t compile yet
because we haven’t implemented the blog crate.
Filename: src/main.rs
use blog::Post;
fn main() {
let mut post = Post::new();
post.add_text("I ate a salad for lunch today");
assert_eq!("", post.content());
post.request_review();
assert_eq!("", post.content());
post.approve();
assert_eq!("I ate a salad for lunch today", post.content());
}Listing 17-11: Code that demonstrates the desired
behavior we want our blog crate to have
We want to allow the user to create a new draft blog post with Post::new. We
want to allow text to be added to the blog post. If we try to get the post’s
content immediately, before approval, we shouldn’t get any text because the
post is still a draft. We’ve added assert_eq! in the code for demonstration
purposes. An excellent unit test for this would be to assert that a draft blog
post returns an empty string from the content method, but we’re not going to
write tests for this example.
Next, we want to enable a request for a review of the post, and we want
content to return an empty string while waiting for the review. When the post
receives approval, it should get published, meaning the text of the post will
be returned when content is called.
Notice that the only type we’re interacting with from the crate is the Post
type. This type will use the state pattern and will hold a value that will be
one of three state objects representing the various states a post can be
in—draft, waiting for review, or published. Changing from one state to another
will be managed internally within the Post type. The states change in
response to the methods called by our library’s users on the Post instance,
but they don’t have to manage the state changes directly. Also, users can’t
make a mistake with the states, like publishing a post before it’s reviewed.
Defining Post and Creating a New Instance in the Draft State
Let’s get started on the implementation of the library! We know we need a
public Post struct that holds some content, so we’ll start with the
definition of the struct and an associated public new function to create an
instance of Post, as shown in Listing 17-12. We’ll also make a private
State trait that will define the behavior that all state objects for a Post
must have.
Then Post will hold a trait object of Box<dyn State> inside an Option<T>
in a private field named state to hold the state object. You’ll see why the
Option<T> is necessary in a bit.
Filename: src/lib.rs
pub struct Post {
state: Option<Box<dyn State>>,
content: String,
}
impl Post {
pub fn new() -> Post {
Post {
state: Some(Box::new(Draft {})),
content: String::new(),
}
}
}
trait State {}
struct Draft {}
impl State for Draft {}Listing 17-12: Definition of a Post struct and a new
function that creates a new Post instance, a State trait, and a Draft
struct
The State trait defines the behavior shared by different post states. The
state objects are Draft, PendingReview, and Published, and they will all
implement the State trait. For now, the trait doesn’t have any methods, and
we’ll start by defining just the Draft state because that is the state we
want a post to start in.
When we create a new Post, we set its state field to a Some value that
holds a Box. This Box points to a new instance of the Draft struct.
This ensures whenever we create a new instance of Post, it will start out as
a draft. Because the state field of Post is private, there is no way to
create a Post in any other state! In the Post::new function, we set the
content field to a new, empty String.
Storing the Text of the Post Content
We saw in Listing 17-11 that we want to be able to call a method named
add_text and pass it a &str that is then added as the text content of the
blog post. We implement this as a method, rather than exposing the content
field as pub, so that later we can implement a method that will control how
the content field’s data is read. The add_text method is pretty
straightforward, so let’s add the implementation in Listing 17-13 to the impl Post block:
Filename: src/lib.rs
pub struct Post {
state: Option<Box<dyn State>>,
content: String,
}
impl Post {
// --snip--
pub fn new() -> Post {
Post {
state: Some(Box::new(Draft {})),
content: String::new(),
}
}
pub fn add_text(&mut self, text: &str) {
self.content.push_str(text);
}
}
trait State {}
struct Draft {}
impl State for Draft {}Listing 17-13: Implementing the add_text method to add
text to a post’s content
The add_text method takes a mutable reference to self, because we’re
changing the Post instance that we’re calling add_text on. We then call
push_str on the String in content and pass the text argument to add to
the saved content. This behavior doesn’t depend on the state the post is in,
so it’s not part of the state pattern. The add_text method doesn’t interact
with the state field at all, but it is part of the behavior we want to
support.
Ensuring the Content of a Draft Post Is Empty
Even after we’ve called add_text and added some content to our post, we still
want the content method to return an empty string slice because the post is
still in the draft state, as shown on line 7 of Listing 17-11. For now, let’s
implement the content method with the simplest thing that will fulfill this
requirement: always returning an empty string slice. We’ll change this later
once we implement the ability to change a post’s state so it can be published.
So far, posts can only be in the draft state, so the post content should always
be empty. Listing 17-14 shows this placeholder implementation:
Filename: src/lib.rs
pub struct Post {
state: Option<Box<dyn State>>,
content: String,
}
impl Post {
// --snip--
pub fn new() -> Post {
Post {
state: Some(Box::new(Draft {})),
content: String::new(),
}
}
pub fn add_text(&mut self, text: &str) {
self.content.push_str(text);
}
pub fn content(&self) -> &str {
""
}
}
trait State {}
struct Draft {}
impl State for Draft {}Listing 17-14: Adding a placeholder implementation for
the content method on Post that always returns an empty string slice
With this added content method, everything in Listing 17-11 up to line 7
works as intended.
Requesting a Review of the Post Changes Its State
Next, we need to add functionality to request a review of a post, which should
change its state from Draft to PendingReview. Listing 17-15 shows this code:
Filename: src/lib.rs
pub struct Post {
state: Option<Box<dyn State>>,
content: String,
}
impl Post {
// --snip--
pub fn new() -> Post {
Post {
state: Some(Box::new(Draft {})),
content: String::new(),
}
}
pub fn add_text(&mut self, text: &str) {
self.content.push_str(text);
}
pub fn content(&self) -> &str {
""
}
pub fn request_review(&mut self) {
if let Some(s) = self.state.take() {
self.state = Some(s.request_review())
}
}
}
trait State {
fn request_review(self: Box<Self>) -> Box<dyn State>;
}
struct Draft {}
impl State for Draft {
fn request_review(self: Box<Self>) -> Box<dyn State> {
Box::new(PendingReview {})
}
}
struct PendingReview {}
impl State for PendingReview {
fn request_review(self: Box<Self>) -> Box<dyn State> {
self
}
}Listing 17-15: Implementing request_review methods on
Post and the State trait
We give Post a public method named request_review that will take a mutable
reference to self. Then we call an internal request_review method on the
current state of Post, and this second request_review method consumes the
current state and returns a new state.
We add the request_review method to the State trait; all types that
implement the trait will now need to implement the request_review method.
Note that rather than having self, &self, or &mut self as the first
parameter of the method, we have self: Box<Self>. This syntax means the
method is only valid when called on a Box holding the type. This syntax takes
ownership of Box<Self>, invalidating the old state so the state value of the
Post can transform into a new state.
To consume the old state, the request_review method needs to take ownership
of the state value. This is where the Option in the state field of Post
comes in: we call the take method to take the Some value out of the state
field and leave a None in its place, because Rust doesn’t let us have
unpopulated fields in structs. This lets us move the state value out of
Post rather than borrowing it. Then we’ll set the post’s state value to the
result of this operation.
We need to set state to None temporarily rather than setting it directly
with code like self.state = self.state.request_review(); to get ownership of
the state value. This ensures Post can’t use the old state value after
we’ve transformed it into a new state.
The request_review method on Draft returns a new, boxed instance of a new
PendingReview struct, which represents the state when a post is waiting for a
review. The PendingReview struct also implements the request_review method
but doesn’t do any transformations. Rather, it returns itself, because when we
request a review on a post already in the PendingReview state, it should stay
in the PendingReview state.
Now we can start seeing the advantages of the state pattern: the
request_review method on Post is the same no matter its state value. Each
state is responsible for its own rules.
We’ll leave the content method on Post as is, returning an empty string
slice. We can now have a Post in the PendingReview state as well as in the
Draft state, but we want the same behavior in the PendingReview state.
Listing 17-11 now works up to line 10!
Adding approve to Change the Behavior of content
The approve method will be similar to the request_review method: it will
set state to the value that the current state says it should have when that
state is approved, as shown in Listing 17-16:
Filename: src/lib.rs
pub struct Post {
state: Option<Box<dyn State>>,
content: String,
}
impl Post {
// --snip--
pub fn new() -> Post {
Post {
state: Some(Box::new(Draft {})),
content: String::new(),
}
}
pub fn add_text(&mut self, text: &str) {
self.content.push_str(text);
}
pub fn content(&self) -> &str {
""
}
pub fn request_review(&mut self) {
if let Some(s) = self.state.take() {
self.state = Some(s.request_review())
}
}
pub fn approve(&mut self) {
if let Some(s) = self.state.take() {
self.state = Some(s.approve())
}
}
}
trait State {
fn request_review(self: Box<Self>) -> Box<dyn State>;
fn approve(self: Box<Self>) -> Box<dyn State>;
}
struct Draft {}
impl State for Draft {
// --snip--
fn request_review(self: Box<Self>) -> Box<dyn State> {
Box::new(PendingReview {})
}
fn approve(self: Box<Self>) -> Box<dyn State> {
self
}
}
struct PendingReview {}
impl State for PendingReview {
// --snip--
fn request_review(self: Box<Self>) -> Box<dyn State> {
self
}
fn approve(self: Box<Self>) -> Box<dyn State> {
Box::new(Published {})
}
}
struct Published {}
impl State for Published {
fn request_review(self: Box<Self>) -> Box<dyn State> {
self
}
fn approve(self: Box<Self>) -> Box<dyn State> {
self
}
}Listing 17-16: Implementing the approve method on
Post and the State trait
We add the approve method to the State trait and add a new struct that
implements State, the Published state.
Similar to the way request_review on PendingReview works, if we call the
approve method on a Draft, it will have no effect because approve will
return self. When we call approve on PendingReview, it returns a new,
boxed instance of the Published struct. The Published struct implements the
State trait, and for both the request_review method and the approve
method, it returns itself, because the post should stay in the Published
state in those cases.
Now we need to update the content method on Post. We want the value
returned from content to depend on the current state of the Post, so we’re
going to have the Post delegate to a content method defined on its state,
as shown in Listing 17-17:
Filename: src/lib.rs
pub struct Post {
state: Option<Box<dyn State>>,
content: String,
}
impl Post {
// --snip--
pub fn new() -> Post {
Post {
state: Some(Box::new(Draft {})),
content: String::new(),
}
}
pub fn add_text(&mut self, text: &str) {
self.content.push_str(text);
}
pub fn content(&self) -> &str {
self.state.as_ref().unwrap().content(self)
}
// --snip--
pub fn request_review(&mut self) {
if let Some(s) = self.state.take() {
self.state = Some(s.request_review())
}
}
pub fn approve(&mut self) {
if let Some(s) = self.state.take() {
self.state = Some(s.approve())
}
}
}
trait State {
fn request_review(self: Box<Self>) -> Box<dyn State>;
fn approve(self: Box<Self>) -> Box<dyn State>;
}
struct Draft {}
impl State for Draft {
fn request_review(self: Box<Self>) -> Box<dyn State> {
Box::new(PendingReview {})
}
fn approve(self: Box<Self>) -> Box<dyn State> {
self
}
}
struct PendingReview {}
impl State for PendingReview {
fn request_review(self: Box<Self>) -> Box<dyn State> {
self
}
fn approve(self: Box<Self>) -> Box<dyn State> {
Box::new(Published {})
}
}
struct Published {}
impl State for Published {
fn request_review(self: Box<Self>) -> Box<dyn State> {
self
}
fn approve(self: Box<Self>) -> Box<dyn State> {
self
}
}Listing 17-17: Updating the content method on Post to
delegate to a content method on State
Because the goal is to keep all these rules inside the structs that implement
State, we call a content method on the value in state and pass the post
instance (that is, self) as an argument. Then we return the value that’s
returned from using the content method on the state value.
We call the as_ref method on the Option because we want a reference to the
value inside the Option rather than ownership of the value. Because state
is an Option<Box<dyn State>>, when we call as_ref, an Option<&Box<dyn State>> is returned. If we didn’t call as_ref, we would get an error because
we can’t move state out of the borrowed &self of the function parameter.
We then call the unwrap method, which we know will never panic, because we
know the methods on Post ensure that state will always contain a Some
value when those methods are done. This is one of the cases we talked about in
the “Cases In Which You Have More Information Than the
Compiler” section of Chapter 9 when we
know that a None value is never possible, even though the compiler isn’t able
to understand that.
At this point, when we call content on the &Box<dyn State>, deref coercion
will take effect on the & and the Box so the content method will
ultimately be called on the type that implements the State trait. That means
we need to add content to the State trait definition, and that is where
we’ll put the logic for what content to return depending on which state we
have, as shown in Listing 17-18:
Filename: src/lib.rs
pub struct Post {
state: Option<Box<dyn State>>,
content: String,
}
impl Post {
pub fn new() -> Post {
Post {
state: Some(Box::new(Draft {})),
content: String::new(),
}
}
pub fn add_text(&mut self, text: &str) {
self.content.push_str(text);
}
pub fn content(&self) -> &str {
self.state.as_ref().unwrap().content(self)
}
pub fn request_review(&mut self) {
if let Some(s) = self.state.take() {
self.state = Some(s.request_review())
}
}
pub fn approve(&mut self) {
if let Some(s) = self.state.take() {
self.state = Some(s.approve())
}
}
}
trait State {
// --snip--
fn request_review(self: Box<Self>) -> Box<dyn State>;
fn approve(self: Box<Self>) -> Box<dyn State>;
fn content<'a>(&self, post: &'a Post) -> &'a str {
""
}
}
// --snip--
struct Draft {}
impl State for Draft {
fn request_review(self: Box<Self>) -> Box<dyn State> {
Box::new(PendingReview {})
}
fn approve(self: Box<Self>) -> Box<dyn State> {
self
}
}
struct PendingReview {}
impl State for PendingReview {
fn request_review(self: Box<Self>) -> Box<dyn State> {
self
}
fn approve(self: Box<Self>) -> Box<dyn State> {
Box::new(Published {})
}
}
struct Published {}
impl State for Published {
// --snip--
fn request_review(self: Box<Self>) -> Box<dyn State> {
self
}
fn approve(self: Box<Self>) -> Box<dyn State> {
self
}
fn content<'a>(&self, post: &'a Post) -> &'a str {
&post.content
}
}Listing 17-18: Adding the content method to the State
trait
We add a default implementation for the content method that returns an empty
string slice. That means we don’t need to implement content on the Draft
and PendingReview structs. The Published struct will override the content
method and return the value in post.content.
Note that we need lifetime annotations on this method, as we discussed in
Chapter 10. We’re taking a reference to a post as an argument and returning a
reference to part of that post, so the lifetime of the returned reference is
related to the lifetime of the post argument.
And we’re done—all of Listing 17-11 now works! We’ve implemented the state
pattern with the rules of the blog post workflow. The logic related to the
rules lives in the state objects rather than being scattered throughout Post.
Why Not An Enum?
You may have been wondering why we didn’t use an
enumwith the different possible post states as variants. That’s certainly a possible solution, try it and compare the end results to see which you prefer! One disadvantage of using an enum is every place that checks the value of the enum will need amatchexpression or similar to handle every possible variant. This could get more repetitive than this trait object solution.
Trade-offs of the State Pattern
We’ve shown that Rust is capable of implementing the object-oriented state
pattern to encapsulate the different kinds of behavior a post should have in
each state. The methods on Post know nothing about the various behaviors. The
way we organized the code, we have to look in only one place to know the
different ways a published post can behave: the implementation of the State
trait on the Published struct.
If we were to create an alternative implementation that didn’t use the state
pattern, we might instead use match expressions in the methods on Post or
even in the main code that checks the state of the post and changes behavior
in those places. That would mean we would have to look in several places to
understand all the implications of a post being in the published state! This
would only increase the more states we added: each of those match expressions
would need another arm.
With the state pattern, the Post methods and the places we use Post don’t
need match expressions, and to add a new state, we would only need to add a
new struct and implement the trait methods on that one struct.
The implementation using the state pattern is easy to extend to add more functionality. To see the simplicity of maintaining code that uses the state pattern, try a few of these suggestions:
- Add a
rejectmethod that changes the post’s state fromPendingReviewback toDraft. - Require two calls to
approvebefore the state can be changed toPublished. - Allow users to add text content only when a post is in the
Draftstate. Hint: have the state object responsible for what might change about the content but not responsible for modifying thePost.
One downside of the state pattern is that, because the states implement the
transitions between states, some of the states are coupled to each other. If we
add another state between PendingReview and Published, such as Scheduled,
we would have to change the code in PendingReview to transition to
Scheduled instead. It would be less work if PendingReview didn’t need to
change with the addition of a new state, but that would mean switching to
another design pattern.
Another downside is that we’ve duplicated some logic. To eliminate some of the
duplication, we might try to make default implementations for the
request_review and approve methods on the State trait that return self;
however, this would violate object safety, because the trait doesn’t know what
the concrete self will be exactly. We want to be able to use State as a
trait object, so we need its methods to be object safe.
Other duplication includes the similar implementations of the request_review
and approve methods on Post. Both methods delegate to the implementation of
the same method on the value in the state field of Option and set the new
value of the state field to the result. If we had a lot of methods on Post
that followed this pattern, we might consider defining a macro to eliminate the
repetition (see the “Macros” section in Chapter 19).
By implementing the state pattern exactly as it’s defined for object-oriented
languages, we’re not taking as full advantage of Rust’s strengths as we could.
Let’s look at some changes we can make to the blog crate that can make
invalid states and transitions into compile time errors.
Encoding States and Behavior as Types
We’ll show you how to rethink the state pattern to get a different set of trade-offs. Rather than encapsulating the states and transitions completely so outside code has no knowledge of them, we’ll encode the states into different types. Consequently, Rust’s type checking system will prevent attempts to use draft posts where only published posts are allowed by issuing a compiler error.
Let’s consider the first part of main in Listing 17-11:
Filename: src/main.rs
use blog::Post;
fn main() {
let mut post = Post::new();
post.add_text("I ate a salad for lunch today");
assert_eq!("", post.content());
post.request_review();
assert_eq!("", post.content());
post.approve();
assert_eq!("I ate a salad for lunch today", post.content());
}We still enable the creation of new posts in the draft state using Post::new
and the ability to add text to the post’s content. But instead of having a
content method on a draft post that returns an empty string, we’ll make it so
draft posts don’t have the content method at all. That way, if we try to get
a draft post’s content, we’ll get a compiler error telling us the method
doesn’t exist. As a result, it will be impossible for us to accidentally
display draft post content in production, because that code won’t even compile.
Listing 17-19 shows the definition of a Post struct and a DraftPost struct,
as well as methods on each:
Filename: src/lib.rs
pub struct Post {
content: String,
}
pub struct DraftPost {
content: String,
}
impl Post {
pub fn new() -> DraftPost {
DraftPost {
content: String::new(),
}
}
pub fn content(&self) -> &str {
&self.content
}
}
impl DraftPost {
pub fn add_text(&mut self, text: &str) {
self.content.push_str(text);
}
}Listing 17-19: A Post with a content method and a
DraftPost without a content method
Both the Post and DraftPost structs have a private content field that
stores the blog post text. The structs no longer have the state field because
we’re moving the encoding of the state to the types of the structs. The Post
struct will represent a published post, and it has a content method that
returns the content.
We still have a Post::new function, but instead of returning an instance of
Post, it returns an instance of DraftPost. Because content is private
and there aren’t any functions that return Post, it’s not possible to create
an instance of Post right now.
The DraftPost struct has an add_text method, so we can add text to
content as before, but note that DraftPost does not have a content method
defined! So now the program ensures all posts start as draft posts, and draft
posts don’t have their content available for display. Any attempt to get around
these constraints will result in a compiler error.
Implementing Transitions as Transformations into Different Types
So how do we get a published post? We want to enforce the rule that a draft
post has to be reviewed and approved before it can be published. A post in the
pending review state should still not display any content. Let’s implement
these constraints by adding another struct, PendingReviewPost, defining the
request_review method on DraftPost to return a PendingReviewPost, and
defining an approve method on PendingReviewPost to return a Post, as
shown in Listing 17-20:
Filename: src/lib.rs
pub struct Post {
content: String,
}
pub struct DraftPost {
content: String,
}
impl Post {
pub fn new() -> DraftPost {
DraftPost {
content: String::new(),
}
}
pub fn content(&self) -> &str {
&self.content
}
}
impl DraftPost {
// --snip--
pub fn add_text(&mut self, text: &str) {
self.content.push_str(text);
}
pub fn request_review(self) -> PendingReviewPost {
PendingReviewPost {
content: self.content,
}
}
}
pub struct PendingReviewPost {
content: String,
}
impl PendingReviewPost {
pub fn approve(self) -> Post {
Post {
content: self.content,
}
}
}Listing 17-20: A PendingReviewPost that gets created by
calling request_review on DraftPost and an approve method that turns a
PendingReviewPost into a published Post
The request_review and approve methods take ownership of self, thus
consuming the DraftPost and PendingReviewPost instances and transforming
them into a PendingReviewPost and a published Post, respectively. This way,
we won’t have any lingering DraftPost instances after we’ve called
request_review on them, and so forth. The PendingReviewPost struct doesn’t
have a content method defined on it, so attempting to read its content
results in a compiler error, as with DraftPost. Because the only way to get a
published Post instance that does have a content method defined is to call
the approve method on a PendingReviewPost, and the only way to get a
PendingReviewPost is to call the request_review method on a DraftPost,
we’ve now encoded the blog post workflow into the type system.
But we also have to make some small changes to main. The request_review and
approve methods return new instances rather than modifying the struct they’re
called on, so we need to add more let post = shadowing assignments to save
the returned instances. We also can’t have the assertions about the draft and
pending review posts’ contents be empty strings, nor do we need them: we can’t
compile code that tries to use the content of posts in those states any longer.
The updated code in main is shown in Listing 17-21:
Filename: src/main.rs
use blog::Post;
fn main() {
let mut post = Post::new();
post.add_text("I ate a salad for lunch today");
let post = post.request_review();
let post = post.approve();
assert_eq!("I ate a salad for lunch today", post.content());
}Listing 17-21: Modifications to main to use the new
implementation of the blog post workflow
The changes we needed to make to main to reassign post mean that this
implementation doesn’t quite follow the object-oriented state pattern anymore:
the transformations between the states are no longer encapsulated entirely
within the Post implementation. However, our gain is that invalid states are
now impossible because of the type system and the type checking that happens at
compile time! This ensures that certain bugs, such as display of the content of
an unpublished post, will be discovered before they make it to production.
Try the tasks suggested at the start of this section on the blog crate as it
is after Listing 17-21 to see what you think about the design of this version
of the code. Note that some of the tasks might be completed already in this
design.
We’ve seen that even though Rust is capable of implementing object-oriented design patterns, other patterns, such as encoding state into the type system, are also available in Rust. These patterns have different trade-offs. Although you might be very familiar with object-oriented patterns, rethinking the problem to take advantage of Rust’s features can provide benefits, such as preventing some bugs at compile time. Object-oriented patterns won’t always be the best solution in Rust due to certain features, like ownership, that object-oriented languages don’t have.
Summary
No matter whether or not you think Rust is an object-oriented language after reading this chapter, you now know that you can use trait objects to get some object-oriented features in Rust. Dynamic dispatch can give your code some flexibility in exchange for a bit of runtime performance. You can use this flexibility to implement object-oriented patterns that can help your code’s maintainability. Rust also has other features, like ownership, that object-oriented languages don’t have. An object-oriented pattern won’t always be the best way to take advantage of Rust’s strengths, but is an available option.
Next, we’ll look at patterns, which are another of Rust’s features that enable lots of flexibility. We’ve looked at them briefly throughout the book but haven’t seen their full capability yet. Let’s go!
Patterns and Matching
Patterns are a special syntax in Rust for matching against the structure of
types, both complex and simple. Using patterns in conjunction with match
expressions and other constructs gives you more control over a program’s
control flow. A pattern consists of some combination of the following:
- Literals
- Destructured arrays, enums, structs, or tuples
- Variables
- Wildcards
- Placeholders
Some example patterns include x, (a, 3), and Some(Color::Red). In the
contexts in which patterns are valid, these components describe the shape of
data. Our program then matches values against the patterns to determine whether
it has the correct shape of data to continue running a particular piece of code.
To use a pattern, we compare it to some value. If the pattern matches the
value, we use the value parts in our code. Recall the match expressions in
Chapter 6 that used patterns, such as the coin-sorting machine example. If the
value fits the shape of the pattern, we can use the named pieces. If it
doesn’t, the code associated with the pattern won’t run.
This chapter is a reference on all things related to patterns. We’ll cover the valid places to use patterns, the difference between refutable and irrefutable patterns, and the different kinds of pattern syntax that you might see. By the end of the chapter, you’ll know how to use patterns to express many concepts in a clear way.
All the Places Patterns Can Be Used
Patterns pop up in a number of places in Rust, and you’ve been using them a lot without realizing it! This section discusses all the places where patterns are valid.
match Arms
As discussed in Chapter 6, we use patterns in the arms of match expressions.
Formally, match expressions are defined as the keyword match, a value to
match on, and one or more match arms that consist of a pattern and an
expression to run if the value matches that arm’s pattern, like this:
match VALUE {
PATTERN => EXPRESSION,
PATTERN => EXPRESSION,
PATTERN => EXPRESSION,
}
For example, here's the match expression from Listing 6-5 that matches on an
Option<i32> value in the variable x:
match x {
None => None,
Some(i) => Some(i + 1),
}The patterns in this match expression are the None and Some(i) on the
left of each arrow.
One requirement for match expressions is that they need to be exhaustive in
the sense that all possibilities for the value in the match expression must
be accounted for. One way to ensure you’ve covered every possibility is to have
a catchall pattern for the last arm: for example, a variable name matching any
value can never fail and thus covers every remaining case.
The particular pattern _ will match anything, but it never binds to a
variable, so it’s often used in the last match arm. The _ pattern can be
useful when you want to ignore any value not specified, for example. We’ll
cover the _ pattern in more detail in the “Ignoring Values in a
Pattern” section later in this
chapter.
Conditional if let Expressions
In Chapter 6 we discussed how to use if let expressions mainly as a shorter
way to write the equivalent of a match that only matches one case.
Optionally, if let can have a corresponding else containing code to run if
the pattern in the if let doesn’t match.
Listing 18-1 shows that it’s also possible to mix and match if let, else if, and else if let expressions. Doing so gives us more flexibility than a
match expression in which we can express only one value to compare with the
patterns. Also, Rust doesn't require that the conditions in a series of if let, else if, else if let arms relate to each other.
The code in Listing 18-1 determines what color to make your background based on a series of checks for several conditions. For this example, we’ve created variables with hardcoded values that a real program might receive from user input.
Filename: src/main.rs
fn main() { let favorite_color: Option<&str> = None; let is_tuesday = false; let age: Result<u8, _> = "34".parse(); if let Some(color) = favorite_color { println!("Using your favorite color, {color}, as the background"); } else if is_tuesday { println!("Tuesday is green day!"); } else if let Ok(age) = age { if age > 30 { println!("Using purple as the background color"); } else { println!("Using orange as the background color"); } } else { println!("Using blue as the background color"); } }
Listing 18-1: Mixing if let, else if, else if let,
and else
If the user specifies a favorite color, that color is used as the background. If no favorite color is specified and today is Tuesday, the background color is green. Otherwise, if the user specifies their age as a string and we can parse it as a number successfully, the color is either purple or orange depending on the value of the number. If none of these conditions apply, the background color is blue.
This conditional structure lets us support complex requirements. With the
hardcoded values we have here, this example will print Using purple as the background color.
You can see that if let can also introduce shadowed variables in the same way
that match arms can: the line if let Ok(age) = age introduces a new
shadowed age variable that contains the value inside the Ok variant. This
means we need to place the if age > 30 condition within that block: we can’t
combine these two conditions into if let Ok(age) = age && age > 30. The
shadowed age we want to compare to 30 isn’t valid until the new scope starts
with the curly bracket.
The downside of using if let expressions is that the compiler doesn’t check
for exhaustiveness, whereas with match expressions it does. If we omitted the
last else block and therefore missed handling some cases, the compiler would
not alert us to the possible logic bug.
while let Conditional Loops
Similar in construction to if let, the while let conditional loop allows a
while loop to run for as long as a pattern continues to match. In Listing
18-2 we code a while let loop that uses a vector as a stack and prints the
values in the vector in the opposite order in which they were pushed.
fn main() { let mut stack = Vec::new(); stack.push(1); stack.push(2); stack.push(3); while let Some(top) = stack.pop() { println!("{}", top); } }
Listing 18-2: Using a while let loop to print values
for as long as stack.pop() returns Some
This example prints 3, 2, and then 1. The pop method takes the last element
out of the vector and returns Some(value). If the vector is empty, pop
returns None. The while loop continues running the code in its block as
long as pop returns Some. When pop returns None, the loop stops. We can
use while let to pop every element off our stack.
for Loops
In a for loop, the value that directly follows the keyword for is a
pattern. For example, in for x in y the x is the pattern. Listing 18-3
demonstrates how to use a pattern in a for loop to destructure, or break
apart, a tuple as part of the for loop.
fn main() { let v = vec!['a', 'b', 'c']; for (index, value) in v.iter().enumerate() { println!("{} is at index {}", value, index); } }
Listing 18-3: Using a pattern in a for loop to
destructure a tuple
The code in Listing 18-3 will print the following:
$ cargo run
Compiling patterns v0.1.0 (file:///projects/patterns)
Finished dev [unoptimized + debuginfo] target(s) in 0.52s
Running `target/debug/patterns`
a is at index 0
b is at index 1
c is at index 2
We adapt an iterator using the enumerate method so it produces a value and
the index for that value, placed into a tuple. The first value produced is the
tuple (0, 'a'). When this value is matched to the pattern (index, value),
index will be 0 and value will be 'a', printing the first line of the
output.
let Statements
Prior to this chapter, we had only explicitly discussed using patterns with
match and if let, but in fact, we’ve used patterns in other places as well,
including in let statements. For example, consider this straightforward
variable assignment with let:
#![allow(unused)] fn main() { let x = 5; }
Every time you've used a let statement like this you've been using patterns,
although you might not have realized it! More formally, a let statement looks
like this:
let PATTERN = EXPRESSION;
In statements like let x = 5; with a variable name in the PATTERN slot, the
variable name is just a particularly simple form of a pattern. Rust compares
the expression against the pattern and assigns any names it finds. So in the
let x = 5; example, x is a pattern that means “bind what matches here to
the variable x.” Because the name x is the whole pattern, this pattern
effectively means “bind everything to the variable x, whatever the value is.”
To see the pattern matching aspect of let more clearly, consider Listing
18-4, which uses a pattern with let to destructure a tuple.
fn main() { let (x, y, z) = (1, 2, 3); }
Listing 18-4: Using a pattern to destructure a tuple and create three variables at once
Here, we match a tuple against a pattern. Rust compares the value (1, 2, 3)
to the pattern (x, y, z) and sees that the value matches the pattern, so Rust
binds 1 to x, 2 to y, and 3 to z. You can think of this tuple
pattern as nesting three individual variable patterns inside it.
If the number of elements in the pattern doesn’t match the number of elements in the tuple, the overall type won’t match and we’ll get a compiler error. For example, Listing 18-5 shows an attempt to destructure a tuple with three elements into two variables, which won’t work.
fn main() {
let (x, y) = (1, 2, 3);
}Listing 18-5: Incorrectly constructing a pattern whose variables don’t match the number of elements in the tuple
Attempting to compile this code results in this type error:
$ cargo run
Compiling patterns v0.1.0 (file:///projects/patterns)
error[E0308]: mismatched types
--> src/main.rs:2:9
|
2 | let (x, y) = (1, 2, 3);
| ^^^^^^ --------- this expression has type `({integer}, {integer}, {integer})`
| |
| expected a tuple with 3 elements, found one with 2 elements
|
= note: expected tuple `({integer}, {integer}, {integer})`
found tuple `(_, _)`
For more information about this error, try `rustc --explain E0308`.
error: could not compile `patterns` due to previous error
To fix the error, we could ignore one or more of the values in the tuple using
_ or .., as you’ll see in the “Ignoring Values in a
Pattern” section. If the problem
is that we have too many variables in the pattern, the solution is to make the
types match by removing variables so the number of variables equals the number
of elements in the tuple.
Function Parameters
Function parameters can also be patterns. The code in Listing 18-6, which
declares a function named foo that takes one parameter named x of type
i32, should by now look familiar.
fn foo(x: i32) { // code goes here } fn main() {}
Listing 18-6: A function signature uses patterns in the parameters
The x part is a pattern! As we did with let, we could match a tuple in a
function’s arguments to the pattern. Listing 18-7 splits the values in a tuple
as we pass it to a function.
Filename: src/main.rs
fn print_coordinates(&(x, y): &(i32, i32)) { println!("Current location: ({}, {})", x, y); } fn main() { let point = (3, 5); print_coordinates(&point); }
Listing 18-7: A function with parameters that destructure a tuple
This code prints Current location: (3, 5). The values &(3, 5) match the
pattern &(x, y), so x is the value 3 and y is the value 5.
We can also use patterns in closure parameter lists in the same way as in function parameter lists, because closures are similar to functions, as discussed in Chapter 13.
At this point, you’ve seen several ways of using patterns, but patterns don’t work the same in every place we can use them. In some places, the patterns must be irrefutable; in other circumstances, they can be refutable. We’ll discuss these two concepts next.
Refutability: Whether a Pattern Might Fail to Match
Patterns come in two forms: refutable and irrefutable. Patterns that will match
for any possible value passed are irrefutable. An example would be x in the
statement let x = 5; because x matches anything and therefore cannot fail
to match. Patterns that can fail to match for some possible value are
refutable. An example would be Some(x) in the expression if let Some(x) = a_value because if the value in the a_value variable is None rather than
Some, the Some(x) pattern will not match.
Function parameters, let statements, and for loops can only accept
irrefutable patterns, because the program cannot do anything meaningful when
values don’t match. The if let and while let expressions accept
refutable and irrefutable patterns, but the compiler warns against
irrefutable patterns because by definition they’re intended to handle possible
failure: the functionality of a conditional is in its ability to perform
differently depending on success or failure.
In general, you shouldn’t have to worry about the distinction between refutable and irrefutable patterns; however, you do need to be familiar with the concept of refutability so you can respond when you see it in an error message. In those cases, you’ll need to change either the pattern or the construct you’re using the pattern with, depending on the intended behavior of the code.
Let’s look at an example of what happens when we try to use a refutable pattern
where Rust requires an irrefutable pattern and vice versa. Listing 18-8 shows a
let statement, but for the pattern we’ve specified Some(x), a refutable
pattern. As you might expect, this code will not compile.
fn main() {
let some_option_value: Option<i32> = None;
let Some(x) = some_option_value;
}Listing 18-8: Attempting to use a refutable pattern with
let
If some_option_value was a None value, it would fail to match the pattern
Some(x), meaning the pattern is refutable. However, the let statement can
only accept an irrefutable pattern because there is nothing valid the code can
do with a None value. At compile time, Rust will complain that we’ve tried to
use a refutable pattern where an irrefutable pattern is required:
$ cargo run
Compiling patterns v0.1.0 (file:///projects/patterns)
error[E0005]: refutable pattern in local binding: `None` not covered
--> src/main.rs:3:9
|
3 | let Some(x) = some_option_value;
| ^^^^^^^ pattern `None` not covered
|
= note: `let` bindings require an "irrefutable pattern", like a `struct` or an `enum` with only one variant
= note: for more information, visit https://doc.rust-lang.org/book/ch18-02-refutability.html
note: `Option<i32>` defined here
--> /rustc/d5a82bbd26e1ad8b7401f6a718a9c57c96905483/library/core/src/option.rs:518:1
|
= note:
/rustc/d5a82bbd26e1ad8b7401f6a718a9c57c96905483/library/core/src/option.rs:522:5: not covered
= note: the matched value is of type `Option<i32>`
help: you might want to use `if let` to ignore the variant that isn't matched
|
3 | let x = if let Some(x) = some_option_value { x } else { todo!() };
| ++++++++++ ++++++++++++++++++++++
help: alternatively, you might want to use let else to handle the variant that isn't matched
|
3 | let Some(x) = some_option_value else { todo!() };
| ++++++++++++++++
For more information about this error, try `rustc --explain E0005`.
error: could not compile `patterns` due to previous error
Because we didn’t cover (and couldn’t cover!) every valid value with the
pattern Some(x), Rust rightfully produces a compiler error.
If we have a refutable pattern where an irrefutable pattern is needed, we can
fix it by changing the code that uses the pattern: instead of using let, we
can use if let. Then if the pattern doesn’t match, the code will just skip
the code in the curly brackets, giving it a way to continue validly. Listing
18-9 shows how to fix the code in Listing 18-8.
fn main() { let some_option_value: Option<i32> = None; if let Some(x) = some_option_value { println!("{}", x); } }
Listing 18-9: Using if let and a block with refutable
patterns instead of let
We’ve given the code an out! This code is perfectly valid, although it means we
cannot use an irrefutable pattern without receiving an error. If we give if let a pattern that will always match, such as x, as shown in Listing 18-10,
the compiler will give a warning.
fn main() { if let x = 5 { println!("{}", x); }; }
Listing 18-10: Attempting to use an irrefutable pattern
with if let
Rust complains that it doesn’t make sense to use if let with an irrefutable
pattern:
$ cargo run
Compiling patterns v0.1.0 (file:///projects/patterns)
warning: irrefutable `if let` pattern
--> src/main.rs:2:8
|
2 | if let x = 5 {
| ^^^^^^^^^
|
= note: this pattern will always match, so the `if let` is useless
= help: consider replacing the `if let` with a `let`
= note: `#[warn(irrefutable_let_patterns)]` on by default
warning: `patterns` (bin "patterns") generated 1 warning
Finished dev [unoptimized + debuginfo] target(s) in 0.39s
Running `target/debug/patterns`
5
For this reason, match arms must use refutable patterns, except for the last
arm, which should match any remaining values with an irrefutable pattern. Rust
allows us to use an irrefutable pattern in a match with only one arm, but
this syntax isn’t particularly useful and could be replaced with a simpler
let statement.
Now that you know where to use patterns and the difference between refutable and irrefutable patterns, let’s cover all the syntax we can use to create patterns.
Pattern Syntax
In this section, we gather all the syntax valid in patterns and discuss why and when you might want to use each one.
Matching Literals
As you saw in Chapter 6, you can match patterns against literals directly. The following code gives some examples:
fn main() { let x = 1; match x { 1 => println!("one"), 2 => println!("two"), 3 => println!("three"), _ => println!("anything"), } }
This code prints one because the value in x is 1. This syntax is useful
when you want your code to take an action if it gets a particular concrete
value.
Matching Named Variables
Named variables are irrefutable patterns that match any value, and we’ve used
them many times in the book. However, there is a complication when you use
named variables in match expressions. Because match starts a new scope,
variables declared as part of a pattern inside the match expression will
shadow those with the same name outside the match construct, as is the case
with all variables. In Listing 18-11, we declare a variable named x with the
value Some(5) and a variable y with the value 10. We then create a
match expression on the value x. Look at the patterns in the match arms and
println! at the end, and try to figure out what the code will print before
running this code or reading further.
Filename: src/main.rs
fn main() { let x = Some(5); let y = 10; match x { Some(50) => println!("Got 50"), Some(y) => println!("Matched, y = {y}"), _ => println!("Default case, x = {:?}", x), } println!("at the end: x = {:?}, y = {y}", x); }
Listing 18-11: A match expression with an arm that
introduces a shadowed variable y
Let’s walk through what happens when the match expression runs. The pattern
in the first match arm doesn’t match the defined value of x, so the code
continues.
The pattern in the second match arm introduces a new variable named y that
will match any value inside a Some value. Because we’re in a new scope inside
the match expression, this is a new y variable, not the y we declared at
the beginning with the value 10. This new y binding will match any value
inside a Some, which is what we have in x. Therefore, this new y binds to
the inner value of the Some in x. That value is 5, so the expression for
that arm executes and prints Matched, y = 5.
If x had been a None value instead of Some(5), the patterns in the first
two arms wouldn’t have matched, so the value would have matched to the
underscore. We didn’t introduce the x variable in the pattern of the
underscore arm, so the x in the expression is still the outer x that hasn’t
been shadowed. In this hypothetical case, the match would print Default case, x = None.
When the match expression is done, its scope ends, and so does the scope of
the inner y. The last println! produces at the end: x = Some(5), y = 10.
To create a match expression that compares the values of the outer x and
y, rather than introducing a shadowed variable, we would need to use a match
guard conditional instead. We’ll talk about match guards later in the “Extra
Conditionals with Match Guards” section.
Multiple Patterns
In match expressions, you can match multiple patterns using the | syntax,
which is the pattern or operator. For example, in the following code we match
the value of x against the match arms, the first of which has an or option,
meaning if the value of x matches either of the values in that arm, that
arm’s code will run:
fn main() { let x = 1; match x { 1 | 2 => println!("one or two"), 3 => println!("three"), _ => println!("anything"), } }
This code prints one or two.
Matching Ranges of Values with ..=
The ..= syntax allows us to match to an inclusive range of values. In the
following code, when a pattern matches any of the values within the given
range, that arm will execute:
fn main() { let x = 5; match x { 1..=5 => println!("one through five"), _ => println!("something else"), } }
If x is 1, 2, 3, 4, or 5, the first arm will match. This syntax is more
convenient for multiple match values than using the | operator to express the
same idea; if we were to use | we would have to specify 1 | 2 | 3 | 4 | 5.
Specifying a range is much shorter, especially if we want to match, say, any
number between 1 and 1,000!
The compiler checks that the range isn’t empty at compile time, and because the
only types for which Rust can tell if a range is empty or not are char and
numeric values, ranges are only allowed with numeric or char values.
Here is an example using ranges of char values:
fn main() { let x = 'c'; match x { 'a'..='j' => println!("early ASCII letter"), 'k'..='z' => println!("late ASCII letter"), _ => println!("something else"), } }
Rust can tell that 'c' is within the first pattern’s range and prints early ASCII letter.
Destructuring to Break Apart Values
We can also use patterns to destructure structs, enums, and tuples to use different parts of these values. Let’s walk through each value.
Destructuring Structs
Listing 18-12 shows a Point struct with two fields, x and y, that we can
break apart using a pattern with a let statement.
Filename: src/main.rs
struct Point { x: i32, y: i32, } fn main() { let p = Point { x: 0, y: 7 }; let Point { x: a, y: b } = p; assert_eq!(0, a); assert_eq!(7, b); }
Listing 18-12: Destructuring a struct’s fields into separate variables
This code creates the variables a and b that match the values of the x
and y fields of the p struct. This example shows that the names of the
variables in the pattern don’t have to match the field names of the struct.
However, it’s common to match the variable names to the field names to make it
easier to remember which variables came from which fields. Because of this
common usage, and because writing let Point { x: x, y: y } = p; contains a
lot of duplication, Rust has a shorthand for patterns that match struct fields:
you only need to list the name of the struct field, and the variables created
from the pattern will have the same names. Listing 18-13 behaves in the same
way as the code in Listing 18-12, but the variables created in the let
pattern are x and y instead of a and b.
Filename: src/main.rs
struct Point { x: i32, y: i32, } fn main() { let p = Point { x: 0, y: 7 }; let Point { x, y } = p; assert_eq!(0, x); assert_eq!(7, y); }
Listing 18-13: Destructuring struct fields using struct field shorthand
This code creates the variables x and y that match the x and y fields
of the p variable. The outcome is that the variables x and y contain the
values from the p struct.
We can also destructure with literal values as part of the struct pattern rather than creating variables for all the fields. Doing so allows us to test some of the fields for particular values while creating variables to destructure the other fields.
In Listing 18-14, we have a match expression that separates Point values
into three cases: points that lie directly on the x axis (which is true when
y = 0), on the y axis (x = 0), or neither.
Filename: src/main.rs
struct Point { x: i32, y: i32, } fn main() { let p = Point { x: 0, y: 7 }; match p { Point { x, y: 0 } => println!("On the x axis at {x}"), Point { x: 0, y } => println!("On the y axis at {y}"), Point { x, y } => { println!("On neither axis: ({x}, {y})"); } } }
Listing 18-14: Destructuring and matching literal values in one pattern
The first arm will match any point that lies on the x axis by specifying that
the y field matches if its value matches the literal 0. The pattern still
creates an x variable that we can use in the code for this arm.
Similarly, the second arm matches any point on the y axis by specifying that
the x field matches if its value is 0 and creates a variable y for the
value of the y field. The third arm doesn’t specify any literals, so it
matches any other Point and creates variables for both the x and y fields.
In this example, the value p matches the second arm by virtue of x
containing a 0, so this code will print On the y axis at 7.
Remember that a match expression stops checking arms once it has found the
first matching pattern, so even though Point { x: 0, y: 0} is on the x axis
and the y axis, this code would only print On the x axis at 0.
Destructuring Enums
We've destructured enums in this book (for example, Listing 6-5 in Chapter 6),
but haven’t yet explicitly discussed that the pattern to destructure an enum
corresponds to the way the data stored within the enum is defined. As an
example, in Listing 18-15 we use the Message enum from Listing 6-2 and write
a match with patterns that will destructure each inner value.
Filename: src/main.rs
enum Message { Quit, Move { x: i32, y: i32 }, Write(String), ChangeColor(i32, i32, i32), } fn main() { let msg = Message::ChangeColor(0, 160, 255); match msg { Message::Quit => { println!("The Quit variant has no data to destructure."); } Message::Move { x, y } => { println!("Move in the x direction {x} and in the y direction {y}"); } Message::Write(text) => { println!("Text message: {text}"); } Message::ChangeColor(r, g, b) => { println!("Change the color to red {r}, green {g}, and blue {b}",) } } }
Listing 18-15: Destructuring enum variants that hold different kinds of values
This code will print Change the color to red 0, green 160, and blue 255. Try
changing the value of msg to see the code from the other arms run.
For enum variants without any data, like Message::Quit, we can’t destructure
the value any further. We can only match on the literal Message::Quit value,
and no variables are in that pattern.
For struct-like enum variants, such as Message::Move, we can use a pattern
similar to the pattern we specify to match structs. After the variant name, we
place curly brackets and then list the fields with variables so we break apart
the pieces to use in the code for this arm. Here we use the shorthand form as
we did in Listing 18-13.
For tuple-like enum variants, like Message::Write that holds a tuple with one
element and Message::ChangeColor that holds a tuple with three elements, the
pattern is similar to the pattern we specify to match tuples. The number of
variables in the pattern must match the number of elements in the variant we’re
matching.
Destructuring Nested Structs and Enums
So far, our examples have all been matching structs or enums one level deep,
but matching can work on nested items too! For example, we can refactor the
code in Listing 18-15 to support RGB and HSV colors in the ChangeColor
message, as shown in Listing 18-16.
enum Color { Rgb(i32, i32, i32), Hsv(i32, i32, i32), } enum Message { Quit, Move { x: i32, y: i32 }, Write(String), ChangeColor(Color), } fn main() { let msg = Message::ChangeColor(Color::Hsv(0, 160, 255)); match msg { Message::ChangeColor(Color::Rgb(r, g, b)) => { println!("Change color to red {r}, green {g}, and blue {b}"); } Message::ChangeColor(Color::Hsv(h, s, v)) => { println!("Change color to hue {h}, saturation {s}, value {v}") } _ => (), } }
Listing 18-16: Matching on nested enums
The pattern of the first arm in the match expression matches a
Message::ChangeColor enum variant that contains a Color::Rgb variant; then
the pattern binds to the three inner i32 values. The pattern of the second
arm also matches a Message::ChangeColor enum variant, but the inner enum
matches Color::Hsv instead. We can specify these complex conditions in one
match expression, even though two enums are involved.
Destructuring Structs and Tuples
We can mix, match, and nest destructuring patterns in even more complex ways. The following example shows a complicated destructure where we nest structs and tuples inside a tuple and destructure all the primitive values out:
fn main() { struct Point { x: i32, y: i32, } let ((feet, inches), Point { x, y }) = ((3, 10), Point { x: 3, y: -10 }); }
This code lets us break complex types into their component parts so we can use the values we’re interested in separately.
Destructuring with patterns is a convenient way to use pieces of values, such as the value from each field in a struct, separately from each other.
Ignoring Values in a Pattern
You’ve seen that it’s sometimes useful to ignore values in a pattern, such as
in the last arm of a match, to get a catchall that doesn’t actually do
anything but does account for all remaining possible values. There are a few
ways to ignore entire values or parts of values in a pattern: using the _
pattern (which you’ve seen), using the _ pattern within another pattern,
using a name that starts with an underscore, or using .. to ignore remaining
parts of a value. Let’s explore how and why to use each of these patterns.
Ignoring an Entire Value with _
We’ve used the underscore as a wildcard pattern that will match any value but
not bind to the value. This is especially useful as the last arm in a match
expression, but we can also use it in any pattern, including function
parameters, as shown in Listing 18-17.
Filename: src/main.rs
fn foo(_: i32, y: i32) { println!("This code only uses the y parameter: {}", y); } fn main() { foo(3, 4); }
Listing 18-17: Using _ in a function signature
This code will completely ignore the value 3 passed as the first argument,
and will print This code only uses the y parameter: 4.
In most cases when you no longer need a particular function parameter, you would change the signature so it doesn’t include the unused parameter. Ignoring a function parameter can be especially useful in cases when, for example, you're implementing a trait when you need a certain type signature but the function body in your implementation doesn’t need one of the parameters. You then avoid getting a compiler warning about unused function parameters, as you would if you used a name instead.
Ignoring Parts of a Value with a Nested _
We can also use _ inside another pattern to ignore just part of a value, for
example, when we want to test for only part of a value but have no use for the
other parts in the corresponding code we want to run. Listing 18-18 shows code
responsible for managing a setting’s value. The business requirements are that
the user should not be allowed to overwrite an existing customization of a
setting but can unset the setting and give it a value if it is currently unset.
fn main() { let mut setting_value = Some(5); let new_setting_value = Some(10); match (setting_value, new_setting_value) { (Some(_), Some(_)) => { println!("Can't overwrite an existing customized value"); } _ => { setting_value = new_setting_value; } } println!("setting is {:?}", setting_value); }
Listing 18-18: Using an underscore within patterns that
match Some variants when we don’t need to use the value inside the
Some
This code will print Can't overwrite an existing customized value and then
setting is Some(5). In the first match arm, we don’t need to match on or use
the values inside either Some variant, but we do need to test for the case
when setting_value and new_setting_value are the Some variant. In that
case, we print the reason for not changing setting_value, and it doesn’t get
changed.
In all other cases (if either setting_value or new_setting_value are
None) expressed by the _ pattern in the second arm, we want to allow
new_setting_value to become setting_value.
We can also use underscores in multiple places within one pattern to ignore particular values. Listing 18-19 shows an example of ignoring the second and fourth values in a tuple of five items.
fn main() { let numbers = (2, 4, 8, 16, 32); match numbers { (first, _, third, _, fifth) => { println!("Some numbers: {first}, {third}, {fifth}") } } }
Listing 18-19: Ignoring multiple parts of a tuple
This code will print Some numbers: 2, 8, 32, and the values 4 and 16 will be
ignored.
Ignoring an Unused Variable by Starting Its Name with _
If you create a variable but don’t use it anywhere, Rust will usually issue a warning because an unused variable could be a bug. However, sometimes it’s useful to be able to create a variable you won’t use yet, such as when you’re prototyping or just starting a project. In this situation, you can tell Rust not to warn you about the unused variable by starting the name of the variable with an underscore. In Listing 18-20, we create two unused variables, but when we compile this code, we should only get a warning about one of them.
Filename: src/main.rs
fn main() { let _x = 5; let y = 10; }
Listing 18-20: Starting a variable name with an underscore to avoid getting unused variable warnings
Here we get a warning about not using the variable y, but we don’t get a
warning about not using _x.
Note that there is a subtle difference between using only _ and using a name
that starts with an underscore. The syntax _x still binds the value to the
variable, whereas _ doesn’t bind at all. To show a case where this
distinction matters, Listing 18-21 will provide us with an error.
fn main() {
let s = Some(String::from("Hello!"));
if let Some(_s) = s {
println!("found a string");
}
println!("{:?}", s);
}Listing 18-21: An unused variable starting with an underscore still binds the value, which might take ownership of the value
We’ll receive an error because the s value will still be moved into _s,
which prevents us from using s again. However, using the underscore by itself
doesn’t ever bind to the value. Listing 18-22 will compile without any errors
because s doesn’t get moved into _.
fn main() { let s = Some(String::from("Hello!")); if let Some(_) = s { println!("found a string"); } println!("{:?}", s); }
Listing 18-22: Using an underscore does not bind the value
This code works just fine because we never bind s to anything; it isn’t moved.
Ignoring Remaining Parts of a Value with ..
With values that have many parts, we can use the .. syntax to use specific
parts and ignore the rest, avoiding the need to list underscores for each
ignored value. The .. pattern ignores any parts of a value that we haven’t
explicitly matched in the rest of the pattern. In Listing 18-23, we have a
Point struct that holds a coordinate in three-dimensional space. In the
match expression, we want to operate only on the x coordinate and ignore
the values in the y and z fields.
fn main() { struct Point { x: i32, y: i32, z: i32, } let origin = Point { x: 0, y: 0, z: 0 }; match origin { Point { x, .. } => println!("x is {}", x), } }
Listing 18-23: Ignoring all fields of a Point except
for x by using ..
We list the x value and then just include the .. pattern. This is quicker
than having to list y: _ and z: _, particularly when we’re working with
structs that have lots of fields in situations where only one or two fields are
relevant.
The syntax .. will expand to as many values as it needs to be. Listing 18-24
shows how to use .. with a tuple.
Filename: src/main.rs
fn main() { let numbers = (2, 4, 8, 16, 32); match numbers { (first, .., last) => { println!("Some numbers: {first}, {last}"); } } }
Listing 18-24: Matching only the first and last values in a tuple and ignoring all other values
In this code, the first and last value are matched with first and last. The
.. will match and ignore everything in the middle.
However, using .. must be unambiguous. If it is unclear which values are
intended for matching and which should be ignored, Rust will give us an error.
Listing 18-25 shows an example of using .. ambiguously, so it will not
compile.
Filename: src/main.rs
fn main() {
let numbers = (2, 4, 8, 16, 32);
match numbers {
(.., second, ..) => {
println!("Some numbers: {}", second)
},
}
}Listing 18-25: An attempt to use .. in an ambiguous
way
When we compile this example, we get this error:
$ cargo run
Compiling patterns v0.1.0 (file:///projects/patterns)
error: `..` can only be used once per tuple pattern
--> src/main.rs:5:22
|
5 | (.., second, ..) => {
| -- ^^ can only be used once per tuple pattern
| |
| previously used here
error: could not compile `patterns` due to previous error
It’s impossible for Rust to determine how many values in the tuple to ignore
before matching a value with second and then how many further values to
ignore thereafter. This code could mean that we want to ignore 2, bind
second to 4, and then ignore 8, 16, and 32; or that we want to ignore
2 and 4, bind second to 8, and then ignore 16 and 32; and so forth.
The variable name second doesn’t mean anything special to Rust, so we get a
compiler error because using .. in two places like this is ambiguous.
Extra Conditionals with Match Guards
A match guard is an additional if condition, specified after the pattern in
a match arm, that must also match for that arm to be chosen. Match guards are
useful for expressing more complex ideas than a pattern alone allows.
The condition can use variables created in the pattern. Listing 18-26 shows a
match where the first arm has the pattern Some(x) and also has a match
guard of if x % 2 == 0 (which will be true if the number is even).
fn main() { let num = Some(4); match num { Some(x) if x % 2 == 0 => println!("The number {} is even", x), Some(x) => println!("The number {} is odd", x), None => (), } }
Listing 18-26: Adding a match guard to a pattern
This example will print The number 4 is even. When num is compared to the
pattern in the first arm, it matches, because Some(4) matches Some(x). Then
the match guard checks whether the remainder of dividing x by 2 is equal to
0, and because it is, the first arm is selected.
If num had been Some(5) instead, the match guard in the first arm would
have been false because the remainder of 5 divided by 2 is 1, which is not
equal to 0. Rust would then go to the second arm, which would match because the
second arm doesn’t have a match guard and therefore matches any Some variant.
There is no way to express the if x % 2 == 0 condition within a pattern, so
the match guard gives us the ability to express this logic. The downside of
this additional expressiveness is that the compiler doesn't try to check for
exhaustiveness when match guard expressions are involved.
In Listing 18-11, we mentioned that we could use match guards to solve our
pattern-shadowing problem. Recall that we created a new variable inside the
pattern in the match expression instead of using the variable outside the
match. That new variable meant we couldn’t test against the value of the
outer variable. Listing 18-27 shows how we can use a match guard to fix this
problem.
Filename: src/main.rs
fn main() { let x = Some(5); let y = 10; match x { Some(50) => println!("Got 50"), Some(n) if n == y => println!("Matched, n = {n}"), _ => println!("Default case, x = {:?}", x), } println!("at the end: x = {:?}, y = {y}", x); }
Listing 18-27: Using a match guard to test for equality with an outer variable
This code will now print Default case, x = Some(5). The pattern in the second
match arm doesn’t introduce a new variable y that would shadow the outer y,
meaning we can use the outer y in the match guard. Instead of specifying the
pattern as Some(y), which would have shadowed the outer y, we specify
Some(n). This creates a new variable n that doesn’t shadow anything because
there is no n variable outside the match.
The match guard if n == y is not a pattern and therefore doesn’t introduce
new variables. This y is the outer y rather than a new shadowed y, and
we can look for a value that has the same value as the outer y by comparing
n to y.
You can also use the or operator | in a match guard to specify multiple
patterns; the match guard condition will apply to all the patterns. Listing
18-28 shows the precedence when combining a pattern that uses | with a match
guard. The important part of this example is that the if y match guard
applies to 4, 5, and 6, even though it might look like if y only
applies to 6.
fn main() { let x = 4; let y = false; match x { 4 | 5 | 6 if y => println!("yes"), _ => println!("no"), } }
Listing 18-28: Combining multiple patterns with a match guard
The match condition states that the arm only matches if the value of x is
equal to 4, 5, or 6 and if y is true. When this code runs, the
pattern of the first arm matches because x is 4, but the match guard if y
is false, so the first arm is not chosen. The code moves on to the second arm,
which does match, and this program prints no. The reason is that the if
condition applies to the whole pattern 4 | 5 | 6, not only to the last value
6. In other words, the precedence of a match guard in relation to a pattern
behaves like this:
(4 | 5 | 6) if y => ...
rather than this:
4 | 5 | (6 if y) => ...
After running the code, the precedence behavior is evident: if the match guard
were applied only to the final value in the list of values specified using the
| operator, the arm would have matched and the program would have printed
yes.
@ Bindings
The at operator @ lets us create a variable that holds a value at the same
time as we’re testing that value for a pattern match. In Listing 18-29, we want
to test that a Message::Hello id field is within the range 3..=7. We also
want to bind the value to the variable id_variable so we can use it in the
code associated with the arm. We could name this variable id, the same as the
field, but for this example we’ll use a different name.
fn main() { enum Message { Hello { id: i32 }, } let msg = Message::Hello { id: 5 }; match msg { Message::Hello { id: id_variable @ 3..=7, } => println!("Found an id in range: {}", id_variable), Message::Hello { id: 10..=12 } => { println!("Found an id in another range") } Message::Hello { id } => println!("Found some other id: {}", id), } }
Listing 18-29: Using @ to bind to a value in a pattern
while also testing it
This example will print Found an id in range: 5. By specifying id_variable @ before the range 3..=7, we’re capturing whatever value matched the range
while also testing that the value matched the range pattern.
In the second arm, where we only have a range specified in the pattern, the code
associated with the arm doesn’t have a variable that contains the actual value
of the id field. The id field’s value could have been 10, 11, or 12, but
the code that goes with that pattern doesn’t know which it is. The pattern code
isn’t able to use the value from the id field, because we haven’t saved the
id value in a variable.
In the last arm, where we’ve specified a variable without a range, we do have
the value available to use in the arm’s code in a variable named id. The
reason is that we’ve used the struct field shorthand syntax. But we haven’t
applied any test to the value in the id field in this arm, as we did with the
first two arms: any value would match this pattern.
Using @ lets us test a value and save it in a variable within one pattern.
Summary
Rust’s patterns are very useful in distinguishing between different kinds of
data. When used in match expressions, Rust ensures your patterns cover every
possible value, or your program won’t compile. Patterns in let statements and
function parameters make those constructs more useful, enabling the
destructuring of values into smaller parts at the same time as assigning to
variables. We can create simple or complex patterns to suit our needs.
Next, for the penultimate chapter of the book, we’ll look at some advanced aspects of a variety of Rust’s features.
Advanced Features
By now, you’ve learned the most commonly used parts of the Rust programming language. Before we do one more project in Chapter 20, we’ll look at a few aspects of the language you might run into every once in a while, but may not use every day. You can use this chapter as a reference for when you encounter any unknowns. The features covered here are useful in very specific situations. Although you might not reach for them often, we want to make sure you have a grasp of all the features Rust has to offer.
In this chapter, we’ll cover:
- Unsafe Rust: how to opt out of some of Rust’s guarantees and take responsibility for manually upholding those guarantees
- Advanced traits: associated types, default type parameters, fully qualified syntax, supertraits, and the newtype pattern in relation to traits
- Advanced types: more about the newtype pattern, type aliases, the never type, and dynamically sized types
- Advanced functions and closures: function pointers and returning closures
- Macros: ways to define code that defines more code at compile time
It’s a panoply of Rust features with something for everyone! Let’s dive in!
Unsafe Rust
All the code we’ve discussed so far has had Rust’s memory safety guarantees enforced at compile time. However, Rust has a second language hidden inside it that doesn’t enforce these memory safety guarantees: it’s called unsafe Rust and works just like regular Rust, but gives us extra superpowers.
Unsafe Rust exists because, by nature, static analysis is conservative. When the compiler tries to determine whether or not code upholds the guarantees, it’s better for it to reject some valid programs than to accept some invalid programs. Although the code might be okay, if the Rust compiler doesn’t have enough information to be confident, it will reject the code. In these cases, you can use unsafe code to tell the compiler, “Trust me, I know what I’m doing.” Be warned, however, that you use unsafe Rust at your own risk: if you use unsafe code incorrectly, problems can occur due to memory unsafety, such as null pointer dereferencing.
Another reason Rust has an unsafe alter ego is that the underlying computer hardware is inherently unsafe. If Rust didn’t let you do unsafe operations, you couldn’t do certain tasks. Rust needs to allow you to do low-level systems programming, such as directly interacting with the operating system or even writing your own operating system. Working with low-level systems programming is one of the goals of the language. Let’s explore what we can do with unsafe Rust and how to do it.
Unsafe Superpowers
To switch to unsafe Rust, use the unsafe keyword and then start a new block
that holds the unsafe code. You can take five actions in unsafe Rust that you
can’t in safe Rust, which we call unsafe superpowers. Those superpowers
include the ability to:
- Dereference a raw pointer
- Call an unsafe function or method
- Access or modify a mutable static variable
- Implement an unsafe trait
- Access fields of
unions
It’s important to understand that unsafe doesn’t turn off the borrow checker
or disable any other of Rust’s safety checks: if you use a reference in unsafe
code, it will still be checked. The unsafe keyword only gives you access to
these five features that are then not checked by the compiler for memory
safety. You’ll still get some degree of safety inside of an unsafe block.
In addition, unsafe does not mean the code inside the block is necessarily
dangerous or that it will definitely have memory safety problems: the intent is
that as the programmer, you’ll ensure the code inside an unsafe block will
access memory in a valid way.
People are fallible, and mistakes will happen, but by requiring these five
unsafe operations to be inside blocks annotated with unsafe you’ll know that
any errors related to memory safety must be within an unsafe block. Keep
unsafe blocks small; you’ll be thankful later when you investigate memory
bugs.
To isolate unsafe code as much as possible, it’s best to enclose unsafe code
within a safe abstraction and provide a safe API, which we’ll discuss later in
the chapter when we examine unsafe functions and methods. Parts of the standard
library are implemented as safe abstractions over unsafe code that has been
audited. Wrapping unsafe code in a safe abstraction prevents uses of unsafe
from leaking out into all the places that you or your users might want to use
the functionality implemented with unsafe code, because using a safe
abstraction is safe.
Let’s look at each of the five unsafe superpowers in turn. We’ll also look at some abstractions that provide a safe interface to unsafe code.
Dereferencing a Raw Pointer
In Chapter 4, in the “Dangling References” section, we mentioned that the compiler ensures references are always
valid. Unsafe Rust has two new types called raw pointers that are similar to
references. As with references, raw pointers can be immutable or mutable and
are written as *const T and *mut T, respectively. The asterisk isn’t the
dereference operator; it’s part of the type name. In the context of raw
pointers, immutable means that the pointer can’t be directly assigned to
after being dereferenced.
Different from references and smart pointers, raw pointers:
- Are allowed to ignore the borrowing rules by having both immutable and mutable pointers or multiple mutable pointers to the same location
- Aren’t guaranteed to point to valid memory
- Are allowed to be null
- Don’t implement any automatic cleanup
By opting out of having Rust enforce these guarantees, you can give up guaranteed safety in exchange for greater performance or the ability to interface with another language or hardware where Rust’s guarantees don’t apply.
Listing 19-1 shows how to create an immutable and a mutable raw pointer from references.
fn main() { let mut num = 5; let r1 = &num as *const i32; let r2 = &mut num as *mut i32; }
Listing 19-1: Creating raw pointers from references
Notice that we don’t include the unsafe keyword in this code. We can create
raw pointers in safe code; we just can’t dereference raw pointers outside an
unsafe block, as you’ll see in a bit.
We’ve created raw pointers by using as to cast an immutable and a mutable
reference into their corresponding raw pointer types. Because we created them
directly from references guaranteed to be valid, we know these particular raw
pointers are valid, but we can’t make that assumption about just any raw
pointer.
To demonstrate this, next we’ll create a raw pointer whose validity we can’t be so certain of. Listing 19-2 shows how to create a raw pointer to an arbitrary location in memory. Trying to use arbitrary memory is undefined: there might be data at that address or there might not, the compiler might optimize the code so there is no memory access, or the program might error with a segmentation fault. Usually, there is no good reason to write code like this, but it is possible.
fn main() { let address = 0x012345usize; let r = address as *const i32; }
Listing 19-2: Creating a raw pointer to an arbitrary memory address
Recall that we can create raw pointers in safe code, but we can’t dereference
raw pointers and read the data being pointed to. In Listing 19-3, we use the
dereference operator * on a raw pointer that requires an unsafe block.
fn main() { let mut num = 5; let r1 = &num as *const i32; let r2 = &mut num as *mut i32; unsafe { println!("r1 is: {}", *r1); println!("r2 is: {}", *r2); } }
Listing 19-3: Dereferencing raw pointers within an
unsafe block
Creating a pointer does no harm; it’s only when we try to access the value that it points at that we might end up dealing with an invalid value.
Note also that in Listing 19-1 and 19-3, we created *const i32 and *mut i32
raw pointers that both pointed to the same memory location, where num is
stored. If we instead tried to create an immutable and a mutable reference to
num, the code would not have compiled because Rust’s ownership rules don’t
allow a mutable reference at the same time as any immutable references. With
raw pointers, we can create a mutable pointer and an immutable pointer to the
same location and change data through the mutable pointer, potentially creating
a data race. Be careful!
With all of these dangers, why would you ever use raw pointers? One major use case is when interfacing with C code, as you’ll see in the next section, “Calling an Unsafe Function or Method.” Another case is when building up safe abstractions that the borrow checker doesn’t understand. We’ll introduce unsafe functions and then look at an example of a safe abstraction that uses unsafe code.
Calling an Unsafe Function or Method
The second type of operation you can perform in an unsafe block is calling
unsafe functions. Unsafe functions and methods look exactly like regular
functions and methods, but they have an extra unsafe before the rest of the
definition. The unsafe keyword in this context indicates the function has
requirements we need to uphold when we call this function, because Rust can’t
guarantee we’ve met these requirements. By calling an unsafe function within an
unsafe block, we’re saying that we’ve read this function’s documentation and
take responsibility for upholding the function’s contracts.
Here is an unsafe function named dangerous that doesn’t do anything in its
body:
fn main() { unsafe fn dangerous() {} unsafe { dangerous(); } }
We must call the dangerous function within a separate unsafe block. If we
try to call dangerous without the unsafe block, we’ll get an error:
$ cargo run
Compiling unsafe-example v0.1.0 (file:///projects/unsafe-example)
error[E0133]: call to unsafe function is unsafe and requires unsafe function or block
--> src/main.rs:4:5
|
4 | dangerous();
| ^^^^^^^^^^^ call to unsafe function
|
= note: consult the function's documentation for information on how to avoid undefined behavior
For more information about this error, try `rustc --explain E0133`.
error: could not compile `unsafe-example` due to previous error
With the unsafe block, we’re asserting to Rust that we’ve read the function’s
documentation, we understand how to use it properly, and we’ve verified that
we’re fulfilling the contract of the function.
Bodies of unsafe functions are effectively unsafe blocks, so to perform other
unsafe operations within an unsafe function, we don’t need to add another
unsafe block.
Creating a Safe Abstraction over Unsafe Code
Just because a function contains unsafe code doesn’t mean we need to mark the
entire function as unsafe. In fact, wrapping unsafe code in a safe function is
a common abstraction. As an example, let’s study the split_at_mut function
from the standard library, which requires some unsafe code. We’ll explore how
we might implement it. This safe method is defined on mutable slices: it takes
one slice and makes it two by splitting the slice at the index given as an
argument. Listing 19-4 shows how to use split_at_mut.
fn main() { let mut v = vec![1, 2, 3, 4, 5, 6]; let r = &mut v[..]; let (a, b) = r.split_at_mut(3); assert_eq!(a, &mut [1, 2, 3]); assert_eq!(b, &mut [4, 5, 6]); }
Listing 19-4: Using the safe split_at_mut
function
We can’t implement this function using only safe Rust. An attempt might look
something like Listing 19-5, which won’t compile. For simplicity, we’ll
implement split_at_mut as a function rather than a method and only for slices
of i32 values rather than for a generic type T.
fn split_at_mut(values: &mut [i32], mid: usize) -> (&mut [i32], &mut [i32]) {
let len = values.len();
assert!(mid <= len);
(&mut values[..mid], &mut values[mid..])
}
fn main() {
let mut vector = vec![1, 2, 3, 4, 5, 6];
let (left, right) = split_at_mut(&mut vector, 3);
}Listing 19-5: An attempted implementation of
split_at_mut using only safe Rust
This function first gets the total length of the slice. Then it asserts that the index given as a parameter is within the slice by checking whether it’s less than or equal to the length. The assertion means that if we pass an index that is greater than the length to split the slice at, the function will panic before it attempts to use that index.
Then we return two mutable slices in a tuple: one from the start of the
original slice to the mid index and another from mid to the end of the
slice.
When we try to compile the code in Listing 19-5, we’ll get an error.
$ cargo run
Compiling unsafe-example v0.1.0 (file:///projects/unsafe-example)
error[E0499]: cannot borrow `*values` as mutable more than once at a time
--> src/main.rs:6:31
|
1 | fn split_at_mut(values: &mut [i32], mid: usize) -> (&mut [i32], &mut [i32]) {
| - let's call the lifetime of this reference `'1`
...
6 | (&mut values[..mid], &mut values[mid..])
| --------------------------^^^^^^--------
| | | |
| | | second mutable borrow occurs here
| | first mutable borrow occurs here
| returning this value requires that `*values` is borrowed for `'1`
For more information about this error, try `rustc --explain E0499`.
error: could not compile `unsafe-example` due to previous error
Rust’s borrow checker can’t understand that we’re borrowing different parts of the slice; it only knows that we’re borrowing from the same slice twice. Borrowing different parts of a slice is fundamentally okay because the two slices aren’t overlapping, but Rust isn’t smart enough to know this. When we know code is okay, but Rust doesn’t, it’s time to reach for unsafe code.
Listing 19-6 shows how to use an unsafe block, a raw pointer, and some calls
to unsafe functions to make the implementation of split_at_mut work.
use std::slice; fn split_at_mut(values: &mut [i32], mid: usize) -> (&mut [i32], &mut [i32]) { let len = values.len(); let ptr = values.as_mut_ptr(); assert!(mid <= len); unsafe { ( slice::from_raw_parts_mut(ptr, mid), slice::from_raw_parts_mut(ptr.add(mid), len - mid), ) } } fn main() { let mut vector = vec![1, 2, 3, 4, 5, 6]; let (left, right) = split_at_mut(&mut vector, 3); }
Listing 19-6: Using unsafe code in the implementation of
the split_at_mut function
Recall from “The Slice Type” section in
Chapter 4 that slices are a pointer to some data and the length of the slice.
We use the len method to get the length of a slice and the as_mut_ptr
method to access the raw pointer of a slice. In this case, because we have a
mutable slice to i32 values, as_mut_ptr returns a raw pointer with the type
*mut i32, which we’ve stored in the variable ptr.
We keep the assertion that the mid index is within the slice. Then we get to
the unsafe code: the slice::from_raw_parts_mut function takes a raw pointer
and a length, and it creates a slice. We use this function to create a slice
that starts from ptr and is mid items long. Then we call the add
method on ptr with mid as an argument to get a raw pointer that starts at
mid, and we create a slice using that pointer and the remaining number of
items after mid as the length.
The function slice::from_raw_parts_mut is unsafe because it takes a raw
pointer and must trust that this pointer is valid. The add method on raw
pointers is also unsafe, because it must trust that the offset location is also
a valid pointer. Therefore, we had to put an unsafe block around our calls to
slice::from_raw_parts_mut and add so we could call them. By looking at
the code and by adding the assertion that mid must be less than or equal to
len, we can tell that all the raw pointers used within the unsafe block
will be valid pointers to data within the slice. This is an acceptable and
appropriate use of unsafe.
Note that we don’t need to mark the resulting split_at_mut function as
unsafe, and we can call this function from safe Rust. We’ve created a safe
abstraction to the unsafe code with an implementation of the function that uses
unsafe code in a safe way, because it creates only valid pointers from the
data this function has access to.
In contrast, the use of slice::from_raw_parts_mut in Listing 19-7 would
likely crash when the slice is used. This code takes an arbitrary memory
location and creates a slice 10,000 items long.
fn main() { use std::slice; let address = 0x01234usize; let r = address as *mut i32; let values: &[i32] = unsafe { slice::from_raw_parts_mut(r, 10000) }; }
Listing 19-7: Creating a slice from an arbitrary memory location
We don’t own the memory at this arbitrary location, and there is no guarantee
that the slice this code creates contains valid i32 values. Attempting to use
values as though it’s a valid slice results in undefined behavior.
Using extern Functions to Call External Code
Sometimes, your Rust code might need to interact with code written in another
language. For this, Rust has the keyword extern that facilitates the creation
and use of a Foreign Function Interface (FFI). An FFI is a way for a
programming language to define functions and enable a different (foreign)
programming language to call those functions.
Listing 19-8 demonstrates how to set up an integration with the abs function
from the C standard library. Functions declared within extern blocks are
always unsafe to call from Rust code. The reason is that other languages don’t
enforce Rust’s rules and guarantees, and Rust can’t check them, so
responsibility falls on the programmer to ensure safety.
Filename: src/main.rs
extern "C" { fn abs(input: i32) -> i32; } fn main() { unsafe { println!("Absolute value of -3 according to C: {}", abs(-3)); } }
Listing 19-8: Declaring and calling an extern function
defined in another language
Within the extern "C" block, we list the names and signatures of external
functions from another language we want to call. The "C" part defines which
application binary interface (ABI) the external function uses: the ABI
defines how to call the function at the assembly level. The "C" ABI is the
most common and follows the C programming language’s ABI.
Calling Rust Functions from Other Languages
We can also use
externto create an interface that allows other languages to call Rust functions. Instead of creating a wholeexternblock, we add theexternkeyword and specify the ABI to use just before thefnkeyword for the relevant function. We also need to add a#[no_mangle]annotation to tell the Rust compiler not to mangle the name of this function. Mangling is when a compiler changes the name we’ve given a function to a different name that contains more information for other parts of the compilation process to consume but is less human readable. Every programming language compiler mangles names slightly differently, so for a Rust function to be nameable by other languages, we must disable the Rust compiler’s name mangling.In the following example, we make the
call_from_cfunction accessible from C code, after it’s compiled to a shared library and linked from C:#![allow(unused)] fn main() { #[no_mangle] pub extern "C" fn call_from_c() { println!("Just called a Rust function from C!"); } }This usage of
externdoes not requireunsafe.
Accessing or Modifying a Mutable Static Variable
In this book, we’ve not yet talked about global variables, which Rust does support but can be problematic with Rust’s ownership rules. If two threads are accessing the same mutable global variable, it can cause a data race.
In Rust, global variables are called static variables. Listing 19-9 shows an example declaration and use of a static variable with a string slice as a value.
Filename: src/main.rs
static HELLO_WORLD: &str = "Hello, world!"; fn main() { println!("name is: {}", HELLO_WORLD); }
Listing 19-9: Defining and using an immutable static variable
Static variables are similar to constants, which we discussed in the
“Differences Between Variables and
Constants” section
in Chapter 3. The names of static variables are in SCREAMING_SNAKE_CASE by
convention. Static variables can only store references with the 'static
lifetime, which means the Rust compiler can figure out the lifetime and we
aren’t required to annotate it explicitly. Accessing an immutable static
variable is safe.
A subtle difference between constants and immutable static variables is that
values in a static variable have a fixed address in memory. Using the value
will always access the same data. Constants, on the other hand, are allowed to
duplicate their data whenever they’re used. Another difference is that static
variables can be mutable. Accessing and modifying mutable static variables is
unsafe. Listing 19-10 shows how to declare, access, and modify a mutable
static variable named COUNTER.
Filename: src/main.rs
static mut COUNTER: u32 = 0; fn add_to_count(inc: u32) { unsafe { COUNTER += inc; } } fn main() { add_to_count(3); unsafe { println!("COUNTER: {}", COUNTER); } }
Listing 19-10: Reading from or writing to a mutable static variable is unsafe
As with regular variables, we specify mutability using the mut keyword. Any
code that reads or writes from COUNTER must be within an unsafe block. This
code compiles and prints COUNTER: 3 as we would expect because it’s single
threaded. Having multiple threads access COUNTER would likely result in data
races.
With mutable data that is globally accessible, it’s difficult to ensure there are no data races, which is why Rust considers mutable static variables to be unsafe. Where possible, it’s preferable to use the concurrency techniques and thread-safe smart pointers we discussed in Chapter 16 so the compiler checks that data accessed from different threads is done safely.
Implementing an Unsafe Trait
We can use unsafe to implement an unsafe trait. A trait is unsafe when at
least one of its methods has some invariant that the compiler can’t verify. We
declare that a trait is unsafe by adding the unsafe keyword before trait
and marking the implementation of the trait as unsafe too, as shown in
Listing 19-11.
unsafe trait Foo { // methods go here } unsafe impl Foo for i32 { // method implementations go here } fn main() {}
Listing 19-11: Defining and implementing an unsafe trait
By using unsafe impl, we’re promising that we’ll uphold the invariants that
the compiler can’t verify.
As an example, recall the Sync and Send marker traits we discussed in the
“Extensible Concurrency with the Sync and Send
Traits”
section in Chapter 16: the compiler implements these traits automatically if
our types are composed entirely of Send and Sync types. If we implement a
type that contains a type that is not Send or Sync, such as raw pointers,
and we want to mark that type as Send or Sync, we must use unsafe. Rust
can’t verify that our type upholds the guarantees that it can be safely sent
across threads or accessed from multiple threads; therefore, we need to do
those checks manually and indicate as such with unsafe.
Accessing Fields of a Union
The final action that works only with unsafe is accessing fields of a
union. A union is similar to a struct, but only one declared field is
used in a particular instance at one time. Unions are primarily used to
interface with unions in C code. Accessing union fields is unsafe because Rust
can’t guarantee the type of the data currently being stored in the union
instance. You can learn more about unions in the Rust Reference.
When to Use Unsafe Code
Using unsafe to take one of the five actions (superpowers) just discussed
isn’t wrong or even frowned upon. But it is trickier to get unsafe code
correct because the compiler can’t help uphold memory safety. When you have a
reason to use unsafe code, you can do so, and having the explicit unsafe
annotation makes it easier to track down the source of problems when they occur.
Advanced Traits
We first covered traits in the “Traits: Defining Shared Behavior” section of Chapter 10, but we didn’t discuss the more advanced details. Now that you know more about Rust, we can get into the nitty-gritty.
Specifying Placeholder Types in Trait Definitions with Associated Types
Associated types connect a type placeholder with a trait such that the trait method definitions can use these placeholder types in their signatures. The implementor of a trait will specify the concrete type to be used instead of the placeholder type for the particular implementation. That way, we can define a trait that uses some types without needing to know exactly what those types are until the trait is implemented.
We’ve described most of the advanced features in this chapter as being rarely needed. Associated types are somewhere in the middle: they’re used more rarely than features explained in the rest of the book but more commonly than many of the other features discussed in this chapter.
One example of a trait with an associated type is the Iterator trait that the
standard library provides. The associated type is named Item and stands in
for the type of the values the type implementing the Iterator trait is
iterating over. The definition of the Iterator trait is as shown in Listing
19-12.
pub trait Iterator {
type Item;
fn next(&mut self) -> Option<Self::Item>;
}Listing 19-12: The definition of the Iterator trait
that has an associated type Item
The type Item is a placeholder, and the next method’s definition shows that
it will return values of type Option<Self::Item>. Implementors of the
Iterator trait will specify the concrete type for Item, and the next
method will return an Option containing a value of that concrete type.
Associated types might seem like a similar concept to generics, in that the
latter allow us to define a function without specifying what types it can
handle. To examine the difference between the two concepts, we’ll look at an
implementation of the Iterator trait on a type named Counter that specifies
the Item type is u32:
Filename: src/lib.rs
struct Counter {
count: u32,
}
impl Counter {
fn new() -> Counter {
Counter { count: 0 }
}
}
impl Iterator for Counter {
type Item = u32;
fn next(&mut self) -> Option<Self::Item> {
// --snip--
if self.count < 5 {
self.count += 1;
Some(self.count)
} else {
None
}
}
}This syntax seems comparable to that of generics. So why not just define the
Iterator trait with generics, as shown in Listing 19-13?
pub trait Iterator<T> {
fn next(&mut self) -> Option<T>;
}Listing 19-13: A hypothetical definition of the
Iterator trait using generics
The difference is that when using generics, as in Listing 19-13, we must
annotate the types in each implementation; because we can also implement
Iterator<String> for Counter or any other type, we could have multiple
implementations of Iterator for Counter. In other words, when a trait has a
generic parameter, it can be implemented for a type multiple times, changing
the concrete types of the generic type parameters each time. When we use the
next method on Counter, we would have to provide type annotations to
indicate which implementation of Iterator we want to use.
With associated types, we don’t need to annotate types because we can’t
implement a trait on a type multiple times. In Listing 19-12 with the
definition that uses associated types, we can only choose what the type of
Item will be once, because there can only be one impl Iterator for Counter.
We don’t have to specify that we want an iterator of u32 values everywhere
that we call next on Counter.
Associated types also become part of the trait’s contract: implementors of the trait must provide a type to stand in for the associated type placeholder. Associated types often have a name that describes how the type will be used, and documenting the associated type in the API documentation is good practice.
Default Generic Type Parameters and Operator Overloading
When we use generic type parameters, we can specify a default concrete type for
the generic type. This eliminates the need for implementors of the trait to
specify a concrete type if the default type works. You specify a default type
when declaring a generic type with the <PlaceholderType=ConcreteType> syntax.
A great example of a situation where this technique is useful is with operator
overloading, in which you customize the behavior of an operator (such as +)
in particular situations.
Rust doesn’t allow you to create your own operators or overload arbitrary
operators. But you can overload the operations and corresponding traits listed
in std::ops by implementing the traits associated with the operator. For
example, in Listing 19-14 we overload the + operator to add two Point
instances together. We do this by implementing the Add trait on a Point
struct:
Filename: src/main.rs
use std::ops::Add; #[derive(Debug, Copy, Clone, PartialEq)] struct Point { x: i32, y: i32, } impl Add for Point { type Output = Point; fn add(self, other: Point) -> Point { Point { x: self.x + other.x, y: self.y + other.y, } } } fn main() { assert_eq!( Point { x: 1, y: 0 } + Point { x: 2, y: 3 }, Point { x: 3, y: 3 } ); }
Listing 19-14: Implementing the Add trait to overload
the + operator for Point instances
The add method adds the x values of two Point instances and the y
values of two Point instances to create a new Point. The Add trait has an
associated type named Output that determines the type returned from the add
method.
The default generic type in this code is within the Add trait. Here is its
definition:
#![allow(unused)] fn main() { trait Add<Rhs=Self> { type Output; fn add(self, rhs: Rhs) -> Self::Output; } }
This code should look generally familiar: a trait with one method and an
associated type. The new part is Rhs=Self: this syntax is called default
type parameters. The Rhs generic type parameter (short for “right hand
side”) defines the type of the rhs parameter in the add method. If we don’t
specify a concrete type for Rhs when we implement the Add trait, the type
of Rhs will default to Self, which will be the type we’re implementing
Add on.
When we implemented Add for Point, we used the default for Rhs because we
wanted to add two Point instances. Let’s look at an example of implementing
the Add trait where we want to customize the Rhs type rather than using the
default.
We have two structs, Millimeters and Meters, holding values in different
units. This thin wrapping of an existing type in another struct is known as the
newtype pattern, which we describe in more detail in the “Using the Newtype
Pattern to Implement External Traits on External Types” section. We want to add values in millimeters to values in meters and have
the implementation of Add do the conversion correctly. We can implement Add
for Millimeters with Meters as the Rhs, as shown in Listing 19-15.
Filename: src/lib.rs
use std::ops::Add;
struct Millimeters(u32);
struct Meters(u32);
impl Add<Meters> for Millimeters {
type Output = Millimeters;
fn add(self, other: Meters) -> Millimeters {
Millimeters(self.0 + (other.0 * 1000))
}
}Listing 19-15: Implementing the Add trait on
Millimeters to add Millimeters to Meters
To add Millimeters and Meters, we specify impl Add<Meters> to set the
value of the Rhs type parameter instead of using the default of Self.
You’ll use default type parameters in two main ways:
- To extend a type without breaking existing code
- To allow customization in specific cases most users won’t need
The standard library’s Add trait is an example of the second purpose:
usually, you’ll add two like types, but the Add trait provides the ability to
customize beyond that. Using a default type parameter in the Add trait
definition means you don’t have to specify the extra parameter most of the
time. In other words, a bit of implementation boilerplate isn’t needed, making
it easier to use the trait.
The first purpose is similar to the second but in reverse: if you want to add a type parameter to an existing trait, you can give it a default to allow extension of the functionality of the trait without breaking the existing implementation code.
Fully Qualified Syntax for Disambiguation: Calling Methods with the Same Name
Nothing in Rust prevents a trait from having a method with the same name as another trait’s method, nor does Rust prevent you from implementing both traits on one type. It’s also possible to implement a method directly on the type with the same name as methods from traits.
When calling methods with the same name, you’ll need to tell Rust which one you
want to use. Consider the code in Listing 19-16 where we’ve defined two traits,
Pilot and Wizard, that both have a method called fly. We then implement
both traits on a type Human that already has a method named fly implemented
on it. Each fly method does something different.
Filename: src/main.rs
trait Pilot { fn fly(&self); } trait Wizard { fn fly(&self); } struct Human; impl Pilot for Human { fn fly(&self) { println!("This is your captain speaking."); } } impl Wizard for Human { fn fly(&self) { println!("Up!"); } } impl Human { fn fly(&self) { println!("*waving arms furiously*"); } } fn main() {}
Listing 19-16: Two traits are defined to have a fly
method and are implemented on the Human type, and a fly method is
implemented on Human directly
When we call fly on an instance of Human, the compiler defaults to calling
the method that is directly implemented on the type, as shown in Listing 19-17.
Filename: src/main.rs
trait Pilot { fn fly(&self); } trait Wizard { fn fly(&self); } struct Human; impl Pilot for Human { fn fly(&self) { println!("This is your captain speaking."); } } impl Wizard for Human { fn fly(&self) { println!("Up!"); } } impl Human { fn fly(&self) { println!("*waving arms furiously*"); } } fn main() { let person = Human; person.fly(); }
Listing 19-17: Calling fly on an instance of
Human
Running this code will print *waving arms furiously*, showing that Rust
called the fly method implemented on Human directly.
To call the fly methods from either the Pilot trait or the Wizard trait,
we need to use more explicit syntax to specify which fly method we mean.
Listing 19-18 demonstrates this syntax.
Filename: src/main.rs
trait Pilot { fn fly(&self); } trait Wizard { fn fly(&self); } struct Human; impl Pilot for Human { fn fly(&self) { println!("This is your captain speaking."); } } impl Wizard for Human { fn fly(&self) { println!("Up!"); } } impl Human { fn fly(&self) { println!("*waving arms furiously*"); } } fn main() { let person = Human; Pilot::fly(&person); Wizard::fly(&person); person.fly(); }
Listing 19-18: Specifying which trait’s fly method we
want to call
Specifying the trait name before the method name clarifies to Rust which
implementation of fly we want to call. We could also write
Human::fly(&person), which is equivalent to the person.fly() that we used
in Listing 19-18, but this is a bit longer to write if we don’t need to
disambiguate.
Running this code prints the following:
$ cargo run
Compiling traits-example v0.1.0 (file:///projects/traits-example)
Finished dev [unoptimized + debuginfo] target(s) in 0.46s
Running `target/debug/traits-example`
This is your captain speaking.
Up!
*waving arms furiously*
Because the fly method takes a self parameter, if we had two types that
both implement one trait, Rust could figure out which implementation of a
trait to use based on the type of self.
However, associated functions that are not methods don’t have a self
parameter. When there are multiple types or traits that define non-method
functions with the same function name, Rust doesn't always know which type you
mean unless you use fully qualified syntax. For example, in Listing 19-19 we
create a trait for an animal shelter that wants to name all baby dogs Spot.
We make an Animal trait with an associated non-method function baby_name.
The Animal trait is implemented for the struct Dog, on which we also
provide an associated non-method function baby_name directly.
Filename: src/main.rs
trait Animal { fn baby_name() -> String; } struct Dog; impl Dog { fn baby_name() -> String { String::from("Spot") } } impl Animal for Dog { fn baby_name() -> String { String::from("puppy") } } fn main() { println!("A baby dog is called a {}", Dog::baby_name()); }
Listing 19-19: A trait with an associated function and a type with an associated function of the same name that also implements the trait
We implement the code for naming all puppies Spot in the baby_name associated
function that is defined on Dog. The Dog type also implements the trait
Animal, which describes characteristics that all animals have. Baby dogs are
called puppies, and that is expressed in the implementation of the Animal
trait on Dog in the baby_name function associated with the Animal trait.
In main, we call the Dog::baby_name function, which calls the associated
function defined on Dog directly. This code prints the following:
$ cargo run
Compiling traits-example v0.1.0 (file:///projects/traits-example)
Finished dev [unoptimized + debuginfo] target(s) in 0.54s
Running `target/debug/traits-example`
A baby dog is called a Spot
This output isn’t what we wanted. We want to call the baby_name function that
is part of the Animal trait that we implemented on Dog so the code prints
A baby dog is called a puppy. The technique of specifying the trait name that
we used in Listing 19-18 doesn’t help here; if we change main to the code in
Listing 19-20, we’ll get a compilation error.
Filename: src/main.rs
trait Animal {
fn baby_name() -> String;
}
struct Dog;
impl Dog {
fn baby_name() -> String {
String::from("Spot")
}
}
impl Animal for Dog {
fn baby_name() -> String {
String::from("puppy")
}
}
fn main() {
println!("A baby dog is called a {}", Animal::baby_name());
}Listing 19-20: Attempting to call the baby_name
function from the Animal trait, but Rust doesn’t know which implementation to
use
Because Animal::baby_name doesn’t have a self parameter, and there could be
other types that implement the Animal trait, Rust can’t figure out which
implementation of Animal::baby_name we want. We’ll get this compiler error:
$ cargo run
Compiling traits-example v0.1.0 (file:///projects/traits-example)
error[E0790]: cannot call associated function on trait without specifying the corresponding `impl` type
--> src/main.rs:20:43
|
2 | fn baby_name() -> String;
| ------------------------- `Animal::baby_name` defined here
...
20 | println!("A baby dog is called a {}", Animal::baby_name());
| ^^^^^^^^^^^^^^^^^ cannot call associated function of trait
|
help: use the fully-qualified path to the only available implementation
|
20 | println!("A baby dog is called a {}", <Dog as Animal>::baby_name());
| +++++++ +
For more information about this error, try `rustc --explain E0790`.
error: could not compile `traits-example` due to previous error
To disambiguate and tell Rust that we want to use the implementation of
Animal for Dog as opposed to the implementation of Animal for some other
type, we need to use fully qualified syntax. Listing 19-21 demonstrates how to
use fully qualified syntax.
Filename: src/main.rs
trait Animal { fn baby_name() -> String; } struct Dog; impl Dog { fn baby_name() -> String { String::from("Spot") } } impl Animal for Dog { fn baby_name() -> String { String::from("puppy") } } fn main() { println!("A baby dog is called a {}", <Dog as Animal>::baby_name()); }
Listing 19-21: Using fully qualified syntax to specify
that we want to call the baby_name function from the Animal trait as
implemented on Dog
We’re providing Rust with a type annotation within the angle brackets, which
indicates we want to call the baby_name method from the Animal trait as
implemented on Dog by saying that we want to treat the Dog type as an
Animal for this function call. This code will now print what we want:
$ cargo run
Compiling traits-example v0.1.0 (file:///projects/traits-example)
Finished dev [unoptimized + debuginfo] target(s) in 0.48s
Running `target/debug/traits-example`
A baby dog is called a puppy
In general, fully qualified syntax is defined as follows:
<Type as Trait>::function(receiver_if_method, next_arg, ...);For associated functions that aren’t methods, there would not be a receiver:
there would only be the list of other arguments. You could use fully qualified
syntax everywhere that you call functions or methods. However, you’re allowed
to omit any part of this syntax that Rust can figure out from other information
in the program. You only need to use this more verbose syntax in cases where
there are multiple implementations that use the same name and Rust needs help
to identify which implementation you want to call.
Using Supertraits to Require One Trait’s Functionality Within Another Trait
Sometimes, you might write a trait definition that depends on another trait: for a type to implement the first trait, you want to require that type to also implement the second trait. You would do this so that your trait definition can make use of the associated items of the second trait. The trait your trait definition is relying on is called a supertrait of your trait.
For example, let’s say we want to make an OutlinePrint trait with an
outline_print method that will print a given value formatted so that it's
framed in asterisks. That is, given a Point struct that implements the
standard library trait Display to result in (x, y), when we call
outline_print on a Point instance that has 1 for x and 3 for y, it
should print the following:
**********
* *
* (1, 3) *
* *
**********
In the implementation of the outline_print method, we want to use the
Display trait’s functionality. Therefore, we need to specify that the
OutlinePrint trait will work only for types that also implement Display and
provide the functionality that OutlinePrint needs. We can do that in the
trait definition by specifying OutlinePrint: Display. This technique is
similar to adding a trait bound to the trait. Listing 19-22 shows an
implementation of the OutlinePrint trait.
Filename: src/main.rs
use std::fmt; trait OutlinePrint: fmt::Display { fn outline_print(&self) { let output = self.to_string(); let len = output.len(); println!("{}", "*".repeat(len + 4)); println!("*{}*", " ".repeat(len + 2)); println!("* {} *", output); println!("*{}*", " ".repeat(len + 2)); println!("{}", "*".repeat(len + 4)); } } fn main() {}
Listing 19-22: Implementing the OutlinePrint trait that
requires the functionality from Display
Because we’ve specified that OutlinePrint requires the Display trait, we
can use the to_string function that is automatically implemented for any type
that implements Display. If we tried to use to_string without adding a
colon and specifying the Display trait after the trait name, we’d get an
error saying that no method named to_string was found for the type &Self in
the current scope.
Let’s see what happens when we try to implement OutlinePrint on a type that
doesn’t implement Display, such as the Point struct:
Filename: src/main.rs
use std::fmt;
trait OutlinePrint: fmt::Display {
fn outline_print(&self) {
let output = self.to_string();
let len = output.len();
println!("{}", "*".repeat(len + 4));
println!("*{}*", " ".repeat(len + 2));
println!("* {} *", output);
println!("*{}*", " ".repeat(len + 2));
println!("{}", "*".repeat(len + 4));
}
}
struct Point {
x: i32,
y: i32,
}
impl OutlinePrint for Point {}
fn main() {
let p = Point { x: 1, y: 3 };
p.outline_print();
}We get an error saying that Display is required but not implemented:
$ cargo run
Compiling traits-example v0.1.0 (file:///projects/traits-example)
error[E0277]: `Point` doesn't implement `std::fmt::Display`
--> src/main.rs:20:6
|
20 | impl OutlinePrint for Point {}
| ^^^^^^^^^^^^ `Point` cannot be formatted with the default formatter
|
= help: the trait `std::fmt::Display` is not implemented for `Point`
= note: in format strings you may be able to use `{:?}` (or {:#?} for pretty-print) instead
note: required by a bound in `OutlinePrint`
--> src/main.rs:3:21
|
3 | trait OutlinePrint: fmt::Display {
| ^^^^^^^^^^^^ required by this bound in `OutlinePrint`
For more information about this error, try `rustc --explain E0277`.
error: could not compile `traits-example` due to previous error
To fix this, we implement Display on Point and satisfy the constraint that
OutlinePrint requires, like so:
Filename: src/main.rs
trait OutlinePrint: fmt::Display { fn outline_print(&self) { let output = self.to_string(); let len = output.len(); println!("{}", "*".repeat(len + 4)); println!("*{}*", " ".repeat(len + 2)); println!("* {} *", output); println!("*{}*", " ".repeat(len + 2)); println!("{}", "*".repeat(len + 4)); } } struct Point { x: i32, y: i32, } impl OutlinePrint for Point {} use std::fmt; impl fmt::Display for Point { fn fmt(&self, f: &mut fmt::Formatter) -> fmt::Result { write!(f, "({}, {})", self.x, self.y) } } fn main() { let p = Point { x: 1, y: 3 }; p.outline_print(); }
Then implementing the OutlinePrint trait on Point will compile
successfully, and we can call outline_print on a Point instance to display
it within an outline of asterisks.
Using the Newtype Pattern to Implement External Traits on External Types
In Chapter 10 in the “Implementing a Trait on a Type” section, we mentioned the orphan rule that states we’re only allowed to implement a trait on a type if either the trait or the type are local to our crate. It’s possible to get around this restriction using the newtype pattern, which involves creating a new type in a tuple struct. (We covered tuple structs in the “Using Tuple Structs without Named Fields to Create Different Types” section of Chapter 5.) The tuple struct will have one field and be a thin wrapper around the type we want to implement a trait for. Then the wrapper type is local to our crate, and we can implement the trait on the wrapper. Newtype is a term that originates from the Haskell programming language. There is no runtime performance penalty for using this pattern, and the wrapper type is elided at compile time.
As an example, let’s say we want to implement Display on Vec<T>, which the
orphan rule prevents us from doing directly because the Display trait and the
Vec<T> type are defined outside our crate. We can make a Wrapper struct
that holds an instance of Vec<T>; then we can implement Display on
Wrapper and use the Vec<T> value, as shown in Listing 19-23.
Filename: src/main.rs
use std::fmt; struct Wrapper(Vec<String>); impl fmt::Display for Wrapper { fn fmt(&self, f: &mut fmt::Formatter) -> fmt::Result { write!(f, "[{}]", self.0.join(", ")) } } fn main() { let w = Wrapper(vec![String::from("hello"), String::from("world")]); println!("w = {}", w); }
Listing 19-23: Creating a Wrapper type around
Vec<String> to implement Display
The implementation of Display uses self.0 to access the inner Vec<T>,
because Wrapper is a tuple struct and Vec<T> is the item at index 0 in the
tuple. Then we can use the functionality of the Display type on Wrapper.
The downside of using this technique is that Wrapper is a new type, so it
doesn’t have the methods of the value it’s holding. We would have to implement
all the methods of Vec<T> directly on Wrapper such that the methods
delegate to self.0, which would allow us to treat Wrapper exactly like a
Vec<T>. If we wanted the new type to have every method the inner type has,
implementing the Deref trait (discussed in Chapter 15 in the “Treating Smart
Pointers Like Regular References with the Deref
Trait” section) on the Wrapper to return
the inner type would be a solution. If we don’t want the Wrapper type to have
all the methods of the inner type—for example, to restrict the Wrapper type’s
behavior—we would have to implement just the methods we do want manually.
This newtype pattern is also useful even when traits are not involved. Let’s switch focus and look at some advanced ways to interact with Rust’s type system.
Advanced Types
The Rust type system has some features that we’ve so far mentioned but haven’t
yet discussed. We’ll start by discussing newtypes in general as we examine why
newtypes are useful as types. Then we’ll move on to type aliases, a feature
similar to newtypes but with slightly different semantics. We’ll also discuss
the ! type and dynamically sized types.
Using the Newtype Pattern for Type Safety and Abstraction
Note: This section assumes you’ve read the earlier section “Using the Newtype Pattern to Implement External Traits on External Types.”
The newtype pattern is also useful for tasks beyond those we’ve discussed so
far, including statically enforcing that values are never confused and
indicating the units of a value. You saw an example of using newtypes to
indicate units in Listing 19-15: recall that the Millimeters and Meters
structs wrapped u32 values in a newtype. If we wrote a function with a
parameter of type Millimeters, we couldn’t compile a program that
accidentally tried to call that function with a value of type Meters or a
plain u32.
We can also use the newtype pattern to abstract away some implementation details of a type: the new type can expose a public API that is different from the API of the private inner type.
Newtypes can also hide internal implementation. For example, we could provide a
People type to wrap a HashMap<i32, String> that stores a person’s ID
associated with their name. Code using People would only interact with the
public API we provide, such as a method to add a name string to the People
collection; that code wouldn’t need to know that we assign an i32 ID to names
internally. The newtype pattern is a lightweight way to achieve encapsulation
to hide implementation details, which we discussed in the “Encapsulation that
Hides Implementation
Details”
section of Chapter 17.
Creating Type Synonyms with Type Aliases
Rust provides the ability to declare a type alias to give an existing type
another name. For this we use the type keyword. For example, we can create
the alias Kilometers to i32 like so:
fn main() { type Kilometers = i32; let x: i32 = 5; let y: Kilometers = 5; println!("x + y = {}", x + y); }
Now, the alias Kilometers is a synonym for i32; unlike the Millimeters
and Meters types we created in Listing 19-15, Kilometers is not a separate,
new type. Values that have the type Kilometers will be treated the same as
values of type i32:
fn main() { type Kilometers = i32; let x: i32 = 5; let y: Kilometers = 5; println!("x + y = {}", x + y); }
Because Kilometers and i32 are the same type, we can add values of both
types and we can pass Kilometers values to functions that take i32
parameters. However, using this method, we don’t get the type checking benefits
that we get from the newtype pattern discussed earlier. In other words, if we
mix up Kilometers and i32 values somewhere, the compiler will not give us
an error.
The main use case for type synonyms is to reduce repetition. For example, we might have a lengthy type like this:
Box<dyn Fn() + Send + 'static>Writing this lengthy type in function signatures and as type annotations all over the code can be tiresome and error prone. Imagine having a project full of code like that in Listing 19-24.
fn main() { let f: Box<dyn Fn() + Send + 'static> = Box::new(|| println!("hi")); fn takes_long_type(f: Box<dyn Fn() + Send + 'static>) { // --snip-- } fn returns_long_type() -> Box<dyn Fn() + Send + 'static> { // --snip-- Box::new(|| ()) } }
Listing 19-24: Using a long type in many places
A type alias makes this code more manageable by reducing the repetition. In
Listing 19-25, we’ve introduced an alias named Thunk for the verbose type and
can replace all uses of the type with the shorter alias Thunk.
fn main() { type Thunk = Box<dyn Fn() + Send + 'static>; let f: Thunk = Box::new(|| println!("hi")); fn takes_long_type(f: Thunk) { // --snip-- } fn returns_long_type() -> Thunk { // --snip-- Box::new(|| ()) } }
Listing 19-25: Introducing a type alias Thunk to reduce
repetition
This code is much easier to read and write! Choosing a meaningful name for a type alias can help communicate your intent as well (thunk is a word for code to be evaluated at a later time, so it’s an appropriate name for a closure that gets stored).
Type aliases are also commonly used with the Result<T, E> type for reducing
repetition. Consider the std::io module in the standard library. I/O
operations often return a Result<T, E> to handle situations when operations
fail to work. This library has a std::io::Error struct that represents all
possible I/O errors. Many of the functions in std::io will be returning
Result<T, E> where the E is std::io::Error, such as these functions in
the Write trait:
use std::fmt;
use std::io::Error;
pub trait Write {
fn write(&mut self, buf: &[u8]) -> Result<usize, Error>;
fn flush(&mut self) -> Result<(), Error>;
fn write_all(&mut self, buf: &[u8]) -> Result<(), Error>;
fn write_fmt(&mut self, fmt: fmt::Arguments) -> Result<(), Error>;
}The Result<..., Error> is repeated a lot. As such, std::io has this type
alias declaration:
use std::fmt;
type Result<T> = std::result::Result<T, std::io::Error>;
pub trait Write {
fn write(&mut self, buf: &[u8]) -> Result<usize>;
fn flush(&mut self) -> Result<()>;
fn write_all(&mut self, buf: &[u8]) -> Result<()>;
fn write_fmt(&mut self, fmt: fmt::Arguments) -> Result<()>;
}Because this declaration is in the std::io module, we can use the fully
qualified alias std::io::Result<T>; that is, a Result<T, E> with the E
filled in as std::io::Error. The Write trait function signatures end up
looking like this:
use std::fmt;
type Result<T> = std::result::Result<T, std::io::Error>;
pub trait Write {
fn write(&mut self, buf: &[u8]) -> Result<usize>;
fn flush(&mut self) -> Result<()>;
fn write_all(&mut self, buf: &[u8]) -> Result<()>;
fn write_fmt(&mut self, fmt: fmt::Arguments) -> Result<()>;
}The type alias helps in two ways: it makes code easier to write and it gives
us a consistent interface across all of std::io. Because it’s an alias, it’s
just another Result<T, E>, which means we can use any methods that work on
Result<T, E> with it, as well as special syntax like the ? operator.
The Never Type that Never Returns
Rust has a special type named ! that’s known in type theory lingo as the
empty type because it has no values. We prefer to call it the never type
because it stands in the place of the return type when a function will never
return. Here is an example:
fn bar() -> ! {
// --snip--
panic!();
}This code is read as “the function bar returns never.” Functions that return
never are called diverging functions. We can’t create values of the type !
so bar can never possibly return.
But what use is a type you can never create values for? Recall the code from Listing 2-5, part of the number guessing game; we’ve reproduced a bit of it here in Listing 19-26.
use rand::Rng;
use std::cmp::Ordering;
use std::io;
fn main() {
println!("Zgadnij liczbę!");
let secret_number = rand::thread_rng().gen_range(1..=100);
println!("Sekretna liczba to: {secret_number}");
loop {
println!("Podaj swoją liczbę:");
let mut guess = String::new();
// --snip--
io::stdin()
.read_line(&mut guess)
.expect("Błąd wczytania linii");
let guess: u32 = match guess.trim().parse() {
Ok(num) => num,
Err(_) => continue,
};
println!("Wybrana przez ciebie liczba: {guess}");
// --snip--
match guess.cmp(&secret_number) {
Ordering::Less => println!("Za mała!"),
Ordering::Greater => println!("Za duża!"),
Ordering::Equal => {
println!("Jesteś zwycięzcą!");
break;
}
}
}
}Listing 19-26: A match with an arm that ends in
continue
At the time, we skipped over some details in this code. In Chapter 6 in “The
match Control Flow Operator”
section, we discussed that match arms must all return the same type. So, for
example, the following code doesn’t work:
fn main() {
let guess = "3";
let guess = match guess.trim().parse() {
Ok(_) => 5,
Err(_) => "hello",
};
}The type of guess in this code would have to be an integer and a string,
and Rust requires that guess have only one type. So what does continue
return? How were we allowed to return a u32 from one arm and have another arm
that ends with continue in Listing 19-26?
As you might have guessed, continue has a ! value. That is, when Rust
computes the type of guess, it looks at both match arms, the former with a
value of u32 and the latter with a ! value. Because ! can never have a
value, Rust decides that the type of guess is u32.
The formal way of describing this behavior is that expressions of type ! can
be coerced into any other type. We’re allowed to end this match arm with
continue because continue doesn’t return a value; instead, it moves control
back to the top of the loop, so in the Err case, we never assign a value to
guess.
The never type is useful with the panic! macro as well. Recall the unwrap
function that we call on Option<T> values to produce a value or panic with
this definition:
enum Option<T> {
Some(T),
None,
}
use crate::Option::*;
impl<T> Option<T> {
pub fn unwrap(self) -> T {
match self {
Some(val) => val,
None => panic!("called `Option::unwrap()` on a `None` value"),
}
}
}In this code, the same thing happens as in the match in Listing 19-26: Rust
sees that val has the type T and panic! has the type !, so the result
of the overall match expression is T. This code works because panic!
doesn’t produce a value; it ends the program. In the None case, we won’t be
returning a value from unwrap, so this code is valid.
One final expression that has the type ! is a loop:
fn main() {
print!("forever ");
loop {
print!("and ever ");
}
}Here, the loop never ends, so ! is the value of the expression. However, this
wouldn’t be true if we included a break, because the loop would terminate
when it got to the break.
Dynamically Sized Types and the Sized Trait
Rust needs to know certain details about its types, such as how much space to allocate for a value of a particular type. This leaves one corner of its type system a little confusing at first: the concept of dynamically sized types. Sometimes referred to as DSTs or unsized types, these types let us write code using values whose size we can know only at runtime.
Let’s dig into the details of a dynamically sized type called str, which
we’ve been using throughout the book. That’s right, not &str, but str on
its own, is a DST. We can’t know how long the string is until runtime, meaning
we can’t create a variable of type str, nor can we take an argument of type
str. Consider the following code, which does not work:
fn main() {
let s1: str = "Hello there!";
let s2: str = "How's it going?";
}Rust needs to know how much memory to allocate for any value of a particular
type, and all values of a type must use the same amount of memory. If Rust
allowed us to write this code, these two str values would need to take up the
same amount of space. But they have different lengths: s1 needs 12 bytes of
storage and s2 needs 15. This is why it’s not possible to create a variable
holding a dynamically sized type.
So what do we do? In this case, you already know the answer: we make the types
of s1 and s2 a &str rather than a str. Recall from the “String
Slices” section of Chapter 4 that the slice data
structure just stores the starting position and the length of the slice. So
although a &T is a single value that stores the memory address of where the
T is located, a &str is two values: the address of the str and its
length. As such, we can know the size of a &str value at compile time: it’s
twice the length of a usize. That is, we always know the size of a &str, no
matter how long the string it refers to is. In general, this is the way in
which dynamically sized types are used in Rust: they have an extra bit of
metadata that stores the size of the dynamic information. The golden rule of
dynamically sized types is that we must always put values of dynamically sized
types behind a pointer of some kind.
We can combine str with all kinds of pointers: for example, Box<str> or
Rc<str>. In fact, you’ve seen this before but with a different dynamically
sized type: traits. Every trait is a dynamically sized type we can refer to by
using the name of the trait. In Chapter 17 in the “Using Trait Objects That
Allow for Values of Different
Types” section, we mentioned that to use traits as trait objects, we must
put them behind a pointer, such as &dyn Trait or Box<dyn Trait> (Rc<dyn Trait> would work too).
To work with DSTs, Rust provides the Sized trait to determine whether or not
a type’s size is known at compile time. This trait is automatically implemented
for everything whose size is known at compile time. In addition, Rust
implicitly adds a bound on Sized to every generic function. That is, a
generic function definition like this:
fn generic<T>(t: T) {
// --snip--
}is actually treated as though we had written this:
fn generic<T: Sized>(t: T) {
// --snip--
}By default, generic functions will work only on types that have a known size at compile time. However, you can use the following special syntax to relax this restriction:
fn generic<T: ?Sized>(t: &T) {
// --snip--
}A trait bound on ?Sized means “T may or may not be Sized” and this
notation overrides the default that generic types must have a known size at
compile time. The ?Trait syntax with this meaning is only available for
Sized, not any other traits.
Also note that we switched the type of the t parameter from T to &T.
Because the type might not be Sized, we need to use it behind some kind of
pointer. In this case, we’ve chosen a reference.
Next, we’ll talk about functions and closures!
Advanced Functions and Closures
This section explores some advanced features related to functions and closures, including function pointers and returning closures.
Function Pointers
We’ve talked about how to pass closures to functions; you can also pass regular
functions to functions! This technique is useful when you want to pass a
function you’ve already defined rather than defining a new closure. Functions
coerce to the type fn (with a lowercase f), not to be confused with the Fn
closure trait. The fn type is called a function pointer. Passing functions
with function pointers will allow you to use functions as arguments to other
functions.
The syntax for specifying that a parameter is a function pointer is similar to
that of closures, as shown in Listing 19-27, where we’ve defined a function
add_one that adds one to its parameter. The function do_twice takes two
parameters: a function pointer to any function that takes an i32 parameter
and returns an i32, and one i32 value. The do_twice function calls the
function f twice, passing it the arg value, then adds the two function call
results together. The main function calls do_twice with the arguments
add_one and 5.
Filename: src/main.rs
fn add_one(x: i32) -> i32 { x + 1 } fn do_twice(f: fn(i32) -> i32, arg: i32) -> i32 { f(arg) + f(arg) } fn main() { let answer = do_twice(add_one, 5); println!("The answer is: {}", answer); }
Listing 19-27: Using the fn type to accept a function
pointer as an argument
This code prints The answer is: 12. We specify that the parameter f in
do_twice is an fn that takes one parameter of type i32 and returns an
i32. We can then call f in the body of do_twice. In main, we can pass
the function name add_one as the first argument to do_twice.
Unlike closures, fn is a type rather than a trait, so we specify fn as the
parameter type directly rather than declaring a generic type parameter with one
of the Fn traits as a trait bound.
Function pointers implement all three of the closure traits (Fn, FnMut, and
FnOnce), meaning you can always pass a function pointer as an argument for a
function that expects a closure. It’s best to write functions using a generic
type and one of the closure traits so your functions can accept either
functions or closures.
That said, one example of where you would want to only accept fn and not
closures is when interfacing with external code that doesn’t have closures: C
functions can accept functions as arguments, but C doesn’t have closures.
As an example of where you could use either a closure defined inline or a named
function, let’s look at a use of the map method provided by the Iterator
trait in the standard library. To use the map function to turn a vector of
numbers into a vector of strings, we could use a closure, like this:
fn main() { let list_of_numbers = vec![1, 2, 3]; let list_of_strings: Vec<String> = list_of_numbers.iter().map(|i| i.to_string()).collect(); }
Or we could name a function as the argument to map instead of the closure,
like this:
fn main() { let list_of_numbers = vec![1, 2, 3]; let list_of_strings: Vec<String> = list_of_numbers.iter().map(ToString::to_string).collect(); }
Note that we must use the fully qualified syntax that we talked about earlier
in the “Advanced Traits” section because
there are multiple functions available named to_string. Here, we’re using the
to_string function defined in the ToString trait, which the standard
library has implemented for any type that implements Display.
Recall from the “Enum values” section of Chapter 6 that the name of each enum variant that we define also becomes an initializer function. We can use these initializer functions as function pointers that implement the closure traits, which means we can specify the initializer functions as arguments for methods that take closures, like so:
fn main() { enum Status { Value(u32), Stop, } let list_of_statuses: Vec<Status> = (0u32..20).map(Status::Value).collect(); }
Here we create Status::Value instances using each u32 value in the range
that map is called on by using the initializer function of Status::Value.
Some people prefer this style, and some people prefer to use closures. They
compile to the same code, so use whichever style is clearer to you.
Returning Closures
Closures are represented by traits, which means you can’t return closures
directly. In most cases where you might want to return a trait, you can instead
use the concrete type that implements the trait as the return value of the
function. However, you can’t do that with closures because they don’t have a
concrete type that is returnable; you’re not allowed to use the function
pointer fn as a return type, for example.
The following code tries to return a closure directly, but it won’t compile:
fn returns_closure() -> dyn Fn(i32) -> i32 {
|x| x + 1
}The compiler error is as follows:
$ cargo build
Compiling functions-example v0.1.0 (file:///projects/functions-example)
error[E0746]: return type cannot have an unboxed trait object
--> src/lib.rs:1:25
|
1 | fn returns_closure() -> dyn Fn(i32) -> i32 {
| ^^^^^^^^^^^^^^^^^^ doesn't have a size known at compile-time
|
= note: for information on `impl Trait`, see <https://doc.rust-lang.org/book/ch10-02-traits.html#returning-types-that-implement-traits>
help: use `impl Fn(i32) -> i32` as the return type, as all return paths are of type `[closure@src/lib.rs:2:5: 2:8]`, which implements `Fn(i32) -> i32`
|
1 | fn returns_closure() -> impl Fn(i32) -> i32 {
| ~~~~~~~~~~~~~~~~~~~
For more information about this error, try `rustc --explain E0746`.
error: could not compile `functions-example` due to previous error
The error references the Sized trait again! Rust doesn’t know how much space
it will need to store the closure. We saw a solution to this problem earlier.
We can use a trait object:
fn returns_closure() -> Box<dyn Fn(i32) -> i32> {
Box::new(|x| x + 1)
}This code will compile just fine. For more about trait objects, refer to the section “Using Trait Objects That Allow for Values of Different Types” in Chapter 17.
Next, let’s look at macros!
Macros
We’ve used macros like println! throughout this book, but we haven’t fully
explored what a macro is and how it works. The term macro refers to a family
of features in Rust: declarative macros with macro_rules! and three kinds
of procedural macros:
- Custom
#[derive]macros that specify code added with thederiveattribute used on structs and enums - Attribute-like macros that define custom attributes usable on any item
- Function-like macros that look like function calls but operate on the tokens specified as their argument
We’ll talk about each of these in turn, but first, let’s look at why we even need macros when we already have functions.
The Difference Between Macros and Functions
Fundamentally, macros are a way of writing code that writes other code, which
is known as metaprogramming. In Appendix C, we discuss the derive
attribute, which generates an implementation of various traits for you. We’ve
also used the println! and vec! macros throughout the book. All of these
macros expand to produce more code than the code you’ve written manually.
Metaprogramming is useful for reducing the amount of code you have to write and maintain, which is also one of the roles of functions. However, macros have some additional powers that functions don’t.
A function signature must declare the number and type of parameters the
function has. Macros, on the other hand, can take a variable number of
parameters: we can call println!("hello") with one argument or
println!("hello {}", name) with two arguments. Also, macros are expanded
before the compiler interprets the meaning of the code, so a macro can, for
example, implement a trait on a given type. A function can’t, because it gets
called at runtime and a trait needs to be implemented at compile time.
The downside to implementing a macro instead of a function is that macro definitions are more complex than function definitions because you’re writing Rust code that writes Rust code. Due to this indirection, macro definitions are generally more difficult to read, understand, and maintain than function definitions.
Another important difference between macros and functions is that you must define macros or bring them into scope before you call them in a file, as opposed to functions you can define anywhere and call anywhere.
Declarative Macros with macro_rules! for General Metaprogramming
The most widely used form of macros in Rust is the declarative macro. These
are also sometimes referred to as “macros by example,” “macro_rules! macros,”
or just plain “macros.” At their core, declarative macros allow you to write
something similar to a Rust match expression. As discussed in Chapter 6,
match expressions are control structures that take an expression, compare the
resulting value of the expression to patterns, and then run the code associated
with the matching pattern. Macros also compare a value to patterns that are
associated with particular code: in this situation, the value is the literal
Rust source code passed to the macro; the patterns are compared with the
structure of that source code; and the code associated with each pattern, when
matched, replaces the code passed to the macro. This all happens during
compilation.
To define a macro, you use the macro_rules! construct. Let’s explore how to
use macro_rules! by looking at how the vec! macro is defined. Chapter 8
covered how we can use the vec! macro to create a new vector with particular
values. For example, the following macro creates a new vector containing three
integers:
#![allow(unused)] fn main() { let v: Vec<u32> = vec![1, 2, 3]; }
We could also use the vec! macro to make a vector of two integers or a vector
of five string slices. We wouldn’t be able to use a function to do the same
because we wouldn’t know the number or type of values up front.
Listing 19-28 shows a slightly simplified definition of the vec! macro.
Filename: src/lib.rs
#[macro_export]
macro_rules! vec {
( $( $x:expr ),* ) => {
{
let mut temp_vec = Vec::new();
$(
temp_vec.push($x);
)*
temp_vec
}
};
}Listing 19-28: A simplified version of the vec! macro
definition
Note: The actual definition of the
vec!macro in the standard library includes code to preallocate the correct amount of memory up front. That code is an optimization that we don’t include here to make the example simpler.
The #[macro_export] annotation indicates that this macro should be made
available whenever the crate in which the macro is defined is brought into
scope. Without this annotation, the macro can’t be brought into scope.
We then start the macro definition with macro_rules! and the name of the
macro we’re defining without the exclamation mark. The name, in this case
vec, is followed by curly brackets denoting the body of the macro definition.
The structure in the vec! body is similar to the structure of a match
expression. Here we have one arm with the pattern ( $( $x:expr ),* ),
followed by => and the block of code associated with this pattern. If the
pattern matches, the associated block of code will be emitted. Given that this
is the only pattern in this macro, there is only one valid way to match; any
other pattern will result in an error. More complex macros will have more than
one arm.
Valid pattern syntax in macro definitions is different than the pattern syntax covered in Chapter 18 because macro patterns are matched against Rust code structure rather than values. Let’s walk through what the pattern pieces in Listing 19-28 mean; for the full macro pattern syntax, see the Rust Reference.
First, we use a set of parentheses to encompass the whole pattern. We use a
dollar sign ($) to declare a variable in the macro system that will contain
the Rust code matching the pattern. The dollar sign makes it clear this is a
macro variable as opposed to a regular Rust variable. Next comes a set of
parentheses that captures values that match the pattern within the parentheses
for use in the replacement code. Within $() is $x:expr, which matches any
Rust expression and gives the expression the name $x.
The comma following $() indicates that a literal comma separator character
could optionally appear after the code that matches the code in $(). The *
specifies that the pattern matches zero or more of whatever precedes the *.
When we call this macro with vec![1, 2, 3];, the $x pattern matches three
times with the three expressions 1, 2, and 3.
Now let’s look at the pattern in the body of the code associated with this arm:
temp_vec.push() within $()* is generated for each part that matches $()
in the pattern zero or more times depending on how many times the pattern
matches. The $x is replaced with each expression matched. When we call this
macro with vec![1, 2, 3];, the code generated that replaces this macro call
will be the following:
{
let mut temp_vec = Vec::new();
temp_vec.push(1);
temp_vec.push(2);
temp_vec.push(3);
temp_vec
}We’ve defined a macro that can take any number of arguments of any type and can generate code to create a vector containing the specified elements.
To learn more about how to write macros, consult the online documentation or other resources, such as “The Little Book of Rust Macros” started by Daniel Keep and continued by Lukas Wirth.
Procedural Macros for Generating Code from Attributes
The second form of macros is the procedural macro, which acts more like a function (and is a type of procedure). Procedural macros accept some code as an input, operate on that code, and produce some code as an output rather than matching against patterns and replacing the code with other code as declarative macros do. The three kinds of procedural macros are custom derive, attribute-like, and function-like, and all work in a similar fashion.
When creating procedural macros, the definitions must reside in their own crate
with a special crate type. This is for complex technical reasons that we hope
to eliminate in the future. In Listing 19-29, we show how to define a
procedural macro, where some_attribute is a placeholder for using a specific
macro variety.
Filename: src/lib.rs
use proc_macro;
#[some_attribute]
pub fn some_name(input: TokenStream) -> TokenStream {
}Listing 19-29: An example of defining a procedural macro
The function that defines a procedural macro takes a TokenStream as an input
and produces a TokenStream as an output. The TokenStream type is defined by
the proc_macro crate that is included with Rust and represents a sequence of
tokens. This is the core of the macro: the source code that the macro is
operating on makes up the input TokenStream, and the code the macro produces
is the output TokenStream. The function also has an attribute attached to it
that specifies which kind of procedural macro we’re creating. We can have
multiple kinds of procedural macros in the same crate.
Let’s look at the different kinds of procedural macros. We’ll start with a custom derive macro and then explain the small dissimilarities that make the other forms different.
How to Write a Custom derive Macro
Let’s create a crate named hello_macro that defines a trait named
HelloMacro with one associated function named hello_macro. Rather than
making our users implement the HelloMacro trait for each of their types,
we’ll provide a procedural macro so users can annotate their type with
#[derive(HelloMacro)] to get a default implementation of the hello_macro
function. The default implementation will print Hello, Macro! My name is TypeName! where TypeName is the name of the type on which this trait has
been defined. In other words, we’ll write a crate that enables another
programmer to write code like Listing 19-30 using our crate.
Filename: src/main.rs
use hello_macro::HelloMacro;
use hello_macro_derive::HelloMacro;
#[derive(HelloMacro)]
struct Pancakes;
fn main() {
Pancakes::hello_macro();
}Listing 19-30: The code a user of our crate will be able to write when using our procedural macro
This code will print Hello, Macro! My name is Pancakes! when we’re done. The
first step is to make a new library crate, like this:
$ cargo new hello_macro --lib
Next, we’ll define the HelloMacro trait and its associated function:
Filename: src/lib.rs
pub trait HelloMacro {
fn hello_macro();
}We have a trait and its function. At this point, our crate user could implement the trait to achieve the desired functionality, like so:
use hello_macro::HelloMacro;
struct Pancakes;
impl HelloMacro for Pancakes {
fn hello_macro() {
println!("Hello, Macro! My name is Pancakes!");
}
}
fn main() {
Pancakes::hello_macro();
}However, they would need to write the implementation block for each type they
wanted to use with hello_macro; we want to spare them from having to do this
work.
Additionally, we can’t yet provide the hello_macro function with default
implementation that will print the name of the type the trait is implemented
on: Rust doesn’t have reflection capabilities, so it can’t look up the type’s
name at runtime. We need a macro to generate code at compile time.
The next step is to define the procedural macro. At the time of this writing,
procedural macros need to be in their own crate. Eventually, this restriction
might be lifted. The convention for structuring crates and macro crates is as
follows: for a crate named foo, a custom derive procedural macro crate is
called foo_derive. Let’s start a new crate called hello_macro_derive inside
our hello_macro project:
$ cargo new hello_macro_derive --lib
Our two crates are tightly related, so we create the procedural macro crate
within the directory of our hello_macro crate. If we change the trait
definition in hello_macro, we’ll have to change the implementation of the
procedural macro in hello_macro_derive as well. The two crates will need to
be published separately, and programmers using these crates will need to add
both as dependencies and bring them both into scope. We could instead have the
hello_macro crate use hello_macro_derive as a dependency and re-export the
procedural macro code. However, the way we’ve structured the project makes it
possible for programmers to use hello_macro even if they don’t want the
derive functionality.
We need to declare the hello_macro_derive crate as a procedural macro crate.
We’ll also need functionality from the syn and quote crates, as you’ll see
in a moment, so we need to add them as dependencies. Add the following to the
Cargo.toml file for hello_macro_derive:
Filename: hello_macro_derive/Cargo.toml
[lib]
proc-macro = true
[dependencies]
syn = "1.0"
quote = "1.0"
To start defining the procedural macro, place the code in Listing 19-31 into
your src/lib.rs file for the hello_macro_derive crate. Note that this code
won’t compile until we add a definition for the impl_hello_macro function.
Filename: hello_macro_derive/src/lib.rs
use proc_macro::TokenStream;
use quote::quote;
use syn;
#[proc_macro_derive(HelloMacro)]
pub fn hello_macro_derive(input: TokenStream) -> TokenStream {
// Construct a representation of Rust code as a syntax tree
// that we can manipulate
let ast = syn::parse(input).unwrap();
// Build the trait implementation
impl_hello_macro(&ast)
}Listing 19-31: Code that most procedural macro crates will require in order to process Rust code
Notice that we’ve split the code into the hello_macro_derive function, which
is responsible for parsing the TokenStream, and the impl_hello_macro
function, which is responsible for transforming the syntax tree: this makes
writing a procedural macro more convenient. The code in the outer function
(hello_macro_derive in this case) will be the same for almost every
procedural macro crate you see or create. The code you specify in the body of
the inner function (impl_hello_macro in this case) will be different
depending on your procedural macro’s purpose.
We’ve introduced three new crates: proc_macro, syn, and quote. The
proc_macro crate comes with Rust, so we didn’t need to add that to the
dependencies in Cargo.toml. The proc_macro crate is the compiler’s API that
allows us to read and manipulate Rust code from our code.
The syn crate parses Rust code from a string into a data structure that we
can perform operations on. The quote crate turns syn data structures back
into Rust code. These crates make it much simpler to parse any sort of Rust
code we might want to handle: writing a full parser for Rust code is no simple
task.
The hello_macro_derive function will be called when a user of our library
specifies #[derive(HelloMacro)] on a type. This is possible because we’ve
annotated the hello_macro_derive function here with proc_macro_derive and
specified the name HelloMacro, which matches our trait name; this is the
convention most procedural macros follow.
The hello_macro_derive function first converts the input from a
TokenStream to a data structure that we can then interpret and perform
operations on. This is where syn comes into play. The parse function in
syn takes a TokenStream and returns a DeriveInput struct representing the
parsed Rust code. Listing 19-32 shows the relevant parts of the DeriveInput
struct we get from parsing the struct Pancakes; string:
DeriveInput {
// --snip--
ident: Ident {
ident: "Pancakes",
span: #0 bytes(95..103)
},
data: Struct(
DataStruct {
struct_token: Struct,
fields: Unit,
semi_token: Some(
Semi
)
}
)
}Listing 19-32: The DeriveInput instance we get when
parsing the code that has the macro’s attribute in Listing 19-30
The fields of this struct show that the Rust code we’ve parsed is a unit struct
with the ident (identifier, meaning the name) of Pancakes. There are more
fields on this struct for describing all sorts of Rust code; check the syn
documentation for DeriveInput for more information.
Soon we’ll define the impl_hello_macro function, which is where we’ll build
the new Rust code we want to include. But before we do, note that the output
for our derive macro is also a TokenStream. The returned TokenStream is
added to the code that our crate users write, so when they compile their crate,
they’ll get the extra functionality that we provide in the modified
TokenStream.
You might have noticed that we’re calling unwrap to cause the
hello_macro_derive function to panic if the call to the syn::parse function
fails here. It’s necessary for our procedural macro to panic on errors because
proc_macro_derive functions must return TokenStream rather than Result to
conform to the procedural macro API. We’ve simplified this example by using
unwrap; in production code, you should provide more specific error messages
about what went wrong by using panic! or expect.
Now that we have the code to turn the annotated Rust code from a TokenStream
into a DeriveInput instance, let’s generate the code that implements the
HelloMacro trait on the annotated type, as shown in Listing 19-33.
Filename: hello_macro_derive/src/lib.rs
use proc_macro::TokenStream;
use quote::quote;
use syn;
#[proc_macro_derive(HelloMacro)]
pub fn hello_macro_derive(input: TokenStream) -> TokenStream {
// Construct a representation of Rust code as a syntax tree
// that we can manipulate
let ast = syn::parse(input).unwrap();
// Build the trait implementation
impl_hello_macro(&ast)
}
fn impl_hello_macro(ast: &syn::DeriveInput) -> TokenStream {
let name = &ast.ident;
let gen = quote! {
impl HelloMacro for #name {
fn hello_macro() {
println!("Hello, Macro! My name is {}!", stringify!(#name));
}
}
};
gen.into()
}Listing 19-33: Implementing the HelloMacro trait using
the parsed Rust code
We get an Ident struct instance containing the name (identifier) of the
annotated type using ast.ident. The struct in Listing 19-32 shows that when
we run the impl_hello_macro function on the code in Listing 19-30, the
ident we get will have the ident field with a value of "Pancakes". Thus,
the name variable in Listing 19-33 will contain an Ident struct instance
that, when printed, will be the string "Pancakes", the name of the struct in
Listing 19-30.
The quote! macro lets us define the Rust code that we want to return. The
compiler expects something different to the direct result of the quote!
macro’s execution, so we need to convert it to a TokenStream. We do this by
calling the into method, which consumes this intermediate representation and
returns a value of the required TokenStream type.
The quote! macro also provides some very cool templating mechanics: we can
enter #name, and quote! will replace it with the value in the variable
name. You can even do some repetition similar to the way regular macros work.
Check out the quote crate’s docs for a thorough introduction.
We want our procedural macro to generate an implementation of our HelloMacro
trait for the type the user annotated, which we can get by using #name. The
trait implementation has the one function hello_macro, whose body contains the
functionality we want to provide: printing Hello, Macro! My name is and then
the name of the annotated type.
The stringify! macro used here is built into Rust. It takes a Rust
expression, such as 1 + 2, and at compile time turns the expression into a
string literal, such as "1 + 2". This is different than format! or
println!, macros which evaluate the expression and then turn the result into
a String. There is a possibility that the #name input might be an
expression to print literally, so we use stringify!. Using stringify! also
saves an allocation by converting #name to a string literal at compile time.
At this point, cargo build should complete successfully in both hello_macro
and hello_macro_derive. Let’s hook up these crates to the code in Listing
19-30 to see the procedural macro in action! Create a new binary project in
your projects directory using cargo new pancakes. We need to add
hello_macro and hello_macro_derive as dependencies in the pancakes
crate’s Cargo.toml. If you’re publishing your versions of hello_macro and
hello_macro_derive to crates.io, they would be regular
dependencies; if not, you can specify them as path dependencies as follows:
hello_macro = { path = "../hello_macro" }
hello_macro_derive = { path = "../hello_macro/hello_macro_derive" }
Put the code in Listing 19-30 into src/main.rs, and run cargo run: it
should print Hello, Macro! My name is Pancakes! The implementation of the
HelloMacro trait from the procedural macro was included without the
pancakes crate needing to implement it; the #[derive(HelloMacro)] added the
trait implementation.
Next, let’s explore how the other kinds of procedural macros differ from custom derive macros.
Attribute-like macros
Attribute-like macros are similar to custom derive macros, but instead of
generating code for the derive attribute, they allow you to create new
attributes. They’re also more flexible: derive only works for structs and
enums; attributes can be applied to other items as well, such as functions.
Here’s an example of using an attribute-like macro: say you have an attribute
named route that annotates functions when using a web application framework:
#[route(GET, "/")]
fn index() {This #[route] attribute would be defined by the framework as a procedural
macro. The signature of the macro definition function would look like this:
#[proc_macro_attribute]
pub fn route(attr: TokenStream, item: TokenStream) -> TokenStream {Here, we have two parameters of type TokenStream. The first is for the
contents of the attribute: the GET, "/" part. The second is the body of the
item the attribute is attached to: in this case, fn index() {} and the rest
of the function’s body.
Other than that, attribute-like macros work the same way as custom derive
macros: you create a crate with the proc-macro crate type and implement a
function that generates the code you want!
Function-like macros
Function-like macros define macros that look like function calls. Similarly to
macro_rules! macros, they’re more flexible than functions; for example, they
can take an unknown number of arguments. However, macro_rules! macros can be
defined only using the match-like syntax we discussed in the section
“Declarative Macros with macro_rules! for General
Metaprogramming” earlier. Function-like macros take a
TokenStream parameter and their definition manipulates that TokenStream
using Rust code as the other two types of procedural macros do. An example of a
function-like macro is an sql! macro that might be called like so:
let sql = sql!(SELECT * FROM posts WHERE id=1);This macro would parse the SQL statement inside it and check that it’s
syntactically correct, which is much more complex processing than a
macro_rules! macro can do. The sql! macro would be defined like this:
#[proc_macro]
pub fn sql(input: TokenStream) -> TokenStream {This definition is similar to the custom derive macro’s signature: we receive the tokens that are inside the parentheses and return the code we wanted to generate.
Summary
Whew! Now you have some Rust features in your toolbox that you likely won’t use often, but you’ll know they’re available in very particular circumstances. We’ve introduced several complex topics so that when you encounter them in error message suggestions or in other peoples’ code, you’ll be able to recognize these concepts and syntax. Use this chapter as a reference to guide you to solutions.
Next, we’ll put everything we’ve discussed throughout the book into practice and do one more project!
Final Project: Building a Multithreaded Web Server
It’s been a long journey, but we’ve reached the end of the book. In this chapter, we’ll build one more project together to demonstrate some of the concepts we covered in the final chapters, as well as recap some earlier lessons.
For our final project, we’ll make a web server that says “hello” and looks like Figure 20-1 in a web browser.
Figure 20-1: Our final shared project
Here is our plan for building the web server:
- Learn a bit about TCP and HTTP.
- Listen for TCP connections on a socket.
- Parse a small number of HTTP requests.
- Create a proper HTTP response.
- Improve the throughput of our server with a thread pool.
Before we get started, we should mention one detail: the method we’ll use won’t be the best way to build a web server with Rust. Community members have published a number of production-ready crates available on crates.io that provide more complete web server and thread pool implementations than we’ll build. However, our intention in this chapter is to help you learn, not to take the easy route. Because Rust is a systems programming language, we can choose the level of abstraction we want to work with and can go to a lower level than is possible or practical in other languages. We’ll therefore write the basic HTTP server and thread pool manually so you can learn the general ideas and techniques behind the crates you might use in the future.
Building a Single-Threaded Web Server
We’ll start by getting a single-threaded web server working. Before we begin, let’s look at a quick overview of the protocols involved in building web servers. The details of these protocols are beyond the scope of this book, but a brief overview will give you the information you need.
The two main protocols involved in web servers are Hypertext Transfer Protocol (HTTP) and Transmission Control Protocol (TCP). Both protocols are request-response protocols, meaning a client initiates requests and a server listens to the requests and provides a response to the client. The contents of those requests and responses are defined by the protocols.
TCP is the lower-level protocol that describes the details of how information gets from one server to another but doesn’t specify what that information is. HTTP builds on top of TCP by defining the contents of the requests and responses. It’s technically possible to use HTTP with other protocols, but in the vast majority of cases, HTTP sends its data over TCP. We’ll work with the raw bytes of TCP and HTTP requests and responses.
Listening to the TCP Connection
Our web server needs to listen to a TCP connection, so that’s the first part
we’ll work on. The standard library offers a std::net module that lets us do
this. Let’s make a new project in the usual fashion:
$ cargo new hello
Created binary (application) `hello` project
$ cd hello
Now enter the code in Listing 20-1 in src/main.rs to start. This code will
listen at the local address 127.0.0.1:7878 for incoming TCP streams. When it
gets an incoming stream, it will print Connection established!.
Filename: src/main.rs
use std::net::TcpListener; fn main() { let listener = TcpListener::bind("127.0.0.1:7878").unwrap(); for stream in listener.incoming() { let stream = stream.unwrap(); println!("Connection established!"); } }
Listing 20-1: Listening for incoming streams and printing a message when we receive a stream
Using TcpListener, we can listen for TCP connections at the address
127.0.0.1:7878. In the address, the section before the colon is an IP address
representing your computer (this is the same on every computer and doesn’t
represent the authors’ computer specifically), and 7878 is the port. We’ve
chosen this port for two reasons: HTTP isn’t normally accepted on this port so
our server is unlikely to conflict with any other web server you might have
running on your machine, and 7878 is rust typed on a telephone.
The bind function in this scenario works like the new function in that it
will return a new TcpListener instance. The function is called bind
because, in networking, connecting to a port to listen to is known as “binding
to a port.”
The bind function returns a Result<T, E>, which indicates that it’s
possible for binding to fail. For example, connecting to port 80 requires
administrator privileges (nonadministrators can listen only on ports higher
than 1023), so if we tried to connect to port 80 without being an
administrator, binding wouldn’t work. Binding also wouldn’t work, for example,
if we ran two instances of our program and so had two programs listening to the
same port. Because we’re writing a basic server just for learning purposes, we
won’t worry about handling these kinds of errors; instead, we use unwrap to
stop the program if errors happen.
The incoming method on TcpListener returns an iterator that gives us a
sequence of streams (more specifically, streams of type TcpStream). A single
stream represents an open connection between the client and the server. A
connection is the name for the full request and response process in which a
client connects to the server, the server generates a response, and the server
closes the connection. As such, we will read from the TcpStream to see what
the client sent and then write our response to the stream to send data back to
the client. Overall, this for loop will process each connection in turn and
produce a series of streams for us to handle.
For now, our handling of the stream consists of calling unwrap to terminate
our program if the stream has any errors; if there aren’t any errors, the
program prints a message. We’ll add more functionality for the success case in
the next listing. The reason we might receive errors from the incoming method
when a client connects to the server is that we’re not actually iterating over
connections. Instead, we’re iterating over connection attempts. The
connection might not be successful for a number of reasons, many of them
operating system specific. For example, many operating systems have a limit to
the number of simultaneous open connections they can support; new connection
attempts beyond that number will produce an error until some of the open
connections are closed.
Let’s try running this code! Invoke cargo run in the terminal and then load
127.0.0.1:7878 in a web browser. The browser should show an error message
like “Connection reset,” because the server isn’t currently sending back any
data. But when you look at your terminal, you should see several messages that
were printed when the browser connected to the server!
Running `target/debug/hello`
Connection established!
Connection established!
Connection established!
Sometimes, you’ll see multiple messages printed for one browser request; the reason might be that the browser is making a request for the page as well as a request for other resources, like the favicon.ico icon that appears in the browser tab.
It could also be that the browser is trying to connect to the server multiple
times because the server isn’t responding with any data. When stream goes out
of scope and is dropped at the end of the loop, the connection is closed as
part of the drop implementation. Browsers sometimes deal with closed
connections by retrying, because the problem might be temporary. The important
factor is that we’ve successfully gotten a handle to a TCP connection!
Remember to stop the program by pressing ctrl-c
when you’re done running a particular version of the code. Then restart the
program by invoking the cargo run command after you’ve made each set of code
changes to make sure you’re running the newest code.
Reading the Request
Let’s implement the functionality to read the request from the browser! To
separate the concerns of first getting a connection and then taking some action
with the connection, we’ll start a new function for processing connections. In
this new handle_connection function, we’ll read data from the TCP stream and
print it so we can see the data being sent from the browser. Change the code to
look like Listing 20-2.
Filename: src/main.rs
use std::{ io::{prelude::*, BufReader}, net::{TcpListener, TcpStream}, }; fn main() { let listener = TcpListener::bind("127.0.0.1:7878").unwrap(); for stream in listener.incoming() { let stream = stream.unwrap(); handle_connection(stream); } } fn handle_connection(mut stream: TcpStream) { let buf_reader = BufReader::new(&mut stream); let http_request: Vec<_> = buf_reader .lines() .map(|result| result.unwrap()) .take_while(|line| !line.is_empty()) .collect(); println!("Request: {:#?}", http_request); }
Listing 20-2: Reading from the TcpStream and printing
the data
We bring std::io::prelude and std::io::BufReader into scope to get access
to traits and types that let us read from and write to the stream. In the for
loop in the main function, instead of printing a message that says we made a
connection, we now call the new handle_connection function and pass the
stream to it.
In the handle_connection function, we create a new BufReader instance that
wraps a mutable reference to the stream. BufReader adds buffering by
managing calls to the std::io::Read trait methods for us.
We create a variable named http_request to collect the lines of the request
the browser sends to our server. We indicate that we want to collect these
lines in a vector by adding the Vec<_> type annotation.
BufReader implements the std::io::BufRead trait, which provides the lines
method. The lines method returns an iterator of Result<String, std::io::Error> by splitting the stream of data whenever it sees a newline
byte. To get each String, we map and unwrap each Result. The Result
might be an error if the data isn’t valid UTF-8 or if there was a problem
reading from the stream. Again, a production program should handle these errors
more gracefully, but we’re choosing to stop the program in the error case for
simplicity.
The browser signals the end of an HTTP request by sending two newline characters in a row, so to get one request from the stream, we take lines until we get a line that is the empty string. Once we’ve collected the lines into the vector, we’re printing them out using pretty debug formatting so we can take a look at the instructions the web browser is sending to our server.
Let’s try this code! Start the program and make a request in a web browser again. Note that we’ll still get an error page in the browser, but our program’s output in the terminal will now look similar to this:
$ cargo run
Compiling hello v0.1.0 (file:///projects/hello)
Finished dev [unoptimized + debuginfo] target(s) in 0.42s
Running `target/debug/hello`
Request: [
"GET / HTTP/1.1",
"Host: 127.0.0.1:7878",
"User-Agent: Mozilla/5.0 (Macintosh; Intel Mac OS X 10.15; rv:99.0) Gecko/20100101 Firefox/99.0",
"Accept: text/html,application/xhtml+xml,application/xml;q=0.9,image/avif,image/webp,*/*;q=0.8",
"Accept-Language: en-US,en;q=0.5",
"Accept-Encoding: gzip, deflate, br",
"DNT: 1",
"Connection: keep-alive",
"Upgrade-Insecure-Requests: 1",
"Sec-Fetch-Dest: document",
"Sec-Fetch-Mode: navigate",
"Sec-Fetch-Site: none",
"Sec-Fetch-User: ?1",
"Cache-Control: max-age=0",
]
Depending on your browser, you might get slightly different output. Now that
we’re printing the request data, we can see why we get multiple connections
from one browser request by looking at the path after GET in the first line
of the request. If the repeated connections are all requesting /, we know the
browser is trying to fetch / repeatedly because it’s not getting a response
from our program.
Let’s break down this request data to understand what the browser is asking of our program.
A Closer Look at an HTTP Request
HTTP is a text-based protocol, and a request takes this format:
Method Request-URI HTTP-Version CRLF
headers CRLF
message-body
The first line is the request line that holds information about what the
client is requesting. The first part of the request line indicates the method
being used, such as GET or POST, which describes how the client is making
this request. Our client used a GET request, which means it is asking for
information.
The next part of the request line is /, which indicates the Uniform Resource Identifier (URI) the client is requesting: a URI is almost, but not quite, the same as a Uniform Resource Locator (URL). The difference between URIs and URLs isn’t important for our purposes in this chapter, but the HTTP spec uses the term URI, so we can just mentally substitute URL for URI here.
The last part is the HTTP version the client uses, and then the request line
ends in a CRLF sequence. (CRLF stands for carriage return and line feed,
which are terms from the typewriter days!) The CRLF sequence can also be
written as \r\n, where \r is a carriage return and \n is a line feed. The
CRLF sequence separates the request line from the rest of the request data.
Note that when the CRLF is printed, we see a new line start rather than \r\n.
Looking at the request line data we received from running our program so far,
we see that GET is the method, / is the request URI, and HTTP/1.1 is the
version.
After the request line, the remaining lines starting from Host: onward are
headers. GET requests have no body.
Try making a request from a different browser or asking for a different address, such as 127.0.0.1:7878/test, to see how the request data changes.
Now that we know what the browser is asking for, let’s send back some data!
Writing a Response
We’re going to implement sending data in response to a client request. Responses have the following format:
HTTP-Version Status-Code Reason-Phrase CRLF
headers CRLF
message-body
The first line is a status line that contains the HTTP version used in the response, a numeric status code that summarizes the result of the request, and a reason phrase that provides a text description of the status code. After the CRLF sequence are any headers, another CRLF sequence, and the body of the response.
Here is an example response that uses HTTP version 1.1, has a status code of 200, an OK reason phrase, no headers, and no body:
HTTP/1.1 200 OK\r\n\r\n
The status code 200 is the standard success response. The text is a tiny
successful HTTP response. Let’s write this to the stream as our response to a
successful request! From the handle_connection function, remove the
println! that was printing the request data and replace it with the code in
Listing 20-3.
Filename: src/main.rs
use std::{ io::{prelude::*, BufReader}, net::{TcpListener, TcpStream}, }; fn main() { let listener = TcpListener::bind("127.0.0.1:7878").unwrap(); for stream in listener.incoming() { let stream = stream.unwrap(); handle_connection(stream); } } fn handle_connection(mut stream: TcpStream) { let buf_reader = BufReader::new(&mut stream); let http_request: Vec<_> = buf_reader .lines() .map(|result| result.unwrap()) .take_while(|line| !line.is_empty()) .collect(); let response = "HTTP/1.1 200 OK\r\n\r\n"; stream.write_all(response.as_bytes()).unwrap(); }
Listing 20-3: Writing a tiny successful HTTP response to the stream
The first new line defines the response variable that holds the success
message’s data. Then we call as_bytes on our response to convert the string
data to bytes. The write_all method on stream takes a &[u8] and sends
those bytes directly down the connection. Because the write_all operation
could fail, we use unwrap on any error result as before. Again, in a real
application you would add error handling here.
With these changes, let’s run our code and make a request. We’re no longer printing any data to the terminal, so we won’t see any output other than the output from Cargo. When you load 127.0.0.1:7878 in a web browser, you should get a blank page instead of an error. You’ve just hand-coded receiving an HTTP request and sending a response!
Returning Real HTML
Let’s implement the functionality for returning more than a blank page. Create the new file hello.html in the root of your project directory, not in the src directory. You can input any HTML you want; Listing 20-4 shows one possibility.
Filename: hello.html
<!DOCTYPE html>
<html lang="en">
<head>
<meta charset="utf-8">
<title>Hello!</title>
</head>
<body>
<h1>Hello!</h1>
<p>Hi from Rust</p>
</body>
</html>
Listing 20-4: A sample HTML file to return in a response
This is a minimal HTML5 document with a heading and some text. To return this
from the server when a request is received, we’ll modify handle_connection as
shown in Listing 20-5 to read the HTML file, add it to the response as a body,
and send it.
Filename: src/main.rs
use std::{ fs, io::{prelude::*, BufReader}, net::{TcpListener, TcpStream}, }; // --snip-- fn main() { let listener = TcpListener::bind("127.0.0.1:7878").unwrap(); for stream in listener.incoming() { let stream = stream.unwrap(); handle_connection(stream); } } fn handle_connection(mut stream: TcpStream) { let buf_reader = BufReader::new(&mut stream); let http_request: Vec<_> = buf_reader .lines() .map(|result| result.unwrap()) .take_while(|line| !line.is_empty()) .collect(); let status_line = "HTTP/1.1 200 OK"; let contents = fs::read_to_string("hello.html").unwrap(); let length = contents.len(); let response = format!("{status_line}\r\nContent-Length: {length}\r\n\r\n{contents}"); stream.write_all(response.as_bytes()).unwrap(); }
Listing 20-5: Sending the contents of hello.html as the body of the response
We’ve added fs to the use statement to bring the standard library’s
filesystem module into scope. The code for reading the contents of a file to a
string should look familiar; we used it in Chapter 12 when we read the contents
of a file for our I/O project in Listing 12-4.
Next, we use format! to add the file’s contents as the body of the success
response. To ensure a valid HTTP response, we add the Content-Length header
which is set to the size of our response body, in this case the size of
hello.html.
Run this code with cargo run and load 127.0.0.1:7878 in your browser; you
should see your HTML rendered!
Currently, we’re ignoring the request data in http_request and just sending
back the contents of the HTML file unconditionally. That means if you try
requesting 127.0.0.1:7878/something-else in your browser, you’ll still get
back this same HTML response. At the moment, our server is very limited and
does not do what most web servers do. We want to customize our responses
depending on the request and only send back the HTML file for a well-formed
request to /.
Validating the Request and Selectively Responding
Right now, our web server will return the HTML in the file no matter what the
client requested. Let’s add functionality to check that the browser is
requesting / before returning the HTML file and return an error if the
browser requests anything else. For this we need to modify handle_connection,
as shown in Listing 20-6. This new code checks the content of the request
received against what we know a request for / looks like and adds if and
else blocks to treat requests differently.
Filename: src/main.rs
use std::{ fs, io::{prelude::*, BufReader}, net::{TcpListener, TcpStream}, }; fn main() { let listener = TcpListener::bind("127.0.0.1:7878").unwrap(); for stream in listener.incoming() { let stream = stream.unwrap(); handle_connection(stream); } } // --snip-- fn handle_connection(mut stream: TcpStream) { let buf_reader = BufReader::new(&mut stream); let request_line = buf_reader.lines().next().unwrap().unwrap(); if request_line == "GET / HTTP/1.1" { let status_line = "HTTP/1.1 200 OK"; let contents = fs::read_to_string("hello.html").unwrap(); let length = contents.len(); let response = format!( "{status_line}\r\nContent-Length: {length}\r\n\r\n{contents}" ); stream.write_all(response.as_bytes()).unwrap(); } else { // some other request } }
Listing 20-6: Handling requests to / differently from other requests
We’re only going to be looking at the first line of the HTTP request, so rather
than reading the entire request into a vector, we’re calling next to get the
first item from the iterator. The first unwrap takes care of the Option and
stops the program if the iterator has no items. The second unwrap handles the
Result and has the same effect as the unwrap that was in the map added in
Listing 20-2.
Next, we check the request_line to see if it equals the request line of a GET
request to the / path. If it does, the if block returns the contents of our
HTML file.
If the request_line does not equal the GET request to the / path, it
means we’ve received some other request. We’ll add code to the else block in
a moment to respond to all other requests.
Run this code now and request 127.0.0.1:7878; you should get the HTML in hello.html. If you make any other request, such as 127.0.0.1:7878/something-else, you’ll get a connection error like those you saw when running the code in Listing 20-1 and Listing 20-2.
Now let’s add the code in Listing 20-7 to the else block to return a response
with the status code 404, which signals that the content for the request was
not found. We’ll also return some HTML for a page to render in the browser
indicating the response to the end user.
Filename: src/main.rs
use std::{ fs, io::{prelude::*, BufReader}, net::{TcpListener, TcpStream}, }; fn main() { let listener = TcpListener::bind("127.0.0.1:7878").unwrap(); for stream in listener.incoming() { let stream = stream.unwrap(); handle_connection(stream); } } fn handle_connection(mut stream: TcpStream) { let buf_reader = BufReader::new(&mut stream); let request_line = buf_reader.lines().next().unwrap().unwrap(); if request_line == "GET / HTTP/1.1" { let status_line = "HTTP/1.1 200 OK"; let contents = fs::read_to_string("hello.html").unwrap(); let length = contents.len(); let response = format!( "{status_line}\r\nContent-Length: {length}\r\n\r\n{contents}" ); stream.write_all(response.as_bytes()).unwrap(); // --snip-- } else { let status_line = "HTTP/1.1 404 NOT FOUND"; let contents = fs::read_to_string("404.html").unwrap(); let length = contents.len(); let response = format!( "{status_line}\r\nContent-Length: {length}\r\n\r\n{contents}" ); stream.write_all(response.as_bytes()).unwrap(); } }
Listing 20-7: Responding with status code 404 and an error page if anything other than / was requested
Here, our response has a status line with status code 404 and the reason phrase
NOT FOUND. The body of the response will be the HTML in the file 404.html.
You’ll need to create a 404.html file next to hello.html for the error
page; again feel free to use any HTML you want or use the example HTML in
Listing 20-8.
Filename: 404.html
<!DOCTYPE html>
<html lang="en">
<head>
<meta charset="utf-8">
<title>Hello!</title>
</head>
<body>
<h1>Oops!</h1>
<p>Sorry, I don't know what you're asking for.</p>
</body>
</html>
Listing 20-8: Sample content for the page to send back with any 404 response
With these changes, run your server again. Requesting 127.0.0.1:7878 should return the contents of hello.html, and any other request, like 127.0.0.1:7878/foo, should return the error HTML from 404.html.
A Touch of Refactoring
At the moment the if and else blocks have a lot of repetition: they’re both
reading files and writing the contents of the files to the stream. The only
differences are the status line and the filename. Let’s make the code more
concise by pulling out those differences into separate if and else lines
that will assign the values of the status line and the filename to variables;
we can then use those variables unconditionally in the code to read the file
and write the response. Listing 20-9 shows the resulting code after replacing
the large if and else blocks.
Filename: src/main.rs
use std::{ fs, io::{prelude::*, BufReader}, net::{TcpListener, TcpStream}, }; fn main() { let listener = TcpListener::bind("127.0.0.1:7878").unwrap(); for stream in listener.incoming() { let stream = stream.unwrap(); handle_connection(stream); } } // --snip-- fn handle_connection(mut stream: TcpStream) { // --snip-- let buf_reader = BufReader::new(&mut stream); let request_line = buf_reader.lines().next().unwrap().unwrap(); let (status_line, filename) = if request_line == "GET / HTTP/1.1" { ("HTTP/1.1 200 OK", "hello.html") } else { ("HTTP/1.1 404 NOT FOUND", "404.html") }; let contents = fs::read_to_string(filename).unwrap(); let length = contents.len(); let response = format!("{status_line}\r\nContent-Length: {length}\r\n\r\n{contents}"); stream.write_all(response.as_bytes()).unwrap(); }
Listing 20-9: Refactoring the if and else blocks to
contain only the code that differs between the two cases
Now the if and else blocks only return the appropriate values for the
status line and filename in a tuple; we then use destructuring to assign these
two values to status_line and filename using a pattern in the let
statement, as discussed in Chapter 18.
The previously duplicated code is now outside the if and else blocks and
uses the status_line and filename variables. This makes it easier to see
the difference between the two cases, and it means we have only one place to
update the code if we want to change how the file reading and response writing
work. The behavior of the code in Listing 20-9 will be the same as that in
Listing 20-8.
Awesome! We now have a simple web server in approximately 40 lines of Rust code that responds to one request with a page of content and responds to all other requests with a 404 response.
Currently, our server runs in a single thread, meaning it can only serve one request at a time. Let’s examine how that can be a problem by simulating some slow requests. Then we’ll fix it so our server can handle multiple requests at once.
Turning Our Single-Threaded Server into a Multithreaded Server
Right now, the server will process each request in turn, meaning it won’t process a second connection until the first is finished processing. If the server received more and more requests, this serial execution would be less and less optimal. If the server receives a request that takes a long time to process, subsequent requests will have to wait until the long request is finished, even if the new requests can be processed quickly. We’ll need to fix this, but first, we’ll look at the problem in action.
Simulating a Slow Request in the Current Server Implementation
We’ll look at how a slow-processing request can affect other requests made to our current server implementation. Listing 20-10 implements handling a request to /sleep with a simulated slow response that will cause the server to sleep for 5 seconds before responding.
Filename: src/main.rs
use std::{ fs, io::{prelude::*, BufReader}, net::{TcpListener, TcpStream}, thread, time::Duration, }; // --snip-- fn main() { let listener = TcpListener::bind("127.0.0.1:7878").unwrap(); for stream in listener.incoming() { let stream = stream.unwrap(); handle_connection(stream); } } fn handle_connection(mut stream: TcpStream) { // --snip-- let buf_reader = BufReader::new(&mut stream); let request_line = buf_reader.lines().next().unwrap().unwrap(); let (status_line, filename) = match &request_line[..] { "GET / HTTP/1.1" => ("HTTP/1.1 200 OK", "hello.html"), "GET /sleep HTTP/1.1" => { thread::sleep(Duration::from_secs(5)); ("HTTP/1.1 200 OK", "hello.html") } _ => ("HTTP/1.1 404 NOT FOUND", "404.html"), }; // --snip-- let contents = fs::read_to_string(filename).unwrap(); let length = contents.len(); let response = format!("{status_line}\r\nContent-Length: {length}\r\n\r\n{contents}"); stream.write_all(response.as_bytes()).unwrap(); }
Listing 20-10: Simulating a slow request by sleeping for 5 seconds
We switched from if to match now that we have three cases. We need to
explicitly match on a slice of request_line to pattern match against the
string literal values; match doesn’t do automatic referencing and
dereferencing like the equality method does.
The first arm is the same as the if block from Listing 20-9. The second arm
matches a request to /sleep. When that request is received, the server will
sleep for 5 seconds before rendering the successful HTML page. The third arm is
the same as the else block from Listing 20-9.
You can see how primitive our server is: real libraries would handle the recognition of multiple requests in a much less verbose way!
Start the server using cargo run. Then open two browser windows: one for
http://127.0.0.1:7878/ and the other for http://127.0.0.1:7878/sleep. If
you enter the / URI a few times, as before, you’ll see it respond quickly.
But if you enter /sleep and then load /, you’ll see that / waits until
sleep has slept for its full 5 seconds before loading.
There are multiple techniques we could use to avoid requests backing up behind a slow request; the one we’ll implement is a thread pool.
Improving Throughput with a Thread Pool
A thread pool is a group of spawned threads that are waiting and ready to handle a task. When the program receives a new task, it assigns one of the threads in the pool to the task, and that thread will process the task. The remaining threads in the pool are available to handle any other tasks that come in while the first thread is processing. When the first thread is done processing its task, it’s returned to the pool of idle threads, ready to handle a new task. A thread pool allows you to process connections concurrently, increasing the throughput of your server.
We’ll limit the number of threads in the pool to a small number to protect us from Denial of Service (DoS) attacks; if we had our program create a new thread for each request as it came in, someone making 10 million requests to our server could create havoc by using up all our server’s resources and grinding the processing of requests to a halt.
Rather than spawning unlimited threads, then, we’ll have a fixed number of
threads waiting in the pool. Requests that come in are sent to the pool for
processing. The pool will maintain a queue of incoming requests. Each of the
threads in the pool will pop off a request from this queue, handle the request,
and then ask the queue for another request. With this design, we can process up
to N requests concurrently, where N is the number of threads. If each
thread is responding to a long-running request, subsequent requests can still
back up in the queue, but we’ve increased the number of long-running requests
we can handle before reaching that point.
This technique is just one of many ways to improve the throughput of a web server. Other options you might explore are the fork/join model, the single-threaded async I/O model, or the multi-threaded async I/O model. If you’re interested in this topic, you can read more about other solutions and try to implement them; with a low-level language like Rust, all of these options are possible.
Before we begin implementing a thread pool, let’s talk about what using the pool should look like. When you’re trying to design code, writing the client interface first can help guide your design. Write the API of the code so it’s structured in the way you want to call it; then implement the functionality within that structure rather than implementing the functionality and then designing the public API.
Similar to how we used test-driven development in the project in Chapter 12, we’ll use compiler-driven development here. We’ll write the code that calls the functions we want, and then we’ll look at errors from the compiler to determine what we should change next to get the code to work. Before we do that, however, we’ll explore the technique we’re not going to use as a starting point.
Spawning a Thread for Each Request
First, let’s explore how our code might look if it did create a new thread for
every connection. As mentioned earlier, this isn’t our final plan due to the
problems with potentially spawning an unlimited number of threads, but it is a
starting point to get a working multithreaded server first. Then we’ll add the
thread pool as an improvement, and contrasting the two solutions will be
easier. Listing 20-11 shows the changes to make to main to spawn a new thread
to handle each stream within the for loop.
Filename: src/main.rs
use std::{ fs, io::{prelude::*, BufReader}, net::{TcpListener, TcpStream}, thread, time::Duration, }; fn main() { let listener = TcpListener::bind("127.0.0.1:7878").unwrap(); for stream in listener.incoming() { let stream = stream.unwrap(); thread::spawn(|| { handle_connection(stream); }); } } fn handle_connection(mut stream: TcpStream) { let buf_reader = BufReader::new(&mut stream); let request_line = buf_reader.lines().next().unwrap().unwrap(); let (status_line, filename) = match &request_line[..] { "GET / HTTP/1.1" => ("HTTP/1.1 200 OK", "hello.html"), "GET /sleep HTTP/1.1" => { thread::sleep(Duration::from_secs(5)); ("HTTP/1.1 200 OK", "hello.html") } _ => ("HTTP/1.1 404 NOT FOUND", "404.html"), }; let contents = fs::read_to_string(filename).unwrap(); let length = contents.len(); let response = format!("{status_line}\r\nContent-Length: {length}\r\n\r\n{contents}"); stream.write_all(response.as_bytes()).unwrap(); }
Listing 20-11: Spawning a new thread for each stream
As you learned in Chapter 16, thread::spawn will create a new thread and then
run the code in the closure in the new thread. If you run this code and load
/sleep in your browser, then / in two more browser tabs, you’ll indeed see
that the requests to / don’t have to wait for /sleep to finish. However, as
we mentioned, this will eventually overwhelm the system because you’d be making
new threads without any limit.
Creating a Finite Number of Threads
We want our thread pool to work in a similar, familiar way so switching from
threads to a thread pool doesn’t require large changes to the code that uses
our API. Listing 20-12 shows the hypothetical interface for a ThreadPool
struct we want to use instead of thread::spawn.
Filename: src/main.rs
use std::{
fs,
io::{prelude::*, BufReader},
net::{TcpListener, TcpStream},
thread,
time::Duration,
};
fn main() {
let listener = TcpListener::bind("127.0.0.1:7878").unwrap();
let pool = ThreadPool::new(4);
for stream in listener.incoming() {
let stream = stream.unwrap();
pool.execute(|| {
handle_connection(stream);
});
}
}
fn handle_connection(mut stream: TcpStream) {
let buf_reader = BufReader::new(&mut stream);
let request_line = buf_reader.lines().next().unwrap().unwrap();
let (status_line, filename) = match &request_line[..] {
"GET / HTTP/1.1" => ("HTTP/1.1 200 OK", "hello.html"),
"GET /sleep HTTP/1.1" => {
thread::sleep(Duration::from_secs(5));
("HTTP/1.1 200 OK", "hello.html")
}
_ => ("HTTP/1.1 404 NOT FOUND", "404.html"),
};
let contents = fs::read_to_string(filename).unwrap();
let length = contents.len();
let response =
format!("{status_line}\r\nContent-Length: {length}\r\n\r\n{contents}");
stream.write_all(response.as_bytes()).unwrap();
}Listing 20-12: Our ideal ThreadPool interface
We use ThreadPool::new to create a new thread pool with a configurable number
of threads, in this case four. Then, in the for loop, pool.execute has a
similar interface as thread::spawn in that it takes a closure the pool should
run for each stream. We need to implement pool.execute so it takes the
closure and gives it to a thread in the pool to run. This code won’t yet
compile, but we’ll try so the compiler can guide us in how to fix it.
Building ThreadPool Using Compiler Driven Development
Make the changes in Listing 20-12 to src/main.rs, and then let’s use the
compiler errors from cargo check to drive our development. Here is the first
error we get:
$ cargo check
Checking hello v0.1.0 (file:///projects/hello)
error[E0433]: failed to resolve: use of undeclared type `ThreadPool`
--> src/main.rs:11:16
|
11 | let pool = ThreadPool::new(4);
| ^^^^^^^^^^ use of undeclared type `ThreadPool`
For more information about this error, try `rustc --explain E0433`.
error: could not compile `hello` due to previous error
Great! This error tells us we need a ThreadPool type or module, so we’ll
build one now. Our ThreadPool implementation will be independent of the kind
of work our web server is doing. So, let’s switch the hello crate from a
binary crate to a library crate to hold our ThreadPool implementation. After
we change to a library crate, we could also use the separate thread pool
library for any work we want to do using a thread pool, not just for serving
web requests.
Create a src/lib.rs that contains the following, which is the simplest
definition of a ThreadPool struct that we can have for now:
Filename: src/lib.rs
pub struct ThreadPool;Then edit main.rs file to bring ThreadPool into scope from the library
crate by adding the following code to the top of src/main.rs:
Filename: src/main.rs
use hello::ThreadPool;
use std::{
fs,
io::{prelude::*, BufReader},
net::{TcpListener, TcpStream},
thread,
time::Duration,
};
fn main() {
let listener = TcpListener::bind("127.0.0.1:7878").unwrap();
let pool = ThreadPool::new(4);
for stream in listener.incoming() {
let stream = stream.unwrap();
pool.execute(|| {
handle_connection(stream);
});
}
}
fn handle_connection(mut stream: TcpStream) {
let buf_reader = BufReader::new(&mut stream);
let request_line = buf_reader.lines().next().unwrap().unwrap();
let (status_line, filename) = match &request_line[..] {
"GET / HTTP/1.1" => ("HTTP/1.1 200 OK", "hello.html"),
"GET /sleep HTTP/1.1" => {
thread::sleep(Duration::from_secs(5));
("HTTP/1.1 200 OK", "hello.html")
}
_ => ("HTTP/1.1 404 NOT FOUND", "404.html"),
};
let contents = fs::read_to_string(filename).unwrap();
let length = contents.len();
let response =
format!("{status_line}\r\nContent-Length: {length}\r\n\r\n{contents}");
stream.write_all(response.as_bytes()).unwrap();
}This code still won’t work, but let’s check it again to get the next error that we need to address:
$ cargo check
Checking hello v0.1.0 (file:///projects/hello)
error[E0599]: no function or associated item named `new` found for struct `ThreadPool` in the current scope
--> src/main.rs:12:28
|
12 | let pool = ThreadPool::new(4);
| ^^^ function or associated item not found in `ThreadPool`
For more information about this error, try `rustc --explain E0599`.
error: could not compile `hello` due to previous error
This error indicates that next we need to create an associated function named
new for ThreadPool. We also know that new needs to have one parameter
that can accept 4 as an argument and should return a ThreadPool instance.
Let’s implement the simplest new function that will have those
characteristics:
Filename: src/lib.rs
pub struct ThreadPool;
impl ThreadPool {
pub fn new(size: usize) -> ThreadPool {
ThreadPool
}
}We chose usize as the type of the size parameter, because we know that a
negative number of threads doesn’t make any sense. We also know we’ll use this
4 as the number of elements in a collection of threads, which is what the
usize type is for, as discussed in the “Integer Types” section of Chapter 3.
Let’s check the code again:
$ cargo check
Checking hello v0.1.0 (file:///projects/hello)
error[E0599]: no method named `execute` found for struct `ThreadPool` in the current scope
--> src/main.rs:17:14
|
17 | pool.execute(|| {
| ^^^^^^^ method not found in `ThreadPool`
For more information about this error, try `rustc --explain E0599`.
error: could not compile `hello` due to previous error
Now the error occurs because we don’t have an execute method on ThreadPool.
Recall from the “Creating a Finite Number of
Threads” section that we
decided our thread pool should have an interface similar to thread::spawn. In
addition, we’ll implement the execute function so it takes the closure it’s
given and gives it to an idle thread in the pool to run.
We’ll define the execute method on ThreadPool to take a closure as a
parameter. Recall from the “Moving Captured Values Out of the Closure and the
Fn Traits” section in Chapter 13 that we can take
closures as parameters with three different traits: Fn, FnMut, and
FnOnce. We need to decide which kind of closure to use here. We know we’ll
end up doing something similar to the standard library thread::spawn
implementation, so we can look at what bounds the signature of thread::spawn
has on its parameter. The documentation shows us the following:
pub fn spawn<F, T>(f: F) -> JoinHandle<T>
where
F: FnOnce() -> T,
F: Send + 'static,
T: Send + 'static,The F type parameter is the one we’re concerned with here; the T type
parameter is related to the return value, and we’re not concerned with that. We
can see that spawn uses FnOnce as the trait bound on F. This is probably
what we want as well, because we’ll eventually pass the argument we get in
execute to spawn. We can be further confident that FnOnce is the trait we
want to use because the thread for running a request will only execute that
request’s closure one time, which matches the Once in FnOnce.
The F type parameter also has the trait bound Send and the lifetime bound
'static, which are useful in our situation: we need Send to transfer the
closure from one thread to another and 'static because we don’t know how long
the thread will take to execute. Let’s create an execute method on
ThreadPool that will take a generic parameter of type F with these bounds:
Filename: src/lib.rs
pub struct ThreadPool;
impl ThreadPool {
// --snip--
pub fn new(size: usize) -> ThreadPool {
ThreadPool
}
pub fn execute<F>(&self, f: F)
where
F: FnOnce() + Send + 'static,
{
}
}We still use the () after FnOnce because this FnOnce represents a closure
that takes no parameters and returns the unit type (). Just like function
definitions, the return type can be omitted from the signature, but even if we
have no parameters, we still need the parentheses.
Again, this is the simplest implementation of the execute method: it does
nothing, but we’re trying only to make our code compile. Let’s check it again:
$ cargo check
Checking hello v0.1.0 (file:///projects/hello)
Finished dev [unoptimized + debuginfo] target(s) in 0.24s
It compiles! But note that if you try cargo run and make a request in the
browser, you’ll see the errors in the browser that we saw at the beginning of
the chapter. Our library isn’t actually calling the closure passed to execute
yet!
Note: A saying you might hear about languages with strict compilers, such as Haskell and Rust, is “if the code compiles, it works.” But this saying is not universally true. Our project compiles, but it does absolutely nothing! If we were building a real, complete project, this would be a good time to start writing unit tests to check that the code compiles and has the behavior we want.
Validating the Number of Threads in new
We aren’t doing anything with the parameters to new and execute. Let’s
implement the bodies of these functions with the behavior we want. To start,
let’s think about new. Earlier we chose an unsigned type for the size
parameter, because a pool with a negative number of threads makes no sense.
However, a pool with zero threads also makes no sense, yet zero is a perfectly
valid usize. We’ll add code to check that size is greater than zero before
we return a ThreadPool instance and have the program panic if it receives a
zero by using the assert! macro, as shown in Listing 20-13.
Filename: src/lib.rs
pub struct ThreadPool;
impl ThreadPool {
/// Create a new ThreadPool.
///
/// The size is the number of threads in the pool.
///
/// # Panics
///
/// The `new` function will panic if the size is zero.
pub fn new(size: usize) -> ThreadPool {
assert!(size > 0);
ThreadPool
}
// --snip--
pub fn execute<F>(&self, f: F)
where
F: FnOnce() + Send + 'static,
{
}
}Listing 20-13: Implementing ThreadPool::new to panic if
size is zero
We’ve also added some documentation for our ThreadPool with doc comments.
Note that we followed good documentation practices by adding a section that
calls out the situations in which our function can panic, as discussed in
Chapter 14. Try running cargo doc --open and clicking the ThreadPool struct
to see what the generated docs for new look like!
Instead of adding the assert! macro as we’ve done here, we could change new
into build and return a Result like we did with Config::build in the I/O
project in Listing 12-9. But we’ve decided in this case that trying to create a
thread pool without any threads should be an unrecoverable error. If you’re
feeling ambitious, try to write a function named build with the following
signature to compare with the new function:
pub fn build(size: usize) -> Result<ThreadPool, PoolCreationError> {Creating Space to Store the Threads
Now that we have a way to know we have a valid number of threads to store in
the pool, we can create those threads and store them in the ThreadPool struct
before returning the struct. But how do we “store” a thread? Let’s take another
look at the thread::spawn signature:
pub fn spawn<F, T>(f: F) -> JoinHandle<T>
where
F: FnOnce() -> T,
F: Send + 'static,
T: Send + 'static,The spawn function returns a JoinHandle<T>, where T is the type that the
closure returns. Let’s try using JoinHandle too and see what happens. In our
case, the closures we’re passing to the thread pool will handle the connection
and not return anything, so T will be the unit type ().
The code in Listing 20-14 will compile but doesn’t create any threads yet.
We’ve changed the definition of ThreadPool to hold a vector of
thread::JoinHandle<()> instances, initialized the vector with a capacity of
size, set up a for loop that will run some code to create the threads, and
returned a ThreadPool instance containing them.
Filename: src/lib.rs
use std::thread;
pub struct ThreadPool {
threads: Vec<thread::JoinHandle<()>>,
}
impl ThreadPool {
// --snip--
/// Create a new ThreadPool.
///
/// The size is the number of threads in the pool.
///
/// # Panics
///
/// The `new` function will panic if the size is zero.
pub fn new(size: usize) -> ThreadPool {
assert!(size > 0);
let mut threads = Vec::with_capacity(size);
for _ in 0..size {
// create some threads and store them in the vector
}
ThreadPool { threads }
}
// --snip--
pub fn execute<F>(&self, f: F)
where
F: FnOnce() + Send + 'static,
{
}
}Listing 20-14: Creating a vector for ThreadPool to hold
the threads
We’ve brought std::thread into scope in the library crate, because we’re
using thread::JoinHandle as the type of the items in the vector in
ThreadPool.
Once a valid size is received, our ThreadPool creates a new vector that can
hold size items. The with_capacity function performs the same task as
Vec::new but with an important difference: it preallocates space in the
vector. Because we know we need to store size elements in the vector, doing
this allocation up front is slightly more efficient than using Vec::new,
which resizes itself as elements are inserted.
When you run cargo check again, it should succeed.
A Worker Struct Responsible for Sending Code from the ThreadPool to a Thread
We left a comment in the for loop in Listing 20-14 regarding the creation of
threads. Here, we’ll look at how we actually create threads. The standard
library provides thread::spawn as a way to create threads, and
thread::spawn expects to get some code the thread should run as soon as the
thread is created. However, in our case, we want to create the threads and have
them wait for code that we’ll send later. The standard library’s
implementation of threads doesn’t include any way to do that; we have to
implement it manually.
We’ll implement this behavior by introducing a new data structure between the
ThreadPool and the threads that will manage this new behavior. We’ll call
this data structure Worker, which is a common term in pooling
implementations. The Worker picks up code that needs to be run and runs the
code in the Worker’s thread. Think of people working in the kitchen at a
restaurant: the workers wait until orders come in from customers, and then
they’re responsible for taking those orders and fulfilling them.
Instead of storing a vector of JoinHandle<()> instances in the thread pool,
we’ll store instances of the Worker struct. Each Worker will store a single
JoinHandle<()> instance. Then we’ll implement a method on Worker that will
take a closure of code to run and send it to the already running thread for
execution. We’ll also give each worker an id so we can distinguish between
the different workers in the pool when logging or debugging.
Here is the new process that will happen when we create a ThreadPool. We’ll
implement the code that sends the closure to the thread after we have Worker
set up in this way:
- Define a
Workerstruct that holds anidand aJoinHandle<()>. - Change
ThreadPoolto hold a vector ofWorkerinstances. - Define a
Worker::newfunction that takes anidnumber and returns aWorkerinstance that holds theidand a thread spawned with an empty closure. - In
ThreadPool::new, use theforloop counter to generate anid, create a newWorkerwith thatid, and store the worker in the vector.
If you’re up for a challenge, try implementing these changes on your own before looking at the code in Listing 20-15.
Ready? Here is Listing 20-15 with one way to make the preceding modifications.
Filename: src/lib.rs
use std::thread;
pub struct ThreadPool {
workers: Vec<Worker>,
}
impl ThreadPool {
// --snip--
/// Create a new ThreadPool.
///
/// The size is the number of threads in the pool.
///
/// # Panics
///
/// The `new` function will panic if the size is zero.
pub fn new(size: usize) -> ThreadPool {
assert!(size > 0);
let mut workers = Vec::with_capacity(size);
for id in 0..size {
workers.push(Worker::new(id));
}
ThreadPool { workers }
}
// --snip--
pub fn execute<F>(&self, f: F)
where
F: FnOnce() + Send + 'static,
{
}
}
struct Worker {
id: usize,
thread: thread::JoinHandle<()>,
}
impl Worker {
fn new(id: usize) -> Worker {
let thread = thread::spawn(|| {});
Worker { id, thread }
}
}Listing 20-15: Modifying ThreadPool to hold Worker
instances instead of holding threads directly
We’ve changed the name of the field on ThreadPool from threads to workers
because it’s now holding Worker instances instead of JoinHandle<()>
instances. We use the counter in the for loop as an argument to
Worker::new, and we store each new Worker in the vector named workers.
External code (like our server in src/main.rs) doesn’t need to know the
implementation details regarding using a Worker struct within ThreadPool,
so we make the Worker struct and its new function private. The
Worker::new function uses the id we give it and stores a JoinHandle<()>
instance that is created by spawning a new thread using an empty closure.
Note: If the operating system can’t create a thread because there aren’t enough system resources,
thread::spawnwill panic. That will cause our whole server to panic, even though the creation of some threads might succeed. For simplicity’s sake, this behavior is fine, but in a production thread pool implementation, you’d likely want to usestd::thread::Builderand itsspawnmethod that returnsResultinstead.
This code will compile and will store the number of Worker instances we
specified as an argument to ThreadPool::new. But we’re still not processing
the closure that we get in execute. Let’s look at how to do that next.
Sending Requests to Threads via Channels
The next problem we’ll tackle is that the closures given to thread::spawn do
absolutely nothing. Currently, we get the closure we want to execute in the
execute method. But we need to give thread::spawn a closure to run when we
create each Worker during the creation of the ThreadPool.
We want the Worker structs that we just created to fetch the code to run from
a queue held in the ThreadPool and send that code to its thread to run.
The channels we learned about in Chapter 16—a simple way to communicate between
two threads—would be perfect for this use case. We’ll use a channel to function
as the queue of jobs, and execute will send a job from the ThreadPool to
the Worker instances, which will send the job to its thread. Here is the plan:
- The
ThreadPoolwill create a channel and hold on to the sender. - Each
Workerwill hold on to the receiver. - We’ll create a new
Jobstruct that will hold the closures we want to send down the channel. - The
executemethod will send the job it wants to execute through the sender. - In its thread, the
Workerwill loop over its receiver and execute the closures of any jobs it receives.
Let’s start by creating a channel in ThreadPool::new and holding the sender
in the ThreadPool instance, as shown in Listing 20-16. The Job struct
doesn’t hold anything for now but will be the type of item we’re sending down
the channel.
Filename: src/lib.rs
use std::{sync::mpsc, thread};
pub struct ThreadPool {
workers: Vec<Worker>,
sender: mpsc::Sender<Job>,
}
struct Job;
impl ThreadPool {
// --snip--
/// Create a new ThreadPool.
///
/// The size is the number of threads in the pool.
///
/// # Panics
///
/// The `new` function will panic if the size is zero.
pub fn new(size: usize) -> ThreadPool {
assert!(size > 0);
let (sender, receiver) = mpsc::channel();
let mut workers = Vec::with_capacity(size);
for id in 0..size {
workers.push(Worker::new(id));
}
ThreadPool { workers, sender }
}
// --snip--
pub fn execute<F>(&self, f: F)
where
F: FnOnce() + Send + 'static,
{
}
}
struct Worker {
id: usize,
thread: thread::JoinHandle<()>,
}
impl Worker {
fn new(id: usize) -> Worker {
let thread = thread::spawn(|| {});
Worker { id, thread }
}
}Listing 20-16: Modifying ThreadPool to store the
sender of a channel that transmits Job instances
In ThreadPool::new, we create our new channel and have the pool hold the
sender. This will successfully compile.
Let’s try passing a receiver of the channel into each worker as the thread pool
creates the channel. We know we want to use the receiver in the thread that the
workers spawn, so we’ll reference the receiver parameter in the closure. The
code in Listing 20-17 won’t quite compile yet.
Filename: src/lib.rs
use std::{sync::mpsc, thread};
pub struct ThreadPool {
workers: Vec<Worker>,
sender: mpsc::Sender<Job>,
}
struct Job;
impl ThreadPool {
// --snip--
/// Create a new ThreadPool.
///
/// The size is the number of threads in the pool.
///
/// # Panics
///
/// The `new` function will panic if the size is zero.
pub fn new(size: usize) -> ThreadPool {
assert!(size > 0);
let (sender, receiver) = mpsc::channel();
let mut workers = Vec::with_capacity(size);
for id in 0..size {
workers.push(Worker::new(id, receiver));
}
ThreadPool { workers, sender }
}
// --snip--
pub fn execute<F>(&self, f: F)
where
F: FnOnce() + Send + 'static,
{
}
}
// --snip--
struct Worker {
id: usize,
thread: thread::JoinHandle<()>,
}
impl Worker {
fn new(id: usize, receiver: mpsc::Receiver<Job>) -> Worker {
let thread = thread::spawn(|| {
receiver;
});
Worker { id, thread }
}
}Listing 20-17: Passing the receiver to the workers
We’ve made some small and straightforward changes: we pass the receiver into
Worker::new, and then we use it inside the closure.
When we try to check this code, we get this error:
$ cargo check
Checking hello v0.1.0 (file:///projects/hello)
error[E0382]: use of moved value: `receiver`
--> src/lib.rs:26:42
|
21 | let (sender, receiver) = mpsc::channel();
| -------- move occurs because `receiver` has type `std::sync::mpsc::Receiver<Job>`, which does not implement the `Copy` trait
...
26 | workers.push(Worker::new(id, receiver));
| ^^^^^^^^ value moved here, in previous iteration of loop
For more information about this error, try `rustc --explain E0382`.
error: could not compile `hello` due to previous error
The code is trying to pass receiver to multiple Worker instances. This
won’t work, as you’ll recall from Chapter 16: the channel implementation that
Rust provides is multiple producer, single consumer. This means we can’t
just clone the consuming end of the channel to fix this code. We also don’t
want to send a message multiple times to multiple consumers; we want one list
of messages with multiple workers such that each message gets processed once.
Additionally, taking a job off the channel queue involves mutating the
receiver, so the threads need a safe way to share and modify receiver;
otherwise, we might get race conditions (as covered in Chapter 16).
Recall the thread-safe smart pointers discussed in Chapter 16: to share
ownership across multiple threads and allow the threads to mutate the value, we
need to use Arc<Mutex<T>>. The Arc type will let multiple workers own the
receiver, and Mutex will ensure that only one worker gets a job from the
receiver at a time. Listing 20-18 shows the changes we need to make.
Filename: src/lib.rs
use std::{
sync::{mpsc, Arc, Mutex},
thread,
};
// --snip--
pub struct ThreadPool {
workers: Vec<Worker>,
sender: mpsc::Sender<Job>,
}
struct Job;
impl ThreadPool {
// --snip--
/// Create a new ThreadPool.
///
/// The size is the number of threads in the pool.
///
/// # Panics
///
/// The `new` function will panic if the size is zero.
pub fn new(size: usize) -> ThreadPool {
assert!(size > 0);
let (sender, receiver) = mpsc::channel();
let receiver = Arc::new(Mutex::new(receiver));
let mut workers = Vec::with_capacity(size);
for id in 0..size {
workers.push(Worker::new(id, Arc::clone(&receiver)));
}
ThreadPool { workers, sender }
}
// --snip--
pub fn execute<F>(&self, f: F)
where
F: FnOnce() + Send + 'static,
{
}
}
// --snip--
struct Worker {
id: usize,
thread: thread::JoinHandle<()>,
}
impl Worker {
fn new(id: usize, receiver: Arc<Mutex<mpsc::Receiver<Job>>>) -> Worker {
// --snip--
let thread = thread::spawn(|| {
receiver;
});
Worker { id, thread }
}
}Listing 20-18: Sharing the receiver among the workers
using Arc and Mutex
In ThreadPool::new, we put the receiver in an Arc and a Mutex. For each
new worker, we clone the Arc to bump the reference count so the workers can
share ownership of the receiver.
With these changes, the code compiles! We’re getting there!
Implementing the execute Method
Let’s finally implement the execute method on ThreadPool. We’ll also change
Job from a struct to a type alias for a trait object that holds the type of
closure that execute receives. As discussed in the “Creating Type Synonyms
with Type Aliases”
section of Chapter 19, type aliases allow us to make long types shorter for
ease of use. Look at Listing 20-19.
Filename: src/lib.rs
use std::{
sync::{mpsc, Arc, Mutex},
thread,
};
pub struct ThreadPool {
workers: Vec<Worker>,
sender: mpsc::Sender<Job>,
}
// --snip--
type Job = Box<dyn FnOnce() + Send + 'static>;
impl ThreadPool {
// --snip--
/// Create a new ThreadPool.
///
/// The size is the number of threads in the pool.
///
/// # Panics
///
/// The `new` function will panic if the size is zero.
pub fn new(size: usize) -> ThreadPool {
assert!(size > 0);
let (sender, receiver) = mpsc::channel();
let receiver = Arc::new(Mutex::new(receiver));
let mut workers = Vec::with_capacity(size);
for id in 0..size {
workers.push(Worker::new(id, Arc::clone(&receiver)));
}
ThreadPool { workers, sender }
}
pub fn execute<F>(&self, f: F)
where
F: FnOnce() + Send + 'static,
{
let job = Box::new(f);
self.sender.send(job).unwrap();
}
}
// --snip--
struct Worker {
id: usize,
thread: thread::JoinHandle<()>,
}
impl Worker {
fn new(id: usize, receiver: Arc<Mutex<mpsc::Receiver<Job>>>) -> Worker {
let thread = thread::spawn(|| {
receiver;
});
Worker { id, thread }
}
}Listing 20-19: Creating a Job type alias for a Box
that holds each closure and then sending the job down the channel
After creating a new Job instance using the closure we get in execute, we
send that job down the sending end of the channel. We’re calling unwrap on
send for the case that sending fails. This might happen if, for example, we
stop all our threads from executing, meaning the receiving end has stopped
receiving new messages. At the moment, we can’t stop our threads from
executing: our threads continue executing as long as the pool exists. The
reason we use unwrap is that we know the failure case won’t happen, but the
compiler doesn’t know that.
But we’re not quite done yet! In the worker, our closure being passed to
thread::spawn still only references the receiving end of the channel.
Instead, we need the closure to loop forever, asking the receiving end of the
channel for a job and running the job when it gets one. Let’s make the change
shown in Listing 20-20 to Worker::new.
Filename: src/lib.rs
use std::{
sync::{mpsc, Arc, Mutex},
thread,
};
pub struct ThreadPool {
workers: Vec<Worker>,
sender: mpsc::Sender<Job>,
}
type Job = Box<dyn FnOnce() + Send + 'static>;
impl ThreadPool {
/// Create a new ThreadPool.
///
/// The size is the number of threads in the pool.
///
/// # Panics
///
/// The `new` function will panic if the size is zero.
pub fn new(size: usize) -> ThreadPool {
assert!(size > 0);
let (sender, receiver) = mpsc::channel();
let receiver = Arc::new(Mutex::new(receiver));
let mut workers = Vec::with_capacity(size);
for id in 0..size {
workers.push(Worker::new(id, Arc::clone(&receiver)));
}
ThreadPool { workers, sender }
}
pub fn execute<F>(&self, f: F)
where
F: FnOnce() + Send + 'static,
{
let job = Box::new(f);
self.sender.send(job).unwrap();
}
}
struct Worker {
id: usize,
thread: thread::JoinHandle<()>,
}
// --snip--
impl Worker {
fn new(id: usize, receiver: Arc<Mutex<mpsc::Receiver<Job>>>) -> Worker {
let thread = thread::spawn(move || loop {
let job = receiver.lock().unwrap().recv().unwrap();
println!("Worker {id} got a job; executing.");
job();
});
Worker { id, thread }
}
}Listing 20-20: Receiving and executing the jobs in the worker’s thread
Here, we first call lock on the receiver to acquire the mutex, and then we
call unwrap to panic on any errors. Acquiring a lock might fail if the mutex
is in a poisoned state, which can happen if some other thread panicked while
holding the lock rather than releasing the lock. In this situation, calling
unwrap to have this thread panic is the correct action to take. Feel free to
change this unwrap to an expect with an error message that is meaningful to
you.
If we get the lock on the mutex, we call recv to receive a Job from the
channel. A final unwrap moves past any errors here as well, which might occur
if the thread holding the sender has shut down, similar to how the send
method returns Err if the receiver shuts down.
The call to recv blocks, so if there is no job yet, the current thread will
wait until a job becomes available. The Mutex<T> ensures that only one
Worker thread at a time is trying to request a job.
Our thread pool is now in a working state! Give it a cargo run and make some
requests:
$ cargo run
Compiling hello v0.1.0 (file:///projects/hello)
warning: field is never read: `workers`
--> src/lib.rs:7:5
|
7 | workers: Vec<Worker>,
| ^^^^^^^^^^^^^^^^^^^^
|
= note: `#[warn(dead_code)]` on by default
warning: field is never read: `id`
--> src/lib.rs:48:5
|
48 | id: usize,
| ^^^^^^^^^
warning: field is never read: `thread`
--> src/lib.rs:49:5
|
49 | thread: thread::JoinHandle<()>,
| ^^^^^^^^^^^^^^^^^^^^^^^^^^^^^^
warning: `hello` (lib) generated 3 warnings
Finished dev [unoptimized + debuginfo] target(s) in 1.40s
Running `target/debug/hello`
Worker 0 got a job; executing.
Worker 2 got a job; executing.
Worker 1 got a job; executing.
Worker 3 got a job; executing.
Worker 0 got a job; executing.
Worker 2 got a job; executing.
Worker 1 got a job; executing.
Worker 3 got a job; executing.
Worker 0 got a job; executing.
Worker 2 got a job; executing.
Success! We now have a thread pool that executes connections asynchronously. There are never more than four threads created, so our system won’t get overloaded if the server receives a lot of requests. If we make a request to /sleep, the server will be able to serve other requests by having another thread run them.
Note: if you open /sleep in multiple browser windows simultaneously, they might load one at a time in 5 second intervals. Some web browsers execute multiple instances of the same request sequentially for caching reasons. This limitation is not caused by our web server.
After learning about the while let loop in Chapter 18, you might be wondering
why we didn’t write the worker thread code as shown in Listing 20-21.
Filename: src/lib.rs
use std::{
sync::{mpsc, Arc, Mutex},
thread,
};
pub struct ThreadPool {
workers: Vec<Worker>,
sender: mpsc::Sender<Job>,
}
type Job = Box<dyn FnOnce() + Send + 'static>;
impl ThreadPool {
/// Create a new ThreadPool.
///
/// The size is the number of threads in the pool.
///
/// # Panics
///
/// The `new` function will panic if the size is zero.
pub fn new(size: usize) -> ThreadPool {
assert!(size > 0);
let (sender, receiver) = mpsc::channel();
let receiver = Arc::new(Mutex::new(receiver));
let mut workers = Vec::with_capacity(size);
for id in 0..size {
workers.push(Worker::new(id, Arc::clone(&receiver)));
}
ThreadPool { workers, sender }
}
pub fn execute<F>(&self, f: F)
where
F: FnOnce() + Send + 'static,
{
let job = Box::new(f);
self.sender.send(job).unwrap();
}
}
struct Worker {
id: usize,
thread: thread::JoinHandle<()>,
}
// --snip--
impl Worker {
fn new(id: usize, receiver: Arc<Mutex<mpsc::Receiver<Job>>>) -> Worker {
let thread = thread::spawn(move || {
while let Ok(job) = receiver.lock().unwrap().recv() {
println!("Worker {id} got a job; executing.");
job();
}
});
Worker { id, thread }
}
}Listing 20-21: An alternative implementation of
Worker::new using while let
This code compiles and runs but doesn’t result in the desired threading
behavior: a slow request will still cause other requests to wait to be
processed. The reason is somewhat subtle: the Mutex struct has no public
unlock method because the ownership of the lock is based on the lifetime of
the MutexGuard<T> within the LockResult<MutexGuard<T>> that the lock
method returns. At compile time, the borrow checker can then enforce the rule
that a resource guarded by a Mutex cannot be accessed unless we hold the
lock. However, this implementation can also result in the lock being held
longer than intended if we aren’t mindful of the lifetime of the
MutexGuard<T>.
The code in Listing 20-20 that uses let job = receiver.lock().unwrap().recv().unwrap(); works because with let, any
temporary values used in the expression on the right hand side of the equals
sign are immediately dropped when the let statement ends. However, while let (and if let and match) does not drop temporary values until the end of
the associated block. In Listing 20-21, the lock remains held for the duration
of the call to job(), meaning other workers cannot receive jobs.
Graceful Shutdown and Cleanup
The code in Listing 20-20 is responding to requests asynchronously through the
use of a thread pool, as we intended. We get some warnings about the workers,
id, and thread fields that we’re not using in a direct way that reminds us
we’re not cleaning up anything. When we use the less elegant ctrl-c method to halt the main thread, all other
threads are stopped immediately as well, even if they’re in the middle of
serving a request.
Next, then, we’ll implement the Drop trait to call join on each of the
threads in the pool so they can finish the requests they’re working on before
closing. Then we’ll implement a way to tell the threads they should stop
accepting new requests and shut down. To see this code in action, we’ll modify
our server to accept only two requests before gracefully shutting down its
thread pool.
Implementing the Drop Trait on ThreadPool
Let’s start with implementing Drop on our thread pool. When the pool is
dropped, our threads should all join to make sure they finish their work.
Listing 20-22 shows a first attempt at a Drop implementation; this code won’t
quite work yet.
Filename: src/lib.rs
use std::{
sync::{mpsc, Arc, Mutex},
thread,
};
pub struct ThreadPool {
workers: Vec<Worker>,
sender: mpsc::Sender<Job>,
}
type Job = Box<dyn FnOnce() + Send + 'static>;
impl ThreadPool {
/// Create a new ThreadPool.
///
/// The size is the number of threads in the pool.
///
/// # Panics
///
/// The `new` function will panic if the size is zero.
pub fn new(size: usize) -> ThreadPool {
assert!(size > 0);
let (sender, receiver) = mpsc::channel();
let receiver = Arc::new(Mutex::new(receiver));
let mut workers = Vec::with_capacity(size);
for id in 0..size {
workers.push(Worker::new(id, Arc::clone(&receiver)));
}
ThreadPool { workers, sender }
}
pub fn execute<F>(&self, f: F)
where
F: FnOnce() + Send + 'static,
{
let job = Box::new(f);
self.sender.send(job).unwrap();
}
}
impl Drop for ThreadPool {
fn drop(&mut self) {
for worker in &mut self.workers {
println!("Shutting down worker {}", worker.id);
worker.thread.join().unwrap();
}
}
}
struct Worker {
id: usize,
thread: thread::JoinHandle<()>,
}
impl Worker {
fn new(id: usize, receiver: Arc<Mutex<mpsc::Receiver<Job>>>) -> Worker {
let thread = thread::spawn(move || loop {
let job = receiver.lock().unwrap().recv().unwrap();
println!("Worker {id} got a job; executing.");
job();
});
Worker { id, thread }
}
}Listing 20-22: Joining each thread when the thread pool goes out of scope
First, we loop through each of the thread pool workers. We use &mut for
this because self is a mutable reference, and we also need to be able to
mutate worker. For each worker, we print a message saying that this
particular worker is shutting down, and then we call join on that worker’s
thread. If the call to join fails, we use unwrap to make Rust panic and go
into an ungraceful shutdown.
Here is the error we get when we compile this code:
$ cargo check
Checking hello v0.1.0 (file:///projects/hello)
error[E0507]: cannot move out of `worker.thread` which is behind a mutable reference
--> src/lib.rs:52:13
|
52 | worker.thread.join().unwrap();
| ^^^^^^^^^^^^^ ------ `worker.thread` moved due to this method call
| |
| move occurs because `worker.thread` has type `JoinHandle<()>`, which does not implement the `Copy` trait
|
note: this function takes ownership of the receiver `self`, which moves `worker.thread`
--> /rustc/d5a82bbd26e1ad8b7401f6a718a9c57c96905483/library/std/src/thread/mod.rs:1581:17
For more information about this error, try `rustc --explain E0507`.
error: could not compile `hello` due to previous error
The error tells us we can’t call join because we only have a mutable borrow
of each worker and join takes ownership of its argument. To solve this
issue, we need to move the thread out of the Worker instance that owns
thread so join can consume the thread. We did this in Listing 17-15: if
Worker holds an Option<thread::JoinHandle<()>> instead, we can call the
take method on the Option to move the value out of the Some variant and
leave a None variant in its place. In other words, a Worker that is running
will have a Some variant in thread, and when we want to clean up a
Worker, we’ll replace Some with None so the Worker doesn’t have a
thread to run.
So we know we want to update the definition of Worker like this:
Filename: src/lib.rs
use std::{
sync::{mpsc, Arc, Mutex},
thread,
};
pub struct ThreadPool {
workers: Vec<Worker>,
sender: mpsc::Sender<Job>,
}
type Job = Box<dyn FnOnce() + Send + 'static>;
impl ThreadPool {
/// Create a new ThreadPool.
///
/// The size is the number of threads in the pool.
///
/// # Panics
///
/// The `new` function will panic if the size is zero.
pub fn new(size: usize) -> ThreadPool {
assert!(size > 0);
let (sender, receiver) = mpsc::channel();
let receiver = Arc::new(Mutex::new(receiver));
let mut workers = Vec::with_capacity(size);
for id in 0..size {
workers.push(Worker::new(id, Arc::clone(&receiver)));
}
ThreadPool { workers, sender }
}
pub fn execute<F>(&self, f: F)
where
F: FnOnce() + Send + 'static,
{
let job = Box::new(f);
self.sender.send(job).unwrap();
}
}
impl Drop for ThreadPool {
fn drop(&mut self) {
for worker in &mut self.workers {
println!("Shutting down worker {}", worker.id);
worker.thread.join().unwrap();
}
}
}
struct Worker {
id: usize,
thread: Option<thread::JoinHandle<()>>,
}
impl Worker {
fn new(id: usize, receiver: Arc<Mutex<mpsc::Receiver<Job>>>) -> Worker {
let thread = thread::spawn(move || loop {
let job = receiver.lock().unwrap().recv().unwrap();
println!("Worker {id} got a job; executing.");
job();
});
Worker { id, thread }
}
}Now let’s lean on the compiler to find the other places that need to change. Checking this code, we get two errors:
$ cargo check
Checking hello v0.1.0 (file:///projects/hello)
error[E0599]: no method named `join` found for enum `Option` in the current scope
--> src/lib.rs:52:27
|
52 | worker.thread.join().unwrap();
| ^^^^ method not found in `Option<JoinHandle<()>>`
|
note: the method `join` exists on the type `JoinHandle<()>`
--> /rustc/d5a82bbd26e1ad8b7401f6a718a9c57c96905483/library/std/src/thread/mod.rs:1581:5
help: consider using `Option::expect` to unwrap the `JoinHandle<()>` value, panicking if the value is an `Option::None`
|
52 | worker.thread.expect("REASON").join().unwrap();
| +++++++++++++++++
error[E0308]: mismatched types
--> src/lib.rs:72:22
|
72 | Worker { id, thread }
| ^^^^^^ expected enum `Option`, found struct `JoinHandle`
|
= note: expected enum `Option<JoinHandle<()>>`
found struct `JoinHandle<_>`
help: try wrapping the expression in `Some`
|
72 | Worker { id, thread: Some(thread) }
| +++++++++++++ +
Some errors have detailed explanations: E0308, E0599.
For more information about an error, try `rustc --explain E0308`.
error: could not compile `hello` due to 2 previous errors
Let’s address the second error, which points to the code at the end of
Worker::new; we need to wrap the thread value in Some when we create a
new Worker. Make the following changes to fix this error:
Filename: src/lib.rs
use std::{
sync::{mpsc, Arc, Mutex},
thread,
};
pub struct ThreadPool {
workers: Vec<Worker>,
sender: mpsc::Sender<Job>,
}
type Job = Box<dyn FnOnce() + Send + 'static>;
impl ThreadPool {
/// Create a new ThreadPool.
///
/// The size is the number of threads in the pool.
///
/// # Panics
///
/// The `new` function will panic if the size is zero.
pub fn new(size: usize) -> ThreadPool {
assert!(size > 0);
let (sender, receiver) = mpsc::channel();
let receiver = Arc::new(Mutex::new(receiver));
let mut workers = Vec::with_capacity(size);
for id in 0..size {
workers.push(Worker::new(id, Arc::clone(&receiver)));
}
ThreadPool { workers, sender }
}
pub fn execute<F>(&self, f: F)
where
F: FnOnce() + Send + 'static,
{
let job = Box::new(f);
self.sender.send(job).unwrap();
}
}
impl Drop for ThreadPool {
fn drop(&mut self) {
for worker in &mut self.workers {
println!("Shutting down worker {}", worker.id);
worker.thread.join().unwrap();
}
}
}
struct Worker {
id: usize,
thread: Option<thread::JoinHandle<()>>,
}
impl Worker {
fn new(id: usize, receiver: Arc<Mutex<mpsc::Receiver<Job>>>) -> Worker {
// --snip--
let thread = thread::spawn(move || loop {
let job = receiver.lock().unwrap().recv().unwrap();
println!("Worker {id} got a job; executing.");
job();
});
Worker {
id,
thread: Some(thread),
}
}
}The first error is in our Drop implementation. We mentioned earlier that we
intended to call take on the Option value to move thread out of worker.
The following changes will do so:
Filename: src/lib.rs
use std::{
sync::{mpsc, Arc, Mutex},
thread,
};
pub struct ThreadPool {
workers: Vec<Worker>,
sender: mpsc::Sender<Job>,
}
type Job = Box<dyn FnOnce() + Send + 'static>;
impl ThreadPool {
/// Create a new ThreadPool.
///
/// The size is the number of threads in the pool.
///
/// # Panics
///
/// The `new` function will panic if the size is zero.
pub fn new(size: usize) -> ThreadPool {
assert!(size > 0);
let (sender, receiver) = mpsc::channel();
let receiver = Arc::new(Mutex::new(receiver));
let mut workers = Vec::with_capacity(size);
for id in 0..size {
workers.push(Worker::new(id, Arc::clone(&receiver)));
}
ThreadPool { workers, sender }
}
pub fn execute<F>(&self, f: F)
where
F: FnOnce() + Send + 'static,
{
let job = Box::new(f);
self.sender.send(job).unwrap();
}
}
impl Drop for ThreadPool {
fn drop(&mut self) {
for worker in &mut self.workers {
println!("Shutting down worker {}", worker.id);
if let Some(thread) = worker.thread.take() {
thread.join().unwrap();
}
}
}
}
struct Worker {
id: usize,
thread: Option<thread::JoinHandle<()>>,
}
impl Worker {
fn new(id: usize, receiver: Arc<Mutex<mpsc::Receiver<Job>>>) -> Worker {
let thread = thread::spawn(move || loop {
let job = receiver.lock().unwrap().recv().unwrap();
println!("Worker {id} got a job; executing.");
job();
});
Worker {
id,
thread: Some(thread),
}
}
}As discussed in Chapter 17, the take method on Option takes the Some
variant out and leaves None in its place. We’re using if let to destructure
the Some and get the thread; then we call join on the thread. If a worker’s
thread is already None, we know that worker has already had its thread
cleaned up, so nothing happens in that case.
Signaling to the Threads to Stop Listening for Jobs
With all the changes we’ve made, our code compiles without any warnings.
However, the bad news is this code doesn’t function the way we want it to yet.
The key is the logic in the closures run by the threads of the Worker
instances: at the moment, we call join, but that won’t shut down the threads
because they loop forever looking for jobs. If we try to drop our
ThreadPool with our current implementation of drop, the main thread will
block forever waiting for the first thread to finish.
To fix this problem, we’ll need a change in the ThreadPool drop
implementation and then a change in the Worker loop.
First, we’ll change the ThreadPool drop implementation to explicitly drop
the sender before waiting for the threads to finish. Listing 20-23 shows the
changes to ThreadPool to explicitly drop sender. We use the same Option
and take technique as we did with the thread to be able to move sender out
of ThreadPool:
Filename: src/lib.rs
use std::{
sync::{mpsc, Arc, Mutex},
thread,
};
pub struct ThreadPool {
workers: Vec<Worker>,
sender: Option<mpsc::Sender<Job>>,
}
// --snip--
type Job = Box<dyn FnOnce() + Send + 'static>;
impl ThreadPool {
/// Create a new ThreadPool.
///
/// The size is the number of threads in the pool.
///
/// # Panics
///
/// The `new` function will panic if the size is zero.
pub fn new(size: usize) -> ThreadPool {
// --snip--
assert!(size > 0);
let (sender, receiver) = mpsc::channel();
let receiver = Arc::new(Mutex::new(receiver));
let mut workers = Vec::with_capacity(size);
for id in 0..size {
workers.push(Worker::new(id, Arc::clone(&receiver)));
}
ThreadPool {
workers,
sender: Some(sender),
}
}
pub fn execute<F>(&self, f: F)
where
F: FnOnce() + Send + 'static,
{
let job = Box::new(f);
self.sender.as_ref().unwrap().send(job).unwrap();
}
}
impl Drop for ThreadPool {
fn drop(&mut self) {
drop(self.sender.take());
for worker in &mut self.workers {
println!("Shutting down worker {}", worker.id);
if let Some(thread) = worker.thread.take() {
thread.join().unwrap();
}
}
}
}
struct Worker {
id: usize,
thread: Option<thread::JoinHandle<()>>,
}
impl Worker {
fn new(id: usize, receiver: Arc<Mutex<mpsc::Receiver<Job>>>) -> Worker {
let thread = thread::spawn(move || loop {
let job = receiver.lock().unwrap().recv().unwrap();
println!("Worker {id} got a job; executing.");
job();
});
Worker {
id,
thread: Some(thread),
}
}
}Listing 20-23: Explicitly drop sender before joining
the worker threads
Dropping sender closes the channel, which indicates no more messages will be
sent. When that happens, all the calls to recv that the workers do in the
infinite loop will return an error. In Listing 20-24, we change the Worker
loop to gracefully exit the loop in that case, which means the threads will
finish when the ThreadPool drop implementation calls join on them.
Filename: src/lib.rs
use std::{
sync::{mpsc, Arc, Mutex},
thread,
};
pub struct ThreadPool {
workers: Vec<Worker>,
sender: Option<mpsc::Sender<Job>>,
}
type Job = Box<dyn FnOnce() + Send + 'static>;
impl ThreadPool {
/// Create a new ThreadPool.
///
/// The size is the number of threads in the pool.
///
/// # Panics
///
/// The `new` function will panic if the size is zero.
pub fn new(size: usize) -> ThreadPool {
assert!(size > 0);
let (sender, receiver) = mpsc::channel();
let receiver = Arc::new(Mutex::new(receiver));
let mut workers = Vec::with_capacity(size);
for id in 0..size {
workers.push(Worker::new(id, Arc::clone(&receiver)));
}
ThreadPool {
workers,
sender: Some(sender),
}
}
pub fn execute<F>(&self, f: F)
where
F: FnOnce() + Send + 'static,
{
let job = Box::new(f);
self.sender.as_ref().unwrap().send(job).unwrap();
}
}
impl Drop for ThreadPool {
fn drop(&mut self) {
drop(self.sender.take());
for worker in &mut self.workers {
println!("Shutting down worker {}", worker.id);
if let Some(thread) = worker.thread.take() {
thread.join().unwrap();
}
}
}
}
struct Worker {
id: usize,
thread: Option<thread::JoinHandle<()>>,
}
impl Worker {
fn new(id: usize, receiver: Arc<Mutex<mpsc::Receiver<Job>>>) -> Worker {
let thread = thread::spawn(move || loop {
let message = receiver.lock().unwrap().recv();
match message {
Ok(job) => {
println!("Worker {id} got a job; executing.");
job();
}
Err(_) => {
println!("Worker {id} disconnected; shutting down.");
break;
}
}
});
Worker {
id,
thread: Some(thread),
}
}
}Listing 20-24: Explicitly break out of the loop when
recv returns an error
To see this code in action, let’s modify main to accept only two requests
before gracefully shutting down the server, as shown in Listing 20-25.
Filename: src/main.rs
use hello::ThreadPool;
use std::fs;
use std::io::prelude::*;
use std::net::TcpListener;
use std::net::TcpStream;
use std::thread;
use std::time::Duration;
fn main() {
let listener = TcpListener::bind("127.0.0.1:7878").unwrap();
let pool = ThreadPool::new(4);
for stream in listener.incoming().take(2) {
let stream = stream.unwrap();
pool.execute(|| {
handle_connection(stream);
});
}
println!("Shutting down.");
}
fn handle_connection(mut stream: TcpStream) {
let mut buffer = [0; 1024];
stream.read(&mut buffer).unwrap();
let get = b"GET / HTTP/1.1\r\n";
let sleep = b"GET /sleep HTTP/1.1\r\n";
let (status_line, filename) = if buffer.starts_with(get) {
("HTTP/1.1 200 OK", "hello.html")
} else if buffer.starts_with(sleep) {
thread::sleep(Duration::from_secs(5));
("HTTP/1.1 200 OK", "hello.html")
} else {
("HTTP/1.1 404 NOT FOUND", "404.html")
};
let contents = fs::read_to_string(filename).unwrap();
let response = format!(
"{}\r\nContent-Length: {}\r\n\r\n{}",
status_line,
contents.len(),
contents
);
stream.write_all(response.as_bytes()).unwrap();
stream.flush().unwrap();
}Listing 20-25: Shut down the server after serving two requests by exiting the loop
You wouldn’t want a real-world web server to shut down after serving only two requests. This code just demonstrates that the graceful shutdown and cleanup is in working order.
The take method is defined in the Iterator trait and limits the iteration
to the first two items at most. The ThreadPool will go out of scope at the
end of main, and the drop implementation will run.
Start the server with cargo run, and make three requests. The third request
should error, and in your terminal you should see output similar to this:
$ cargo run
Compiling hello v0.1.0 (file:///projects/hello)
Finished dev [unoptimized + debuginfo] target(s) in 1.0s
Running `target/debug/hello`
Worker 0 got a job; executing.
Shutting down.
Shutting down worker 0
Worker 3 got a job; executing.
Worker 1 disconnected; shutting down.
Worker 2 disconnected; shutting down.
Worker 3 disconnected; shutting down.
Worker 0 disconnected; shutting down.
Shutting down worker 1
Shutting down worker 2
Shutting down worker 3
You might see a different ordering of workers and messages printed. We can see
how this code works from the messages: workers 0 and 3 got the first two
requests. The server stopped accepting connections after the second connection,
and the Drop implementation on ThreadPool starts executing before worker 3
even starts its job. Dropping the sender disconnects all the workers and
tells them to shut down. The workers each print a message when they disconnect,
and then the thread pool calls join to wait for each worker thread to finish.
Notice one interesting aspect of this particular execution: the ThreadPool
dropped the sender, and before any worker received an error, we tried to join
worker 0. Worker 0 had not yet gotten an error from recv, so the main thread
blocked waiting for worker 0 to finish. In the meantime, worker 3 received a
job and then all threads received an error. When worker 0 finished, the main
thread waited for the rest of the workers to finish. At that point, they had
all exited their loops and stopped.
Congrats! We’ve now completed our project; we have a basic web server that uses a thread pool to respond asynchronously. We’re able to perform a graceful shutdown of the server, which cleans up all the threads in the pool.
Here’s the full code for reference:
Filename: src/main.rs
use hello::ThreadPool;
use std::fs;
use std::io::prelude::*;
use std::net::TcpListener;
use std::net::TcpStream;
use std::thread;
use std::time::Duration;
fn main() {
let listener = TcpListener::bind("127.0.0.1:7878").unwrap();
let pool = ThreadPool::new(4);
for stream in listener.incoming().take(2) {
let stream = stream.unwrap();
pool.execute(|| {
handle_connection(stream);
});
}
println!("Shutting down.");
}
fn handle_connection(mut stream: TcpStream) {
let mut buffer = [0; 1024];
stream.read(&mut buffer).unwrap();
let get = b"GET / HTTP/1.1\r\n";
let sleep = b"GET /sleep HTTP/1.1\r\n";
let (status_line, filename) = if buffer.starts_with(get) {
("HTTP/1.1 200 OK", "hello.html")
} else if buffer.starts_with(sleep) {
thread::sleep(Duration::from_secs(5));
("HTTP/1.1 200 OK", "hello.html")
} else {
("HTTP/1.1 404 NOT FOUND", "404.html")
};
let contents = fs::read_to_string(filename).unwrap();
let response = format!(
"{}\r\nContent-Length: {}\r\n\r\n{}",
status_line,
contents.len(),
contents
);
stream.write_all(response.as_bytes()).unwrap();
stream.flush().unwrap();
}Filename: src/lib.rs
use std::{
sync::{mpsc, Arc, Mutex},
thread,
};
pub struct ThreadPool {
workers: Vec<Worker>,
sender: Option<mpsc::Sender<Job>>,
}
type Job = Box<dyn FnOnce() + Send + 'static>;
impl ThreadPool {
/// Create a new ThreadPool.
///
/// The size is the number of threads in the pool.
///
/// # Panics
///
/// The `new` function will panic if the size is zero.
pub fn new(size: usize) -> ThreadPool {
assert!(size > 0);
let (sender, receiver) = mpsc::channel();
let receiver = Arc::new(Mutex::new(receiver));
let mut workers = Vec::with_capacity(size);
for id in 0..size {
workers.push(Worker::new(id, Arc::clone(&receiver)));
}
ThreadPool {
workers,
sender: Some(sender),
}
}
pub fn execute<F>(&self, f: F)
where
F: FnOnce() + Send + 'static,
{
let job = Box::new(f);
self.sender.as_ref().unwrap().send(job).unwrap();
}
}
impl Drop for ThreadPool {
fn drop(&mut self) {
drop(self.sender.take());
for worker in &mut self.workers {
println!("Shutting down worker {}", worker.id);
if let Some(thread) = worker.thread.take() {
thread.join().unwrap();
}
}
}
}
struct Worker {
id: usize,
thread: Option<thread::JoinHandle<()>>,
}
impl Worker {
fn new(id: usize, receiver: Arc<Mutex<mpsc::Receiver<Job>>>) -> Worker {
let thread = thread::spawn(move || loop {
let message = receiver.lock().unwrap().recv();
match message {
Ok(job) => {
println!("Worker {id} got a job; executing.");
job();
}
Err(_) => {
println!("Worker {id} disconnected; shutting down.");
break;
}
}
});
Worker {
id,
thread: Some(thread),
}
}
}We could do more here! If you want to continue enhancing this project, here are some ideas:
- Add more documentation to
ThreadPooland its public methods. - Add tests of the library’s functionality.
- Change calls to
unwrapto more robust error handling. - Use
ThreadPoolto perform some task other than serving web requests. - Find a thread pool crate on crates.io and implement a similar web server using the crate instead. Then compare its API and robustness to the thread pool we implemented.
Summary
Well done! You’ve made it to the end of the book! We want to thank you for joining us on this tour of Rust. You’re now ready to implement your own Rust projects and help with other peoples’ projects. Keep in mind that there is a welcoming community of other Rustaceans who would love to help you with any challenges you encounter on your Rust journey.
Dodatki
Kolejne sekcje zawierają materiał referencyjny, który może okazać się przydatny w Twojej podróży z Rustem.
Appendix A: Keywords
The following list contains keywords that are reserved for current or future use by the Rust language. As such, they cannot be used as identifiers (except as raw identifiers as we’ll discuss in the “Raw Identifiers” section). Identifiers are names of functions, variables, parameters, struct fields, modules, crates, constants, macros, static values, attributes, types, traits, or lifetimes.
Keywords Currently in Use
The following is a list of keywords currently in use, with their functionality described.
as- perform primitive casting, disambiguate the specific trait containing an item, or rename items inusestatementsasync- return aFutureinstead of blocking the current threadawait- suspend execution until the result of aFutureis readybreak- exit a loop immediatelyconst- define constant items or constant raw pointerscontinue- continue to the next loop iterationcrate- in a module path, refers to the crate rootdyn- dynamic dispatch to a trait objectelse- fallback forifandif letcontrol flow constructsenum- define an enumerationextern- link an external function or variablefalse- Boolean false literalfn- define a function or the function pointer typefor- loop over items from an iterator, implement a trait, or specify a higher-ranked lifetimeif- branch based on the result of a conditional expressionimpl- implement inherent or trait functionalityin- part offorloop syntaxlet- bind a variableloop- loop unconditionallymatch- match a value to patternsmod- define a modulemove- make a closure take ownership of all its capturesmut- denote mutability in references, raw pointers, or pattern bindingspub- denote public visibility in struct fields,implblocks, or modulesref- bind by referencereturn- return from functionSelf- a type alias for the type we are defining or implementingself- method subject or current modulestatic- global variable or lifetime lasting the entire program executionstruct- define a structuresuper- parent module of the current moduletrait- define a traittrue- Boolean true literaltype- define a type alias or associated typeunion- define a union; is only a keyword when used in a union declarationunsafe- denote unsafe code, functions, traits, or implementationsuse- bring symbols into scopewhere- denote clauses that constrain a typewhile- loop conditionally based on the result of an expression
Keywords Reserved for Future Use
The following keywords do not yet have any functionality but are reserved by Rust for potential future use.
abstractbecomeboxdofinalmacrooverrideprivtrytypeofunsizedvirtualyield
Raw Identifiers
Raw identifiers are the syntax that lets you use keywords where they wouldn’t
normally be allowed. You use a raw identifier by prefixing a keyword with r#.
For example, match is a keyword. If you try to compile the following function
that uses match as its name:
Plik: src/main.rs
fn match(needle: &str, haystack: &str) -> bool {
haystack.contains(needle)
}you’ll get this error:
error: expected identifier, found keyword `match`
--> src/main.rs:4:4
|
4 | fn match(needle: &str, haystack: &str) -> bool {
| ^^^^^ expected identifier, found keyword
The error shows that you can’t use the keyword match as the function
identifier. To use match as a function name, you need to use the raw
identifier syntax, like this:
Plik: src/main.rs
fn r#match(needle: &str, haystack: &str) -> bool { haystack.contains(needle) } fn main() { assert!(r#match("foo", "foobar")); }
This code will compile without any errors. Note the r# prefix on the function
name in its definition as well as where the function is called in main.
Raw identifiers allow you to use any word you choose as an identifier, even if
that word happens to be a reserved keyword. This gives us more freedom to
choose identifier names, as well as lets us integrate with programs written in
a language where these words aren’t keywords. In addition, raw identifiers
allow you to use libraries written in a different Rust edition than your crate
uses. For example, try isn’t a keyword in the 2015 edition but is in the 2018
edition. If you depend on a library that’s written using the 2015 edition and
has a try function, you’ll need to use the raw identifier syntax, r#try in
this case, to call that function from your 2018 edition code. See Appendix
E for more information on editions.
Appendix B: Operators and Symbols
This appendix contains a glossary of Rust’s syntax, including operators and other symbols that appear by themselves or in the context of paths, generics, trait bounds, macros, attributes, comments, tuples, and brackets.
Operators
Table B-1 contains the operators in Rust, an example of how the operator would appear in context, a short explanation, and whether that operator is overloadable. If an operator is overloadable, the relevant trait to use to overload that operator is listed.
Table B-1: Operators
| Operator | Example | Explanation | Overloadable? |
|---|---|---|---|
! | ident!(...), ident!{...}, ident![...] | Macro expansion | |
! | !expr | Bitwise or logical complement | Not |
!= | expr != expr | Nonequality comparison | PartialEq |
% | expr % expr | Arithmetic remainder | Rem |
%= | var %= expr | Arithmetic remainder and assignment | RemAssign |
& | &expr, &mut expr | Borrow | |
& | &type, &mut type, &'a type, &'a mut type | Borrowed pointer type | |
& | expr & expr | Bitwise AND | BitAnd |
&= | var &= expr | Bitwise AND and assignment | BitAndAssign |
&& | expr && expr | Short-circuiting logical AND | |
* | expr * expr | Arithmetic multiplication | Mul |
*= | var *= expr | Arithmetic multiplication and assignment | MulAssign |
* | *expr | Dereference | Deref |
* | *const type, *mut type | Raw pointer | |
+ | trait + trait, 'a + trait | Compound type constraint | |
+ | expr + expr | Arithmetic addition | Add |
+= | var += expr | Arithmetic addition and assignment | AddAssign |
, | expr, expr | Argument and element separator | |
- | - expr | Arithmetic negation | Neg |
- | expr - expr | Arithmetic subtraction | Sub |
-= | var -= expr | Arithmetic subtraction and assignment | SubAssign |
-> | fn(...) -> type, |...| -> type | Function and closure return type | |
. | expr.ident | Member access | |
.. | .., expr.., ..expr, expr..expr | Right-exclusive range literal | PartialOrd |
..= | ..=expr, expr..=expr | Right-inclusive range literal | PartialOrd |
.. | ..expr | Struct literal update syntax | |
.. | variant(x, ..), struct_type { x, .. } | “And the rest” pattern binding | |
... | expr...expr | (Deprecated, use ..= instead) In a pattern: inclusive range pattern | |
/ | expr / expr | Arithmetic division | Div |
/= | var /= expr | Arithmetic division and assignment | DivAssign |
: | pat: type, ident: type | Constraints | |
: | ident: expr | Struct field initializer | |
: | 'a: loop {...} | Loop label | |
; | expr; | Statement and item terminator | |
; | [...; len] | Part of fixed-size array syntax | |
<< | expr << expr | Left-shift | Shl |
<<= | var <<= expr | Left-shift and assignment | ShlAssign |
< | expr < expr | Less than comparison | PartialOrd |
<= | expr <= expr | Less than or equal to comparison | PartialOrd |
= | var = expr, ident = type | Assignment/equivalence | |
== | expr == expr | Equality comparison | PartialEq |
=> | pat => expr | Part of match arm syntax | |
> | expr > expr | Greater than comparison | PartialOrd |
>= | expr >= expr | Greater than or equal to comparison | PartialOrd |
>> | expr >> expr | Right-shift | Shr |
>>= | var >>= expr | Right-shift and assignment | ShrAssign |
@ | ident @ pat | Pattern binding | |
^ | expr ^ expr | Bitwise exclusive OR | BitXor |
^= | var ^= expr | Bitwise exclusive OR and assignment | BitXorAssign |
| | pat | pat | Pattern alternatives | |
| | expr | expr | Bitwise OR | BitOr |
|= | var |= expr | Bitwise OR and assignment | BitOrAssign |
|| | expr || expr | Short-circuiting logical OR | |
? | expr? | Error propagation |
Non-operator Symbols
The following list contains all symbols that don’t function as operators; that is, they don’t behave like a function or method call.
Table B-2 shows symbols that appear on their own and are valid in a variety of locations.
Table B-2: Stand-Alone Syntax
| Symbol | Explanation |
|---|---|
'ident | Named lifetime or loop label |
...u8, ...i32, ...f64, ...usize, etc. | Numeric literal of specific type |
"..." | String literal |
r"...", r#"..."#, r##"..."##, etc. | Raw string literal, escape characters not processed |
b"..." | Byte string literal; constructs an array of bytes instead of a string |
br"...", br#"..."#, br##"..."##, etc. | Raw byte string literal, combination of raw and byte string literal |
'...' | Character literal |
b'...' | ASCII byte literal |
|...| expr | Closure |
! | Always empty bottom type for diverging functions |
_ | “Ignored” pattern binding; also used to make integer literals readable |
Table B-3 shows symbols that appear in the context of a path through the module hierarchy to an item.
Table B-3: Path-Related Syntax
| Symbol | Explanation |
|---|---|
ident::ident | Namespace path |
::path | Path relative to the crate root (i.e., an explicitly absolute path) |
self::path | Path relative to the current module (i.e., an explicitly relative path). |
super::path | Path relative to the parent of the current module |
type::ident, <type as trait>::ident | Associated constants, functions, and types |
<type>::... | Associated item for a type that cannot be directly named (e.g., <&T>::..., <[T]>::..., etc.) |
trait::method(...) | Disambiguating a method call by naming the trait that defines it |
type::method(...) | Disambiguating a method call by naming the type for which it’s defined |
<type as trait>::method(...) | Disambiguating a method call by naming the trait and type |
Table B-4 shows symbols that appear in the context of using generic type parameters.
Table B-4: Generics
| Symbol | Explanation |
|---|---|
path<...> | Specifies parameters to generic type in a type (e.g., Vec<u8>) |
path::<...>, method::<...> | Specifies parameters to generic type, function, or method in an expression; often referred to as turbofish (e.g., "42".parse::<i32>()) |
fn ident<...> ... | Define generic function |
struct ident<...> ... | Define generic structure |
enum ident<...> ... | Define generic enumeration |
impl<...> ... | Define generic implementation |
for<...> type | Higher-ranked lifetime bounds |
type<ident=type> | A generic type where one or more associated types have specific assignments (e.g., Iterator<Item=T>) |
Table B-5 shows symbols that appear in the context of constraining generic type parameters with trait bounds.
Table B-5: Trait Bound Constraints
| Symbol | Explanation |
|---|---|
T: U | Generic parameter T constrained to types that implement U |
T: 'a | Generic type T must outlive lifetime 'a (meaning the type cannot transitively contain any references with lifetimes shorter than 'a) |
T: 'static | Generic type T contains no borrowed references other than 'static ones |
'b: 'a | Generic lifetime 'b must outlive lifetime 'a |
T: ?Sized | Allow generic type parameter to be a dynamically sized type |
'a + trait, trait + trait | Compound type constraint |
Table B-6 shows symbols that appear in the context of calling or defining macros and specifying attributes on an item.
Table B-6: Macros and Attributes
| Symbol | Explanation |
|---|---|
#[meta] | Outer attribute |
#![meta] | Inner attribute |
$ident | Macro substitution |
$ident:kind | Macro capture |
$(…)… | Macro repetition |
ident!(...), ident!{...}, ident![...] | Macro invocation |
Table B-7 shows symbols that create comments.
Table B-7: Comments
| Symbol | Explanation |
|---|---|
// | Line comment |
//! | Inner line doc comment |
/// | Outer line doc comment |
/*...*/ | Block comment |
/*!...*/ | Inner block doc comment |
/**...*/ | Outer block doc comment |
Table B-8 shows symbols that appear in the context of using tuples.
Table B-8: Tuples
| Symbol | Explanation |
|---|---|
() | Empty tuple (aka unit), both literal and type |
(expr) | Parenthesized expression |
(expr,) | Single-element tuple expression |
(type,) | Single-element tuple type |
(expr, ...) | Tuple expression |
(type, ...) | Tuple type |
expr(expr, ...) | Function call expression; also used to initialize tuple structs and tuple enum variants |
expr.0, expr.1, etc. | Tuple indexing |
Table B-9 shows the contexts in which curly braces are used.
Table B-9: Curly Brackets
| Context | Explanation |
|---|---|
{...} | Block expression |
Type {...} | struct literal |
Table B-10 shows the contexts in which square brackets are used.
Table B-10: Square Brackets
| Context | Explanation |
|---|---|
[...] | Array literal |
[expr; len] | Array literal containing len copies of expr |
[type; len] | Array type containing len instances of type |
expr[expr] | Collection indexing. Overloadable (Index, IndexMut) |
expr[..], expr[a..], expr[..b], expr[a..b] | Collection indexing pretending to be collection slicing, using Range, RangeFrom, RangeTo, or RangeFull as the “index” |
Dodatek C: Cechy Wyprowadzalne
In various places in the book, we’ve discussed the derive attribute, which
you can apply to a struct or enum definition. The derive attribute generates
code that will implement a trait with its own default implementation on the
type you’ve annotated with the derive syntax.
In this appendix, we provide a reference of all the traits in the standard
library that you can use with derive. Each section covers:
- What operators and methods deriving this trait will enable
- What the implementation of the trait provided by
derivedoes - What implementing the trait signifies about the type
- The conditions in which you’re allowed or not allowed to implement the trait
- Examples of operations that require the trait
If you want different behavior than that provided by the derive attribute,
consult the standard library documentation
for each trait for details of how to manually implement them.
These traits listed here are the only ones defined by the standard library that
can be implemented on your types using derive. Other traits defined in the
standard library don’t have sensible default behavior, so it’s up to you to
implement them in the way that makes sense for what you’re trying to accomplish.
An example of a trait that can’t be derived is Display, which handles
formatting for end users. You should always consider the appropriate way to
display a type to an end user. What parts of the type should an end user be
allowed to see? What parts would they find relevant? What format of the data
would be most relevant to them? The Rust compiler doesn’t have this insight, so
it can’t provide appropriate default behavior for you.
The list of derivable traits provided in this appendix is not comprehensive:
libraries can implement derive for their own traits, making the list of
traits you can use derive with truly open-ended. Implementing derive
involves using a procedural macro, which is covered in the
“Macros” section of Chapter 19.
Debug for Programmer Output
The Debug trait enables debug formatting in format strings, which you
indicate by adding :? within {} placeholders.
The Debug trait allows you to print instances of a type for debugging
purposes, so you and other programmers using your type can inspect an instance
at a particular point in a program’s execution.
The Debug trait is required, for example, in use of the assert_eq! macro.
This macro prints the values of instances given as arguments if the equality
assertion fails so programmers can see why the two instances weren’t equal.
PartialEq and Eq for Equality Comparisons
The PartialEq trait allows you to compare instances of a type to check for
equality and enables use of the == and != operators.
Deriving PartialEq implements the eq method. When PartialEq is derived on
structs, two instances are equal only if all fields are equal, and the
instances are not equal if any fields are not equal. When derived on enums,
each variant is equal to itself and not equal to the other variants.
The PartialEq trait is required, for example, with the use of the
assert_eq! macro, which needs to be able to compare two instances of a type
for equality.
The Eq trait has no methods. Its purpose is to signal that for every value of
the annotated type, the value is equal to itself. The Eq trait can only be
applied to types that also implement PartialEq, although not all types that
implement PartialEq can implement Eq. One example of this is floating point
number types: the implementation of floating point numbers states that two
instances of the not-a-number (NaN) value are not equal to each other.
An example of when Eq is required is for keys in a HashMap<K, V> so the
HashMap<K, V> can tell whether two keys are the same.
PartialOrd and Ord for Ordering Comparisons
The PartialOrd trait allows you to compare instances of a type for sorting
purposes. A type that implements PartialOrd can be used with the <, >,
<=, and >= operators. You can only apply the PartialOrd trait to types
that also implement PartialEq.
Deriving PartialOrd implements the partial_cmp method, which returns an
Option<Ordering> that will be None when the values given don’t produce an
ordering. An example of a value that doesn’t produce an ordering, even though
most values of that type can be compared, is the not-a-number (NaN) floating
point value. Calling partial_cmp with any floating point number and the NaN
floating point value will return None.
When derived on structs, PartialOrd compares two instances by comparing the
value in each field in the order in which the fields appear in the struct
definition. When derived on enums, variants of the enum declared earlier in the
enum definition are considered less than the variants listed later.
The PartialOrd trait is required, for example, for the gen_range method
from the rand crate that generates a random value in the range specified by a
range expression.
The Ord trait allows you to know that for any two values of the annotated
type, a valid ordering will exist. The Ord trait implements the cmp method,
which returns an Ordering rather than an Option<Ordering> because a valid
ordering will always be possible. You can only apply the Ord trait to types
that also implement PartialOrd and Eq (and Eq requires PartialEq). When
derived on structs and enums, cmp behaves the same way as the derived
implementation for partial_cmp does with PartialOrd.
An example of when Ord is required is when storing values in a BTreeSet<T>,
a data structure that stores data based on the sort order of the values.
Clone and Copy for Duplicating Values
The Clone trait allows you to explicitly create a deep copy of a value, and
the duplication process might involve running arbitrary code and copying heap
data. See the “Ways Variables and Data Interact:
Clone” section in
Chapter 4 for more information on Clone.
Deriving Clone implements the clone method, which when implemented for the
whole type, calls clone on each of the parts of the type. This means all the
fields or values in the type must also implement Clone to derive Clone.
An example of when Clone is required is when calling the to_vec method on a
slice. The slice doesn’t own the type instances it contains, but the vector
returned from to_vec will need to own its instances, so to_vec calls
clone on each item. Thus, the type stored in the slice must implement Clone.
The Copy trait allows you to duplicate a value by only copying bits stored on
the stack; no arbitrary code is necessary. See the “Stack-Only Data:
Copy” section in Chapter 4 for more information
on Copy.
The Copy trait doesn’t define any methods to prevent programmers from
overloading those methods and violating the assumption that no arbitrary code
is being run. That way, all programmers can assume that copying a value will be
very fast.
You can derive Copy on any type whose parts all implement Copy. A type that
implements Copy must also implement Clone, because a type that implements
Copy has a trivial implementation of Clone that performs the same task as
Copy.
The Copy trait is rarely required; types that implement Copy have
optimizations available, meaning you don’t have to call clone, which makes
the code more concise.
Everything possible with Copy you can also accomplish with Clone, but the
code might be slower or have to use clone in places.
Hash for Mapping a Value to a Value of Fixed Size
The Hash trait allows you to take an instance of a type of arbitrary size and
map that instance to a value of fixed size using a hash function. Deriving
Hash implements the hash method. The derived implementation of the hash
method combines the result of calling hash on each of the parts of the type,
meaning all fields or values must also implement Hash to derive Hash.
An example of when Hash is required is in storing keys in a HashMap<K, V>
to store data efficiently.
Default for Default Values
The Default trait allows you to create a default value for a type. Deriving
Default implements the default function. The derived implementation of the
default function calls the default function on each part of the type,
meaning all fields or values in the type must also implement Default to
derive Default.
The Default::default function is commonly used in combination with the struct
update syntax discussed in the “Creating Instances From Other Instances With
Struct Update Syntax” section in Chapter 5. You can customize a few fields of a struct and then
set and use a default value for the rest of the fields by using
..Default::default().
The Default trait is required when you use the method unwrap_or_default on
Option<T> instances, for example. If the Option<T> is None, the method
unwrap_or_default will return the result of Default::default for the type
T stored in the Option<T>.
Appendix D - Useful Development Tools
In this appendix, we talk about some useful development tools that the Rust project provides. We’ll look at automatic formatting, quick ways to apply warning fixes, a linter, and integrating with IDEs.
Automatic Formatting with rustfmt
The rustfmt tool reformats your code according to the community code style.
Many collaborative projects use rustfmt to prevent arguments about which
style to use when writing Rust: everyone formats their code using the tool.
To install rustfmt, enter the following:
$ rustup component add rustfmt
This command gives you rustfmt and cargo-fmt, similar to how Rust gives you
both rustc and cargo. To format any Cargo project, enter the following:
$ cargo fmt
Running this command reformats all the Rust code in the current crate. This
should only change the code style, not the code semantics. For more information
on rustfmt, see its documentation.
Fix Your Code with rustfix
The rustfix tool is included with Rust installations and can automatically fix compiler warnings that have a clear way to correct the problem that’s likely what you want. It’s likely you’ve seen compiler warnings before. For example, consider this code:
Filename: src/main.rs
fn do_something() {} fn main() { for i in 0..100 { do_something(); } }
Here, we’re calling the do_something function 100 times, but we never use the
variable i in the body of the for loop. Rust warns us about that:
$ cargo build
Compiling myprogram v0.1.0 (file:///projects/myprogram)
warning: unused variable: `i`
--> src/main.rs:4:9
|
4 | for i in 0..100 {
| ^ help: consider using `_i` instead
|
= note: #[warn(unused_variables)] on by default
Finished dev [unoptimized + debuginfo] target(s) in 0.50s
The warning suggests that we use _i as a name instead: the underscore
indicates that we intend for this variable to be unused. We can automatically
apply that suggestion using the rustfix tool by running the command cargo fix:
$ cargo fix
Checking myprogram v0.1.0 (file:///projects/myprogram)
Fixing src/main.rs (1 fix)
Finished dev [unoptimized + debuginfo] target(s) in 0.59s
When we look at src/main.rs again, we’ll see that cargo fix has changed the
code:
Filename: src/main.rs
fn do_something() {} fn main() { for _i in 0..100 { do_something(); } }
The for loop variable is now named _i, and the warning no longer appears.
You can also use the cargo fix command to transition your code between
different Rust editions. Editions are covered in Appendix E.
More Lints with Clippy
The Clippy tool is a collection of lints to analyze your code so you can catch common mistakes and improve your Rust code.
To install Clippy, enter the following:
$ rustup component add clippy
To run Clippy’s lints on any Cargo project, enter the following:
$ cargo clippy
For example, say you write a program that uses an approximation of a mathematical constant, such as pi, as this program does:
Filename: src/main.rs
fn main() { let x = 3.1415; let r = 8.0; println!("the area of the circle is {}", x * r * r); }
Running cargo clippy on this project results in this error:
error: approximate value of `f{32, 64}::consts::PI` found
--> src/main.rs:2:13
|
2 | let x = 3.1415;
| ^^^^^^
|
= note: `#[deny(clippy::approx_constant)]` on by default
= help: consider using the constant directly
= help: for further information visit https://rust-lang.github.io/rust-clippy/master/index.html#approx_constant
This error lets you know that Rust already has a more precise PI constant
defined, and that your program would be more correct if you used the constant
instead. You would then change your code to use the PI constant. The
following code doesn’t result in any errors or warnings from Clippy:
Filename: src/main.rs
fn main() { let x = std::f64::consts::PI; let r = 8.0; println!("the area of the circle is {}", x * r * r); }
For more information on Clippy, see its documentation.
IDE Integration Using rust-analyzer
To help IDE integration, the Rust community recommends using
rust-analyzer. This tool is a set of
compiler-centric utilities that speaks the Language Server Protocol, which is a specification for IDEs and programming languages to
communicate with each other. Different clients can use rust-analyzer, such as
the Rust analyzer plug-in for Visual Studio Code.
Visit the rust-analyzer project’s home page
for installation instructions, then install the language server support in your
particular IDE. Your IDE will gain abilities such as autocompletion, jump to
definition, and inline errors.
Appendix E - Editions
In Chapter 1, you saw that cargo new adds a bit of metadata to your
Cargo.toml file about an edition. This appendix talks about what that means!
The Rust language and compiler have a six-week release cycle, meaning users get a constant stream of new features. Other programming languages release larger changes less often; Rust releases smaller updates more frequently. After a while, all of these tiny changes add up. But from release to release, it can be difficult to look back and say, “Wow, between Rust 1.10 and Rust 1.31, Rust has changed a lot!”
Every two or three years, the Rust team produces a new Rust edition. Each edition brings together the features that have landed into a clear package with fully updated documentation and tooling. New editions ship as part of the usual six-week release process.
Editions serve different purposes for different people:
- For active Rust users, a new edition brings together incremental changes into an easy-to-understand package.
- For non-users, a new edition signals that some major advancements have landed, which might make Rust worth another look.
- For those developing Rust, a new edition provides a rallying point for the project as a whole.
At the time of this writing, three Rust editions are available: Rust 2015, Rust 2018, and Rust 2021. This book is written using Rust 2021 edition idioms.
The edition key in Cargo.toml indicates which edition the compiler should
use for your code. If the key doesn’t exist, Rust uses 2015 as the edition
value for backward compatibility reasons.
Each project can opt in to an edition other than the default 2015 edition. Editions can contain incompatible changes, such as including a new keyword that conflicts with identifiers in code. However, unless you opt in to those changes, your code will continue to compile even as you upgrade the Rust compiler version you use.
All Rust compiler versions support any edition that existed prior to that compiler’s release, and they can link crates of any supported editions together. Edition changes only affect the way the compiler initially parses code. Therefore, if you’re using Rust 2015 and one of your dependencies uses Rust 2018, your project will compile and be able to use that dependency. The opposite situation, where your project uses Rust 2018 and a dependency uses Rust 2015, works as well.
To be clear: most features will be available on all editions. Developers using any Rust edition will continue to see improvements as new stable releases are made. However, in some cases, mainly when new keywords are added, some new features might only be available in later editions. You will need to switch editions if you want to take advantage of such features.
For more details, the Edition
Guide is a complete book
about editions that enumerates the differences between editions and explains
how to automatically upgrade your code to a new edition via cargo fix.
Dodatek F: Tłumaczenia książki
Materiały referencyjne w językach innych niż angielski. Większość tłumaczeń jest w toku; szukaj etykiety Translations, aby pomóc w tłumaczeniu lub dać znać o nowym!
- Português (BR)
- Português (PT)
- 简体中文
- 正體中文
- Українська
- Español, alternate
- Italiano
- Русский
- 한국어
- 日本語
- Français
- Polski
- Cebuano
- Tagalog
- Esperanto
- ελληνική
- Svenska
- Farsi
- Deutsch
- हिंदी
- ไทย
- Danske
Appendix G - How Rust is Made and “Nightly Rust”
This appendix is about how Rust is made and how that affects you as a Rust developer.
Stability Without Stagnation
As a language, Rust cares a lot about the stability of your code. We want Rust to be a rock-solid foundation you can build on, and if things were constantly changing, that would be impossible. At the same time, if we can’t experiment with new features, we may not find out important flaws until after their release, when we can no longer change things.
Our solution to this problem is what we call “stability without stagnation”, and our guiding principle is this: you should never have to fear upgrading to a new version of stable Rust. Each upgrade should be painless, but should also bring you new features, fewer bugs, and faster compile times.
Choo, Choo! Release Channels and Riding the Trains
Rust development operates on a train schedule. That is, all development is
done on the master branch of the Rust repository. Releases follow a software
release train model, which has been used by Cisco IOS and other software
projects. There are three release channels for Rust:
- Nightly
- Beta
- Stable
Most Rust developers primarily use the stable channel, but those who want to try out experimental new features may use nightly or beta.
Here’s an example of how the development and release process works: let’s
assume that the Rust team is working on the release of Rust 1.5. That release
happened in December of 2015, but it will provide us with realistic version
numbers. A new feature is added to Rust: a new commit lands on the master
branch. Each night, a new nightly version of Rust is produced. Every day is a
release day, and these releases are created by our release infrastructure
automatically. So as time passes, our releases look like this, once a night:
nightly: * - - * - - *
Every six weeks, it’s time to prepare a new release! The beta branch of the
Rust repository branches off from the master branch used by nightly. Now,
there are two releases:
nightly: * - - * - - *
|
beta: *
Most Rust users do not use beta releases actively, but test against beta in their CI system to help Rust discover possible regressions. In the meantime, there’s still a nightly release every night:
nightly: * - - * - - * - - * - - *
|
beta: *
Let’s say a regression is found. Good thing we had some time to test the beta
release before the regression snuck into a stable release! The fix is applied
to master, so that nightly is fixed, and then the fix is backported to the
beta branch, and a new release of beta is produced:
nightly: * - - * - - * - - * - - * - - *
|
beta: * - - - - - - - - *
Six weeks after the first beta was created, it’s time for a stable release! The
stable branch is produced from the beta branch:
nightly: * - - * - - * - - * - - * - - * - * - *
|
beta: * - - - - - - - - *
|
stable: *
Hooray! Rust 1.5 is done! However, we’ve forgotten one thing: because the six
weeks have gone by, we also need a new beta of the next version of Rust, 1.6.
So after stable branches off of beta, the next version of beta branches
off of nightly again:
nightly: * - - * - - * - - * - - * - - * - * - *
| |
beta: * - - - - - - - - * *
|
stable: *
This is called the “train model” because every six weeks, a release “leaves the station”, but still has to take a journey through the beta channel before it arrives as a stable release.
Rust releases every six weeks, like clockwork. If you know the date of one Rust release, you can know the date of the next one: it’s six weeks later. A nice aspect of having releases scheduled every six weeks is that the next train is coming soon. If a feature happens to miss a particular release, there’s no need to worry: another one is happening in a short time! This helps reduce pressure to sneak possibly unpolished features in close to the release deadline.
Thanks to this process, you can always check out the next build of Rust and
verify for yourself that it’s easy to upgrade to: if a beta release doesn’t
work as expected, you can report it to the team and get it fixed before the
next stable release happens! Breakage in a beta release is relatively rare, but
rustc is still a piece of software, and bugs do exist.
Unstable Features
There’s one more catch with this release model: unstable features. Rust uses a
technique called “feature flags” to determine what features are enabled in a
given release. If a new feature is under active development, it lands on
master, and therefore, in nightly, but behind a feature flag. If you, as a
user, wish to try out the work-in-progress feature, you can, but you must be
using a nightly release of Rust and annotate your source code with the
appropriate flag to opt in.
If you’re using a beta or stable release of Rust, you can’t use any feature flags. This is the key that allows us to get practical use with new features before we declare them stable forever. Those who wish to opt into the bleeding edge can do so, and those who want a rock-solid experience can stick with stable and know that their code won’t break. Stability without stagnation.
This book only contains information about stable features, as in-progress features are still changing, and surely they’ll be different between when this book was written and when they get enabled in stable builds. You can find documentation for nightly-only features online.
Rustup and the Role of Rust Nightly
Rustup makes it easy to change between different release channels of Rust, on a global or per-project basis. By default, you’ll have stable Rust installed. To install nightly, for example:
$ rustup toolchain install nightly
You can see all of the toolchains (releases of Rust and associated
components) you have installed with rustup as well. Here’s an example on one
of your authors’ Windows computer:
> rustup toolchain list
stable-x86_64-pc-windows-msvc (default)
beta-x86_64-pc-windows-msvc
nightly-x86_64-pc-windows-msvc
As you can see, the stable toolchain is the default. Most Rust users use stable
most of the time. You might want to use stable most of the time, but use
nightly on a specific project, because you care about a cutting-edge feature.
To do so, you can use rustup override in that project’s directory to set the
nightly toolchain as the one rustup should use when you’re in that directory:
$ cd ~/projects/needs-nightly
$ rustup override set nightly
Now, every time you call rustc or cargo inside of
~/projects/needs-nightly, rustup will make sure that you are using nightly
Rust, rather than your default of stable Rust. This comes in handy when you
have a lot of Rust projects!
The RFC Process and Teams
So how do you learn about these new features? Rust’s development model follows a Request For Comments (RFC) process. If you’d like an improvement in Rust, you can write up a proposal, called an RFC.
Anyone can write RFCs to improve Rust, and the proposals are reviewed and discussed by the Rust team, which is comprised of many topic subteams. There’s a full list of the teams on Rust’s website, which includes teams for each area of the project: language design, compiler implementation, infrastructure, documentation, and more. The appropriate team reads the proposal and the comments, writes some comments of their own, and eventually, there’s consensus to accept or reject the feature.
If the feature is accepted, an issue is opened on the Rust repository, and
someone can implement it. The person who implements it very well may not be the
person who proposed the feature in the first place! When the implementation is
ready, it lands on the master branch behind a feature gate, as we discussed
in the “Unstable Features” section.
After some time, once Rust developers who use nightly releases have been able to try out the new feature, team members will discuss the feature, how it’s worked out on nightly, and decide if it should make it into stable Rust or not. If the decision is to move forward, the feature gate is removed, and the feature is now considered stable! It rides the trains into a new stable release of Rust.